
|
|
|
ORMS Configuration Groups
Note: This topic applies to ORMS ADF11.
The Groups Configuration Dashboard (Configuration>Groups) allows users to configure the Class Types and Wholesale Allotments that are used to ensure that the Modeling process will generate appropriate data for future Group Materialization forecasts. Group and Wholesale Blocks offer a variety of configurable classifications on the Business Block header in OPERA. These serve the purpose of further segmenting the blocks and distinguishing them from others as distinct categories of business. These distinct categories will then be used by ORMS for forecasting group pick-up for that type of business. In addition to classifications such as Market Code and Source Code, Booking Type is frequently used to indicate the nature of the group and can also be used to provide reports of the type of business that is being booked. Configurable classifications are selected on the Block Header that become the determinant of the current Group, used for predicting group behavior. Once you have decided which of the available classifications you will use as the determinant for the group, you can proceed to define these even further in ORMS. You assign one or more attributes of the selected determinant to define an Allotment Class, which serves the purpose of further refining blocks in ORMS for forecasting.
Wholesale Blocks can also be identified on the business block header in OPERA. When ORMS is active, a check box displays on the Business Block Header, called Wholesale Block. You can select or deselect it. For convenience, all blocks of more than 60 days will automatically be marked as Wholesale Blocks on time during property activation for ORMS. Those blocks less than 60 days are left alone and are unmarked, and are treated as regular “blocks” by ORMS. After the initial activation, it will be your responsibility to select the check box and make the block 'Wholesale,' or not, as ORMS forecasts Wholesale Blocks separately from regular blocks.
With the blocks classified and Allotment Classes assigned, and with certain blocks identified as Wholesale Blocks, during forecasting ORMS searches for past blocks of the same Allotment Class. In addition, several other factors including the block’s age, size (based on average rooms per day), duration and booking pace are considered.
The process uses a hierarchical sort, in the following order:
1. Block type (MUST criteria)
2. Block_class
3. Operator (company profile) and Pace
4. Rooms + Days + Age delta
ORMS will find within the same group class, groups that resemble the future group most, and within certain lenience of resemblance having a clear priority to the resemblance of the block over the age of the block.
ORMS will then use the six best matching past groups found as the statistical models for the specific group to be predicted. Based on these six past groups, ORMS will determine the average materialization rate and apply it across all dates of the specified group. For example, if six groups representing these statistical models on average produced 40% of the originally assigned rooms, ORMS will take 40% of the rooms originally assigned to the group to be predicted out of the inventory (that would normally be available to transient demand). The difference with Wholesale Blocks is when they are predicted, ORMS will add the Day of Week and the Season to the determining equation. ORMS will then apply the average materialization for any given Weekday and Season to the Wholesale Block. As Wholesale Blocks age and change, ORMS will gradually rely more on that block’s own past history, rather than using other predictor groups for that purpose. This is called past cycles and the length of a cycle depends on the length of a Wholesale Block:
< 4 Months = 7 day cycles
4 – 6 Months = 14 day cycles
> 6 Months = 28 day cycles
In a multi-property environment with more than one modeled or pre-modeled property, the Property LOV displays in the Title Bar ![]() . Users with access rights and permissions to other properties can select the LOV and choose either the modeled or pre-modeled property they want to work with. The sections on the dashboard refresh data specific to the selected property. In a single property environment or in a multi-property environment where the user has rights to only one property, the property field is read-only.
. Users with access rights and permissions to other properties can select the LOV and choose either the modeled or pre-modeled property they want to work with. The sections on the dashboard refresh data specific to the selected property. In a single property environment or in a multi-property environment where the user has rights to only one property, the property field is read-only.
The Configuration Groups Dashboard contains two tabs: one for configuring Allotment Class Types and one for Wholesale Allotments. The Class Type tab is the first tab to display.
Identify the Allotment Class Type you want to use for Modelization and assign it Allotment Class Codes and Attributes.
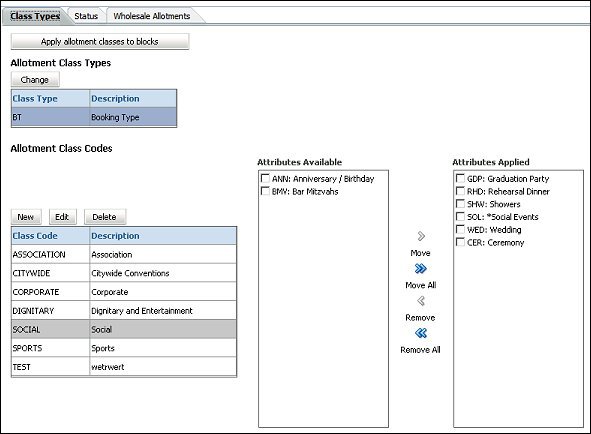
Apply allotment classes to blocks. Select this button to apply new class codes or edited class codes to existing blocks after all changes have been made.
Change. Select this button to select the Allotment Class Type you want to use for block materialization. The Select Allotment Modelization Class screen appears.
The Select Allotment Modelization Class grid displays the available allotment class types and descriptions.
Class Type. Six Allotment Class Types (Booking Type, Channel Code, Market Code, Market Group, Source Code, Source Group) are provided, but only one can be selected and this displays the one that is selected for the property.
Class Description. Description of the Allotment Class Type selected for the property.
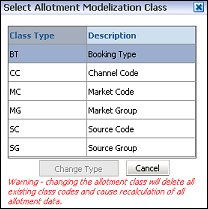
Note: Whenever the allotment class has been changed, after selecting the Change Type button, all existing class codes will be deleted and allotment data will be recalculated.
New. Select this button to create a new class code and description. The New Class Code screen appears. See Add or Edit Class Code below.
Edit. Select this button to change the current class code description. The Edit Class Code screen appears. See Add or Edit Class Code below.
Delete. Select this button to delete the current class code and description.
This screen appears after you have selected either the Allotment Class Codes Edit or New button.
Class Code. User definable codes that reflect categorizations or groupings of business block business.
Class Description. Description of what the class code represents.

The attributes listed here are available to be applied to the class codes for the Allotment Class Type.
These are the attributes that have been applied to the class code. Attributes can be moved from one section to another (Available or Applied) by selecting the check box net to the desired Class Code and using the Move, Move All, Remove, or Remove All buttons to shuffle the Class Codes to the correct table.
Note: All attributes must be applied to a Class Code prior to modeling, otherwise resulting blocks not having a Class Code assigned will not get materialized.
All groups or blocks have a status that is attached to the block header. This status code reflects the groups’ status in terms of inquiry, contract sent, contract pending, confirmed, open for pickup, cancelled, etc. With each status, different options can be included.
The status type of the status code determines if blocked rooms are deducted from inventory (e.g., a Definite status code), allow for pickup (e.g., a Tentative status code), or if the blocked rooms should be considered in ORMS.
Note: Changes to a Status are only reflected the next day due to ORMS Daily Processing.
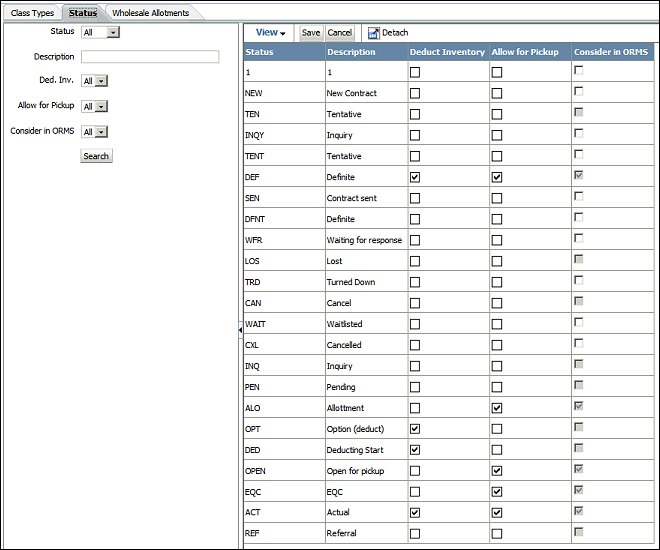
The Status grid can be populated based on your search criteria. Enter your criteria and select the Search button.
Status. Select the down arrow to choose the code used to define a status.
Description. Enter the full or partial description used for the status.
Ded. Inv. Select the down arrow to filter the statuses by Deduct Inventory (Y) statuses, Non-Deduct Inventory (N) statuses, or All statuses.
Allow for Pickup. Select the down arrow to filter the statuses by Allow for Pickup (Y) statuses, Non-Allow for Pickup (N) statuses, or All statuses.
Consider in ORMS. Select the down arrow to filter the statuses by Consider in ORMS (Y) statuses, Non-Consider in ORMS (N) statuses, or All statuses.
Status. Code used to define the status.
Description. Description for the status code.
Deduct Inventory. Select, or de-select, the check box to define if the status should be deduct inventory or non-deduct inventory.
Allow for Pickup. Select, or de-select, the check box to define if the status should be allowed for pickup or not allowed for pickup. Selecting this check box will consider the status code for the ORMS Group Forecast.
Consider in ORMS. Select, or de-select, the check box to define if the status should be considered in ORMS for Group Forecast or not considered. This check box can only be selected, or de-selected, if is not attached to any active business blocks. If it is attached to an active business block, then it is grayed out automatically and populated with the value (selected/de-selected) for when it was attached to the block.
Save. Select to save any changes made to the Status tab.
Cancel. Select to cancel any changes made to the Status tab. If changes were made and this button is selected, then you will be prompted if you want to save the changes made or not.
Wholesale allotments are an important distinction when ORMS is determining Block Materialization for creation of your properties forecast. When ORMS was activated for your property, any block that was 60 days or older was automatically selected as a Wholesale Allotment. This screen allows you to make any modifications to these wholesale allotments or to select individual (regular) allotments and make them wholesale, if necessary.
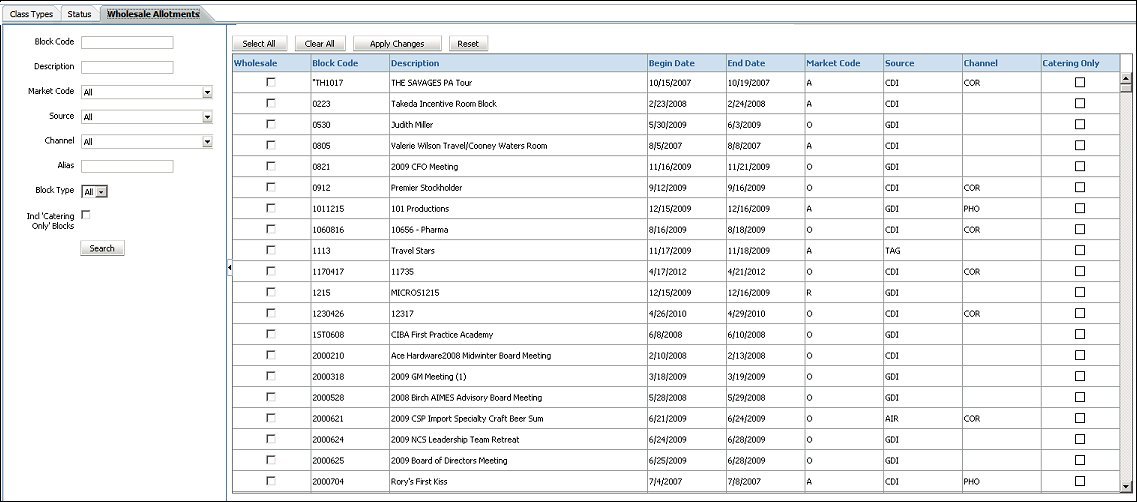
The Wholesale Allotment grid can be populated based on your search criteria. Enter your criteria and select the Search button
Block Code. Enter % and the partial word or full search criteria and select the Search button to display the appropriate block code.
Description. Description of the Block Code.
Market Code. Market segment code attached to the business block.
Source. Source of the business block reservation.
Channel. Channel used to sell the business block.
Alias. Alias name for the block code that was created in the Block Header (Reservations>Blocks>Business Block). The corresponding block(s) will appear in the grid after Search has been selected.
Block Type. You may filter your blocks by selecting either ALL (includes both wholesale blocks and regular groups), W (Wholesale blocks), or G (Groups) from the drop-down menu.
Incl 'Catering Only' Blocks. Select this check box if you want to include blocks that are identified in OPERA as 'Catering only.'
Wholesale. Select the check box to make the business block a wholesale block. When the business block is changed to a wholesale block, select the check box and click the Apply Changes button.
Block Code. Code assigned to the block.
Description. Description of the block code.
Begin Date. Begin date of the group reservation.
End Date. End date of the group reservation.
Market Code. Market segment code attached to the business block.
Source. Source of the business block reservation.
Channel. Channel used to sell the business block.
Catering Only. This check box is informational only and indicates if this block is for catering only. The check box is selected by the user on the Block Header in OPERA.
Select All. Selects all of the block codes in the grid.
Clear All. Un-selects all of the block codes that have been selected.
Apply Changes. Applies the selected block codes to become wholesale blocks.
Reset. Selecting this button resets the grid check boxes to what they were before you either selected or deselected the check boxes.