
|
|
|
Profile Notifications
Notifications can automatically be displayed for specific profiles when accessing specific areas of OPERA. Available when the PROFILES > PROFILE NOTIFICATION application function is set to Y, the Profile Notifications screen is manually accessed by selecting the Notifications button on the Profile Options and if notifications are already setup for the guest profile, then this screen is automatically displayed based on the area that the notification has been setup for.
Note: Notifications are available for Individual, Company, Travel Agent, Source and Contacts profile types. For the profile notification to show for a reservation (notification areas: Reservation, Check In, Check Out) the profile has to be attached to the reservation's Name field.
Profile notifications can be used to alert users of a task or tasks that need to be completed for the guest or the guests reservation during their stay, next stay, etc.
When the Profile Notifications screen is displayed, the user will only be able to see notifications for the department they belong to or notifications that are set up for all departments, unless they have been granted the PROFILES > PROFILE NOTIFICATION VIEW ALL user permission.
Property. Available when the OPP_MHOT Multi-Property Base add-on license is active, select the down arrow to choose one or more specific properties to filter the notifications by.
Notification Area. Select to filter the results by the Check In, Check Out, Note, Profile, and/or Reservation notification areas.
Department. This view-only field displays the department the user belongs to.
Resolved. Select to include those notifications that have been resolved.
Unresolved. Select to include those notifications that are unresolved.
Note Type. Type of note that the notification is a part of.
Notification Title. Title of the notification.
Resolved On. Date that the notification was resolved on.
Resolved By. Name of the individual that resolved the notification.
Properties. All of the properties that the notification exists for.
Departments. All of the Departments that the notification was assigned to.
Note: The logged in user will always be able to see notifications that they entered themselves, regardless of the department the Note Type is set up as and the department the user belongs to.
Notification Areas. The Notification Areas that the notification is a part of in OPERA.
All. Selects all results displayed in the grid. This allows for an easy way to Resolve, Unresolve, or Delete multiple records at one time.
None. De-selects any of the records that have been selected in the grid.
Resolve. Resolves any of the selected notifications in the grid. If the selected notification has a resolved status, then this button displays Unresolve and selecting it will unresolve the notification. User must be granted the PROFILES > PROFILE NOTIFICATION RESOLVE user permission to access the Resolve button and the PROFILES > PROFILE NOTIFICATION UNRESOLVE permission to access the Unresolve button.
New. Select to create a new Profile Notification. User must be granted the PROFILES > PROFILE NOTIFICATION NEW user permission to access this button. See Adding and Editing Profile Notifications below.
Edit. Select to edit the Profile Notification highlighted in the grid. User must be granted the PROFILES > PROFILE NOTIFICATION EDIT user permission to access this button. See Adding and Editing Profile Notifications below.
Delete. Select to delete the Profile Notifications selected in the grid. User must be granted the PROFILES > PROFILE NOTIFICATION DELETE user permission to access this button.
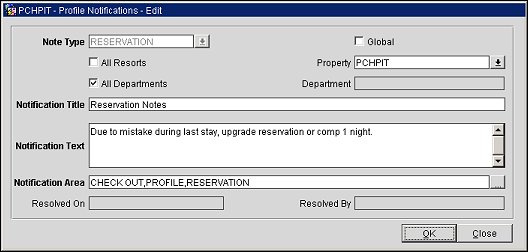
Enter the following notification details and select OK button.
Note Type. Select the down arrow to choose the note type for the OPERA Area that the profile notification will belong to. When selecting a Note Type, if any, or all, Departments are already configured, then they are automatically populated in the Department field and the All Departments field is disabled.
Global. Select to make the notification Global. When this check box is selected, the All Resorts, Property, All Departments, and Department fields become disabled and cannot be used.
All Resorts. Select the check box to include the notification in all properties that are apart your properties environment.
Property. Disabled when All Resorts is selected, select the down arrow to specify a property, or properties, that the notification should display for.
All Departments. This check box is only selectable when the Note Type has been set up for a specific department. In this case, the user can decide to make the Notification visible for all departments. When the Note Type has been configured for all departments, the check box is automatically selected, grayed out, and cannot be changed.
Department. Based on the Note Type selected, this field displays the Departments that the notification will display for. If no departments are displayed in this field, then the notification is applicable for all departments.
Notification Title. (Max of 2000 Characters) If a Note Type is selected, then this field is populated with the Note Type description. But this can be updated to another title.
Notification Text. (Max of 4000 Characters) Free-text entry field to enter the text for the notification.
Notification Area. Select the ellipsis button to choose the Notification Areas that the profile notification will be displayed to the user. The following notification areas are available for selection:
Note: When no Notification Area was configured during the Note Type set up then this field will default to PROFILE.
Resolved On. When editing a notification that has already been resolved, displays the date that the notification was resolved on.
Resolved By. When editing a notification that has already been resolved, displays the user that resolved the notification.
See Also