Profile Requests
The Profile Requests feature allows you to request that email or print (mail) information products — such as brochures, event fliers, rate cards, and so on — be sent to the guest via email or print. The feature also allows you to see when the request was processed, and to resend requests if necessary. To access the Profile Requests feature, select the Requests button from the Profile screen's Profile Options menu or from the Profile Search screen. (To make this feature available, the Profiles>Profile Requests application function must be set to Y.) To access profile request, select the Requests button from the Profile Options menu. Or, from the Profile Search screen, highlight the profile and select the Requests button.
Properties may use any of the following procedures for fulfillment of profile requests:
Other options include:

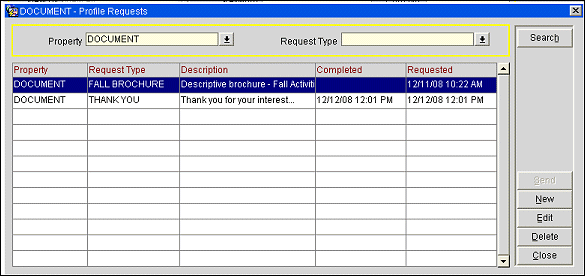
The Profile Requests screen shows the profile requests that have been submitted, and allows you to make new requests. You may also submit and resubmit profile requests for those having an EMAIL send method, and create data extracts (mailings) in response to profile requests.
Use the following options to find profile requests. When you have entered your search criteria, select the Search button.
Property. Available when the OPP_MHOT Multi-property PMS add-on license code is active. Select the down arrow to choose the property to find profile requests. The default is your log-in property.
Request Type. Select the down arrow to choose the request type you wish to find. The default is all request types (blank).
The following information is available on this screen.
Property. Available when the OPP_HOT Multi-property PMS add-on license code is active. The property associated with the profile request.
Request Type. Name of the information resource requested.
Description. Description of the request type.
Completed. Date and time when the request was processed or last processed.
Requested. Date and time when the request was created.
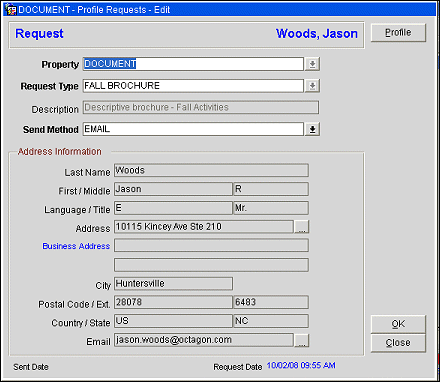
To create a new profile request, select the New button. To modify an existing request, highlight your choice and select the Edit button. The Profile Requests - New or Profile Requests - Edit screen appears.

The profile name appears in the upper right-hand area of the screen. The Sent Date and the Request Date appear in the lower part of the screen. Select the Profile button to display the Profile screen.
Provide the following information and select the OK button.
Property. Available when the OPP_MHOT Multi-property PMS add-on license is active. Select the down arrow to choose the property with which this profile request is associated. This field may not be changed once the request has been submitted.
Request Type. Select the down arrow to choose a request type. When you have made your choice, the description of the request type appears in the Description field. This field may not be changed once the request has been submitted.
Description. Description of the request type selected in the Request Type field. This field is view-only.
Send Method. Select the down arrow to choose one or more delivery methods for the profile request information resource. Only the methods configured for the request type are available.
Note: When you select the EMAIL option, you are prompted to indicate whether you wish to send the information immediately using an embedded HTML message, if this option is available. If the option is not available, or if you reply No to the prompt, the profile request will be handled using whatever process (e.g., data extract, export file, etc.) your property normally uses. (See Request Definition, for information on configuring embedded HTML profile request messages.)
Address Information
Last Name. Guest's last name.
First/Middle. Guest's first name and middle name or initial.
Language/Title. Language and title associated with the profile.
Address. Mailing address for the profile. This address will be used if the profile request is mailed. The current profile primary address is shown by default. Select the ellipsis button to edit the address or to choose another address.
Email. Email address for the profile. This email address will be used if the profile request is emailed. Select the ellipsis button to choose another email address or to edit the email address.
Note: In ORS, when the OPR<ORS version number> license code is active, the EMAIL_REQ (Email Requests) communication type can be selected and associated with the profile in ORS on the Profile Screen. The EMAIL_REQ address is used specifically for profile requests and appears as the default email address in ORS. The EMAIL_REQ address does not download to PMS. Within PMS (and ORS), other email addresses can be added or changed here and will transfer between the two systems.
When you have provided the information on the Profile Requests - New or Profile Requests - Edit screen, select the OK button to proceed. The Request Action screen appears.
Provide the following information and select the OK button.
Mark as Complete. Select this check box to enter a date and time in the Completed column on the Profile Requests screen for this profile request.
Email. Select the check box to process the profile request by email. A couple of configuration items need to be completed in order to get the Email check box to display and to be enabled. First, the Email Send Method and a Request Definition must be selected on the Request Types configuration to display the Email check box. Then to enable the check box, an email must be defined for the profile.
Document. Select the check box to process the profile request by mail. A couple of configuration items need to be completed in order to get the Document check box to display and to be enabled. First, the Mail Send Method and a Request Template must be selected on the Request Types configuration to display the Mail check box. Then to enable the check box, a mailing address must be defined for the profile.
The Send and Resend buttons apply only to profile requests for profile request types (information sources) that have an EMAIL send method associated with them. (See Profile Request Types configuration.)
Highlight a request having an email send method on the Profile Requests screen and select the Send button to send an immediate embedded HTML email (if this communication method has been configured for the request type). If the request has already been processed and a date and time appear in the Completed column, the button label changes to Resend when the entry is highlighted.
To select multiple requests, right click on the request(s) you wish to process and click on the Mailing Selection pop-up button.
Note: If you select a mix of requests that includes some that have been completed and others that have not been completed, only the Send button is available; any completed items that you have selected will be ignored (that is, they will not be re-sent).
When you select the Send or Resend button, a message prompts you to confirm that you wish to send the email immediately. Respond Yes to continue and send the email.
If the profile request you have selected does not have a request definition associated with it (that is, if it cannot be processed immediately as an embedded HTML email message) a prompt notifies you (see Profile Request Definition and Profile Request Types ).
See Also