Split Transactions
You may split most posted transactions (including negative ones) by a fixed amount, a percentage, or a quantity. When a transaction is split, it is divided into two amounts within the same window. You can then move either of the resulting amounts to another window (by using the drag-and-drop method or by right clicking and selecting Transfer to Window from the Quick Menu); or to another guest's bill (by using the Transfer Transaction right-click Quick Menu option, or by dragging-and-dropping to another guest whose Billing screen is also opened).
Note: The Transfer function offers a Partial Posting option that allows you to split and transfer in a single operation. (See Transfer Transactions and Partial Posting for details.)
Note: You may not split payment transactions or transactions that are part of a package.
Note: You may not split deposit transfer transactions if the Cashiering>Advance Deposit Handling application setting is set to an option that creates a folio for a deposit (e.g., Print Folio for Deposit Receipt).
Note: Rates and other amounts expressed in the currencies of certain countries can involve strings of up to 16 digits. Due to space limitations, these strings can't be easily accommodated by OPERA screens and reports. When the Currency Divisor feature is activated, the property can set a divisor of either one thousand (1000) or one million (1,000,000) through General>Currency Divisor Value application setting. When the currency divisor is active, an (M) for million or (K) for thousand, depending on the parameter setting chosen, follows the currency code. For example, assume the rate amount is 155000000. If the currency divisor is set to one million, the Rate Query screen would show 15.5. The (M) indicator would appear following the currency code.
When splitting transactions, all copies of receipts that got printed for that particular receipt, remain with the Master transaction (first transaction) where the split is originating from.
To split a transaction, display the In-House Guest Search screen (Cashiering>Billing) and select the guest for whom you wish to split a transaction. The Billing screen appears.
On the Billing screen, highlight the transaction you wish to split. To split multiple transactions, click in the X column to mark the transactions you wish to split.
Note: When you split a transaction that has generates such as a tax attached, the tax is automatically recalculated for the two resulting transactions. A generate that has been split cannot be selected and transferred to another window by itself (without the main transaction) if the Cashiering>Auto Transfer Generate with Main application parameter is set to Y.)
Note: If the Cashiering>Tax Type Calculation application setting is set to Profile, when a split transaction with generates is moved between windows, the generate for the moved portion of the transaction recalculates based on the tax type of the profile attached to the target window.
Note: If the transaction is "rolled-up" (for example, if two or more postings were included under a single check number), double click on the plus sign (+) to display the line items that are part of the posting. Then individually select and split one or more of the component transactions. (The Cashiering>Rollup Transactions application parameter must be set to Y in order to enable this functionality.)
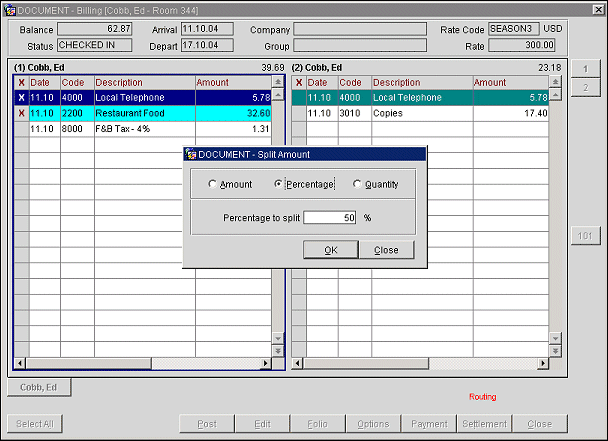
Select the Split Transaction right-click Quick Menu option. The Split Amount screen appears.

Select either the Amount, Percentage, or Quantity option, depending on whether you wish to split the posting by a fixed amount, percentage or quantity. In the Amount to Split, Percentage to Split, or Quantity to Split text entry field, specify the fixed amount, percentage, or quantity (if more than one exists for the posting) depending on the type of split you have chosen to perform.
Note: If you are performing a split based on a fixed amount, the charge you have chosen to split need not be greater than the Amount to Split you specify. For example, if the charge you are splitting is $10, you could specify an $11 Amount to Split. The result would be an $11 transaction and a -$1 transaction. However, none of the resulting split amounts may be zero. This means you cannot split an $11 charge by an Amount to Split of $11.
Note: Negative amounts or percentages may be entered as an Amount to Split / Percentage to Split. For example, if you split a posting of 100 by -10, the result would be postings of 110 and -10. Or if you split a posting for 40 by -10% the result would be postings of 44 and -4. If you split a posting of -10 by -5%, the result would be postings of -10.50 and 0.50. In a split posting, the two resulting values will always equal the amount you start with.
Note: You may not perform a split that would result in a zero amount for one of the transactions. For example, assume a package posting of $150 with a $9.00 tax. If you right click on the package posting and attempt to split by -.01, the message "Unable to split transaction when one transaction results in a zero amount" appears. This is because the split of the 9.00 tax would have resulted in an amount of 0.00.
Select OK to complete the split.
Following is a description of the fields on the Split Amount screen.
Amount. Select the Amount radio button to split the transaction(s) into two fixed amounts. Next, enter the amount you want to split off of the original transaction in the Amount to Split field. Select OK. The transaction will be split into two transactions: One will be for the amount you specified, and the other will be for the remainder of the original amount.
Amount to Split. Enter the amount by which the transaction is to be split.
For Example
Suppose a guest has a restaurant charge of $110. Because her company has a $75 limit on meal expenses, she would like $75 to go to the Billing screen window which holds her business expenses (window 2), and the rest to go to the window that holds her personal expenses (window 1). The Cashier splits the $110 transaction by a fixed amount ($75), moves the $75 portion of the transaction to window 2, and leaves the remainder amount ($35) in window 1.
Percentage. Select the Percentage radio button to split the transaction by a percentage of the original amount. Next, enter the percentage you want to split off the original transaction in the Percentage to Split field. Select OK. The transaction will be split into two transactions: One will be for the percentage of the original amount you specified, and the other will be for the remainder of the original amount.
Percentage to Split. Enter the percentage by which the transaction is to be split.
For Example
Suppose a guest has a restaurant charge of $200. Because her company covers 25% of meal expenses, she would like 25% to go to the Billing screen window which holds her business expenses (window 2), and the rest to go to the window that holds her personal expenses (window 1). The Cashier splits the $200 transaction by a percentage (25%), moves the 25% ($50) portion of the transaction to window 2, and leaves the remainder amount ($150) in window 1.
Quantity. Select the Quantity radio button to split the transaction by a quantity so the amount is automatically split based on the unit price multiplied by the respective new quantity values for the resulting transactions.
Quantity to Split. When a quantity of more than one exists for the transaction, enter the quantity by which the transaction is to be split. Transactions with more than 1 quantity can be split by a quantity between 1 and existing quantity minus 1. If a single transaction having 1 quantity is selected for split, then the Quantity option is not available. If multiple transactions are selected and any of the transactions cannot or did not split, then a message is displayed that "X Charge(s) Not Split".
For Example
Suppose 4 guests (3 Family Members (Dad + 2 Sons) and 1 Friend) book to play a round of golf at the hotels golf course. Each round of golf costs a flat rate of $150. The Dad has arrived earlier than the 2 Sons and 1 Friend and has the whole transaction (Quantity of 4 @ $150 = $600) posted to his bill. But when the dad is settling his bill, he would like one of the rounds of golf split off and transferred to the Friends bill. The Cashier splits the $600 transaction by a quantity of 1 ($150), transfers the quantity of 1 to the Friends bill, and leaves the remainder amount Quantity of 3 = $450) on the Dad's bill.
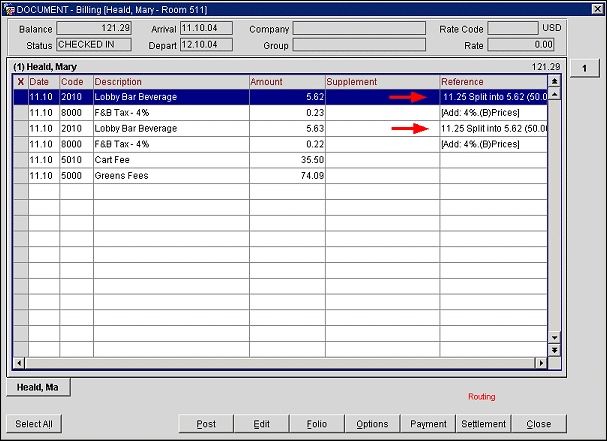
Two transactions are created in the same window. A Reference notation is automatically added to both transactions to describe the split action. For example, if a $10 Laundry charge were to be split into two equal transactions, the Reference on each resulting transaction would read: "10.00 Split into 5.00 (50.00%)5.00". Reference notations are not added to generate taxes associated with a transaction. If the Reference is too long to display on the Billing screen, double click on the transaction record to display the Edit Transaction Details screen which shows the full Reference information.

The Routing Limits feature (see Routing Limits for more details) brings with it extra functionality when the OPP_GCA Comp Accounting add-on license code is active. In the gaming world, when the Cashiering>Routing Limits application function is set to Y (this is the default for Comp Accounting), the Limit and Used fields appear on the Routing Instructions screen.
For window routing and room routing, these fields work as they do for PMS environments in general. Limit accepts the total amount that may be routed for any one reservation using this routing instruction. The Used field shows the current amount already routed.
However, when the Comp radio button option is selected to set up comp routing, these fields have a slightly different functionality.
The Limit field again establishes a ceiling on the amount that may be comped for the guest, but the amount entered in the Limit field may not exceed the per-instance credit limit on the transaction code or codes configured for the authorizer who is approving this routing instruction. The authorizer’s limit for the selected transaction codes appears in this field by default. The Limit amount may be set lower than the authorizer’s per instance credit limit, but may not go over it.
When charges for which a comp routing instruction applies are made to the guest’s bill, the comped amount is automatically transferred to the comp window identified by the comp routing instruction. Should the charge exceed the amount specified by the Limit field on the Routing Instructions screen, the overage will automatically be routed to the guest’s window 1 (also called the “cash window”).
Note that when the Cashiering>Routing Limits application function is set to N, authorizer per-instance credit limits are not set in authorizer configuration and the Limit column does not appear on the Authorizer screen.
Show Me
![]() Split Financial Transactions by Amount
Split Financial Transactions by Amount
![]() Split Financial Transactions by Percentage
Split Financial Transactions by Percentage
![]() Split Financial Transactions by Quantity
Split Financial Transactions by Quantity
See Also