
|
|
|
OBI Custom Calendar
The OBI Custom Calendar feature allows you to create and use custom calendars for your OBI Cubes instead of using the default Gregorian calendar. A calendar must first be created before fiscal years and periods can be set up. This is because a calendar must first exist before the year and period attributes can be added. Likewise, a year must first be created before periods can be set up for it, since periods fall within particular years.
Note: All OBI Cubes must be rebuilt after a custom calendar is created or modified.
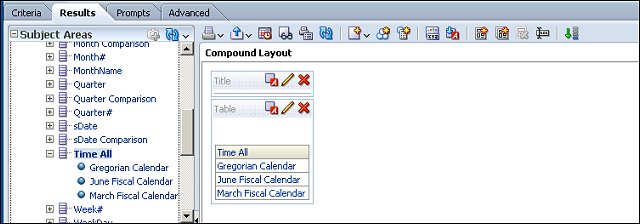
The Gregorian Calendar is the default calendar in OBI. To view OBI calendars, both custom and default, log in to OBI and select New>Analysis and choose a subject area. In the Subject Areas pane, select the Results tab and choose a dimension and attribute. For example, in the Guest Subject Areas pane, select the Results tab and choose the Time dimension and expand the node for the Time All attribute. This will display a list of calendars under this attribute. You can click on a calendar to view its data and drag and drop columns onto its layout to add additional columns to the calendar. Links under the columns can be selected to retrieve the data and view it in more detail.
If the OBI>OBI Use Custom Calendar application parameter is set to Y, in ORS select Setup>System Configuration>Setup>Business Intelligence Setup>Options and select the Custom Calendars option from the OBI Setup Options menu to create custom calendars for OBI.
Note: Cube disk size will increase approximately 100% with each enabled custom calendar. For example, if the Guest Cube increased to 10GB with one calendar, it will increase to 20GB for two calendars and 30GB for three calendars, etc. Build times for cubes will also increase 100% per custom calendar with some extra time taken to compile the Date dimensions in the cube.

Choose your search options and select the Search button to display one or more calendars for a specific fiscal year.
Calendar. Select the down arrow and choose a Calendar from the list of values to filter search results by calendar. Calendars are set up from the OBI Custom Calendar screen, accessed by selecting the Calendar button.
Year. Select the down arrow to choose a year. Years are set up from the Year Setup screen, accessed by selecting the Year button.
Quarter. Select the down arrow and choose a quarter to filer search results by a particular quarter. Quarters are set up from the Period Setup screen, accessed by selecting the Period button.
Month. Select the down arrow to choose a calendar month from the list of values to filter results by month.
Search. Select to display search results, which will be filtered based on the selected search criteria.
Process. Select to process all the calendars you have created. When doing this, you will see the following message: "Calendar Setup has changed. Would you like to validate the calendars?" Select Yes to proceed.
Calendar. Select to open the OBI Custom Calendar screen and create or edit a custom calendar.
Year. Select to open the Year Setup screen and create or edit a fiscal year.
Period. Select to open the Period Setup screen and create or edit a fiscal period.
Select the Calendar button to open the OBI Custom Calendar screen. From this screen, you can select New to create a new custom calendar or Edit to make changes to an existing one. The OBI Custom Calendar - New/Edit screen opens.
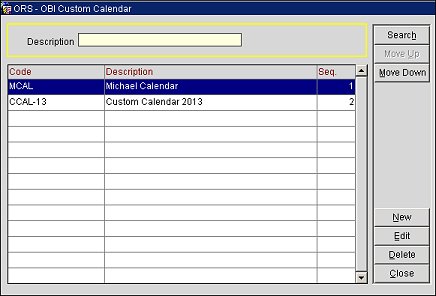
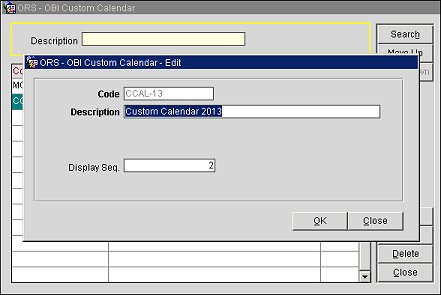
Code. (read-only when editing) Enter a code for the calendar.
Description. Enter or edit the description for the calendar.
Display Seq. The display order of the calendar on the search results grid. When creating a new calendar, this will default to the next display number. For example, if you are creating the third calendar, this will default to 3. You can edit this later to change the order in which the calendar is listed in the grid.
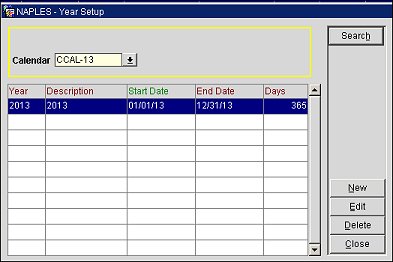
Select the Years button to open the Year Setup screen and create or edit a fiscal year. From this screen, you can select New to create a year or Edit to make changes to an existing one. Select a Calendar from the drop-down list and select Search to display it. This is the calendar for which you will create a fiscal year.
Select New to add a calendar year or select Edit to make changes to an existing one. The Year Setup screen will open.
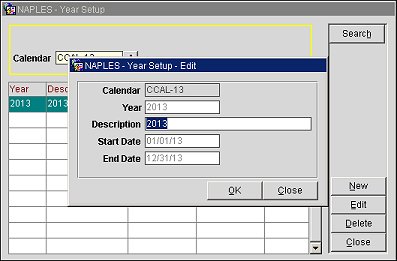
Note: Only the description field can be changed when editing.
Calendar. This is the calendar for which you will create a year.
Year. The year you are adding. The Start and End Date fields will auto-populate based on the year enter here.
Start Date. The start date of the year. The start date auto-populates based on the start date of the year entered.
End Date. The end date of the year. The end date auto-populates based on the end date of the year entered.
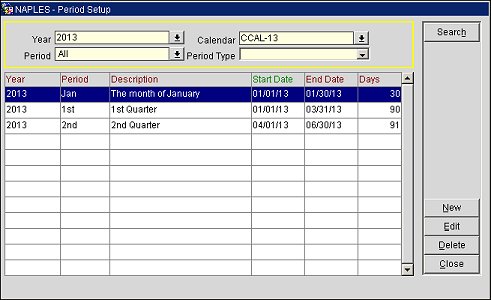
Select the Period button to open the Period Setup screen and create or edit a fiscal period. From this screen, you can select New to create a new period or Edit to make changes to an existing one.
Choose from the following search criteria to filter the results displayed in the grid:
Year. Select the down arrow and choose a calendar year to filter by.
Period. Select the down arrow and choose a period definition to filter by.
Calendar. Select the down arrow and choose a custom calendar to filter by.
Period Type. Select the down arrow and choose either QUARTER or MONTH to filter results by a period type.
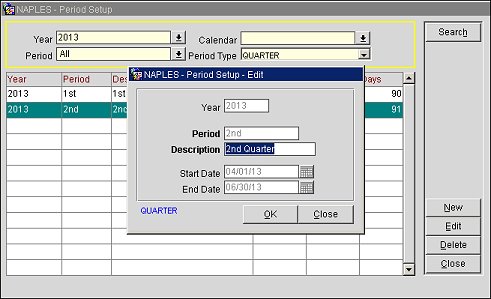
Select New to add a new period to the selected year or select Edit to make changes to an existing one. The Period Setup screen will open.
Period Setup - Edit

Period Setup - New
Note: Only the description field can be changed when editing.
Year. Select the down arrow and choose a year from the list of values.
Quarter. Select to base the period on a quarter. "QUARTER" will display in blue type on the bottom of the screen when you go back to edit.
Month. Select to base the period on a month. "MONTH" will display in blue type on the bottom of the screen when you go back to edit.
Period. Enter a value for the period.
Description. Enter a description for the period.
Start Date. The start date of the period. Select the Calendar button and choose a date.
End Date. The end date of the period. Select the Calendar button and choose a date.
Note: The Start and End dates of the period cannot overlap with the dates of existing periods.
See Also