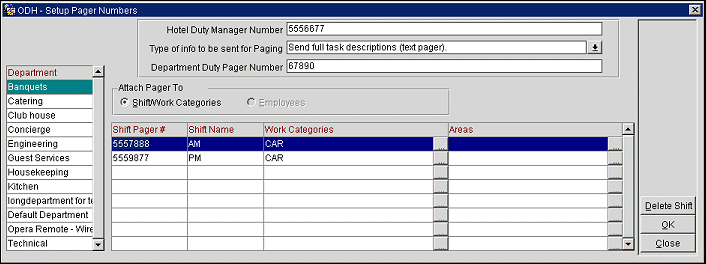
Pager Number Setup
Select Configuration>Quality Management>Navigator>Pager Setup>Number Setup to access the Number Setup screen. The Pager Number Setup and the Pager Notify Setup screens must be setup in order to and run the OPERA Paging Task Manager (PTM) System. When completely setup the OPERA PTM System pages the appropriate department/employee when a quick task is entered in the Task Navigator.

Objectives required for a successful setup include:
Department duty and property duty pager numbers are available for setup in this area as well, but this is optional.
Areas are also an optional selection. QMS allows the selection of any combination of rooms/locations, sections and floors. For example, room 100 may be configured in section 01 and it also exists on the first floor. It is acceptable to select all three choices in the setup. Floors are displayed from the OPERA floor configuration and contain Rooms only (no Locations).
An asterisk next to a selection indicates that the item has been previously selected for the same Dept./Work Category combination on a shift pager. However, you can still select this item if you choose. In this instance Rollover Logic will apply, which will alternate where the page is sent when multiple shift pagers have the same combination.
Follow the instructions below to setup a department's shifts, pager numbers, work categories, and areas. You can setup as many department shifts as needed.
When entering the pager numbers for this section ensure that the numbers are entered as one string of characters (i.e., 4151357) without any spaces, dashes, or other characters. Also, do not enter a prefix, area code, or any local access number because the paging server is already configured with the paging service access number.
Property Duty Manager Number. Optional. Manually enter the number to be used. If you plan on using the department-level task notification escalation options available in Pager Notify Setup, then you must enter a property duty pager number.
Type of info to be sent for Paging. Select one of the following three options. Your choice will be governed by the type of pagers your property uses.
Dept Duty Pager Number. Optional. Manually enter the number to be used. If you plan on using the department-level task notification escalation options available in Pager Notify Setup, then you must enter a department duty pager number.
Attach Pager To. Ensure that the Shift/Work Categories option is selected. The ability to attach a pager to employees is under construction.
Select a department from the department list to establish a shift pager #, shift name, and work categories.
Shift Pager #. Click in the field to enter the pager number for the department selected.
Shift Name. Click in the field and enter a shift name. Use obvious names for each shift, especially if you intend to create multiple shifts (i.e., HSKP AM 1, HSKP AM 2, HSKP PM 1, HSKP PM 2, and HSKP Overnight, etc.)
Work Categories. Click in the drop down list and select the work categories you want to attach to this department's shift.
Highlight the Category Code and its' corresponding Description.
Use the Select or De-select buttons to add/delete the work category from the shift.
Note: A work category can only be assigned to one department at a time. However, you can assign the same work category to other shifts within the same department.
Areas. Click in the drop down list to have the Areas screen display. Select the areas you want to attach to this department's shift.
Select Rooms if you wish to select from a list of all active rooms. If locations are only needed, select the Locations button to narrow your search. As the default All Rooms/Locations is selected and displayed. In the Checkmark column click or hit the spacebar to make your selection. If all entries displayed are desired select All. To de-select all of the selections choose None.
The Sections column displays any sections that have been configured for the current department selected. To select a Section mouse click or use the spacebar in the checkbox next to the proper section. By clicking on the same selection again, the entry is de-selected. If all displayed are desired hit All. To de-select all of the selections click None.
If a specific floor or multiple floors are desired, in the Checkmark column click or hit the spacebar to make your selection. If all displayed are desired hit All. To de-select all of the selections click None.
Repeat these last steps to add additional departmental shifts, each time moving down one row.
Note: This action is irreversible and you will not receive a system warning. If you inadvertently press this button you will have to re-create the deleted shift. Department shifts should be deleted at the end of each shift.
See Also