|
|
|
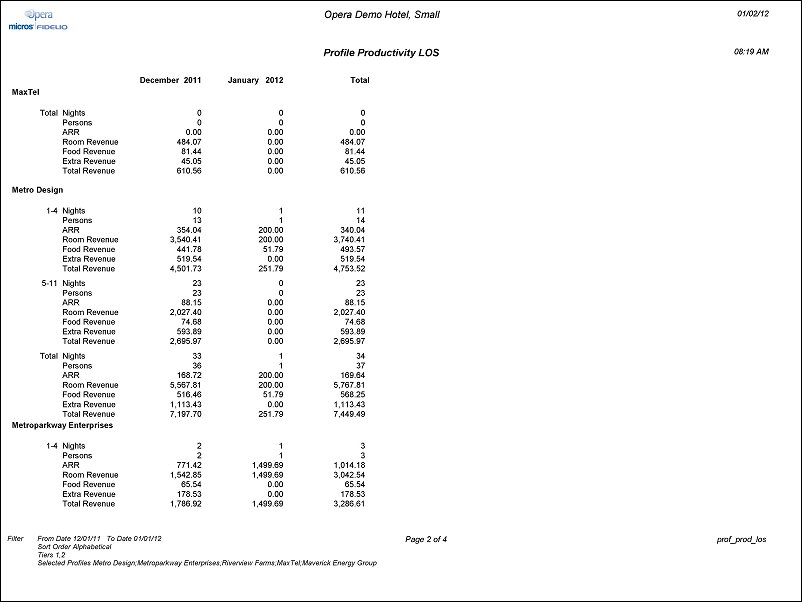
Profile Productivity LOS (prof_prod_los with STA8.FMX)
Note: When printing this Report help topic, we recommend printing with Landscape page orientation.
The Profile Productivity LOS allows the user to display profile production by pre-defined Length of Stay Groups. If the function RATE TIERS is not active, the Length of Stay groupings will be 1-4, 5-11, 12-29, and 30+ days. When RATE TIERS is active, the report will use the Lengths of Stay configured by the Property in Configuration>Rate Management>Rate Classifications>Rate Tiers. The output will include a total of all nights, and if the report is printed for a Profile Type, a Grand Total of production for the Profile type will be displayed. Additional filters include defining a Minimum Number of Nights and a Minimum Amount of Revenue produced. The Revenue display will be a total of all revenues posted to the profile.

Date Range. Selected the From and To Date for the results to display in the report.
Room Nights. Select the check box to display the total number of room nights for the selected date range.
Persons. Select the check box to display the number of persons that have stayed under the profile during the selected date range.
Average Room Rate. Select the check box to display the average room rate that has been charged to the profile during the selected date range.
Room Revenue. Select the check box to display the room revenue amount received from the profile during the selected date range.
Food and Beverage. Select the check box to display the amount of revenue received by the profile from food and beverage during the selected date range.
Extra Revenue. Select the check box to display the amount of extra revenue received from the profile during the selected date range.
Total Revenue. Select the check box to display the total amount of revenue that has been received from the profile for the time period selected.
Minimum Nights. Enter the minimum number of nights to begin the results of the report with.
Minimum Total Revenue. Enter the minimum amount of total revenue to begin the results of the report with.
Tiers. Multi Select LOV to filter by specific tiers.
Account Type. Select the down arrow to choose an Account Type (Corporate, Direct Bill, City Ledger, etc.) from the single select list of values.
Owner. When the General>Owner application function is active, select a specific Sales Manager for filtering on the report. Opera users can be configured with an owner code. The owner code can then be associated with account profiles (and business blocks). If the owner has no profiles associated with it, the owner will be excluded from the report. The LOV will display all owners with access to the selected property.
Business Segment. Available for Company, Travel Agent, Source, and Contact profiles. This refers to the Business Segment attached to a profile, not on the reservation. The Business Segment field is not available for Group profiles. However, for all other profile types, the Business Segment field is available on the Sales Info tab.
Rollup Master Statistics. Three SID data relationship types have been introduced to the application. These relationships must be used in creating the hierarchy in order for the Statistical Master Account Reporting to work. The relationships have been created for Company, Source, and Travel Agents, and may not be edited or deleted. The Relationships are as follows:
From Type: |
Company |
From Relationship: |
C-Master |
Relationship Description: |
Company Master |
To Type: |
Company |
To Relationship: |
C-Sub |
Relationship Description: |
Company Subsidiary |
From Type: |
Travel Agent |
From Relationship: |
T-Master |
Relationship Description: |
Agent Master |
To Type: |
Travel Agent |
To Relationship: |
T-Sub |
Relationship Description: |
Agent Subsidiary |
From Type: |
Source |
From Relationship: |
S-Master |
Relationship Description: |
Source Master |
To Type: |
Source |
To Relationship: |
S-Sub |
Relationship Description: |
Source Subsidiary |
The report will be used to provide the Master account statistical information. This enables the property to print statistics based on an established hierarchy, and, therefore, quickly ascertain those Companies, Travel Agents or Sources that are providing the most business for the property.
When Rollup Master Statistics is selected, the report output will only display those Master profiles at the highest level and, in turn, will include all statistics attached to the Subsidiary Profiles that have a Relationship established.
You may filter and report on an entire profile type category (Individual, Company, Travel Agent, Group, Source, or Contact), or you may select individual profiles from one or more type category.
To filter and report on one profile type category, select the Individuals, Companies, Travel Agents, Groups, Sources, or Contacts radio button. All profiles in the category you select are eligible for the report, depending on the other filter criteria you choose.
To filter and report on selected profiles from one or more profile type categories, select the Selected Profiles radio button. A field with a down arrow appears to the right, allowing you to make your selection of profiles from all categories. (At least one profile must be selected.)
To choose profiles, select the down arrow. The Profile Search screen appears. Use this screen as you normally would to search for the profile you want to include in the report (see Profile Search screen). Two special features appear on the Profile Search screen when it is accessed from the Profile Production Statistics screen:
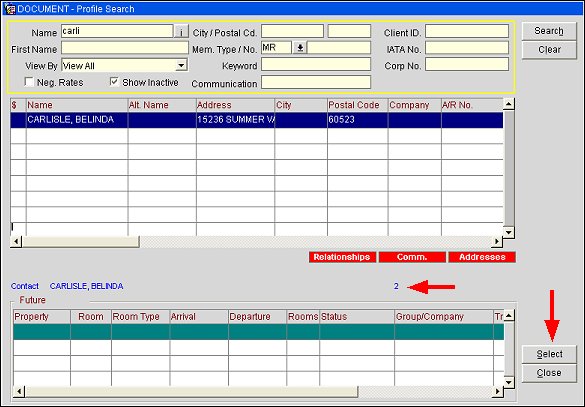
(Options such as editing profiles and creating new profiles are not available from the Profile Search screen when accessed for purposes of this report.) When you select the Close button on the Profile Search screen, the Select Profile screen appears.
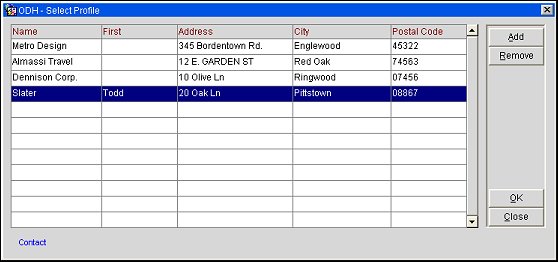
This screen shows the profiles you have chosen for the report, including address information. The profile type of the highlighted profile appears in blue text in the lower left-hand corner of the screen.
Use this screen to verify your choices of profiles and to add or remove profiles from the report.
Add. Select this button to return to the Profile Search screen to choose additional profiles for reporting.
Remove. Highlight a profile and select this button to remove the profile from the profiles being reported on.
When you are done, select the OK button to return to the report options screen.
Note: Once you have chosen one or more profiles for reporting, the Profile Select screen, rather than the Profile Search screen, will appear when you select the down arrow on the Selected Profiles field.
Sort Order. Alphabetical, Room Nights, Total Revenue
When the Sort Order is either Room Nights or Total Revenue, the report results will be sorted in a descending order where the profiles with the highest number, based on the selected Sort Order, will be listed first. Also a Rank will be displayed next to the Profile Name to signify the rank of the profile, based on the selected Sort Order.