
|
|
|
Profile Distribution
Multiple profiles can be queried, managed, and distributed by users who have the appropriate permission. Users can process changes to groups of profiles, such as apply keywords; centrally protect profiles; create and distribute profiles for subscriptions; and delete large quantities of profiles within the ORS/OCIS database.
Note: All profile distribution processes are run in batch by the OPERA Scheduler.
OBI keywords can be assigned to important Companies, Travel Agents, and Guests so that these profiles and keywords will be included in BI cubes for analysis. When the OBI license code is active: OPB_<version number> OBI Enterprise (Multiple Properties), or OPI_BUIP_<version number> OBI Standard (Single) users can access the Profile Distribute screen by selecting the OPERA Business Intelligence Setup>Options>Assign OBI Keywords menu option.
Using the Profile Distribute screen, OBI users can create new OBI keywords or delete existing OBI keyword criteria for the profile types of Company, Travel Agent or Individual. The keywords are assigned to the profiles and accounts based on the filter and criteria you selected. This enables the accounts and profiles to appear in specific OBI reports. You will need to build (or rebuild) the cubes after these new OBI keywords are assigned. Then, you will need to schedule the BI - Cube Maintenance so that the profiles and keywords are constantly updated for the BI cube dimensions.
Note: When a Master Company Profile has subsidiary companies, and the subsidiaries have been assigned a keyword, the Master Company is also assigned the keyword. The Master Company appears on subsequent profile screens for identification. When you select Preview, you will only see the Master Company listed on the Profile Search screen. When you complete the BI- Company OBI Keywords job, you will see that the Master Company has the keyword applied. This implies that the subsidiaries also have the keywords assigned.
Creating and deleting OBI keywords on the Distribute Profile screen is controlled by the permission: PROFILES>MAINTAIN OBI KEYWORD.
You can search for profiles having OBI keywords already assigned to them by accessing the Profile Search screen. In the Keyword field, enter the prefix of the OBI_ and the keyword.
A typical workflow begins when users have a business need for managing and changing a group of profiles.
Example
A user may need to upgrade a credit rating for a group of guests having certain characteristics. This is done at the Distribute Profile screen.
We may select Profile Criteria/Name Type: Individual. We may select the current Credit Rating: Level 2 High and the VIP Status: 003, Loyalty Important Person. Therefore, all Individual Profiles from Database 007 having a Credit Rating of Level 2 High and VIP Status of 003, Loyalty Important Person will be grouped into a profile set for upgrading to a higher credit rating. If a previously used query was saved having the desired filter criteria, we could also select a previously saved query in the Query Name field.
Note: Because of the sophistication of the Distribute Profile tool for processing large quantities of profiles, the processing time for subscribing profiles on the user-interface may be quite noticeable. This is normal and to be expected, as not all filter conditions available on the Distribute Profile screen have indexes. In any case, the advantages of this tool outweigh the performance issues.
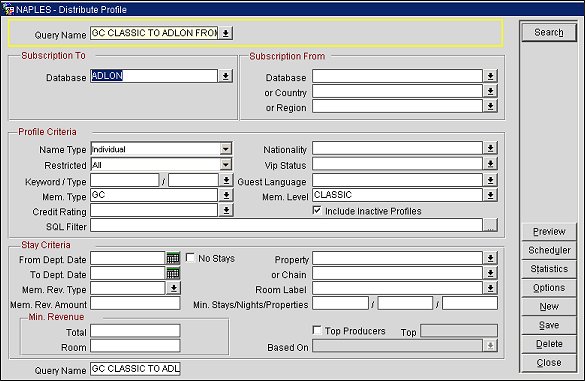
Query Name. You may search by a previously named and saved query. You can quickly populate the necessary fields in this screen and perform processes to a profile set by selecting an existing query from the Query Name LOV. If you use certain standard queries on a regular basis, it would be efficient to name and save the query, and then simply use the saved query in the future. For example, users may query on a monthly basis for the "Top 100 Individuals for Revenue" and save it as a query name which can be used every month. The query is named by entering a name in the Query Name field and selecting the Save button.
Subscription From/Subscription To. You can filter profiles based on subscriptions from selected property databases, country of hotel, or region of hotel and then distribute/subscribe the profiles to other property databases.
Subscription From. Filters the profiles based on current subscriptions based on property, country or region. You can select from a Database, Country (see the Country screen below), or Region LOV. If nothing is selected in these fields, the criteria you enter in the other fields on the screen will search for all subscribed profiles in all ORS/OCIS database to create a profile result set.
Subscription To. Database identifies the property database(s) from the Database LOV you want the profiles distributed/subscribed to.
Profile Criteria. This section contains filters for searching profile data to create the profile set. The following fields are available.
Name Type. Select the type of profile you want to search for from the LOV: Individual, Company, Travel Agent, Source, Group, Contact, or Vendor. (When Company or Travel Agent are selected, the Update Priority button is available on the Options menu where you can update the priority code. See Options Screen Description/Update Priority below.)
Nationality. Select the nationality from the LOV of the profiles you want to filter.
Restricted. Select the type of restriction you want to search for from the LOV: Unrestricted, Restricted, or All.
VIP Status. Select the VIP Code/Description(s) for the profiles you want to filter. (The VIP Status can also be updated for the profile set. Select the VIP Status here and the Options button to update. See Options Screen Description/Update VIP Status below.)
Keyword/Type. Enter the keyword and select the keyword type from the Keyword Type LOV.
Guest Language. Select the language(s) of the guest profile you want to filter.
Mem. Type. Select the membership type associated to the profile from the LOV you want to filter.
Mem. Level. Select the membership level associated to the profile from the LOV.
Credit Rating. Select from the LOV the credit rating you want to filter.
Include Inactive Profiles. Select this check box if you want to include inactive profiles in the profile result set.
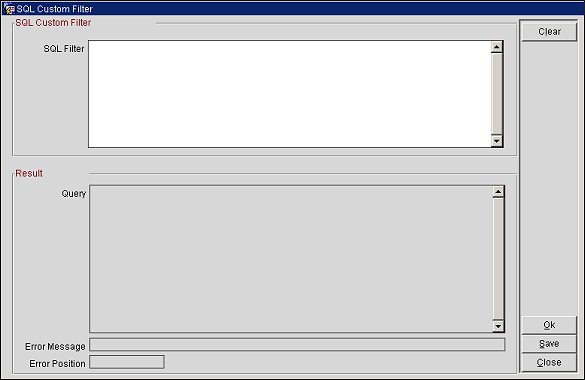
SQL Filter. Create a custom SQL statement to query profiles. Select the ellipsis button to open the SQL Custom Filter screen (see screen below), where you can enter an additional SQL filter. Select OK to load SQL statement and view result in the Query pane. If you enter an invalid statement, an error message will display at the bottom of the screen along with the exact position of the error. Select Clear to clear all fields on this screen or select Save to save custom SQL filter. Select Close to return to the main screen.
This section contains filters for searching stay data associated with the profiles to create the profile set. The following fields are available.
No Stays. Select this check box to indicate your search for guests who haven't made reservations within a certain timeframe. Use the From Dept./To Dept. for the date range. These fields can be used to filter profiles that will be made inactive.
Property. Select either the property where the stay occurred, or select the chain below.
Or, Chain. Select the chain where the stay occurred.
Min. Stays. This field is enabled when the Top Producers check box is not selected. Enter the minimum number of stays associated with the profile.
Min. Nights. This field is enabled when the Top Producers check box is not selected. Enter the minimum number of nights associated with the profile.
Room Label. This field is enabled when the Top Producers check box is not selected. Select the Room Type filter from the LOV.
Top Producers. Select this check box to include the top producers' profiles associated with the stay criteria. When this check box is selected, the From Dept./To Dept., Top, and Based On fields are enabled (see below). When this check box is selected, other fields are disabled such as Min. Stays, Min. Nights, Room Label, Min. Revenue of Total and Room fields.
From Dept./To Dept. Select the departure date or date range you want to search the profiles for. For date range, select the beginning and ending date.
Mem. Rev. Type. Select the down arrow and choose one or more Membership Revenue Types from the list of values.
Mem. Rev. Amount. Enter a total generated revenue amount for the specified Membership Revenue Type.
Top. This field is enabled when the Top Producers check box is selected. Enter a number to indicate the top range, such "10" for the top ten.
Based On. This field is enabled when the Top Producers check box is selected. Select from the LOV what the top producers are based on: Food and Beverage, Number of Stays, Room Nights, Room Revenue, or Total Revenue.
This section contains filters for searching revenue data to create the profile set. The following fields are available.
Total. This field is enabled when the Top Producers check box is not selected. Enter the currency value of the revenue.
Room. This field is enabled when the Top Producers check box is not selected. Enter the room revenue associated with the revenue.
Query Name. Enter a name in the Query Name field and select the Save button to save the entire filter and search parameters. This query will now appear in the Query Name LOV for future use and selection.
Preview. Select this button to preview the profiles that will be affected by your query criteria. The Profile Search screen appears.
Scheduler. This button opens the OPERA Scheduler screen where you can search for and view the state of the batch jobs by Job ID, that were selected here to be processed by the OPERA Scheduler. The OPERA Scheduler automatically processes the batch jobs from the Options Menu. This utility also processes batches for other ORS/OCIS functionality, such as membership points calculations, so you may see these jobs listed on the screen as well. See OPERA Scheduler Batch Processing for more information.
Statistics. Selecting this button displays the status of the pending queue for the profiles to be distributed and subscribed. When the subscription process is complete, the Query Name remains on the screen for reference. (See the Options Screen Description below for more information on the Subscription button.)

Query Name. The saved query name that was used to create the profile set for distribution.
Subscribed. The number of profiles in the profile set that have already been subscribed as a result of this distribution. This number dynamically changes during the process.
Pending for B.E. The number of profiles in the profile set pending distribution. This number dynamically changes during the process.
Waiting for Sub. The number of profiles in the interface queue waiting to be processed as subscriptions by the interface monitor.
Options. Select this button to open the Options screen. (See Options Screen Description below.)
New. Select this button to create a new query. Existing values from previous queries will be cleared.
Save. Select this button to save a query and filter criteria. You will be prompted to name the query. This query will now appear in the Query Name LOV.
Delete. Select this button to delete an existing query name with its filter criteria from the Query Name LOV.
Close. Select this button to close the Profile Distribute screen.
The Options screen appears when the Options button has been selected on the Distribute Profile screen. Profile processing options and buttons are enabled, depending on the filter criteria entered on the Profile Distribute screen.
Note: For all profile distribution processes run by the OPERA Scheduler, the OPERA Scheduler displays a message indicating the Job ID: process name and ID number. This Job ID is used to identify and view the job status on the Scheduler screens.
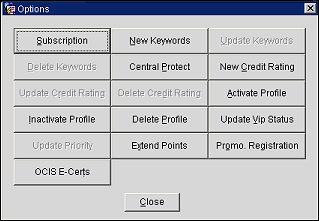
Subscription. This button is enabled when both the Subscription From/Subscription To fields are complete.
If there are less than 100 profiles, a message prompt appears displaying the number of profiles contained in the profile result set available for processing. Users can select one of three options: Yes/No/Cancel.
(Yes). Users can choose Yes to distribute the profile set at this time and create subscriptions in ORS to the database(s) indicated in the Subscription To field. The OPERA Scheduler will perform this process now. This selection depends, of course, on the user's needs and time of day when processing will occur, as there will be an impact on the interface queue. Users must be conscious of the volume of messages this will immediately place on the queue when selecting Yes.
(No). Users can choose to create the profile set now.
(Cancel). Users can cancel the creation and distribution of this profile set.
In both cases, whether the profile set is broadcast by the OPERA Scheduler, the process mode is identified in the OPERA Scheduler screens - listed as Queue. (The OPERA Scheduler utility also performs other batch processes for other ORS/OCIS functionality, such as membership points calculations, so you may see these jobs listed on the screens as well.)
New Keywords. Select this button to create a new keyword (data) and keyword type and apply it to the profile set. The New Keyword/Type screen appears. Enter the new keyword and type; select the Process button to apply it to the profile set.
Update Keywords. Select this button to change an existing keyword (data) and keyword type for the profile set. Enter the New Keyword and Type; select the Process button.
Delete Keywords. Select this button to delete the current keyword for the profile set. The processing prompt appears. Select Yes to process.
Central Protect. Select this button to centrally protect the profile set. The processing prompt appears. Select Yes to process.
New Credit Rating. Select this button to replace the current credit rating with a new one. The New Credit Rating screen appears. Select the new credit rating from the LOV; select the Process button.
Update Credit Rating. Select this button to replace an existing credit rating for the profile set. Select the new credit rating from the LOV; select the Process button.
Delete Credit Rating. Select this button to delete the current credit rating from the profile set. The processing prompt appears. Select Yes to process.
Activate Profile. Select this button to activate all inactive profiles in the profile set. The processing prompt appears. Select Yes to process.
Inactivate Profile. Select this button to deactivate all active profiles in the profile set. The processing prompt appears. Select Yes to process. The profiles are not deleted, but remain in the database with Active_YN flag set to N.
Delete Profile. Select this button to delete profiles in the profile set. The processing prompt appears. Select Yes to process. The profiles meeting the filter criteria and the profile cleanup filter criteria will have the inactive date set to sysdate. The next time a full purge is ran, these profiles will be completely deleted from the database and cannot be recovered.
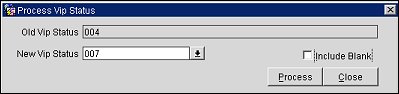
Update VIP Status. Select this button to change the selected VIP codes for the queried profiles to a new VIP code. Select the New VIP code and select the Process button. The Scheduler will present the Job ID and update the VIP codes.
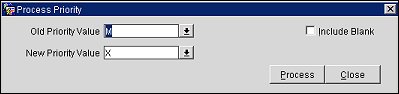
Update Priority. Select this button to change the existing priority codes for the profile type Company or Travel Agent. Select the old priority code and the new, updated one. Select the Process button. The Scheduler will present the Job ID and update the Company or Travel Agent priority codes.
Extend Points. (ORS/OCIS only) Select to pre-select the profiles for points extension. This will extend the points for all pre-selected members in mass. After this button is selected, an OPERA job will be created to carry out the task, and a status report will display when the job is finished (This status report can be viewed by selecting the Scheduler button on the main Distribute Profile screen.)
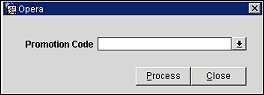
Promo Registration. (ORS/OCIS only) Select to open the Promotion Code screen and enter a promotion code or select the down arrow and choose one from the list of values. The promotion code that is selected must be of type "PROFILE" promotion. Select the Process button to assign the promotion code to the profiles.
Note: For the Promo Registration button option to be available, a Membership type must first be selected on the Distribute Profile screen and the Membership>MEMBERSHIP PROMOTION CODE application parameter must be set to Y.
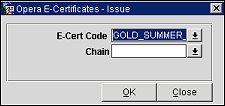
OCIS E-Certs. (ORS/OCIS only) Select to open the E-Certificates - Issue screen and enter an E-Certificate or select the down arrow and choose one from the list of values. When an e-certificate code is populated, the Chain field will be displayed. Select the down arrow and choose a chain code to associate with the E-Certificate. Select OK to issue the E-Certificate code to the profiles which satisfy the previously defined profile search criteria.
Note: For the OCIS E-Certs button option to be available, the Profiles>OCIS E-CERTIFICATE ISSUING permission must be granted to the user and the Profiles>OCIS E-CERTIFICATES application parameter must be set to Y.
See Also