
|
|
|
Room Types
Select Configuration>Reservations>Room Classifications>Room Types to configure and manage room types. A room type code is used to identify each kind of room available in your property. You might, for example, configure room types that reflect the primary characteristic of the room -- Deluxe, Superior, Standard. Keep in mind that availability is calculated and displayed by room type; therefore, not only should room types be meaningful for this purpose, but you should only define those room types that you consider being vital for tracking availability and statistics.
Pseudo Room Types - Pseudo Room types do not affect the property's room inventory. If the room type configured on the template is flagged as a pseudo room type, copied to the property, then this room type at the property level will be flagged as a pseudo. This pseudo room type cannot be unmarked at the property level. If the room type is not flagged on the template level as pseudo and then copied to the property level, the room type cannot be flagged as pseudo at the property level.
Can Be Meeting Room - Often a guest room can be used as a Meeting room. If the room type configured on the template is flagged as Can be Meeting Room, the room type is then copied to the property, and then this room type at the property level will be flagged as Can be Meeting room. This Can be Meeting room flag cannot be unmarked at the property level. If the room type is not flagged on the template level as Can Be Meeting Room and then copied to the property level, the room type will not be flagged at the property level. The user does have the ability at the property level to flag this room type as Can Be Meeting Room. Once checked however, the user cannot unselect this Can Be Meeting Room flag at the property level. The Can Be Meeting Room flag can only be marked on those room types not configured as Pseudo. A room specified as Can Be Meeting Room and that is already checked in by being associated with an event, cannot be checked out early using Early Departure Settlement option as it is inactive.
Component Room - A configured room type comprised of two or more room types is called a Component Room. The Component Room is made up of multiple inter-connecting rooms (two or more room types) that define the new Component Room room type. When a reservation is made for a Component Room, OPERA deducts one room from the Component Room room type, as well as one room from each of the component room's physical rooms. Component Room functionality can be used in a PMS-only environment or with PMS and ORS combined (in ORS, Component Rooms are sometimes called Component Room Suites or Virtual Suites), although the configuration and operation differs in the two environments.
The multiple room types are linked together to form a Component Room room type via the Components button on the room type configuration screen. Once room types have been linked together for the Component Room room type, the Components check box on the room type configuration screen is automatically checked, indicating this is a Component Room. To enable Component Room functionality, set the General>Component Rooms application function to Y. If you want the inventory accounted for at the Room Number level, set the Reservations>Component Verification application parameter to Y. If you want the inventory accounted for at the Room Type level, set the application parameter Reservations>Component Verification to N.
Reservations>Component Verification application parameter set to N:
Global Room Types - Global room types are logical categories that are set up to hold groups of "regular" room types which usually share similar characteristics. For example, a REG global room type might include the standard (STD) room type and the double (DBL) room type, both of which might be very much alike. Physical rooms would never be assigned to a global room type, although rooms would be associated with the regular room types that comprise the global room type.
Global room types are used in a multi-property environment to run inquiries for room availability by room type over multiple properties without having to specify the required room type for each property.
Generic Room Types - This option allows the properties flexibility in making reservations without specifying the exact room types. This generic room type is a grouping of several similar room types within the same property. For example, if a hotel needs to block 5 double rooms, not necessarily five double rooms with views or five double rooms without views nor five double rooms in the tower — just simply five double rooms. Reservations can be made for these generic room types, but never actually checked in to these room types, as they do not exist. They simply represent other physical room types for the property, and are a selling classification of room types.
The generic room type does not have any physical rooms associated with it, but allows the property to make a reservation for a room without specifying which type of room will actually be assigned to the guest. Generic room types are useful for making group reservations, where the actual room type is selected once the block is split.
Multiple generic room types can be created, as long as each is associated to a unique room class. The room class acts as an umbrella to associate the generic room type to the actual room types.
You cannot mark a room as Pseudo and Housekeeping within the Room Type Configuration for a PMS only property. Also, all configured rooms (those marked as pseudo and those marked as Housekeeping) display within the Rooms Maintenance screen.

Room types can be configured for multi-property OPERA PMS installations (when the OPP MHOT Multi-property PMS license is active) as well as for single-property standalone OPERA PMS installations, and for ORS installations (when the OPR<version number>ORS license code is active). In multi-property installations, room type templates are available to simplify creating a set of standard room types which may then be copied to the individual properties. Once copied to a property, the room types may be modified to meet property needs, with a few exceptions mentioned earlier in this topic. Using a standard template can reduce the time spent on room type set up.
Template. Select the Template radio button to create and manage a set of room type templates which can be copied to individual properties where they may be customized as necessary.
Property. Select the Property radio button to display the room types that have been configured at the property level. When you select this radio button you are prompted to choose the property for which you wish to display room types. (Thereafter, the Property LOV becomes available allowing you to choose a different property.)
Show Inactive. Available when the Property radio button is selected. Select this check box to display inactive room types for the property. Room types may be set to inactive at the property level only if there is no inventory available for that room type, for example. The same validation checks for deleting a room type remain in effect for inactivating a room type. These include the following: the room type cannot be associated with a rate code; it cannot be associated with a current and/or future reservation; it cannot be associated with an active business block; it cannot have room numbers associated with it; and it cannot be part of a component room type configuration. (Inactive room types will not display as an option when you select the Room Type LOV on the Reservation screen, when viewing the Rate Query Details screen, or when accessing the Room Grid from within the Business Blocks module.)
The room type information is described in Adding and Editing Room Types, below.
Note: User activity related to adding, editing and deleting room types is recorded in the user activity log under the Configuration activity group.
In multi-property installations when the OPP MHOT Multi-property PMS add on license or OPR<version number>ORS license code is active, you may create new room types for the template set of room types, then copy one or more of them to individual properties. In single-property standalone PMS installations, you may create room types directly for your property.
To create a new room type, select the New button from the Room Types list screen. (In multi-property installations, the New button is available only when the Template radio button is selected.) To edit an existing room type, highlight your choice and select the Edit button. The Room Type - New or Room Type - Edit screen appears.
In multi-property installations, the room features you create here are available for viewing on the Sales Screen/Rate Availability screen when you double-click the room type code and within the Room Assignment screens.
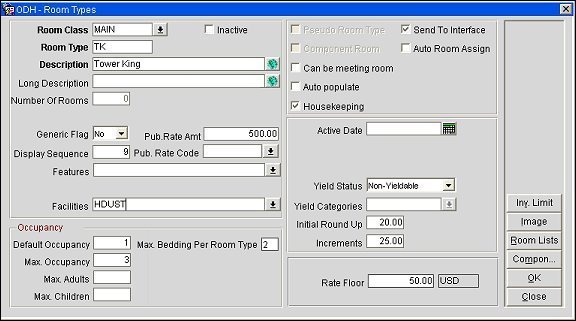
Provide the following information and select the OK button.
Inactive. This check box may be selected only if there is no inventory available for this room type at the property, for example. The same validation checks for deleting a room type remain in effect for inactivating a room type. These include the following: the room type cannot be associated with a rate code; it cannot be associated with a current and/or future reservation; it cannot be associated with an active business block; it cannot have room numbers associated with it; and it cannot be part of a component room type configuration. (Inactive room types will not display as an option when you select the Room Type LOV on the Reservation screen, when viewing the Rate Query Details screen, or when accessing the Room Grid from within the Business Blocks module.)
Room Class. (Available when the General>Room Class application function is set to Y.) Select the down arrow to choose the room class with which this room type is associated. See Room Classes for details.
Note: When the General>Room Class and General>Component Rooms application functions are set to Y and the Inventory>INV_ROOMCLASS OXI Parameter is set to YS (See OXI INVENTORY PARAMETERS for details), Physical Room Types and Component Room Types cannot be attached to the same Room Class. Also, only 1 Component Room Type can be attached to a Room Class.
Room Type. Room type code. This identifier may be edited except for Pseudo Room Type and Can Be Meeting Room room types. Once the Room Type has been saved for Pseudo Room Type and Can Be Meeting Room room types, it may not be modified.
Note: The Room Type field is restricted to a maximum of 6 characters. In previous versions, Room Type codes may have been configured with up to 20 characters. Although this format is no longer allowed for Room Type fields, OPERA will still recognize previously configured Room Type codes longer than 6 characters as valid.
Number of Rooms. This field auto-populates with the number of rooms of this room type that have been configured for the property. This view-only column will always be 0 for templates and for rooms having the Generic Flag set to Yes. The Room Lists button, accessible at the Property level, allows you to see the rooms belonging to this room type that have been configured for the property.
Description. Text description for the room type. When the General>Profile Language application function is set to Y, click the globe icon  to enter the description in other languages. For more information, see Multi-language Descriptions.
Long Description. A fuller text description of the room type (2000 characters maximum). This description will be displayed from various places in OPERA, such as on the Room Type Detail screen which appears when you click on a Room Type hyperlink in the Room Plan screen or the Room Assignment screen. When the General>Profile Language application function is set to Y, click the globe icon to enter the long description in other languages. For more information, see Multi-language Descriptions.
Max. Occupancy, Max. Adults, Max. Children. These settings are used to define the maximum number of individuals allowed in rooms of this room type. Max. Occupancy can be used alone or in combination with Max. Adults and/or Max. Children. These values are referenced throughout OPERA, for example, when a room is assigned to a reservation, when rates are set up based on occupancy, and when a room move is performed. A message will prompt you when the maximum number of persons would be exceeded for a specific room. (You may override the limitation if your Reservations>Override Max Occupancy permissions allow.)
When used alone, Max. Occupancy sets the limit on the number of persons (adults and children) that may occupy rooms of this room type. For example, if Max Occupancy is 3 and Max Adults and Max Children are both blank (null), the room could be occupied by any mix of adults and children not to exceed 3 persons: by 3 adults, or by 2 adults and 1 child, or by 1 adult and 2 children, or by 3 children, etc. When Max. Occupancy is used with Max. Adults and/or Max. Children, the number of persons occupying the room may not exceed Max. Occupancy, nor may the individual limits on the number of adults (Max. Adults) and/or the number of children (Max. Children) be exceeded. This means that the Max Adults value and the Max Children values cannot be individually greater than the Max. Occupancy value.
Note: A 0 (zero) in the Max. Adults or Max. Children fields means that none will be allowed; a blank (null) field means that OPERA will not perform any validation based on the field value.
Note: Max. Adults and Max. Children may not be specified if Max. Occupancy is not already specified. If Max. Occupancy, Max. Adults, and Max. Children are specified, then Max. Occupancy is deleted, none of the values will be saved.
When the Max. Occupancy is defined at the room type level, this max occupancy number defaults for a new room number of that room type. (See Room Tab for details.) Users can alter this max occupancy for the room number. If Max. Adults and/or Max. Children values exist on the room type level, these are referenced at the associated room number level.
Example 1:
Max. Occupancy = 4, Max. Adults = 3, Max. Children = 3 on room type (assuming the room number does not have a Max Occupancy field defined).
Reservation for 2 adults and 2 children would be accepted
Reservation for 4 adults would not be accepted
Reservation for 3 adults and 2 children would not be accepted
Reservation for 1 adult and 3 children would be accepted
Should the Max. Occupancy and Max. Adults/Max. Children fields be defined for a room type, the Max. Occupancy will default for new room numbers of that room type. Assuming a room number has its own defined max occupancy, this will be the total persons allowed for the reservation for that room; the Max. Adults/Max. Children will be referenced from the room number's associated room type.
Example 2:
Room type ABC has Max. Occupancy = 4, Max Adults = 3, Max. Children = 2
Room 101 is an ABC room with Max. Occupancy = 5.
Acceptable value for reservation in room 101 is 3 adults, 2 children because the total maximum occupancy is 5 for the room, even though the max occupancy for the room type is 4.
Room 102 is an ABC room with Max. Occupancy = 2.
Acceptable values for reservation in room 102 is 2 adults and 0 children, or 1 adult and 1 child, or 0 adults and 2 children. The room type allows for more adults and children yet the max occupancy for the room number is 2 and this value in total persons cannot be exceeded.
Room 103 is an ABC room with no Max. Occupancy defined for the room number; it is blank (null)
Acceptable values for the reservation are pulled from the room type, that is, Max. Occupancy = 4, Max. Adults = 3, Max. Children = 2.
Example 3:
Room type DEF has Max. Occupancy = 3, Max Adults = 1, Max. Children = 3
Room 108 is a DEF room with Max. Occupancy = null (blank).
Acceptable values for a reservation in room 108 is 1 adult, 0 children because the total maximum occupancy is 3 for the room type.
1 adult, 1 child would be accepted
1 adult, 2 children would be accepted
0 adult, 1 child would be accepted
0 adult, 2 children would be accepted
0 adult, 3 children would be accepted
1 adult, 3 children would not be accepted because 4 exceeds the maximum occupancy of 3.
Max. Bedding Per Room Type. Available when a Package Code is selected for the Reservations>Package for Extra Bed application setting, enter the number of actual beds that exist for this Room Type. When this field is utilized (based on the factor that each guest will use 1 bed), this number will be compared to the number of adults and children that are attached to the reservation. If the number is exceeded, then a Crib Package or Extra Bed Package will automatically be attached to the reservation. The values defined for the Rates>Min Age Rate Bucket 1 and Rates>Max Age Rate Bucket 1 application settings will be used to determine if the extra bedding needs to be a crib or bed. If the age of the extra person(s) fall within this age range, then a Crib Package will be attached to the reservation. If the age does not fall within the age range, then an Extra Bed Package will be attached to the reservation.
Note: The Crib Package that is attached is defined by the Reservations>Package for Crib application setting. A Crib Package will automatically be attached to the reservation if the Child Age(s) attached to the reservation falls within the Rates>Min Age Rate Bucket 1 and Rates>Max Age Rate Bucket 1 application setting age range.
The Extra Bed package that is attached is defined by the Reservations>Package for Extra Bed application setting.
Examples
Min Age Rate Bucket 1 = 0
Max Age Rate Bucket 1 = 2
Package for Crib = CRIB
Package for Extra Bed = EXTRA BED
Room Type = STANDARD, Max Occupancy = 2, with Max. Bedding Per Room Type = 2
Reservation 1
Adults = 1, Child = 1/Age = 1 (CRIB Package is automatically attached)
Reservation 2
Adults = 4 (2 EXTRA BED Packages are automatically attached)
Reservation 3
Adults = 2, Child = 3/Ages = 1,2,3 (2 CRIB and 1 EXTRA BED Package is automatically attached)
Reservation 4
Adults = 3, Child = 2/Ages 2,3 (1 CRIB and 2 EXTRA BED Packages are automatically attached)
Max. Rollaways. Maximum number of rollaways allowed in this room type.
Published Rate Code. Rate Code with which this room type is associated for the Manager's Report or Rate Variance Report.
Published Rate Amount. Potential revenue associated with this room type for the Manager's Report or Rate Variance Report.
Def. Occupancy. Default occupancy. The minimum number of people required for a room to be occupied. Set to 0 for a pseudo room type such as a posting master (PM).
Sales Flag. (Available when the OPR<version number>ORS license code is active.) This field contains a value of Lead, Upsell, or Alternate if the application setting Global>Function>Enable Sales Strategy Flags = Y. This field appears in the Rate Availability screen (Reservation>Sales Screen>New>Availability) and indicates to the reservation agent how this room type fits into the sales strategy.
Active Date. The date the room type is available for sale. You may enter a date manually, or use the calendar tool to select a date. Defining a future date in this field will prevent users from seeing or otherwise having access to this room type until the business date equals the active date; this prevents reservations from being made for the room type until the active date is reached. For example, if the active date for room type DLX is set to January 1, 2008, and today's date is June 15, 2007, you may not make a reservation for a DLX room regardless of the stay dates (even for stay dates in the upcoming year). On January 1, 2008, you may start making reservations for DLX rooms for January 1 or for any future date.
Note: There is no interaction between the room type's Active Date and the number of rooms on the property's OPERA PMS license.
Generic Flag. (Available when the Reservations>Generic Room Type application function is set to Y.) This feature is often used when setting up a Component Group where a number of rooms is associated with the group but specific room type(s) that relate to physical rooms will be assigned later as reservations are picked up. (Do not confuse component groups with component rooms.) The generic room type does not have any physical rooms associated with it, but allows the property to make a reservation for a room without specifying which type of room will actually be assigned to the guest. When this flag is set to Yes, your inventory will show available and occupied rooms within the generic room type.
Note: If you book a generic room type, no associated regular room type will be deducted from inventory. For this reason, users should be cautioned that reviewing generic availability may give an incorrect impression of house availability.
Display Sequence. Number that determines the position of the room type on the Rate Query screen. In addition to manually entering a sequence number in this field, you may also highlight a room type in the room type list and use the Move Up/Move Down buttons to change the display sequence of the room type. When two or more room types have the same sequence number, they are displayed alphabetically.
Note: Room types appear in sequence order across the Rate Query screen. Only 10 room types can be displayed at one time. Scrolling buttons will allow viewing of any additional room types.
Yield Status. (Available at the property level when a yield integration add-on license is active.) Select the down arrow to specify whether the room type is yieldable or non-yieldable.
Yield Category. (Available at the property level when a yield integration add-on license is active and when Yield Status is Yieldable.) Select the down arrow to choose the yield category for this room type.
Pseudo Room Type. Select this check box if this room type will not be associated with physical rooms included in inventory. Used for posting master (PM) rooms, for example. If this is flagged at the template level, then it cannot be changed at the property level. (See the scenarios outlined for the Can Be Meeting Room option described below.)
Component Room. Available at the property level except for generic room types or pseudo room types. Available when the General>Component Rooms application function is set to Y. If you want the inventory accounted for at the Room Number level, set the Reservations>Component Verification application parameter to Y. If you want the inventory accounted for at the Room Type level, set the application parameter Reservations>Component Verification to N. A Component Room room type combines two or more room types into a single room type for inventory purposes. When the room type is made up of component room types, the Component Room check box is selected and unavailable. Select the Components button to define and edit the component room types and quantities. See Component Rooms, below.
Auto Room Assign. (Available only at the Property level and when the Reservation>Room Type Auto Assign application parameter is set to Y.) Select this check box if you wish OPERA to auto-assign a room number to a new reservation when the reservation is made for this room type and a room has not already been manually selected for the reservation. If no room numbers belonging to this room type are available for auto room assignment at the time of making a new reservation, a room number will not be automatically assigned to the reservation. Auto room assignment is available only when you are creating a new reservation except when creating a new reservation for a sharer by selecting a profile (see Shares), or when creating new reservations by splitting a multi-room group reservation (see Group Rooming Lists). Please be aware that if this check box is selected and then is hidden by setting the parameter to N, the functionality throughout OPERA will still work the same as if it was displayed and selected. Just because the parameter is set to N, the check box is still selected and room numbers will automatically be assigned to new reservations for this room type.
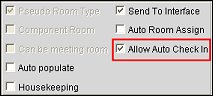
Allow Auto Check In. Available only at the Property level when the Reservations>Auto Check In for Pseudo Rooms application parameter is set to Y, and the Pseudo Room Type option is selected. See Auto Check In for Pseudo Rooms, below, for details .
Auto Populate. (Available when the OPR<version number>ORS license code is active and the Reservation>Room Type Auto Populate application parameter is set to Y.) Available when the Property check box>Edit button is selected. Select the Auto populate check box if you want this room type to be included when a new rate code is created for the property (Configuration>Rate Management>Rate Classifications>Rate Codes). On the Rate Setup - Rate Header screen, this room type will automatically default for all new Rate Codes in the Room Type field on the Rate Code Header screen. Users may remove this room type or add other room types to the Rate Header. Please be aware that if this check box is selected and then is hidden by setting the parameter to N, the functionality throughout OPERA will still work the same as if it was displayed and selected. Just because the parameter is set to N, the check box is still selected and this room type to be included when a new rate code is created for the property.
Housekeeping. The Housekeeping check box enables guest room for all housekeeping functions. Pseudo rooms that are also flagged as Can Be Meeting Rooms can be flagged for housekeeping too, in order to be able to set these rooms out of order/out of service.
Note: If the Rooms Management>Facility Management application function is set to Y, select the Housekeeping check box to enable setting up facility tasks for rooms having this room type. When a guest is checked into this room type, the Facility Scheduler option will be available on the Reservation screen options menu.
Note: Component Room room types cannot be flagged for Housekeeping. When attaching individual room types to a Component Room room type, if the Component Room room type was originally flagged for Housekeeping, OPERA automatically un-flags it and flags the individual room types that comprise the component room. This action is taken without a message or user prompt.
Send to Interface. Select this check box to send a check-in message to the various property interfaces for this room type. For example, you may wish to activate the phone interface or the in-room movie system.
Note: If the Send to Interface check box is not selected, virtual numbers functionality is bypassed for rooms associated with this room type (i.e., the Virtual Pools tab is not available on the Room screen for these rooms).
Can be meeting room. Select this check box if the room type can be converted to a meeting room and is available for sell to the Sales & Catering application (OPS<version number>). This check box also displays in SFA (active OPF<version number> license code). If this check box is flagged at the template level, then it cannot be changed at the property level. The following room types scenarios would require these settings:
Sleeping-room room type only
Function space/meeting-room room type only
Sleeping-room room type that can also be use as meeting room
PM room type
Note: When a Room Type is configured with the 'Can be a meeting room' flag checked, this option is made available on the Rooms - New screen. When checked on the Rooms screen, this option then activates three additional tabs: Function Space Details Tab, Rate/Combo Tab and the Space Details Tab. Once this option is checked, it cannot be undone.
Features. (Available at the property level.) Select the down arrow to display the Select Features LOV. From the list, choose those room features that apply to this room type. (Room features are configured using Configuration>Profiles>Preferences>Room Features.) The features selected here become the default room features for this room type, and they will copy to all rooms created with this room type after the features were added. (These defaults may be changed for individual rooms of this room type when the room is configured.)
Facilities. (Available at the property level when the Rooms Management>Facility Management application function is set to Y.) Select the down arrow to display the Facility Tasks screen. This screen allows you to configure the tasks (for example, total cleaning, light touch, dusting, etc.) that are associated with this room type, along with their frequency and priority. (See Room Types and Facility Management, below.) This field is only accessible for those room types configured with the Housekeeping check box selected.
Initial Round Up. When the ORMS OPO_, OPH_, or OPK_ license code is active, the Initial Round Up and Increments fields are available when either the Rates>Prevailing Rate by LOS application function is set to Y or when the Rates>Daily Rates application function is set to Y. These fields are also available when the legacy revenue management system TLP with the OPP_OPUS add on license is active and the Rates>Prevailing Rate by LOS application function is set to Y). This affects ORMS Prevailing Rates and ORMS Daily Rates functionality. The digit of the Initial Round Up value for the rate will replace the last two whole numbers and any decimals of the rate, according to your specification during dynamic calculations. In Multi-property environments, Initial Round Up and Increments may be configured at the individual property level only. (They are usually provided by the yield management system, but you may edit them.) These fields are not available when creating or editing room type templates. See Rates by Day by Room Type by LOS for details. For information on ORMS dynamic daily rates, for ORMS v5.0.02.02 see ORMS Configuration Tab>Miscellaneous, or for ORMS ADF 11, v5.0.02.03+ see ORMS Configuration Miscellaneous.
Increments. When the ORMS OPO_, OPH_, or OPK_ license code is active, the Initial Round Up and Increments fields are available when either the Rates>Prevailing Rate by LOS application function is set to Y or when the Rates>Daily Rates application function set to Y. These fields are also available when the legacy revenue management system TLP with the OPP_OPUS add on license is active and the Rates>Prevailing Rate by LOS application function is set to Y). This affects ORMS Prevailing Rates and ORMS Daily Rates functionality. The Increment value for the rate is a whole number that is equal to or greater than the Initial Round Up amount. The increment is added to the calculated rate after the Initial Round Up is applied. In Multi-property environments, Initial Round Up and Increments may be configured at the individual property level only. (They are usually provided by the yield management system, but you may edit them.) These fields are not available when creating or editing room type templates. The Increment must be equal to or greater than the Initial Round Up. When you save this screen, any decimal will be truncated and rounded up if necessary. See Rates by Day by Room Type by LOS for details. For information on ORMS dynamic daily rates, for ORMS v5.0.02.02 see ORMS Configuration Tab>Miscellaneous, or for ORMS ADF 11, v5.0.02.03+ see ORMS Configuration Miscellaneous.
Rate Floor. (Available at the property level and when the Rates>Rate Floor Level of Control application setting is set to Room Type Level.) Enter a rate floor amount for the room type. This is the minimum amount for which the rate can be sold. Under Rate Detail tab, a user must enter a rate amount for the room type that is at or above the rate floor, or an error message will display. If user has the RATEMGMT CONFIG>Rate Floor Override permission granted, the rate floor amount can be overridden.
Inventory. (Available at the property level) when the Reservations>Item Inventory application function is set to Y.) Select this button to display the Room Type Inventory Limit screen. This feature allows you to control the quantity of specific inventory items attached to a reservation based on the room type.
Room Lists. (Available at the property level.) Select this button to display the Room Lists screen. This is a view-only display of the rooms that are associated with this room type. (Not available for generic room types.)
Components. (Available at the property level.) Select this button to display the Suite Components screen. Use this screen to select the component room types for a room type that is made up of multiple room types. When components have been selected, the Component Room check box is selected and unavailable. (Not available for generic room types or pseudo room types.) See Component Rooms, below.
Image. (Available at the property level.) Select this button to display the Image Maintenance screen. Use this screen to view available images of room types and select an image to be displayed. Room type images are available from the Sales screens by selecting the Rm. Image button. Images may also be displayed from the Room Blocking screen, the Room Plan screen and the Floor Plan screen. Only images with the file extension of .jpg, .bmp, .gif, .cals, .jfif, .pict, .ras, .tiff, and .tpic can be used.
You may create a set of room types as a template, then copy one or more of these room types, along with their parameters, to other properties.
To copy room types, select the Template radio button to display the available template room types. To choose the room types to be copied, mark an X in the X column next to the room types you wish to duplicate. (You may also use the All/None buttons to mark and un-mark all room types.) Then select the Copy button. The Property LOV appears. Choose the property or properties to which you wish to copy the marked room types and select the OK button.
Once room types have been copied to the property, you may select the property and edit the room type information, if you like.
A component room is a room type that is commonly used to define a suite, comprised of multiple inter-connecting rooms that define a single room of a new room type. Multiple room types may be linked together to form a component room via the Components button on the room type configuration form. Once room types have been linked together for the component room, the Components check box on the room type configuration form is automatically flagged for the user.
The level that is used to account for inventory is controlled by the Reservation>Component Verification application parameter. If the parameter is set to Y, component room inventory is accounted for at the room number level. If the parameter is set to N, the component room inventory is accounted for at the room type level. See Component Verification below for a more detailed explanation.
The component rooms functionality is available when the General>Component Rooms application function is set to Y. A Component Room room type is a room type that is comprised of two or more specific room types, for which inventory is accounted for at the room number level (the Component Verification application parameter is set to Y).
Component rooms are always referred to as "Virtual Suites" in ORS or if the Component Verification application parameter is set to N in PMS, because inventory is accounted for at the room type level only. See ORS and PMS Component Room Suite and Component Room Environment for more information.
OPERA allows you to combine "regular" room types as well as other Component Room room types into a Component Room room type. In other words, if your needs dictate, you may have component rooms inside component rooms to any level.
Following are some recommendations for designing component rooms:
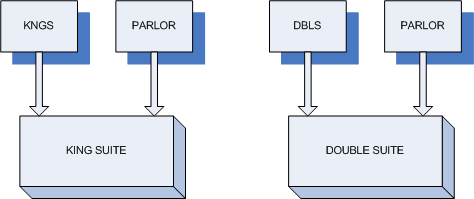
Implement Separate Room Types. When defining room types we recommend that you create separate room types for use in building component rooms even though they may be for the same bed type as another "regular" room type. For example, set up a room types KNGS for king rooms that will be part of component rooms and KNG for king rooms that are not sold as part of component rooms. Similarly, set up a room types DBLS for double rooms that will be part of component rooms and DBL for double rooms that are not sold as part of component rooms. By taking this approach, when you sell the KNGS and DBLS OPERA will also keep track of the available Component Room room types (comprised of KNGS and DBLS), because OPERA knows how many of each are needed to compose the component room.
External Sources. When considering inventory, all external sources need to be considered (e.g., GDS, CRS, external S&C systems, etc.). These systems nearly always only pass the room type attribute between systems. Thus, you have better control over inventory when separate room types are defined for use with component rooms.
Preassign Component Room Room Numbers. When booking reservations for component rooms, always preassign the Component Room room numbers to make sure that the physical rooms that comprise the component room are not assigned individually to other reservations (e.g., when the hotel books a KNGS or a DBLS).
Here are two examples that illustrate hierarchical levels of component rooms and how various bookings affect availability:
Example 1 - Component Rooms with 1 Level
Assume the hotel has 4 physical rooms.
Number |
Room Type |
1 |
KNGS |
2 |
PARLOR |
1 |
DBLS |
These rooms are used in the following ways to compose 1 KING SUITE and 1 DOUBLE SUITE.
The following matrix shows Availability by Room Type when rooms of various room types are booked. These changes in availability as various room types are booked would be visible in OPERA's Rate Query, Maximum Availability, and Detailed Availability screens.
Room Type: |
KNGS |
DBLS |
PARLOR |
KING SUITE |
DOUBLE SUITE |
Hotel Availability |
1 |
1 |
2 |
1 |
1 |
If 1 KNGS is Booked |
0 |
1 |
2 |
0 |
1 |
If 1 DBLS is Booked |
1 |
0 |
2 |
1 |
0 |
If 1 KING SUITE is Booked |
0 |
1 |
1 |
0 |
1 |
If 1 DOUBLE SUITE is Booked |
1 |
0 |
1 |
1 |
0 |
Example 2 - Component Rooms with 2 Levels (Component Rooms Within Component Rooms)
Assume the hotel has 4 physical rooms.
Number |
Room Type |
1 |
KNGS |
2 |
PARLOR |
1 |
DBLS |
These rooms are used in the following ways to compose 1 KING SUITE, 1 DOUBLE SUITE, and 1 PRESIDENTIAL SUITE.

The following matrix shows Availability by Room Type when rooms of various room types are booked. These changes in availability as various room types are booked would be visible in OPERA's Rate Query, Maximum Availability, and Detailed Availability screens.
Room Type: |
KNGS |
DBLS |
PARLOR |
KING SUITE |
DOUBLE SUITE |
PRESIDENTIAL SUITE |
Hotel Availability |
1 |
1 |
2 |
1 |
1 |
1 |
If 1 KNGS is Booked |
0 |
1 |
2 |
0 |
1 |
0 |
If 1 DBLS is Booked |
1 |
0 |
2 |
1 |
0 |
0 |
If 1 KING SUITE is Booked |
0 |
1 |
1 |
0 |
1 |
0 |
If 1 DOUBLE SUITE is Booked |
1 |
0 |
1 |
1 |
0 |
0 |
If PRESIDENTIAL SUITE is Booked |
0 |
0 |
0 |
0 |
0 |
0 |
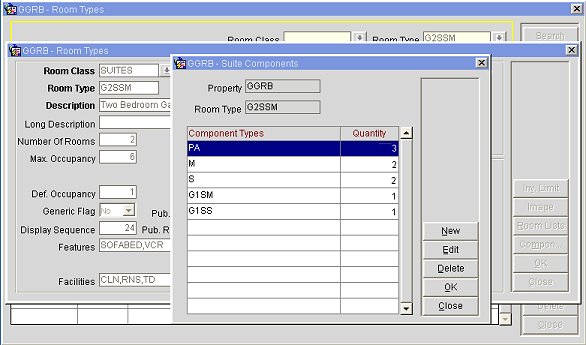
When configuring component rooms within component rooms, the room types that you specify must be both the room types that are associated with physical rooms plus the component rooms. Assume that you have the component room G2SSM which consists of 1 component room type G1SS and 1 component room type G1SM, plus 1 S room type, 1 M room type, and 1 PA room type.
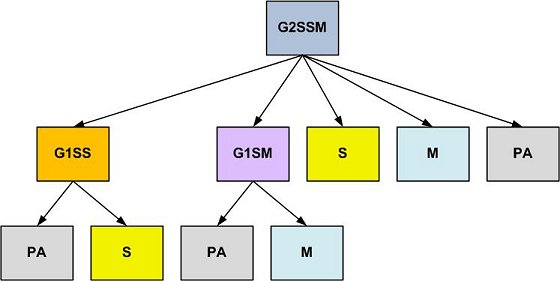
The G1SS component room type consists of 1 PA room and 1 S room; the G1SM component room type consists of 1 PA room and 1 M room. The configuration would look like this:
With this configuration, 7 physical rooms will be deducted: PA (3) + S (2) + M (2) = 7 Total
Note: When configuring room types and room numbers for component rooms, the suggested order is as follows:
1. Create room types.
2. Create Component Room room types.
3. Create Component Room room types that contain other Component Room room types (referencing room types and first-level Component Room room types).
4. Create room numbers.
5. Specify Component Room room numbers (referencing room numbers).
6. Specify Component Room room numbers for component rooms that contain other Component Room room numbers (referencing room numbers and first-level Component Room room numbers).
At the property level, OPERA allows you to configure the room types associated with Component Room room types. When you configure rooms (see Room Tab for details on room configuration) you may assign the physical room numbers of each room type to create the actual component rooms.
Select the Component button from the Room Types screen to choose the room types that comprise the Component Room room type. The Room Components screen appears.

Select the New button to add room types to the Component Room room type. Use the Delete button to remove room types from the Component Room room type.
Note: You may not add a room type as a component of a component room if that room type is associated with a currently reserved or occupied room.
OPERA imposes no restrictions on the room class or room type of the individual components of a component room, or on the resulting component room itself. (Room classes are available if the General>Room Class application function is set to Y.) For example, assume the property has the following room classes and room types:
Room Type |
Room Class |
TK |
TOWER1 |
CK |
TOWER2 |
A component room could be made up of the TK and CK room types even though these room types belong to different room classes. The room class of the resulting component room can be the same as either of the room types, or a completely different room class. When reporting for the component room, the room class associated with the Component Room room type will be used, rather than the room classes of its elements.
Note: Please be sure that you, as the user, understand the complete functionality and change in behavior to the inventory handling that will occur before activating the Reservations>Component Verification parameter. Please see the Application Parameters Help, Component Verification Parameter for complete details on the parameter.
Activating the Reservations>Component Verification parameter will cause differences in availability screens regarding component room availability should a reservation be assigned a room number that is part of a component room, the availability will now show the component room as also not available for sale. Below are examples of what can occur to a property's room availability by activating this parameter.
In the following example, a property has a physical inventory of 16 DLX rooms and SUI Component Rooms are comprised of 4 DLX rooms. Making 4 SUI Component Rooms available at the property.
SUI |
101234 |
201234 |
301234 |
401234 |
DLX |
101 |
201 |
301 |
401 |
DLX |
102 |
202 |
302 |
402 |
DLX |
103 |
203 |
303 |
403 |
DLX |
104 |
204 |
304 |
404 |
|
|
|
Parameter Off |
|
Parameter On |
||
Scenario |
|
|
DLX Rooms |
SUI Component Rooms |
|
DLX Rooms |
SUI Component Rooms |
DLX 101 |
DLX 101 assigned |
|
15 |
3 |
|
15 |
3 |
4 DLX |
4 DLX Rooms assigned |
|
11 |
2 |
|
11 |
2 |
DLX 201 |
DLX 201 assigned |
|
10 |
2 |
|
10 |
2 |
DLX 301 |
DLX 301 assigned |
|
9 |
2 |
|
9 |
1 |
3 DLX |
3 DLX Rooms assigned |
|
6 |
1 |
|
6 |
1 |
DLX 401 |
DLX 401 assigned |
|
5 |
1 |
|
5 |
0 |
2 DLX |
2 DLX Rooms assigned |
|
3 |
0 |
|
3 |
0 |
SUI |
SUI Component Room assigned |
|
-1 |
0 |
|
-1 |
0 |
3 DLX |
3 DLX Rooms assigned |
|
-4 |
-1 |
|
-4 |
-1 |
|
|
|
Parameter Off |
|
Parameter On |
||
Scenario |
|
|
DLX Rooms |
E4 Component Rooms |
|
DLX Rooms |
E4 Component Rooms |
DLX 101 |
DLX 101 assigned |
|
15 |
3 |
|
15 |
3 |
DLX 201 |
DLX 201 assigned |
|
14 |
3 |
|
14 |
2 |
DLX 301 |
DLX 301 assigned |
|
13 |
3 |
|
13 |
1 |
DLX 401 |
DLX 401 assigned |
|
12 |
3 |
|
12 |
0 |
A room type can only be deleted when it has no dependencies associated with it. This means that it cannot be linked to any reservations, activities, rooms, etc. If the room type is associated to anything, the user will receive a warning message about the problem and will not be able to delete it until it is fixed. Even when no dependencies are linked to the room type and it is being deleted, a "When deleting a room type, past reservations and statistics will not recognize this room type." message is displayed. Select Yes to continue with the deletion or No to stop the deletion.
When the Rooms Management>Facility Management application function is set to Y, room types may have facility tasks attached for auto-population into reservations. For example, if the Total Clean facility task (TOTCLN), has been configured to take place every 7 days after the guest's arrival, and understanding that DLX room types should have a total cleaning once each week, you are able to attach this TOTCLN task to the DLX room type. Then, each time a DLX room type is selected for a reservation, housekeeping would be notified through the task sheets and reports that a total cleaning task would be required every 7th day after the arrival date for this room.
Facility tasks are associated with room types at the property level only. Select the down arrow next to the Facilities field to access this feature. See Facility Tasks for details on setting up facility tasks for room types.
If the property is thinking of using the concept of Run of House rooms, the following setup would be suggested. A new room type called ROH, for example, would be configured. This room type would have no room numbers configured against it. However, when making reservations, the room type would be available within the Rate Query screen keeping a negative inventory count. Once these reservations arrive, the room type would then be updated to redistribute these ROH reservations to rooms of actual room types depending on the current state of availability, or thus the best available rooms for the property at that time (Run of House).
Auto Check In for Pseudo Rooms functionality is enabled for the property when the Reservations>Auto Check In for Pseudo Rooms application parameter is set to Y.
If this parameter is active, the Allow Auto Check In check box is available on the Room Type setup screen when the Pseudo Room Type check box is selected.
In addition, when a reservation for a pseudo room type that is designated as Allow Auto Check In is made, the Privileges screen for the reservation (Reservation Options menu Privileges button) displays the Allow Auto Check In check box. If this Privileges option is selected for the reservation, the reservation will be handled according to Auto Check In for Pseudo Rooms functionality. (See Privileges for details.)
At the time a user (or the End of Day process) checks out a reservation for a pseudo room that is designated as Allow Auto Check In, an automatic process creates an add-on reservation for that room with duplicate reservation details and checks the new reservation in. The process is as follows:
Those attributes of the new reservation that are managed by the Add On process (see Add On Reservations for details) will match the attributes of the original reservation, per normal add-on functionality. The new reservation will be assigned the same room type, room number, reservation type and privileges as the original reservation. If any of the reservation information from the original reservation is not valid when creating the add-on reservation, the user will be prompted that the add-on reservation cannot be created.
When automatically creating a new reservation, if a future reservation already exists for the same room number with overlapping dates, OPERA will not create a sharing reservation. The user will be prompted that the room number is already assigned to a future reservation. Similarly, if the rate code assigned to the original reservation is not valid for the dates of the add-on reservation, the user will be prompted that the rate code is not valid. The check out of the original reservation will not continue unless the room number for the existing future reservation is changed or removed, or the Allow Auto Check In privilege on the reservation being checked out is removed.
Check in of the new reservation will be handled internally without user intervention. Registration cards are not printed, keys are not generated, and no credit card authorization is performed. Provided all mandatory information is available on the new reservation, it will be checked in automatically.
The user activity log records the creation of the new reservation and the check in of the new reservation in the Reservation activity group.
See Also