Trace Code Set Up
From the main menu, select Setup> Configuration>Database>Trace Code Setup. The Trace Code Maintenance screen appears. Use this screen to set up and manage Trace Codes.
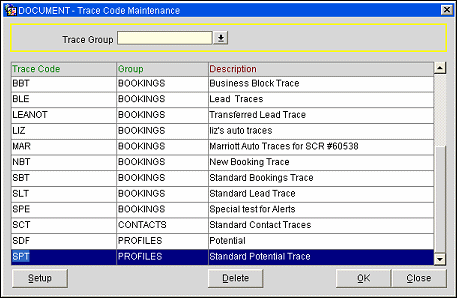
Fields
Select Trace Group. Pick the Trace Group for the Trace Code you wish to see. Trace Groups are higher-level categories of Trace Codes.
Note: When either of these S&C licenses are active, OSM_<version number> OPERA S&C ACCOUNT MANAGEMENT (BASED ON ROOM QTY) or OSL_<version number> OPERA S&C ACCOUNT MANAGEMENT (BASED ON CONCURRENT USERS), the Business Block Trace Group option is not available. When the application function>General>Potential is set to N, the Potentials Trace Group option is not available.
Trace Code. Enter the code which is associated with the trace. These codes are user definable. These are the choices you see when in the application.
Group. The group to which the Trace Code belongs. The only options are Accounts, Contacts, Business Blocks, Profiles, Activities.
Description. The description of the Trace Code.
Button Functions
Set Up. Go to the Trace Definition screen, where are able to specify trace triggers.
Delete. Delete the highlighted trace code, if it is no longer in use.
OK. Save additions and changes to this main screen.
Close. Close the screen without saving changes. You will not receive warning if you have made changes that have not been saved.
Managing Trace Codes
Create a New Trace Code:
- Go to the Set Up option on the main menu.
- Choose the System Configuration option.
- You will now be in the Configuration Section of OPERA.
- Go to the Database option on the main menu.
- Choose the Trace Code Definition option.
- You will see a three (3) column grid and the grid will be blank if this is the first entry.
- Fill in the Trace Code, the Group it belongs to and the Description.
- Press the Enter key to take you to the next line and fill that line in if required.
- Once you have completed these codes, select the OK button to save these changes.
- Press the Close button to close this screen, you will not warn you to save any changes or additions
Edit an Existing Trace Code:
- Go to the Set Up option on the main menu
- Choose the System Configuration option
- You will now be in the Configuration Section of OPERA
- Go to the Database option on the main menu
- Choose the Trace Code Definition option
- If there is an existing trace code that does not have any trace definitions attached then you are able to edit any field directly into the grid.
- If there are trace definitions attached then you can only edit the Description field.
- Once you have made the desired changes, select the OK button to save these changes.
- Press the Close button to close this screen, you will not warn you to save any changes or additions
Delete a Trace Code:
- Go to the Set Up option on the main menu.
- Choose the System Configuration option.
- You will now be in the Configuration Section of OPERA.
- Go to the Database option on the main menu.
- Choose the Trace Code Definition option.
- If there is an existing trace code that does not have any trace definitions attached then you are able to delete the trace code directly from the grid.
- If there are trace definitions attached then you cannot delete the trace code.
- Press the Delete button to delete the trace code.
- Once you have made the desired changes, select the OK button to save these changes.
- Press the Close button to close this screen, you will not warn you to save any changes or additions
