
|
|
|
User Permissions
Note: The individual user permissions are described in the online help under the User Permission Groups first-level heading in the Table of Contents.
The User Permissions screen allows you to assign/revoke permissions to assign/revoke user- groups (along with associated permissions) and individual permissions to users. Individual users can be associated to one or multiple user groups. Should additional permissions be required for the user at a specific property, the additional permissions can be granted beyond the added. ones already granted from the user group. Within the individual user permission screen, OPERA does provide the Copy functionality for a particular user's permissions. For example, if User X is assigned to the Reservation and Front Desk user groups for Property A, the Copy functionality gives users to options: 1. Copy to Another User and 2. Copy to Another Property. The first option will copy these exact permissions to another user (all configured users, not just the users with the currently logged in property). The second option will grant the same granted permissions for User X to the selected Property.
Note: OPERA Supervisor Group permission should be granted only to users who require full access to all OPERA features and functionality. OPERA Supervisor Group permission can be granted to a user who was set up in any property of a multi-property cluster by an OPERA Supervisor working from the same or any other property in that multi-property cluster.
The functionality of the screen is similar whether you are assigning permissions to user groups or to users; however, this topic will address only the assignment of permissions to individual users. For further details on assigning permissions to user groups, see User Group Permissions.
The User Permissions screen Property field defaults to the user's logged-in property. When the OPP_MHOT Multi-property license is active, users can be given access to, and permissions at, multiple properties in the multi-property cluster. These properties will be listed in the Property list of values. See User Property Permissions for information on selecting other properties for the purpose of granting the user access and permissions.) Select the down arrow to display a single select list of values that allows you to choose from the properties to which the user has been granted property access. Permissions that are granted for the default property can be different from those granted for another property.
The Permissions screen is split into a Non- Granted side (on the left) and a Granted side (on the right). On the alphabetically listed Non-Granted side, you can see all the user groups to which the current user does not belong, and all the individual permissions, by permission group, that are not granted to the current user.
On the Granted side, you can see all the user groups to which the current user belongs, along with the user's permissions, by permission group.
On both sides, user groups can be expanded in Explorer tree- fashion to display the permission groups and permissions each contains by clicking on the plus sign next to the group name. Similarly, permission groups can be expanded to show the individual permissions each includes.
To add the current user to a user group, thereby granting the user all permissions that belong to the group, click on the group displayed in the upper left-hand panel and select the Grant button (right- arrow). Or, you may double-click on the group.
To grant the user permissions for an entire permission group, click on the permission group in the lower left-hand panel and select the Grant button (right- arrow). Or, you may double click on the permission group. Permission groups can be expanded in order to grant specific permissions from the permission group using either the arrow method or the double-click method.
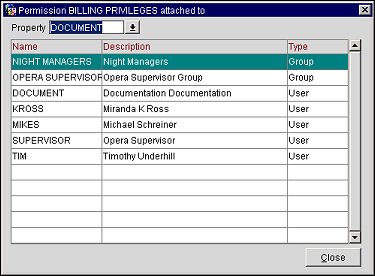
By selecting a user group or an individual permission and choosing the Grantees button, a screen displays which users belong to that group or have been granted that permission.
Revoking permissions is handled by moving user groups, permission groups, and permissions from the right side of the screen to the left side of the screen using the Revoke button (left arrow).
Grant. The Grant button moves user groups, permission groups or single permissions from the non-granted side of the screen (left) to the granted side (right). Available to the user when the application parameter General>Grant Individual Permissions is active for assigning permissions to Users and User Groups. When this application parameter is inactive, the user (hotel) can only grant permissions to User Groups.
Revoke. The Revoke button moves user groups, permission groups or single permissions from the granted side of the screen (right) to the non-granted side (left). This function is always available whether or not General>Grant Individual Permissions is active.
Grantees. By selecting a user group or an individual permission and choosing the Grantees button, a screen pops up to show which users belong to that group or have been granted that permission.
Note: Users who are not members of the OPERA Supervisors Group cannot view grantees of that group.
Find. Display the Find Permission box to locate a specific permission. Enter all or the first part of the permission or its description in the Find Permission/Description field. The search will be conducted in user groups or in permission groups, depending on whether a user group or a permission group is highlighted.
Copy. Copy permissions between users and properties, when the OPP_MHOT OPERA Property Management Multi-Property Base add on license is active (see Copy Permissions below for details).
Save. Save the permission setup for the current user.
OK. Select the OK button to close this screen without saving the changes made to the selected user.
Close. Select the Close button to receive the option to either save (or not save) the changes made to the selected user.
Permissions can be copied in a number of ways. Permissions assigned to a User Group (e.g., , a group of permissions (e.g., CASHIERING, CASHIERING CONFIG, etc.), or a single permission can be copied. After selecting the group or the individual permissions you wish copy, selecting the Copy button displays a window where the selected permissions can be copied to another user or to another property.
When copying User Group permissions through Configuration>Setup>User Configuration>User Groups or Setup>User Configuration>User Groups, the screen is a little different than copying individual permissions. The user will be copying to another Group, instead of to another user and the options display as Copy to Another Group and From and To Group.
Provide the following information to copy permissions and select the OK button.
Copy to Another User. Select to copy the permission(s) to another user.
Copy to Property. Select to copy permission(s) to another property or multiple properties.
From User. Select the down arrow to display a single select LOV to choose the user from which the permissions need to be copied. The field is automatically populated with the user that was selected to be copied from in the Permissions screen.
To User. Select the down arrow to display a single select LOV to choose the user to copy the permissions to. (Not available when the Copy to Property radio button is selected.)
From Property. Select the down arrow to display a multi select LOV and choose all of the properties to copy permissions from. The field is automatically populated with the property the user is logged into.
To Property. Select the down arrow to display a multi select LOV and choose all of the properties to copy the permissions to.
Note: When completing a copy, all of the permissions that exist for the To Property(s) will be deleted and then all of the permissions that exist for the From Property(s) will be copied to the To Property(s).
For Example
I need to have PROPERTY 1 and PROPERTY 2 with all of the permissions for PROPERTY 1, PROPERTY 2 and PROPERTY 3. So it would be configured as follows:
From Property: PROPERTY 1, PROPERTY 2, PROPERTY 3
To Property: PROPERTY 1, PROPERTY 2
When the Copy is started, all the permissions that currently exist for To Properties PROPERTY 1 and PROPERTY 2 are deleted and when the copy is complete, PROPERTY 1 and PROPERTY 2 will have all of the permissions that were configured for PROPERTY 1, PROPERTY 2, and PROPERTY 3.
OK. Select to copy the permissions to the selected user for the selected property. When copying a user group that is comprised of another user group, these will not copy as they could contain permissions for multiple properties. The following message prompt will display to alert the user:

Select the OK button to continue with the copying of the individual property permissions.
See Also