 Part 1: Building the RESTful Services

You can design a databound user interface by dragging an item from the Data Controls panel and dropping it on a page as a specific UI component. When you use data controls to create a UI component, JDeveloper automatically creates the various code and objects needed to bind the component to the data control you selected.
In the next few steps, you build data controls for the Department Service. The REST services are consumed in Oracle ADF by use of the new REST service data control (REST DC). To create the REST DC model.
You'll create a REST data control for the department resource. The data control exposes a single method for the service GET request and expects an XML response to represent a list of departments.
-
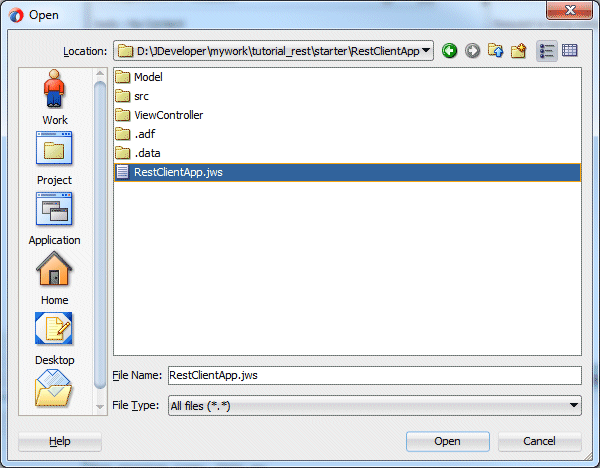
In Oracle JDeveloper, select File > Open and navigate to the directory containing the unpacked sample application zip file content. Open the RestClientApp folder and select the RestClientApp.jws file.
-
In Select the Model project, and select File > New > From Gallery, then expand the Business Tier > Web Services and select Web Service Data Control (SOAP / REST). Then click OK.
-
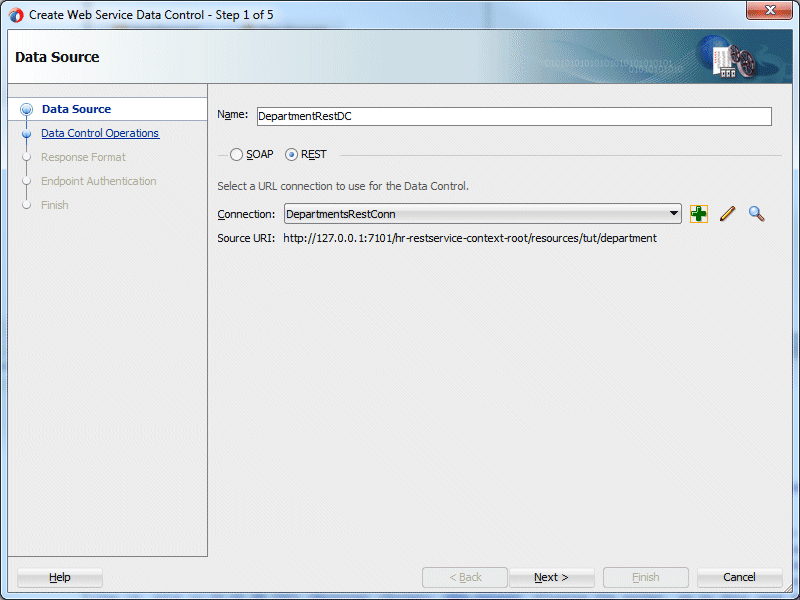
In the Create Web Service Data Control dialog box, enter DepartmentRestDC in the Name field and select the REST radio button.
-
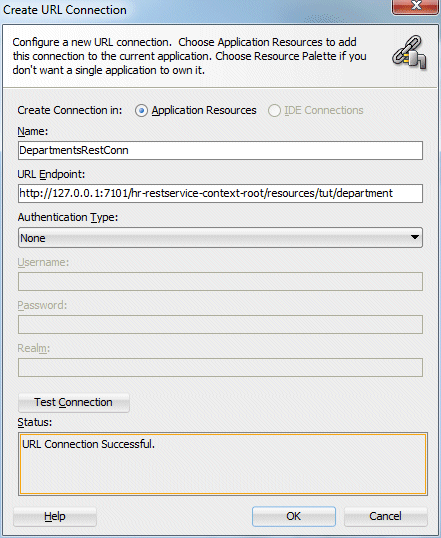
Click the green plus (+) icon next to the Connection field.
In the Create URL Connection dialog box, enter DepartmentsRestConn in the Name field.
Enter http://127.0.0.1:7101/hr-restservice-context-root/resources/tut/department in the URL Endpoint field.
Note: The URL Endpoint URL does not have an ending slash.
Click the Test Connection button to confirm the serve is available. If it is not, then go back into the EjbRestService and test the DepartmentService.
-
Then click OK and then click Next in the Create Web Service Data Control dialog box.
-
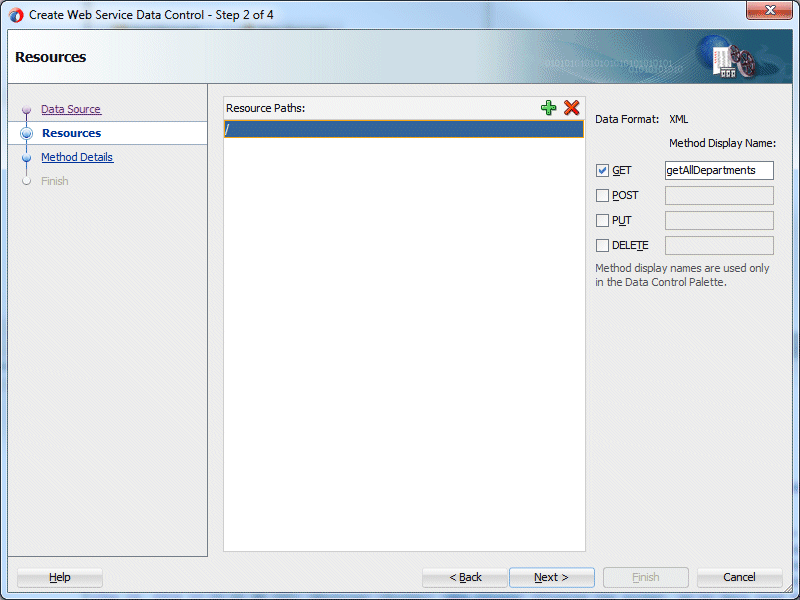
In Click the green plus (+) icon next to the Resource Paths label.
Change the Resource Paths value to /, and select GET.
Enter getAllDepartments as the Method Display Name.
Click Next.
-
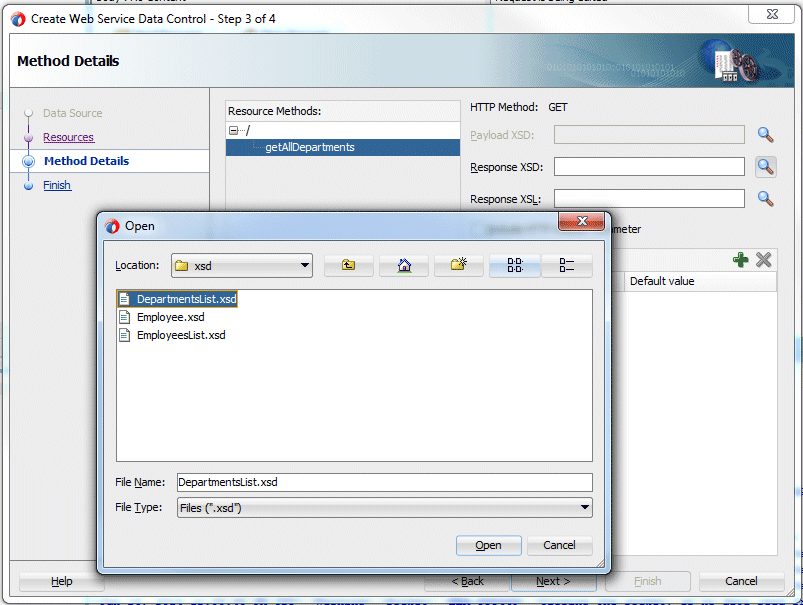
Select getAllDepartments under Resource Methods, and click the browse button (magnifier icon) next to the Response XSD field.
In the dialog box, open the xsd folder, select the DepartmentsList.xsd file, and click Open.
-
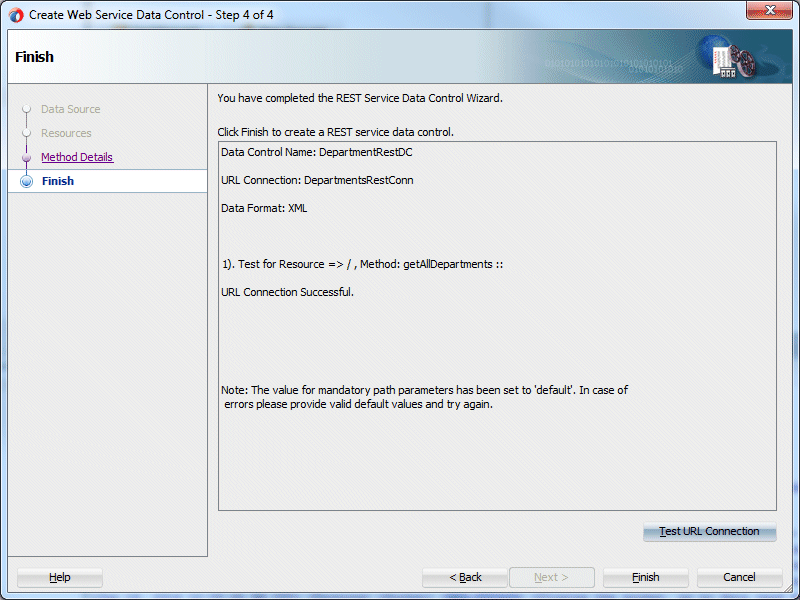
Click Next and then Test URL Connection button. Then Finish to create the data control.
-
Click the Save all
 icon to save your work.
In the next few steps, you create a second data control. The employee REST data control you will build next is a bit more complex than the department data control, because it exposes three REST HTTP methods—for GET, POST, and DELETE—and also needs to define input arguments for GET and DELETE.
-
Again, in the Oracle JDeveloper Application window, right-click the Model project and select New > Web Service Data Control (SOAP / REST).
-
In the Create Web Service Data Control dialog box, enter EmployeeRestDC in the Name field.
Select the REST radio button.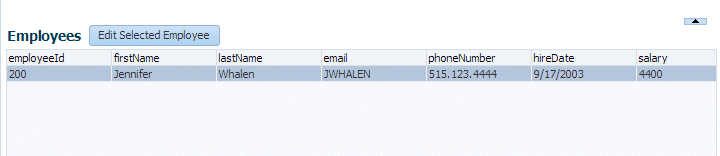
-
Click the green plus (+) icon next to the Connection field.
In the Create URL Connection dialog box, enter EmployeesRestConn in the Name field.
Enter http://127.0.0.1:7101/hr-restservice-context-root/resources/tut/employee in the URL Endpoint field.
Then click the Test Connection button.
-
Click OK, then Next.
-
Click the green plus (+) icon next to the Resource Paths label.
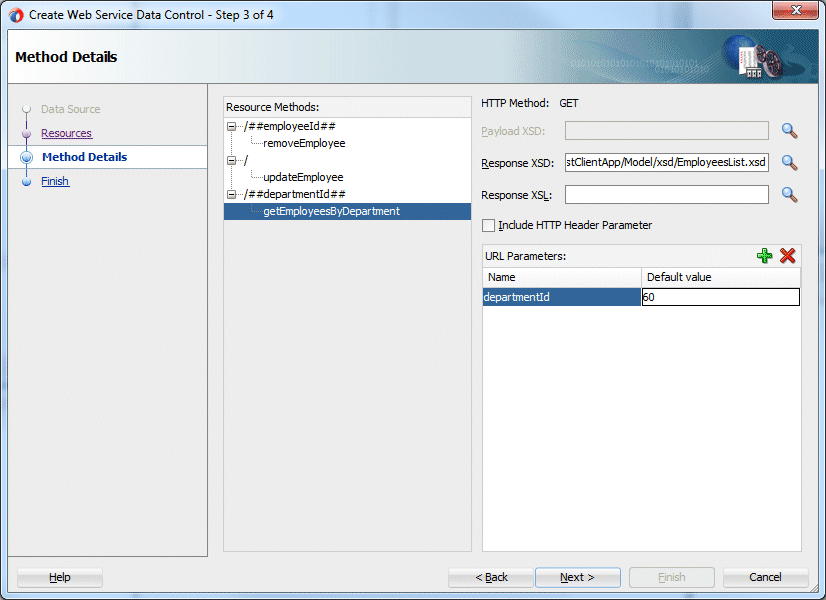
Change the Resource Paths value from /path0 to /##departmentId##, and select GET. Enter getEmployeesByDepartment as the Method Display Name value for GET.
Note: The ##departmentId## flag defines parameters in the Oracle ADF REST data control. The parameter names will show as arguments to the methods in the data control panel.
-
Again, click the green plus (+) icon next to the Resource Paths label.
.
Change the Resource Paths value from /path0 to /, and select POST. Enter updateEmployee as the value of Method Display Name for POST.
-
Again, click the green plus (+) icon next to the Resource Paths label.
Change the Resource Paths value from /path0 to /##employeeId##, and select DELETE. Enter removeEmployee as the value of Method Display Name for DELETE.
Then click Next.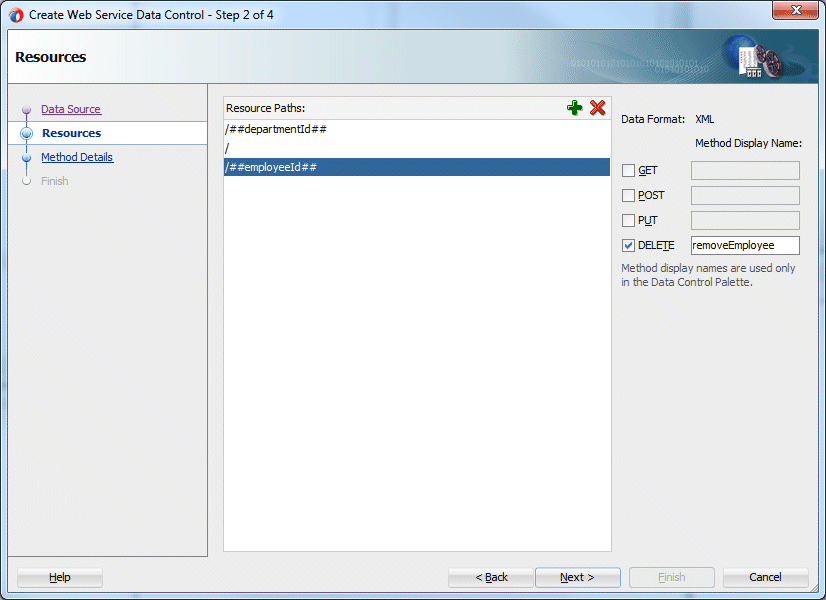
-
Select removeEmployee from the Resource Methods list, and enter a default value of 100 for employeeId (in the URL Parameters section).
Note: The 100 value is used to verify that the REST method request is valid at design time. (No delete will be processed, however) .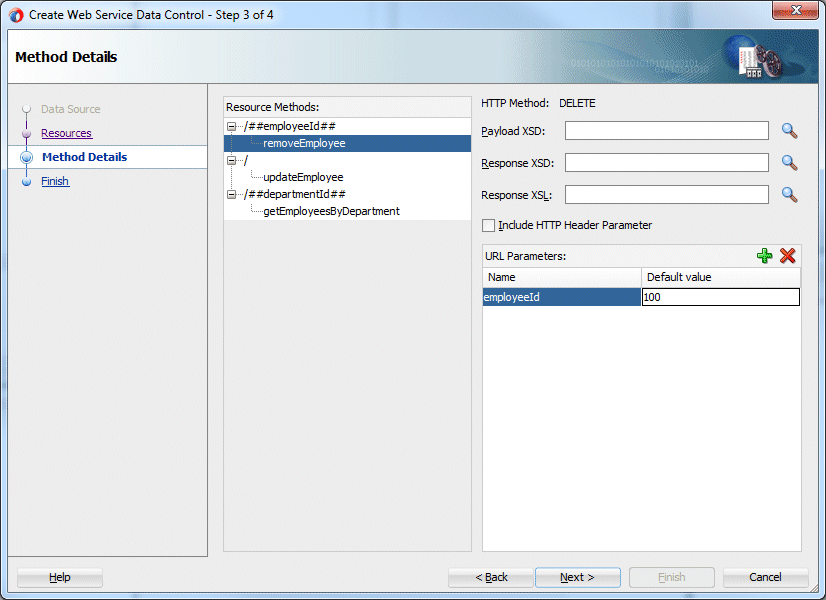
-
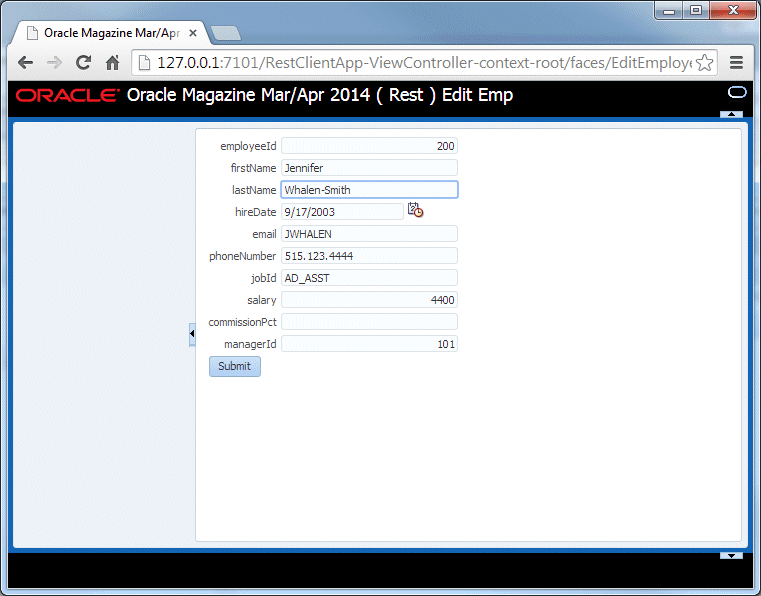
Select updateEmployee from the Resource Methods list, and click the browse button (magnifier icon) next to the Payload XSD field.
In the Open dialog box, open the xsd folder, select the Employee.xsd file, and click Open.
Note: The update method of the REST service has a single object argument of type Employee. Because this type is defined as a JAXB object, it can be marshaled and unmarshaled to and from XML. Therefore, you’ll provide the XML representation of the argument.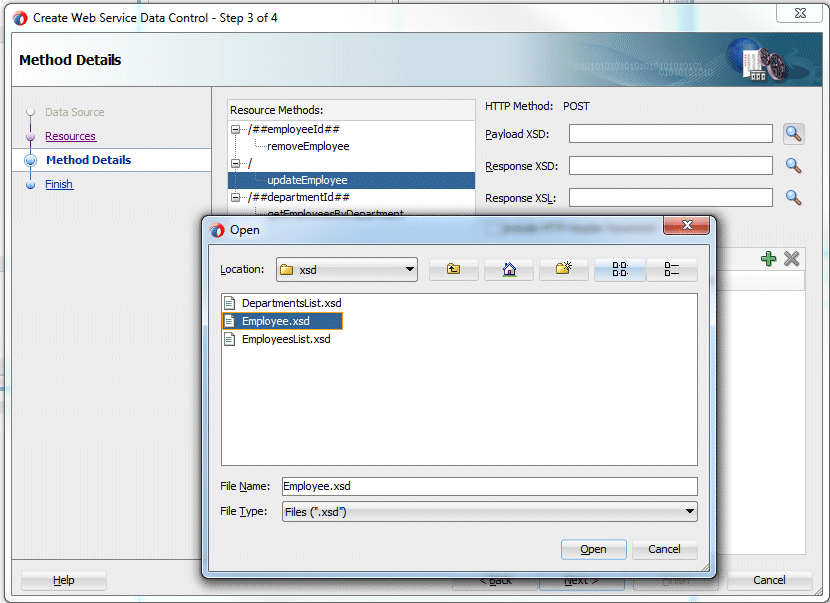
-
Select getEmployeesByDepartment from the Resource Methods list and click the browse button (magnifier icon) next to the Response XSD field.
In the Open dialog box, open the xsd folder, select the EmployeesList.xsd file, and click Open..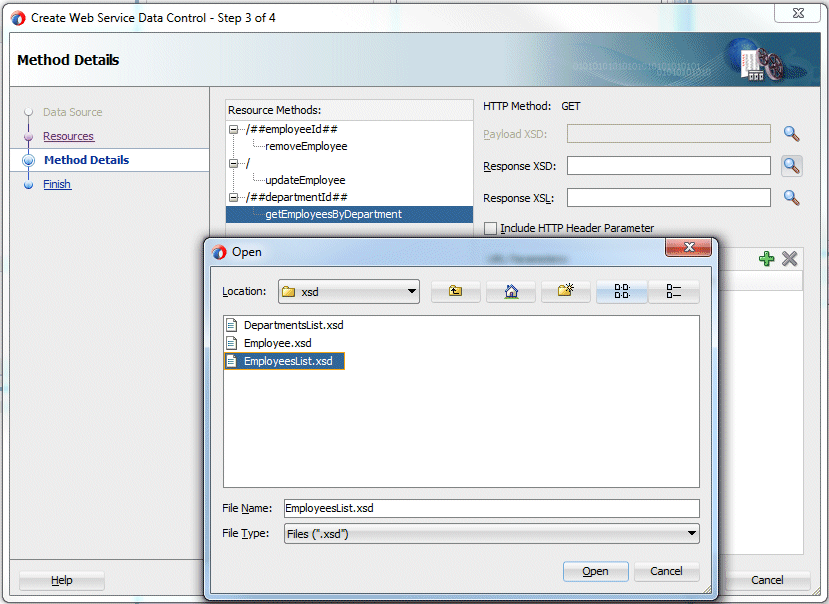
-
Enter a default value of 60 for departmentId (in the URL Parameters section). Again, this is used for REST URI verification only at design time.
 .
. -
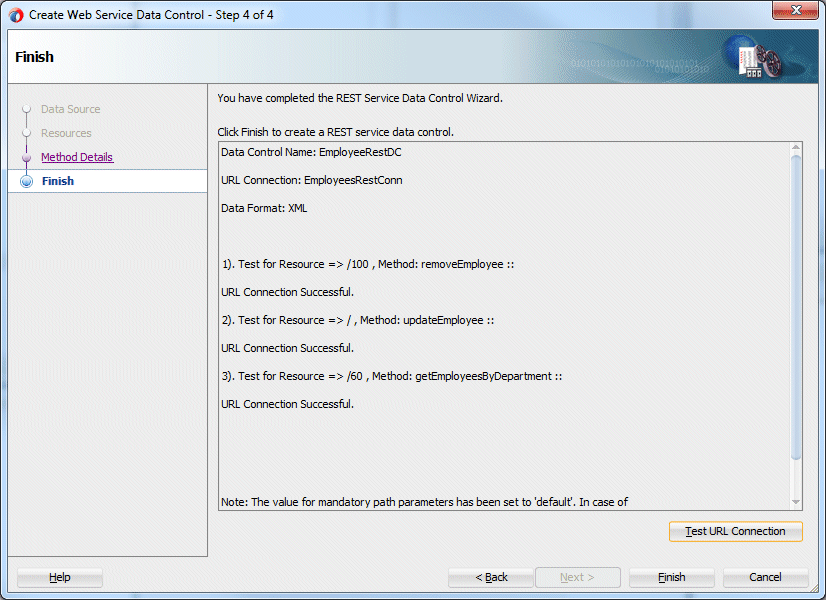
Click Next, and then click Test URL Connection.
-
Click Finish when the test is successful. Otherwise, check and correct the provided REST URI.
In the Application window, expand the Data Controls panel and refresh it by clicking the refresh button (icon with two arrows). The two data controls are now displayed. .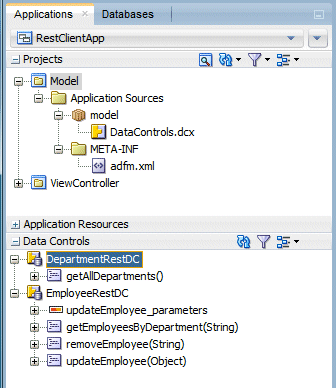
-
Click the Save all
icon to save your work.
-
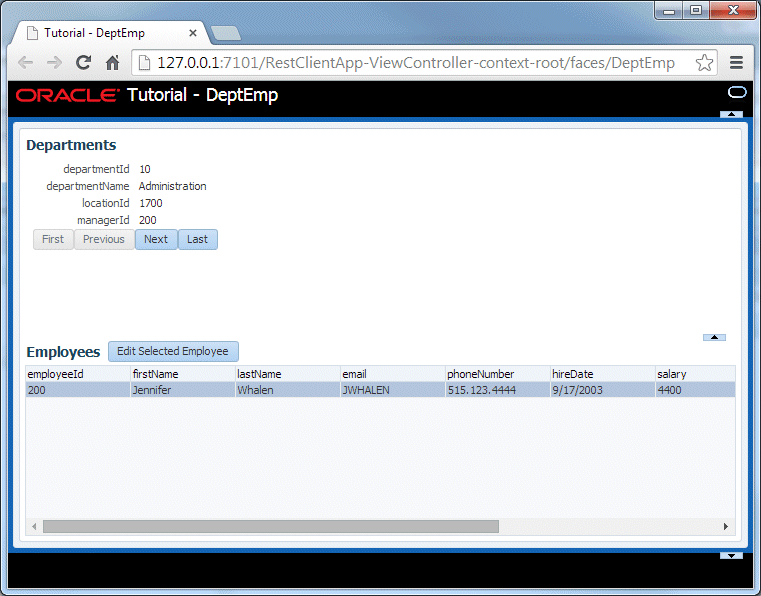
With the REST services and the REST data controls created, the final step is to build a master-detail page. To create the master-detail page,
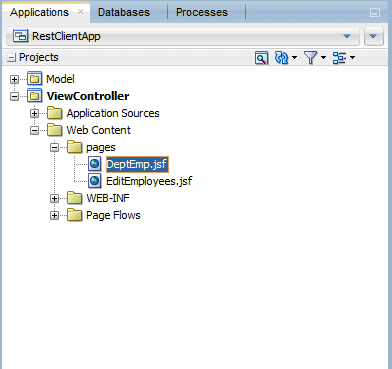
In the Application window, expand the ViewController project and the Web Content > pages node.
Double-click the DeptEmp.jsf page to open it in the visual page editor.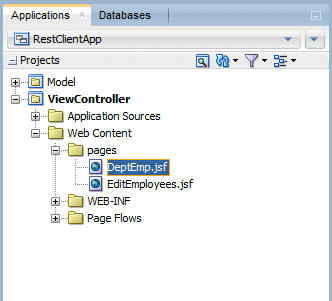
-
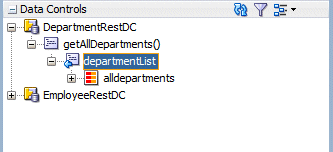
Expand the Data Controls panel and then the DepartmentRestDC > getAllDepartments() > departmentList nodes.
-
Drag the alldepartments entry from the Data Controls panel, and drop it in the Departments area in the visual page editor.
Select ADF Form from the Create menu.

-
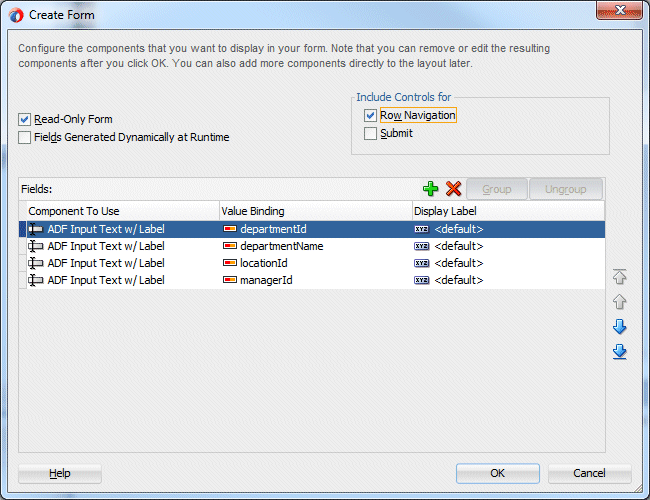
Select the Read-Only Form checkbox in the Create Form dialog box.
In the Include Controls for section, select Row Navigation and leave all the field at their defaults.
Then click OK.
-
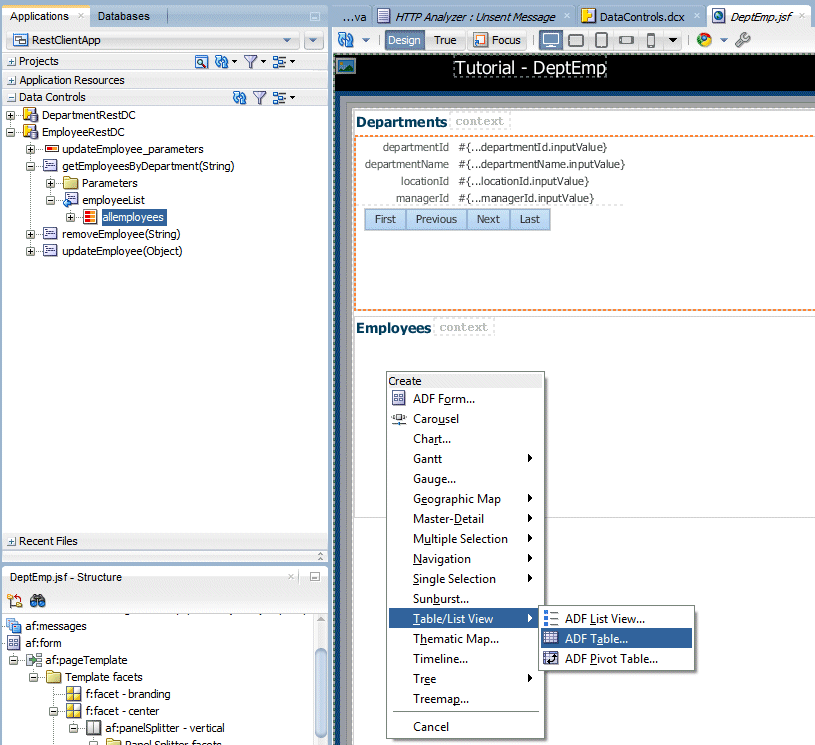
In the Data Controls panel, expand the EmployeeRestDc > getEmployeesByDepartment > employeeList node.
Drag the allemployees entry from the Data Controls panel, and drop it in the Employees area in the visual page editor.
Select Table/List View > ADF Table from the Create menu..
-
In the Create Table dialog box, select Single Row and Read-Only Table. Optionally, reorder the employee attributes so they’re in a more logical order if you like.
Click OK.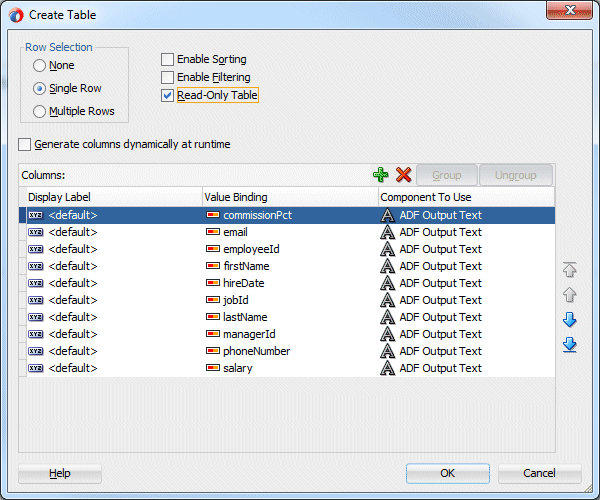
-
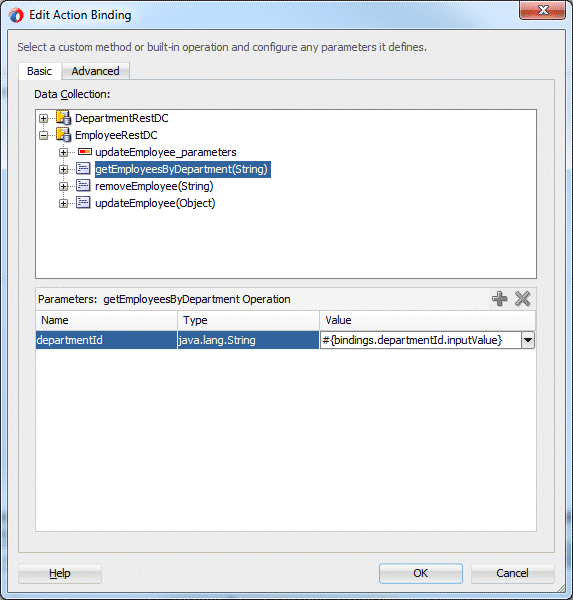
In the Edit Action Binding dialog box, enter #{bindings.departmentId.inputValue} as the departmentId value and click OK.
-
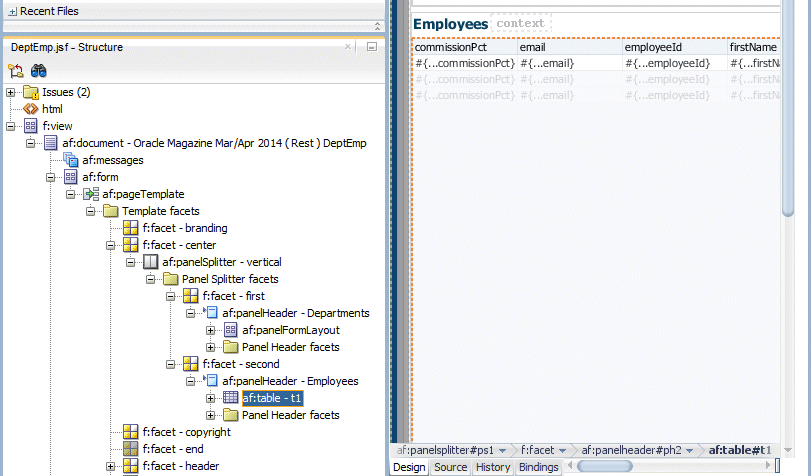
In the Structure window, click the table from the Employees area. The bread crumb at the bottom of the visual editor should be the af:table#t1 crumb, highlighted (boldfaced), as the last element. If not, click the bread crumb to select the table.
-
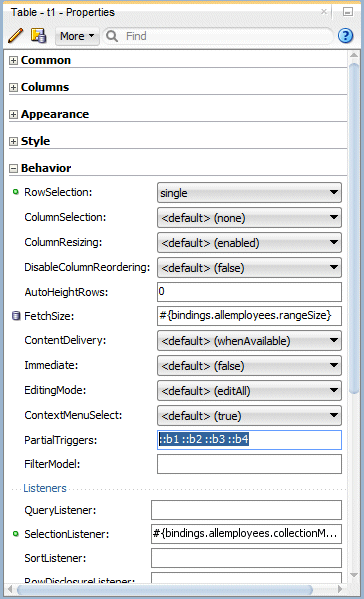
Open the Properties window (Window > Properties), navigate to the PartialTriggers property under the Behavior category, and enter ::b1 ::b2 ::b3 ::b4.
Note: ::b1 through ::b4 are the IDs of the navigation buttons that should trigger a table refresh. Whenever the user navigates the list of departments, the employee list will refresh to display only the employees of the selected department. .
-
Save all your work.
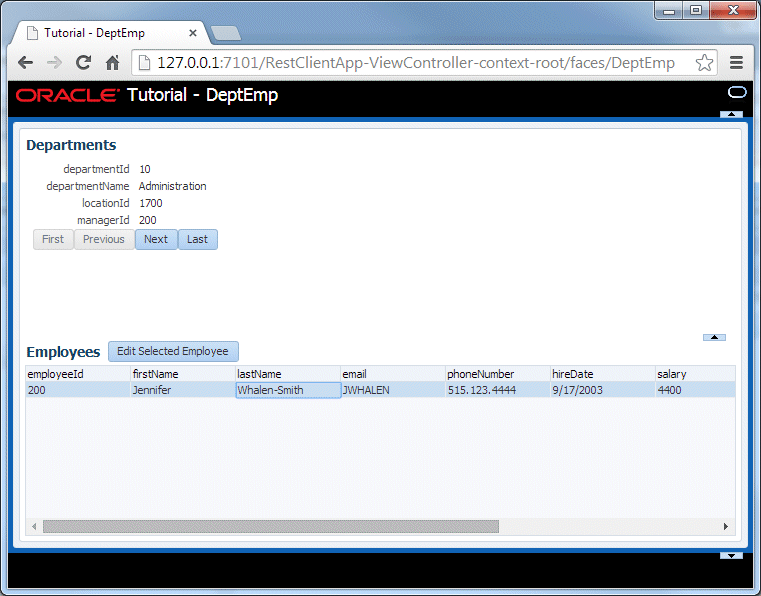
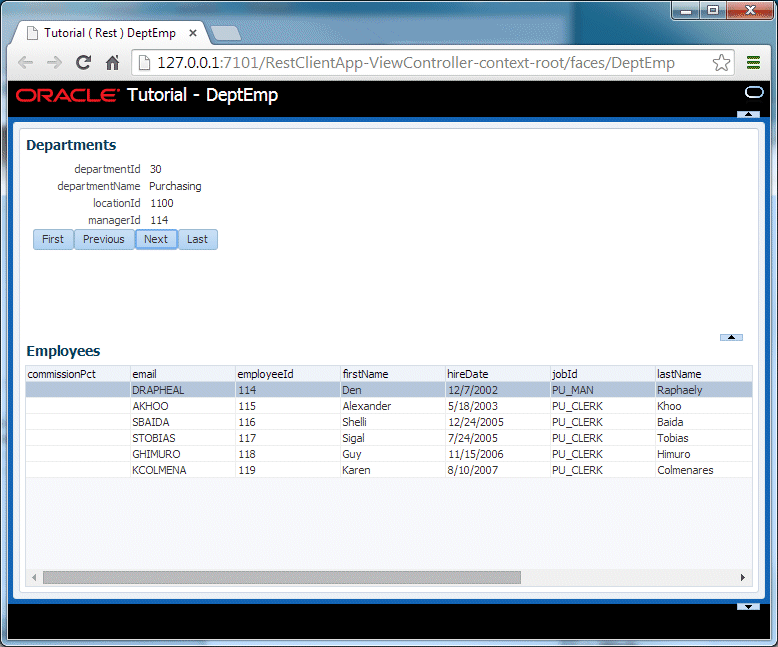
In this step, you created a master-detail page that uses the department REST service, the department REST data control, and the employee REST data control you created in previous steps.
-
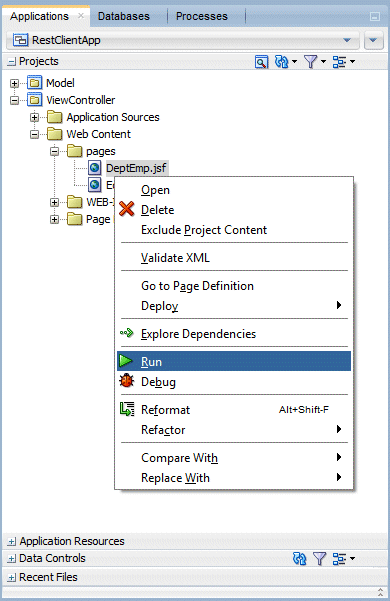
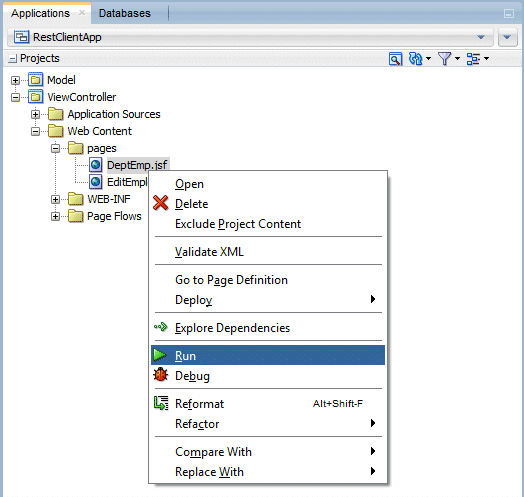
In the Application panel, expand the ViewController > Web Content > pages, right-click the DepEmp.jsf file node and select Run.
-
Use the navigation buttons in the Departments section to change the display and watch the employee list refresh.

-
Close the browser window and return to JDeveloper. The tutorial is complete.