| Oracle® Life Sciences Data Hub Installation Guide Release 2.4 E52194-03 |
|
|
PDF · Mobi · ePub |
| Oracle® Life Sciences Data Hub Installation Guide Release 2.4 E52194-03 |
|
|
PDF · Mobi · ePub |
This section includes the following topics:
Section 7.4, "Upgrade and Configure Oracle Database and Oracle Warehouse Builder 11.2.0.4."
Section 7.10, "Complete the Oracle Warehouse Builder Update."
Section 7.5, "Upgrade Oracle Thesaurus Management System Database to 5.0.1"
Section 7.8, "Upgrade Integration with Oracle Business Intelligence Publisher"
Section 7.10, "Complete the Oracle Warehouse Builder Update"
Section 7.11, "Upgrade the Distributed Processing Server User Account"
Section 7.13, "Perform the Remaining Post-Installation Tasks"
Upgrading to Oracle Life Sciences Data Hub (Oracle LSH) is supported from Oracle LSH Release 2.3.1 only.
If you have not already done so, upgrade to Oracle LSH Release 2.3.1:
Upgrade to Release 2.3 by following instructions in the upgrade chapter of the Release 2.3 Oracle Life Sciences Data Hub Installation Guide at http://docs.oracle.com/cd/E48406_01/index.htm.
Upgrade to Release 2.3.1 by following instructions in the Oracle Life Sciences Data Hub Release 2.3.1 release notes, which are on My Oracle Support with article ID 1581715.1; see "Finding More Information".
This step is required for all upgrade paths.
Before you begin the upgrade, stop the following servers:
Oracle Life Sciences Data Hub (Oracle LSH) Distributed Processing (DP) Server (see Section 5.16.7, "Start the DP Server")
Application Server
Follow My Oracle Support document 1058763.1, Interoperability Notes EBS 12.0 and 12.1 with Database 11gR2 to upgrade Oracle Database to 11.2.0.4.
Upgrade the TMS database components required to support the Oracle LSH classification system from Release 4.6.1 to Release 5.0.1. See My Oracle Support article 1665045.1, Upgrading Directly from TMS 4.6.1 to 5.0.1, for instructions.
Oracle LSH 2.4 supports two versions of Informatica PowerCenter:
Informatica PowerCenter 8.6.1 with HotFix 11
Informatica PowerCenter 9.0.1 with HotFix 2
The software is optional and is not included in the media pack. You must buy this software from Informatica.
If you need to upgrade:
Run the installer, selecting the option to upgrade from the previous version.
Note:
If more recent releases have become available, do NOT install them unless explicitly instructed to do so by an Oracle LSH-specific note or alert on My Oracle Support.You can get the required HotFix even if it has been superseded by a later version by logging a Service Request with Informatica.
Make sure the environment file infa.env exists under $INFA_HOME (Informatica Installation Directory) and has the following environment variable settings:
INFA_HOME=<Informatica Installation Directory>
LANG=C
LD_LIBRARY_PATH=$LD_LIBRARY_PATH:<Informatica Installation
Directory>/server/bin
On a Linux platform, add this extra line to the file:
unset LD_ASSUME_KERNEL
To support OBIEE Business Areas and data visualizations, Oracle LSH is compatible with both OBIEE 10g and OBIEE 11g; see Section 2.3, "Integrated External Systems" for the exact versions.
You can use both OBIEE 10g and OBIEE 11g if you want. For example, if you are using Oracle Clinical Development Analytics you may want to dedicate one OBIEE installation to OCDA on 10g and have another for Oracle LSH OBIEE visualizations. You can install both on the same computer or different ones, but even if they are on the same computer you must define a different service location and services for each. You must install the DP Server on each machine where the Oracle BI Server is installed.
To install OBIEE 10.1.3.4.1, see Section 6.5.2, "Install OBIEE 10.1.3.4.1 for Visualizations". To install OBIEE 11g, see the following section.
If you want to upgrade to OBIEE 11g for data visualizations, you must install OBIEE 11g and upgrade the RPD file.
To upgrade, you must install OBIEE 11g in an Oracle Fusion Oracle Home following instructions the Oracle Fusion Middleware Installation Guide for Oracle Business Intelligence 11g Release 1 (11.1.1) (E10539-01) (Part E 10539-01).
Use the correct settings for an upgrade as outlined in Section 4.4 of the Oracle Fusion Middleware Upgrade Guide for Oracle Business Intelligence 11g Release 1 (11.1.1) (Part E16452-01).
Note:
As noted in Oracle Fusion Middleware Installation Guide for Oracle Business Intelligence 11g Release 1 (11.1.1), you need to install Oracle Fusion Middleware Repository Creation Utility 11g (11.1.1.3.3) before installing OBIEE 11g.The obieedeploy.cmd and obieeinstall.cmd command script files changed for the OBIEE 11g integration.
Copy the Oracle LSH Release 2.4 versions of obieedeploy.cmd and obieeinstall.cmd from $cdr/admin/templates to the Oracle LSH Distributed Processing Server location.
Edit obieedeploy.cmd, which has a RPD_DIR environment variable that indicates the path where the LSH master RPD will reside. Unlike OBIEE 10g, in the OBIEE 11g integration, this can be any folder path on the BI Server machine's file system.
set RPD_DIR=absolute_path
For example:
set RPD_DIR=C:\RPD
Edit obieeinstall.cmd, which has new environment variables. Provide local values as follows:
set PATH=E:\Oracle\fmw\Oracle_BI1\bifoundation\server\bin;%PATH%
set ORACLE_BI_APPLICATION=coreapplication
set ORACLE_BI_INSTANCE=E:\Oracle\fmw\instances\instance1
set COMPONENT_NAME=coreapplication_obis1
set COMPONENT_TYPE=OracleServerComponent
set ORACLE_INSTANCE=E:\Oracle\fmw\instances\instance1
If you have a master RPD file containing the source code for multiple Business Areas, follow instructions in this section to upgrade your master repository (RPD) file from 10g to 11g and then manually deploy it.
The 10g master RPD file is located under Server\Repository in the Oracle Business Intelligence installation directory. Copy it from there to the location you specified in the obieedeploy.cmd file; see Section 7.7.1.2, "Copy and Edit Revised Execution Command Scripts".
You must migrate your master OBIEE 10g RPD to OBIEE 11g by running the Upgrade Assistant (ua.bat) available under E:\oracle\fmw\Oracle_BI1\bin.
If you are using Oracle Clinical Development Analytics, you must upgrade the Web Catalog as well as the RPD.
Follow instructions in Section 4.4 of the Oracle Fusion Middleware Upgrade Guide for Oracle Business Intelligence 11g Release 1 (11.1.1) (Part E16452-01).
On the Oracle BI Server, open the Oracle BI Administration Tool and:
In the Physical tab, navigate to the migrated RPD, expand its node, and click Connection Pool. The Connection Pool window opens.
Click the Connection Scripts tab.
Expand the Execute before query node.
Select the call script. The Physical SQL window opens.
Change the first word, "begin," with "call" and remove the semicolon (;) from the end of the script. The default script is:
begin cdr_obiee_security.syncLSHSecurity(271201,1,upper(':USER')) end;
Edit it to:
call cdr_obiee_security.syncLSHSecurity(271201,1,upper(':USER'))
Click OK and exit.
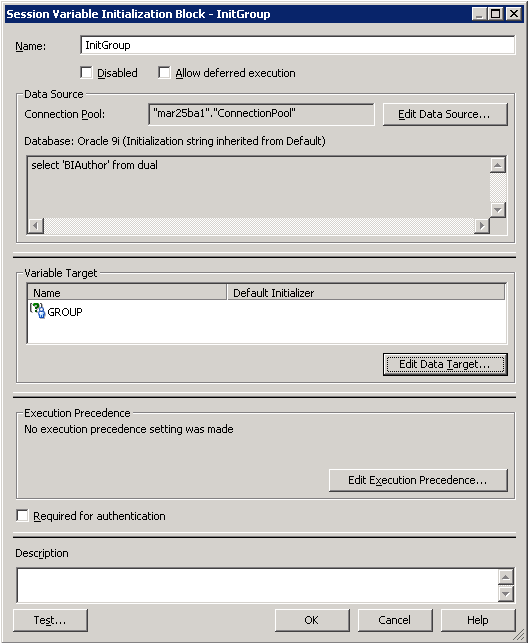
The InitGroup initialization block is required for OBIEE 11g RPDs. To add it:
Open the upgraded 11g RPD in Administrator's Tool.
Navigate to the Session Initialization Blocks from the top Menu >Manage > Variables > Session > Initialization Blocks. Add a new initialization block named InitGroup as shown in the following screenshot.
Click Edit Data Source and select the available ConnectionPool.
Enter the following query:
select 'BIAuthor' from dual
Click Edit Data Target and create a new Target Variable called GROUP.
Figure 7-1 Adding the InitGroup Initialization Block
Manually deploy the new 11g version of the master RPD file on your OBIEE 11g BI Server using the Oracle Enterprise Manager. This step is now required every time a Definer installs a Business Area.
Note:
Oracle Enterprise Manager automatically edits the NQSConfig.ini file, which was a manual step when installing OBIEE for use with Oracle LSH in previous releases. In Oracle LSH 2.4, do not edit the NQSConfig.ini file.Open the Oracle Enterprise Manager using the URL specific to your environment.
Note:
If the URL does not work, you may need to restart the WebLogic Server; see Section 7.7.1.5, "Starting the WebLogic Server".In the left-hand panel, navigate to Farm_bifoundation_domain, then Business Intelligence, then coreapplication in the left pane. Then click the Deployment tab, and then the Repository subtab.
Click Lock and Edit Configuration near the top. A confirmation message appears.
Under Upload BI Server Repository, click the Browse button for the Repository File field and select the master RPD file.
Note:
The location of the master RPD file is determined by the obieedeploy.cmd file; see Section 7.7.1.2, "Copy and Edit Revised Execution Command Scripts".Enter the repository password and confirm password. The password must be same as the administrator password stored in LSH under Remote Location Connections. This is very important for the integration. Click Apply.
Click Activate Changes and confirm that Activate Changes is successful
Click Restart and confirm.
Ensure that Restart All completed successfully. This indicates the successful deployment of the RPD on the BI Server and a successful restart of the BI Server services. The Business Area RPD is now ready to be used through the OBIEE Presentation Service (BI Answers).
OBIEE 11g has a DefaultAuthenticator provider to handle authentication. Since LSH RPDs have their own SQL authentication block configured, the DefaultAuthenticator should be made OPTIONAL in OBIEE 11g.
After the master RPD has been successfully deployed and the BI Server services successfully restarted, do the following:
Open the Weblogic Server Administration Console using the URL specific to your environment.
Note:
If the URL does not work, you may need to restart the WebLogic Server; see Section 7.7.1.5, "Starting the WebLogic Server".On the Home page, under Your Application's Security Settings, click Security Realms.
Under Change Center in the upper left, click Lock & Edit.
Under How Do I.... click Configure a New Security Realm and follow instructions on screen.
Click the name of the new security realm. The Settings for the security realm are displayed.
In the top row of tabs, click the Providers tab.
If it is not already selected, click the Authentication subtab.
Click DefaultAuthenticator.
Set Control Flag to OPTIONAL and Save.
If the URL for either Oracle Enterprise Manager or the WebLogic Administration Console is not working, the WebLogic Server may be down. To start it:
On the BI Server computer, right-click Command Prompt under the Start menu and select Run as Administrator.
Change directory to the Domain folder under the OBIEE installation folder; for example, E:\oracle\fmw\user_projects\domains\bifoundation_domain.
Run the command startWeblogic.cmd under this folder. The system prompts you for the WebLogic Server username and password.
Check that the command window displays the message "Server started in RUNNING mode."
If a Definer has modified the generated RPD file for a Business Area in the OBIEE Administrator's Tool on the Definer's PC and uploaded the RPD as the Business Area's Source Code (indicated in Oracle LSH by a setting of USER for the SAS File Reference Name property of the Source Code), the Definer should upgrade that RPD file to 11g so that, if the Business Area is reinstalled in the future, the merge with the migrated master RPD file will work.
Navigate to the Business Area properties page and launch the IDE. The OBIEE Administrator's Tool opens.
In the Administrator's Tool, navigate to the CDR Work folder (whose location is configured in the CDR Client) then navigate to the RPD that was extracted during the Admin Tool launch.
Run the Upgrade Assistant on the RPD, following instructions in Section 4.4 of the Oracle Fusion Middleware Upgrade Guide for Oracle Business Intelligence 11g Release 1 (11.1.1) (Part E16452-01).
In the Business Area, browse for the newly generated 11g version of the RPD and upload it as the Source Code.
The next time the Business Area is installed, LSH automatically merges the revised version of this RPD file with the 11g master RPD. The Definer does not need to manually add the initialization block. However, the Definer does need to deploy the re-merged master RPD manual and restart the services as in Section 7.7.1.3.5, "Manually Deploy the Master RPD File" every time he or she reinstalls the Business Area.
Note:
Additional configuration is required; see the Oracle Life Sciences Data Hub System Administrator's Guide for instructions.orareprunner.sh, the sample execution command script for Oracle Reports Programs, was modified for Release 2.3. If you use Oracle BIP to run reports and are upgrading from a version earlier than 2.3, you must copy the new version from $CDR_TOP/admin/template to the DP Server Home directory or a subdirectory of itâwherever you have the existing version.
These steps are required for all upgrade paths.
Follow the instructions in the following sections of Chapter 5, "Installing the Oracle Life Sciences Data Hub."
Change the setting of the FND_Validation_Level profile. In previous releases a setting of NONE was required, but now a setting of ERROR is required.
Open your Oracle LSH URL.
Log on with the system administrator account. An E-Business Suite screen opens.
In the Main Menu pane, expand the System Administrator (not System Administration) node, then Profile, and then click System.
A new browser screen opens with several windows open and the Find System Profile Values window on top.
In the Profile field, enter FND_Validation_Level.
Click Find.
In the Site column, use the drop-down list to set the value to Error.
In the File menu, select Save and Proceed. The system displays a message that the transaction is complete.
Click OK. The transaction message pop-up disappears.
Click the X in the upper right corner of the System Profile Values window to close the window.
Do the following:
Follow instructions in Section 5.5.2, "Create Directories and Copy Files."
Log in to the database as CDR_RTREPOS.
Run the script $CDR_TOP/patch/115/sql/cdrresetowbstorepwd.sql.
The script prompts you for the following:
OWBSYS password
APPS password
Database name
You must run a script to upgrade the Distributed Processing (DP) Server database account cdr_dpserver with additional privileges required for Oracle DMW File Watcher. This is required even if you are not using Oracle DMW. You need to use this account to start the DP Server.
To run the script:
Go to $CDR_TOP/patch/115/sql
Log in to SQL*Plus as apps
Run the script:
cdrcreatedpserveruser.sql
At the prompt, enter the password you want to use for the cdr_dpserver account.
Exit from SQL*Plus.
Upgrade the Oracle LSH DP Server on every computer where it is installed:
Go to the lib directory in the DP Server Home directory on each computer where the DP Server resides.
Copy DPServer.zip from $CDR_TOP/jar to the lib directory.
Using GNU zip or another utility, unzip DPServer.zip into the lib directory. The DPServer.zip file contains the following files:
DPServer.jar
fileWatcherServer.jar
xmlparserv2.zip
xmlparserv2-904.zip
If any of the following files are in your lib directory, remove them:
nls_charset12.zip
Jdbc12.zip
Using SFTP, copy the following files from the $ORACLE_HOME/rdbms/jlib directory on the database server computer to the lib directory.
jmscommon.jar
aqapi.jar
Using SFTP, copy the following files from the $ORACLE_HOME/jlib directory on the database server computer to the lib directory:
jta.jar
orai18n-mapping.jar
Using SFTP, copy ojdbc5.jar from $ORACLE_HOME/jdbc/lib directory on the database server computer to the lib directory.
Using SFTP, copy ucp.jar from $ORACLE_HOME/ucp/lib directory on the database server computer to the lib directory.
On each computer where you install the DP Server, set the NLS_LANG environment variable to UTF8.
Save a backup of your current copy of cdr_apps_dpserver.sh as a reference, and copy the new version of the file from $CDR_TOP/admin/template to the DP Server home directory. The new version of the file includes additional parameters for the Oracle DMW File Watcher Service and changes to the CLASSPATH environment variable.
Edit the new version of cdr_apps_dpserver.sh to set the location variables required, using your backup copy as a reference:
$DPSERVER_HOME
SVC
JDK_LOC
JVM
See Section 5.16.5.2, "Edit the DP Server Start Script" for more information.
When you start up the DP Server process by running the new cdr_apps_dpserver.sh script, you must specify additional parameters. See Section 5.16.7, "Start the DP Server" for an explanation of these parameters.
These steps are required for all upgrade paths.
Follow the instructions in the following sections:
If you are installing Oracle LSH for use with Oracle DMW, follow instructions in Section 5.11.4, "Run the Audit Trail Update Tables Concurrent Program."
This step is required for all upgrade paths.
Start the following servers:
Application Server
Oracle LSH Distributed Processing (DP) Server (see Section 5.16.7, "Start the DP Server")
|
Copyright © 2006, 2018, Oracle and/or its affiliates. All rights reserved. Legal Notices |
|