You can customize certain features of the Diagnostics tools. The procedure in this topics walks you through each of the options available in the Diagnostic Options dialog box
Note: | All steps in the following procedure are optional. |
 To customize the Diagnostics tools:
In the Diagnostics group in the Smart View ribbon, select Diagnostics Options.
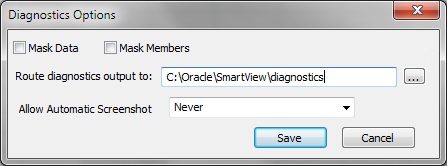
The Diagnostics Options is displayed, as shown in Figure 100, Diagnostics Options Dialog Box.
To hide data values in the Office document, select Mask Data.
Select this option if data values in your output should be hidden for confidentiality purposes.
To hide member names in the Office document, select Mask Members.
Select this option if member names in your output should be hidden for confidentiality purposes.
To direct the diagnostics output files to a folder other than the default, in Route diagnostics output to, click
 and navigate to the folder location to store the files.
You can also enter the folder location manually.
The default folder location is:
C:\Users\username.domain\AppData\Roaming\Oracle\SmartView\Diagnostics
To allow automatic screenshots for each warning or error message that is displayed, select an option:
Errors
Warnings
If you do not want automatic screenshots, select Never (the default).