10 Quick Commissioning New Media Engine Systems
This chapter provides the basic information that allows you to configure Media Engine (ME) software after you have physically installed the system in your network. Commissioning enables an ME system or compatible third-party device to process WebRTC and WebRTC-Session Initiation Protocol (SIP) sessions.
Prerequisites to Quick Commissioning
Before using the information in this chapter, make sure that you have properly installed and cabled the system. The following ME documents provide additional information on configuring ME services, as well as how manage the system using the ME CLI and the ME Management System.
-
Oracle Communications WebRTC Session Controller System Administrator's Guide
-
Oracle Communications WebRTC Session Controller Media Engine Object Reference
Additionally, the Oracle Communications WebRTC Session Controller Release Notes provides important information about the software that you should review before commissioning a system in your network.
Steps 1 through 5 cover the tasks and services for getting the system up and running on an IP network so that the Ethernet interfaces can process WebRTC and WebRTC-SIP sessions. When enabled on an IP network, you can manage the system and its configuration remotely over the Internet using the ME Management System.
Steps 6 through 10 cover the tasks that allow you to control and monitor WebRTC and WebRTC-SIP sessions, as well as store call detail records and recordings.
Building the Configuration File
The ME configuration file (cxc.cfg) is made up of configuration objects and property settings that control how the system processes and manages WebRTC and WebRTC-SIP traffic. As you open these objects and set properties using the CLI or the ME Management System, the software builds a configuration hierarchy of objects that are applied to WebRTC and WebRTC-SIP sessions. You can display this configuration hierarchy using the show and show -v (verbose) commands.
For new users, as well as for users who are adding functionality to their configuration, you will need to open configuration objects using the config command to enable the default settings for those objects, even if you choose not to edit any of their associated properties. For example, if you need to enable the ICMP protocol and its default settings, you simply open the object and execute return, as shown in the session below. Notice that the ICMP object has been added to the configuration hierarchy at the end of the session on the eth4 interface.
config> config box interface eth4
config interface eth4> config ip 172.26.2.14
config ip 172.26.2.14> config icmp
config ip 172.26.2.14> return
config interface eth4> return
config box> return
config> show -v
interface eth4
  admin enabled
  mtu 1500
  arp enabled
  speed 1Gb
  duplex full
  autoneg enabled
  ip 172.26.2.14
   admin enabled
   ip-address dhcp
   geolocation 0
   metric 1
   classification-tag
   security-domain
   address-scope
   filter-intf disabled
   icmp
    admin enabled
    limit 10 5
To remove an object from the configuration hierarchy, use the CLI or ME Management System delete command.
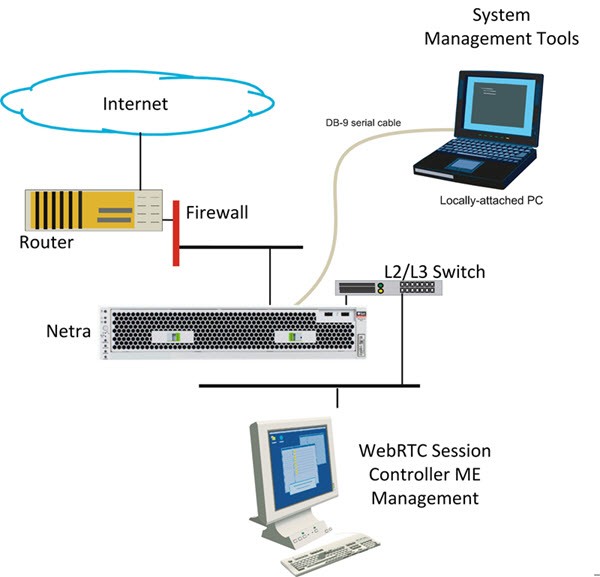
Basic Network Topology
Figure 10-1 illustrates a network topology using the ME with a directly-attached PC for initial setup, and the ME Management System for remote access using a graphical user interface.
Step 1. Configuring Basic IP Connectivity
Before you can manage an ME system remotely over the Internet using the ME Management System or over a Telnet or SSH connection, you need to locally assign an IP address to one of the Ethernet interfaces, eth0, eth1, eth2, or eth3. If you are setting up the device remotely, you will also need to configure an IP route, a route to a destination host or network, and a gateway IP address.
If you are using the ME Management System, you will also need to know the assigned IP address on one of the Ethernet ports to manage the ME configuration. The ME Management System application runs directly on the ME system over the Internet.
Example 10-1, "Configuring Basic IP Connectivity" shows a CLI session creates and enables an IP interface named 192.168.124.5, sets the static IP address and network mask, configures an IP route (if connecting remotely), and enables Web access on this IP interface. You will need to enable ICMP on the ME IP interface before you can use the ping command from your console to test the device as a responding node on the network. Use the show -v command to display the configuration.
CLI Session
Example 10-1 Configuring Basic IP Connectivity
NNOS-E> config box
config box> set hostname local2610
config box> config interface eth1
config interface eth1> config ip mgmt-int
Creating ’mgmt-int'
config mgmt-int> set admin enabled
config mgmt-int> set ip-address static 192.168.124.5/24
config mgmt-int> config routing
config routing> config route internetGateway
Creating ’route internetGateway'
config route internetGateway> set destination default
config route internetGateway> set gateway 192.168.124.3
config route internetGateway> return
config routing> return
config ip mgmt-int> config web
config web> set admin enabled
config web> set port 80
config web> return
config mgmt-int> config icmp
config icmp> set admin enabled
config icmp> top
config> save
config> show -v
Using the Setup Script
An optional configuration setup script called cxc.setup is now included with newly shipped systems. After installing a new system, you can run the script directly from the NNOS-E> prompt, as shown in Example 10-2.
Example 10-2 Using the Setup Script
CLI Session
NNOS-E> config setup
set box\hostname: <name>
config box\interface: eth1
set box\interface eth1\ip a\ip-address: <ipAddress/mask>
config box\interface eth1\ip a\ssh (y or n)? n
config box\interface eth1\ip a\web (y or n)? y
config box\interface eth1\ip a\routing\route: <routeName>
set box\interface eth1\ip a\routing\route localGateway\gateway:
<ipAddress>
set box\cli\prompt: <newPrompt>
Do you want to commit this setup script (y or n) y
Do you want to update the startup configuration (y or n)? y
The script presents a set of questions to help you with the initial system configuration. The information in the script includes the following:
-
Local hostname
-
IP interface names and addresses
-
SSH and Web access
-
Default route and any additional static routes per interface for remote management
-
User-defined CLI prompt
Every ME system has a minimum of two Ethernet interfaces. Any Ethernet interface on the system can be used for management traffic, however, Oracle recommends the use of eth1, as eth0 is reserved for fault-tolerant clustering with other ME systems. Management traffic is also supported on any interface that is carrying private or public network traffic. This means that it would be possible to use eth1 to carry WebRTC and WebRTC-SIP traffic and management traffic.
Note:
The /cxc directory on the ME system may include vendor-specific scripts that address unique startup configuration requirements. Specify the name of the script on the command line following the config setup command. For example: NNOS-E> config setup vendor.setup Check the /cxc directory for any vendor-specific setup files included with your system.Enabling Network Access
To ensure you can manage the system using services such as Telnet or the ME Management System, you must configure the ME system so that it is available on the network. You need to create a default (or static) IP route, a route to a destination host or network, and a gateway IP address.
After you configure the static route, enable ICMP and then use the ping command at the top-level of the CLI to test network accessibility.
Defining a Default Route and Gateway IP
If you are setting up the box remotely, you must configure an IP route, a route to a destination host or network, and a gateway IP address.
See "Step 1. Configuring Basic IP Connectivity" for the example CLI session that shows the routing context and the route named internetGateway. This is the default route that uses 192.168.124.3 as the default gateway.
Launching the Media Engine Management System
In addition to the CLI, you can use the ME Management System to configure the ME. To access the ME using the ME Management System, open an HTTP or secure HTTP window (HTTPS) to the IP address of the Eth0 port on the ME system. For example:
https://192.168.124.5
You should see the Oracle ME Log In window, illustrated in the following image. 
By default, there are no user accounts configured on a new system. This means any value can be entered in for username & password, or leave the fields blank and click Login. Once you log in, the ME Management System main page appears. 
The remaining steps in this chapter use the ME Management System to commission the ME.
Changing the Linux Root Password
To change the Linux root password, use the secret root action. When prompted, specify and confirm the new password. For example:
NNOS-E>secret root
password:*******
confirm:*******
Success!
NNOS-E>
Note:
The password must be at least four characters long.For more information on the secret root action, see the Oracle Communications WebRTC Session Controller Media Engine Objects and Properties Reference Guide.
Step 2. Configuring Advanced IP Connectivity
Use the Configuration tab or the CLI to configure several additional Ethernet interfaces, as covered in "Step 1. Configuring Basic IP Connectivity". As a security device, the ME uses a default setting of disabled for these objects in the configuration file. This means that you must enable each interface. These objects include:
-
SSH: To enable SSH client connectivity on the interface
-
Media ports: To enable a range of port numbers for on the interface
-
SIP: To enable SIP traffic on the interface)
When editing Ethernet interface and examining each object using the ME Management System, note that many of the objects are already visible, but they are not yet enabled. For these objects to actually be enabled on the ME system, you must select the object and save the configuration.
After editing an interface configuration, elect Set, then Update & save configuration, as illustrated in the following image.
When you select Configuration/Update and save configuration you will be asked "Do you want to update the live configuration?" followed by "Do you also want to save the live configuration?" Click OK for both questions to ensure that the configuration is properly saved to the ME configuration file, cxc.cfg.
The following steps are necessary to set some specific parameters for the objects listed above:
-
Select the Configuration Cluster/ Box 1/Interface Eth0/IP local object on the left menu tree. Under the General field, edit the Media Ports properties as desired, then click Set.
-
Under the Other Properties field, edit the SSH properties. Accept the defaults by clicking Set.
-
Select SIP from the menu tree. Enter the following values for each fields:
-
admin: enabled (default)
-
NAT translation: disabled (default)
-
UDP port: Select Add UDP port, accept the defaults, then click Finish->Set.
-
TCP port: Select Add TCP port, accept the defaults, then click Finish->Set.
-
TLS port: Select Add TLS port, accept the defaults, then click Finish->Set.
-
Certificate: blank (default)
-
When you are finished editing the SIP fields, select Set->Configuration/Update and save configuration.
Step 3. Creating User Accounts for Basic Access
By default, the ME does not contain any predefined user accounts. This means it is possible to access the management interfaces without entering any login credentials (username and password). To properly secure ME/SE integration, however, you must configure two users. First configure a management user with access to all ME functionality. Then configure a web services user with access to web-services, actions, and statuses only.
Note:
You must configure the management user first. If you configure the web services user first, you will not be able to access the CLI or web UI.If you want to create a user account at this time, follow the steps below. If not, go directly to Step 4.
-
Using the ME Management System, select the Access tab, then select Access from the left menu pane. The Access Permissions/Configure Access page appears.
-
Under permissions, select Add permissions and create a permissions group called super-user and accept all default settings with all permission types enabled.
Select Set, then select Update and save configuration from the Configuration pull-down in the left pane.
-
From the Directories object, select Add users. Accept the default setting of enabled.
-
Select Add user and enter the required name and password of your choice, then re-enter the password to confirm your original password entry. In the permissions field, choose the permissions group that you just created (super-user).
-
Click Create. Select Configuration->Update and save configuration.
These steps created a username and password for a super-user account. Future attempts to log in to the ME (using the CLI or the ME Management System) will require that you specify these login credentials. If needed, you can also create user accounts with one or more of the super-user permissions.
Step 4. Enabling Master Services
The master-services configuration enables directory, accounting, database and registration services to run on the system. Perform the following steps to configure these master services:
-
Select the Services tab, then select master-services from the left menu pane.
-
Accept the default settings for cluster-master, directory, accounting, database (with Show advanced button selected), and registration. Click Set.
After you have configured all five services, select Configuration->Update and save configuration. The completed Master Services configuration appears.
Step 5. Configuring Basic Services
The Services configuration enables event logging and virus scanning services to run on the ME. Perform the following steps to configure event logging on the system.
-
Select the Services tab then select Services from the left menu pane.
-
On the Configure services page, select event-log from the menu pane, accept the defaults and click Set. Under the event-log configuration, additional options are available that you can configure.
You can direct the event logs to one or more of the following locations:
-
A syslog server
-
An ASCII file in an ME directory
-
A database on the ME system
-
An external database
-
-
In the file object, click Edit, then enter the name event-log in the text block. Click Set.
This configures event logging so that messages are written to the local file named event-log.
Step 6. Enabling the Virtual System Partition (VSP)
The ME virtual system partition (VSP) is the part of the system that holds the comprehensive customer-defined configuration that controls how the system processes, stores, directs, and routes WebRTC and WebRTC-SIP traffic. The VSP is where you can create session configurations, registration and dial plans, and policies that handle session message traffic that the system will receive and forward to a call destination, authentication and accounting database, service provider or enterprise server, and so on.
Using the ME Management System, perform the following steps.
-
Select the Configuration tab, then select vsp from the menu to open the Configure vsp page.
-
Under the general heading:, change the admin state to enabled.
-
Click Set, then select Configuration->Update and save configuration.
Step 7. Configuring the Accounting Environments
-
Select the ME Management System Configuration tab, then select vsp->accounting from the menu to display the Configure vsp\accounting page.
-
Under targets, click Configure next to the database field and set the admin property to enabled.
-
Click Add group and enter the target-name and mode property. Click Next. The Edit server screen appears.
-
Enter the database's name in the target-name field and select Create to display the Configure database group page.

-
Click Edit beside the server field and configure the following settings:
-
admin: enabled
-
name: localdb
-
type: Select local
-
username: postgres
-
password-tag: postgres
Note:
If you set the server type to local, using the local database as the accounting target, set the username and the password-tag to postgres. If you edit the username and password-tag properties to anything other than postgres, data will not be written to the database.
For information about password tags, refer to the Oracle Communications WebRTC Session Controller Media Engine Object Reference.
-
-
Click Set, then select Configuration->Update and save configuration.
Step 8. Configuring the Media Engine to Process SIP Traffic
The next step is to configure a default system policy that allows the ME to process SIP traffic. By default, and for security purposes, the ME does not allow any SIP traffic to pass.
-
Select the Configuration tab, then select vsp->default-session-config from the menu to display the vsp/default-session-config page.
-
In the sip-directive object, change the directive policy to allow, if not already set. This allows SIP traffic to traverse the ME system. Click Set.
-
Scroll down to the media object. Change the anchor property to enabled. Accept all other default settings.
-
Click Set, then select Configuration->Update and save configuration.
Step 9. Reviewing the Configuration
Once you have completed Steps 1 through 8, review the configuration to make sure it is accurate. A quick way to do this is to scan the ME Management System navigation tree to make sure there is an entry for each of the objects that you configured.
The following image is a listing of the Configuration and Services objects configured as part of basic ME commissioning. If you are using the CLI, run the show -v command from the ME prompt to display the configuration that you just created. The following image displays the configuration and services navigation trees.