20 Configuring Permissions, Users, and Authorization
This chapter describes configuring and managing permissions, users, and authorization under the ME's Access tab.
Configuring Permissions
Under the Access tab you can configure permissions. From this object you can enable or disable access to a variety of ME services. Once a permission set is created, it can be applied to configured users.
To create a permission set:
-
Select the Access tab and click Access.
-
Click Add permissions.
-
Enter the name you want to give this permission set and select Create.
The permissions object appears. For more information on the permissions object and properties, see the Oracle Communications WebRTC Session Controller Media Engine Object Reference.
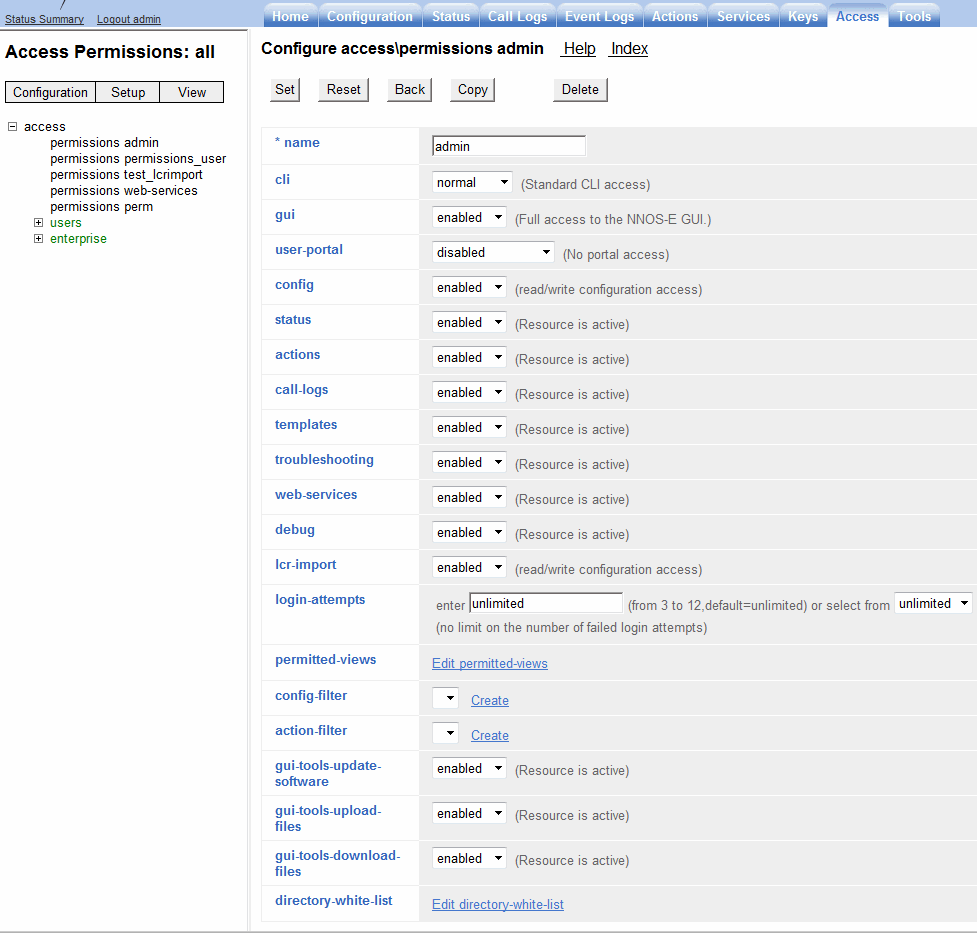
Figure 20-1 shows a permission set named admin.
Note:
To edit an existing permission set, click Edit beside that permission and the permissions object. To delete a permission set click Delete.Configuring Users
Configure ME users using the Access tab's users object.
When creating a user, you assign them a name, a password, and apply to them a configured permissions set.
To create a user:
-
Select the Access tab and click users.
-
admin: Set to enabled to allow configured users access to the ME.
-
Click Add user. The user object appears.

-
name: Enter a name to give this user.
-
password: Enter a password for this user.
Note:
Via the password-policy object, you can specify password requirements for configured users. For more information on the password-policy object, see the Oracle Communications WebRTC Session Controller Media Engine Object Reference. -
confirm: Reenter the password.
-
permissions: Select a pre-configured permissions set to apply to this user from the drop-down list. If you have not configured permissions yet, click Create.
-
Click Create.
-
Click Set. Update and save the configuration.
Configuring Action and Config Filters
The ME supports filtering mechanisms which control which users have access to specific actions and configuration objects and properties. These filters are configured under the access > permissions object.
The three permission filters are:
-
Config-filter
-
Action-filter-blacklist
-
Action-filter-whitelist
There are three steps necessary to assign action and configuration filters to configured users. You must create the filters, assign filters to permissions set, then assign each user a permission set.
Configuring Config-Filters
Via the config-filter property, you can select a config-filter containing a list of configuration objects and properties you want to restrict certain users from being able to access.
Config-filters have three permission levels.
-
read-write: Users can modify the configuration
-
read-only: Users can view the configuration but cannot modify it
-
none: Users can neither view nor modify the configuration
By default, child objects and properties inherit permissions from their parent classes, however, a user may apply a lesser permission to a child object or property. The following table lists the inheritance of permissions for the configuration.
Table 20-1 Configuration Permissions Inheritance
| Inherited Permission | Child Object/Property Permission | Effective Permission of Child Object/Property Permission |
|---|---|---|
|
read-write |
read-write |
read-write |
|
read-write |
read-only |
read-only |
|
read-write |
none |
none |
|
read-only |
read-only |
read-only |
|
read-only |
none |
none |
|
none |
none |
none |
To configure a config-filter:
-
Select the Access tab and click Access.
-
Click Configure next to permission-filters.
-
Click Add config-filter.
-
name: Specify a name to give this config-filter.
-
Click Create. The filter object appears.
-
admin: Set to enabled to enable this config-filter.
-
Click Add filter.
-
filter: Specify a configuration object by entering the class, object, and property in free form, separating each with a back slash ”\”.
-
Click Create.
-
Repeat Steps 7 and 8 for as many configuration objects you want to apply to this filter.
-
Click Set. Update and save the configuration.
To specify a filter permission:
-
Click Edit next to the filter.
-
permission: Select the permission level for this filter from the drop-down list. This is set to none by default.
-
Repeat this for each filter.
-
Click Set. Update and save the configuration.
Configuring Action-Filters
Via the action-filter-blacklist property, you can select an action-filter containing a list of actions you want to restrict certain users from using. When a user attempts to execute a restricted action, he gets the following error message:
Insufficient permissions for user
Via the action-filter-whitelist property, you can select an action-filter containing a list of actions you want to allow certain users to use.
The action-filter-whitelist property supports the use of a wildcard. The wildcard is an asterisk (*) that can be located at the end of a string only. For example, to create an action-filter for all call-control actions, enter call-control-*.
When action-filters are configured on the ME, the ME always checks the action-filter-blacklist settings first. If the action is found on the blacklist, the user is not allowed to use it.
If both the action-filter-blacklist and action-filter-whitelist are configured and an action does not appear on either list, the user is restricted from using the action.
If an action is not found on the action-filter-blacklist and action-filter-whitelist is not configured, the user is allowed to use it.
Note:
You must enter actions into the action-filter-blacklist and action-filter-whitelist properties without any arguments. When anything more than an action name is specified, the ME ignores the filter.To configure an action-filter:
-
Select the Access tab and click Access.
-
Click Configure next to permission-filters.
-
Click Add action-filter.
-
name: Specify a name to give this action-filter.
-
Click Create. The filter object appears.
-
admin: Set to enabled to enable this action-filter.
-
Click Add filter.
-
filter: Specify an action, without any arguments, to be applied to this filter.
Note:
If you enter an action with arguments, the action is ignored. -
Repeat Steps 7 and 8 for as many actions you want to apply to this filter.
-
Click Set. Update and save the configuration.
Applying Filters to Permissions Sets
Once you have created config-filters and action-filters, you must apply them to a permission set.
To apply config-filters and action-filters to a permissions set:
-
Select the Access tab and click Access.
-
Click Add permissions to create a new permissions set or click Edit next to an existing permissions set.
-
config-filter: Select a config-filter from the drop-down list whose configuration objects you want to restrict users with this permissions set from using. If you have not yet created a config-filter, click Create next to this property.
-
action-filter-blacklist: Select an action-filter from the drop-down list whose actions you want to restrict users with this permissions set from using. If you have not yet created an action-filter, click Create next to this property.
-
action-filter-whitelist: Select an action-filter from the drop-down list whose actions you want to allow users with this permissions set to use. If you have not yet created an action-filter, click Create next to this property.
-
Click Set. Update and save the configuration.
Once you have configured config-filters and action-filters and applied them to a permissions set, you can assign the permissions set to users. For more information on applying permissions set to users, see Configuring Users.
Configuring Authorization
Once you have configured permission sets and users, you can further define user access by configuring authorization. Authorization consists of creating specific grants, or privileges.
There are three types of grants you can create:
-
default-grants: Applies to all configured ME users
-
attribute-grants: Applies to configured ME users based on values extracted from their attributes.
-
group-grants: Applies to configured ME users based on group membership
The grants you can create apply to just a small segment of actions, which are divided into groups called resource-types. A resource-type is the ME function on which you are setting permissions.
The following table lists the resource types along with their corresponding actions.
| Resource-Type | Associated Actions | CRUD Privileges |
|---|---|---|
|
call |
call-control-accept |
N/A |
|
N/A |
call-control-annotate |
N/A |
|
N/A |
call-control-attach |
CU |
|
N/A |
call-control-call |
C |
|
N/A |
call-control-call-to-session |
CU |
|
N/A |
call-control-connect |
N/A |
|
N/A |
call-control-create-session |
C |
|
N/A |
call-control-destroy-session |
D |
|
N/A |
call-control-detach |
D |
|
N/A |
call-control-disconnect |
D |
|
N/A |
call-control-fork |
U |
|
N/A |
call-control-get-annotation |
U |
|
N/A |
call-control-hold |
U |
|
N/A |
call-control-info-request |
U |
|
N/A |
call-control-intercept |
U |
|
N/A |
call-control-join |
U |
|
N/A |
call-control-message-request |
U |
|
N/A |
call-control-modify |
U |
|
N/A |
call-control-mute-off |
U |
|
N/A |
call-control-mute-on |
U |
|
N/A |
call-control-notify |
U |
|
N/A |
call-control-notify-request |
U |
|
N/A |
call-control-options-request |
U |
|
N/A |
call-control-park |
CU |
|
N/A |
call-control-park-to-session |
CU |
|
N/A |
call-control-persistence |
U |
|
N/A |
call-control-record-stop |
C |
|
N/A |
call-control-redirect |
U |
|
N/A |
call-control-reject |
U |
|
N/A |
call-control-retrieve |
U |
|
N/A |
call-control-ringing |
U |
|
N/A |
call-control-send-message |
U |
|
N/A |
call-control-subscribe-request |
U |
|
N/A |
call-control-terminate |
D |
|
N/A |
call-control-transfer |
U |
|
call-recording |
call-control-record-start |
C |
|
N/A |
call-control-record-stop |
C |
|
call-monitor |
call-control-monitor-file |
CU |
|
N/A |
call-control-monitor-session |
CU |
|
call-media-insertion |
call-control-drop-file |
CU |
|
N/A |
call-control-insert-dtmf |
U |
|
N/A |
call-control-media-pause |
CU |
|
N/A |
call-control-media-resume |
CU |
|
N/A |
call-control-media-scanner-start |
CU |
|
N/A |
call-control-media-scanner-stop |
CU |
|
N/A |
call-control-media-seek |
CU |
|
N/A |
call-control-media-stop |
CU |
|
N/A |
call-control-memo-begin |
CU |
|
N/A |
call-control-memo-end |
CU |
|
N/A |
call-control-play |
U |
|
sip-request |
sip-send-message |
CU |
|
N/A |
sip-send-notify |
CU |
|
N/A |
sip-send-options |
CU |
|
N/A |
sip-send-other |
CU |
|
N/A |
sip-send-subscribe |
CU |
|
N/A |
sip-send-unsubscribe |
CU |
|
registration |
register |
C |
|
N/A |
unregister |
D |
|
event-channel |
dynamic-event-service register |
CR |
|
N/A |
dynamic-event-service keepalive |
U |
|
N/A |
dynamic-event-service unregister |
D |
In cases where an action has required either <handle> or <session ID> arguments, the ME extracts the To and From URI identities from each call leg, matches them against the resource-identity specified in a user's privileges, and determines whether that user is authorized to perform an operation.
When configuring a grant, you must define privileges for that resource-type. Privileges specify what a user can or cannot do with that resource-type.
Privileges on the ME follow the standard CRUD model:
-
create
-
retrieve
-
update
-
delete
Configuring Default Grants
Configure grants under the Access tab's authorization object.
Default grants are one of three types of grants you can configure on the ME. Default grants are grants that apply to all ME users matching the specified resource identity.
To configure default grants:
-
Select the Access tab and click authorization.
-
Set admin to enabled to enable authorization.
-
Click Add default-grant. The default-grant object appears.
-
name: Enter a name to give this grant.
-
resource-identity: Select the type of matching to use to identify a resource-type. The following are valid values:
-
equals <value>: The value that a user provides during an authorization request must be exactly the same as the resulting resource-identity. This is the default setting.
-
matches <expression>: The value that a user provides during an authorization request is matched against the resource-identity using a regular expression match.
Note:
For more information on using Regular Expressions, see the Oracle Communications WebRTC Session Controller Media Engine Object Reference. -
any: Any value a user provides during an authorization request matches.
-
-
resource-type: Select the resource-type for this grant from the drop-down list.
-
privileges: Check the CRUD privileges to allow for this resource-type. By default, they are all selected.
-
Click Create.
-
Click Set. Update and save the configuration.
Configuring Attribute Grants
Attribute grants are grants that apply to all ME users that have the attribute and match the specified resource-identity.
To configure attribute-grants:
-
Select the Access tab and click authorization.
-
name: Enter the name of the attribute for which you are creating this grant.
Note:
The name you provide must be the name of an actual attribute used within the directory. -
Click Create. The attribute-grant object appears.
-
Click Add grant-pattern.
-
name: Enter a descriptive name to give this grant.
-
pattern: Enter the regular expression pattern to use to define the attribute.
-
resource-identity: Select the type of matching to use to identify a resource-type. The following are valid values:
-
equals <value>: The value that a user provides during an authorization request must be exactly the same as the resulting resource-identity. This is the default setting.
-
matches <expression>: The value that a user provides during an authorization request is matched against the resource-identity using a regular expression match.
Note:
For more information on using Regular Expressions, see the Oracle Communications WebRTC Session Controller Media Engine Object Reference. -
any: Any value a user provides during an authorization request matches.
-
-
resource-type: Select the resource-type that this extracted value represents from the drop-down list.
-
privileges: Check the CRUD privileges to allow for this resource-type. By default, they are all selected.
-
Click Create.
-
Click Set. Update and save the configuration.
Configuring Group Grants
Under the group-grant object, you can configure default and attribute grants for specific groups. Group grants apply to users belonging to these groups and matching the resource-identity.
To add a group-grant:
-
Select the Access tab and click authorization.
-
Click Add group-grant.
-
name: Enter the name of the group for which you are configuring this grant.
-
Click Create. The group-grant object appears.
-
Click Add default-grant to configure a default grant for this group or click Add attribute-grant to configure an attribute grant for this group.
-
Configure the default or attribute grant as described above.
Note:
For more information on configuring default-grants see Configuring Default Grants. For more information on configuring attribute-grants see Configuring Attribute grants. -
Click Set. Update and save the configuration.
Viewing User Privilege Information
There are three show commands which allow you to view information on your grant configuration: show authorized-user-privileges, show authorized-user-attributes, and show authorized-user-groups.
The show authorized-user-privileges action displays information about users' authorization privileges from the user cache.
Note:
If a user has never logged into the ME, their name does not appear in the cache and, therefore, is not displayed in the show authorized-user-privileges command output.
NNOS-E>show authorized-user-privileges

username   resource-type privilege identity-type resource-identity
--------   ------------- --------- ------------- -----------------
admin      event-channel C+R+U+D   equals        /system/*
The following table lists and describes the properties associated with the show authorized-user-privileges show command.
Table 20-3 Show Authorized-User-Privileges Properties
| Field | Description |
|---|---|
|
username |
The name of the configured ME user. |
|
resource-type |
The resource-type of the grant configured for this user. |
|
privilege |
The CRUD privileges of the of the resource-type configured for this user. |
|
identity-type |
The method in which the ME matches the users' resource-identity. |
|
resource-identity |
The value or regular expression the ME uses to check users' authorization privileges. |
The show authorized-user-attributes action displays information about configured ME users and their attributes and values.
NNOS-E>show authorized-user-attributes

username   attribute                     value
--------   ---------                     -----
sjones     mail                          sjones@acmepacket.com
sjones     msrtcsip-primaryuseraddress   sip:sjones@acmepacket.com
sjones     cn                            Sam Jones
sjones     samaccountname                sjones
sjones     msrtcsip-line                 tel:+17815557256
sjones     st                            MA
sjones     telephonenumber               +1 (781) 555-4839
The following table lists and describes the properties associated with the show authorized-user-attributes show command.
Table 20-4 Show Authorized-User-Attributes Properties
| Field | Description |
|---|---|
|
username |
The configured ME user. |
|
attribute |
The attribute name. |
|
value |
The value of the attribute for that user. |
The show authorized-user-groups action displays the configured users and the groups to which they belong from the user cache.
NNOS-E>show authorized-user-groups

username     group
--------     -----
sjones       eng
sjones       software
sjones       dev
sjones       ct
sjones       engineering
sjones       deliveries
sjones       funcspec
The following table lists and describes the properties associated with the show authorized-user-group show command.
Table 20-5 Show Authorized-User-Group Properties
| Field | Description |
|---|---|
|
username |
The configured ME user. |
|
group |
The group to which the user belongs. |
The show authorized-user-summary action displays an abbreviated version of users' authorization privileges from the user cache.
NNOS-E>show authorized-user-summary

username    resource-types
--------    --------------
admin       event-channel
test_user   event-channel
The following table lists and describes the properties associated with the show authorized-user-summary show command.
Table 20-6 Show Authorized-User-Summary Properties
| Field | Description |
|---|---|
|
username |
The name of the configured ME user. |
|
resource-type |
The resource-type of the grant configured for this user. |