13 Developing WebRTC-enabled Android Applications
This chapter shows how you can use the Oracle Communications WebRTC Session Controller Android application programming interface (API) library to develop WebRTC-enabled Android applications.
About the Android SDK
The WebRTC Session Controller Android SDK enables you to integrate your Android applications with core WebRTC Session Controller functions. You can use the Android SDK to implement the following features:
-
Audio calls between an Android application and any other WebRTC-enabled application, a Session Initialization Protocol (SIP) endpoint, or a Public Switched Telephone Network endpoint using a SIP trunk.
-
Video calls between an Android application and any other WebRTC-enabled application, with suitable video conferencing support.
-
Seamless upgrading of an audio call to a video call and downgrading of a video call to an audio call.
-
Support for Interactive connectivity Establishment (ICE) server configuration, including support for Trickle ICE.
-
Transparent session reconnection following network connectivity interruption.
The WebRTC Session Controller Android SDK is built upon several additional libraries and modules as shown in Figure 13-1.
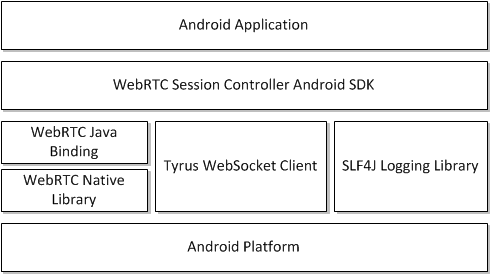
The WebRTC Java binding enables Java access to the native WebRTC library which itself provides WebRTC support. The Tyrus websocket client enables the websocket access required to communicate with WebRTC Session Controller. Finally, the SLF4J logging library enables you to plug in a logging framework of your choice to create persistent log files for application monitoring and troubleshooting.
For more details on any of the APIs described in this document, see Oracle Communications WebRTC Session Controller Android API Reference.
About the Android SDK WebRTC Call Workflow
The general workflow for using the WebRTC Session Controller Android SDK is:
-
Authenticate against WebRTC Session Controller using the HttpContext class. You initialize the HttpContext with necessary HTTP headers and optional SSLContext information in the following manner:
-
Send an HTTP GET request to the login URI of WebRTC Session Controller
-
Complete the authentication process based upon your authentication scheme
-
Proceed with the WebSocket handshake on the established authentication context
-
-
Establish a WebRTC Session Controller session using the WSCSession class. Two additional classes must be implemented:
-
ConnectionCallback: An interface that reports on the success or failure of the session creation.
-
WSCSession.Observer: An abstract class that signals on various session state changes, including CLOSED, CONNECTED, FAILED, and others.
-
-
Once a session is established, create a CallPackage which manages Call objects in a WSCSession.
-
Create a Call using the CallPackage createCall method with a callee ID as its argument, for example, alice@example.com.
-
Create a Call.Observer class which attaches to the Call to monitor call events such as ACCEPTED, REJECTED, RECEIVED.
-
Create a new CallConfig object to determine the nature of the WebRTC call, whether bi or mono-directional audio or video or both.
-
Create and configure a new PeerConnectionFactory object and start the Call using the Call object's start method.
-
When the call is complete, terminate the Call object using its end method.
Prerequisites
Before continuing, make sure you thoroughly review and understand the JavaScript API discussed in the following chapters:
The WebRTC Session Controller Android SDK is closely aligned in concept and functionality with the JavaScript SDK to ensure a seamless transition.
In addition to an understanding of the WebRTC Session Controller JavaScript API, you are expected to be familiar with:
-
Java and object oriented programming concepts
-
General Android SDK programming concepts including event handling, and activities
There are many excellent online resources for learning Java programming, and, for a practical introduction to Android programming, see http://developer.android.com/guide/index.html.
Android SDK System Requirements
In order to develop applications with the WebRTC Session Controller SDK, you must meeting the following software/hardware requirements:
-
Java Development Kit (JDK) 1.6 or higher installed with all available security patches:
http://www.oracle.com/technetwork/java/javase/downloads/java-archive-downloads-javase6-419409.htmlNote:
OpenJDK is not supported. -
The latest version of the Android SDK available from
http://developer.android.com/sdk/installing/index.html, running on a supported version of Windows, Mac OS X, or Linux. -
If you are using the Android SDK command line tools, you must have Apache ANT 1.8 or later:
http://ant.apache.org/. -
A installed and fully configured WebRTC Session Controller installation. See the WebRTC Session Controller Installation Guide.
-
An actual Android hardware device. While you can test the general flow and function of your Android WebRTC Session Controller application using the Android emulator, a physical Android device such as a phone or tablet is required to utilize audio or video functionality.
About the Examples in This Chapter
The examples and descriptions in this chapter are kept intentionally straightforward in order to illustrate the functionality of the WebRTC Session Controller Android SDK API without obscuring it with user interface code and other abstractions and indirections. Since it is likely that use cases for production applications will take many forms, the examples assume no pre-existing interface schemes except when absolutely necessary, and then, only with the barest minimum of code. For example, if a particular method requires arguments such as a user name, a code example will show a plain string username such as "alice@example.com" being passed to the method. It is assumed that in a production application, you would interface with the Android device's contact manager.
General Android SDK Best Practices
When designing and implementing your WebRTC-enabled Android application, keep the following best practices in mind:
-
Following Android application development general guidelines, do not invoke any networking operations in the main Application UI thread. Instead, run network operations on a separate background thread, using the supplied Observer mechanisms to handle any necessary responses.
-
The Observers themselves run on a separate background thread, and your application should not make any user interface updates on that thread since the Android user interface toolkit is not thread safe. For more information, see
https://developer.android.com/training/multiple-threads/communicate-ui.html. -
In any class that extends or uses the android.app.Application class or any initial Activity class, initialize the WebRTC PeerConnectionFactory only once during its lifetime:
PeerConnectionFactory.initializeAndroidGlobals(context, true /* initializeAudio */, true /* initializeVideo */);
-
Since the signaling communications takes place over a background thread, initialize and create WebRTC Session Controller sessions using an Android background service to prevent communications disruption. The background service can maintain a reference to the Session object and share that among all of your Android application's activities, fragments and other components. The service can also be run at a higher priority and be used to handle notifications. For more information, see
https://developer.android.com/training/best-background.html.
Installing the Android SDK
To install the WebRTC Session Controller Android SDK, do the following:
-
After you have installed your Android development environment, use the Android SDK Manager to download the required SDK tools and platform support:
http://developer.android.com/sdk/installing/adding-packages.html.Note:
Android API level 17 (4.2.2 Jellybean) is the minimum required by the WebRTC Session Controller Android SDK for full functionality. Generally, you should target the lowest API level possible to ensure the broadest application compatibility. -
Configure virtual and hardware devices as required for your application:
http://developer.android.com/tools/devices/index.htmlandhttp://developer.android.com/tools/device.html. -
Create a new Android project using the Android development environment of your choice:
http://developer.android.com/tools/projects/index.html. -
Download and extract the libs folder from the WebRTC Session Controller Android SDK zip file into the libs folder of your Android application. Create the libs folder if it does not already exist.
Note:
Both debug and release versions of the WebRTC peer connection library are included. Choose the correct one for the development state of your project. -
Depending on your Android development environment, add the path to the libs folder to your Android project as indicated in your Android development environment documentation.
WebRTC Session Controller SDK Required Permissions
The WebRTC Session Controller SDK requires the following Android permissions to function correctly:
-
android.permission.INTERNET
-
android.permission.ACCESS_NETWORK_STATE
-
android.permission.CAMERA
-
android.permission.RECORD_AUDIO
Additionally, if your logging subsystem requires access to an external SD card (or a different storage volume) also grant the android.permission.WRITE_EXTERNAL_STORAGE permission.
Configuring Logging
The WebRTC Session Controller Android SDK includes support for the Simple Logging Facade for Java (SLF4J) which lets you plug in your preferred logging framework.
Examples in this chapter use the popular Log4J logging framework which requires the addition of the following libraries to your project, where n indicates a version number:
-
slf4j-log4jn-n.n.n.jar
-
log4j-n.n.n.jar
-
android-logging-log4j-n.n.n.jar
Example 13-1 Configuring Log4J
public class ConfigureLog4J {
  public void configureLogging() {
    Log.i(MyApp.TAG, "Configuring the Log4J logging framework...");
    final LogConfigurator logConfigurator = new LogConfigurator();
    logConfigurator.setFileName(Environment.getExternalStorageDirectory()
               + File.separator
               + "sample_android_app.log");
    logConfigurator.setRootLevel(Level.DEBUG);
    logConfigurator.setFilePattern("%d %-5p [%c{2}]-[%L] %m%n");
    logConfigurator.setMaxFileSize(1024 * 1024 * 5);
    logConfigurator.setImmediateFlush(true);
    logConfigurator.configure();
  }
}
Note:
If you want to write log files to any location other than an Android device's internal storage, you must grant the WRITE_EXTERNAL_STORAGE permission.For more information on configuring and using Log4J, see http://logging.apache.org/log4j/.
Authenticating with WebRTC Session Controller
You use the class HttpContext to set up an authentication context. The authentication context contains the necessary HTTP headers and SSLContext information, and is used when setting up a wsc.Session.
Initialize the CookieManager
You initialize the cookie manager to handle storage of authentication headers and URIs. For more information on the Android CookieManager class, see http://developer.android.com/reference/android/webkit/CookieManager.html.
Initialize a URL Connection
You then create a new URL object using the URI to your WebRTC Session Controller endpoint and open a urlConnection using the URL object openConnection method.
Example 13-3 Initializing a URL Connection
try {
  url = new URL("http://server:port/login?wsc_app_uri=/ws/webrtc/myapp");
} catch (MalformedURLException e1) {
  Log.i(MyApp.TAG, "Malformed URL.");
}
try {
  urlConnection = (HttpURLConnection) url.openConnection();
} catch (IOException e) {
  Log.i(MyApp.TAG, "IO Exception.");
}
Note:
The default WebRTC Session Controller port is 7001.Configure Authorization Headers if Required
You then configure authorization headers as required by your authentication scheme. The following example uses Basic authentication; OAuth and other authentication schemes will be similarly configured. For more information on WebRTC Session Controller authentication, see "Setting Up Security."
Example 13-4 Initializing Basic Authentication Headers
String name = "username";
String password = "password";
        String authString = "Basic " + name + ":" + password;
byte[] authEncBytes = Base64.encode(authString.getBytes(), 0);
String authHeader = new String(authEncBytes);
urlConnection.setRequestProperty(HttpContext.AUTHORIZATION_HEADER, authHeader);
Note:
If you are using Guest authentication, no headers are required.Configure the SSL Context if Required
If you are using Secure Sockets Layer (SSL), configure the SSL context, including the TrustManager if required. Example 13-6 expects as URL object and passes that object to a custom getNullHostVerifier method, whose job is to validate that the URL is actually live.
Example 13-5 Configuring the SSL Context
if (HTTPS.equals(url.getProtocol())) {
  Log.i(MyApp.TAG, "Configuring SSL context...");
  HttpsURLConnection.setDefaultHostnameVerifier(getNullHostVerifier());
  SSLContext ctx = null;
  try {
    ctx = SSLContext.getInstance("TLS");
  } catch (NoSuchAlgorithmException e) {
    Log.i(MyApp.TAG, "No Such Algorithm.");
  }
  try {
    ctx.init(null, getTrustAllManager(), new SecureRandom());
  } catch (KeyManagementException e) {
    Log.i(MyApp.TAG, "Key Management Exception.");
  }
  final SSLSocketFactory sslFactory = ctx.getSocketFactory();
  HttpsURLConnection.setDefaultSSLSocketFactory(sslFactory);
}
Example 13-6 is a stub method in which you can implement a routine to test the validity of the input URL object, and handle program flow based upon HTTP return codes.
Example 13-6 Host Name Verification
private HostnameVerifier getNullHostVerifier() {
  return new HostnameVerifier() {
    @Override
    public boolean verify(final String hostname, final SSLSession session) {
      Log.i(MyApp.TAG, "Stub verification for " + hostname +
                              " for session: " + session);
      return true;
    }
  };
}
Finally, if your implementation depends upon a Java Secure Socket Extension implementation, configure the Android TrustManager class as required. For more information on the Android TrustManager class, see http://developer.android.com/reference/android/webkit/CookieManager.html.
Example 13-7 Configuring the TrustManager
public static TrustManager[] getTrustAllManager() {
  return new X509TrustManager[] { new X509TrustManager() {
    @Override
    public java.security.cert.X509Certificate[] getAcceptedIssuers() {
      return null;
    }

    @Override
    public void checkClientTrusted(
      java.security.cert.X509Certificate[] certs, String authType) {
    }

    @Override
    public void checkServerTrusted(
      java.security.cert.X509Certificate[] certs, String authType) {
    }
  } };
}
Build the HTTP Context
Next you build the HTTP context, retrieving the authorization headers using the CookieManager class you instantiated in "Initialize the CookieManager."
Example 13-8 Building the HTTP Context
Log.i(MyApp.TAG, "Building the HTTP context...");
Map<String, List<String>> headers = new HashMap<String, List<String>>();

HttpContext httpContext = null;

try {
  httpContext = HttpContext.Builder.create()
                .withHeaders(cookieManager.get(url.toURI(), headers))
                .build();
} catch (IOException e) {
  e.printStackTrace();
} catch (URISyntaxException e) {
  e.printStackTrace();
}
Configuring Interactive Connectivity Establishment (ICE)
If you have access to one or more STUN/TURN ICE servers, you can implement the IceServerConfig interface. For details on ICE, see "Managing Interactive Connectivity Establishment Interval."
Example 13-10 Configuring the ICE Server Config Class
class MyIceServerConfig implements IceServerConfig {
  public Set<IceServer> getIceServers() {
    Log.i(MyApp.TAG, "Setting up ICE servers...");
    Set<IceServer> iceServers = new HashSet<IceServer>();
    iceServers.add(new IceServerConfig.IceServer(
           "stun:stun-relay.example.net:3478", "admin", "password"));
    iceServers.add(new IceServerConfig.IceServer(
           "turn:turn-relay.example.net:3478", "admin", "password"));
    return iceServers;
  }
}
Creating a WebRTC Session Controller Session
Once you have configured your authentication method and connected to your WebRTC Session Controller endpoint, you can instantiate a WebRTC Session Controller session object. Before instantiating a session object you configure the following elements:
-
To handle the results of a session creation request, you "Implement the ConnectionCallback Interface."
-
To monitor and respond to changes in session state, you "Create a Session Observer Object."
-
To configure specific session object behaviors and performance parameters, you "Configure Session Properties."
Implement the ConnectionCallback Interface
You must implement the ConnectionCallback interface to handle the results of your session creation request. The ConnectionCallback interface has two event handlers:
-
onSuccess: Triggered upon a successful session creation.
-
onFailure: Returns a an enum of type StatusCode. Triggered when session creation fails. For a listing of status code, see Oracle Communications WebRTC Session Controller Android API Reference.
Example 13-11 Implementing the ConnectionCallback Interface
public class MyConnectionCallback implements ConnectionCallback {
  @Override
  public void onFailure(StatusCode arg0) {
    Log.i(MyApp.TAG, "Handle a connection failure...");
  }

  @Override
  public void onSuccess() {
    Log.i(MyApp.TAG, "Handle a connection success...");
  }
}
Create a Session Observer Object
You must create a session Observer object to monitor and respond to changes in session state.
Example 13-12 Instantiating a Session Observer
public class MySessionObserver extends Observer {
  @Override
  public void stateChanged(final SessionState state) {
    runOnUiThread(new Runnable() {
      @Override
      public void run() {
        Log.i(MyApp.TAG, "Session state changed to " + state);
        switch (state) {
          case CONNECTED:
            break;
          case RECONNECTING:
            break;
          case FAILED:
            Log.i(MyApp.TAG,
                  "Send events to various active activities as required...");
            shutdownCall();
            break;
          case CLOSED:
          default:
            break;
        }
      }
    });
  }
}
Build the Session Object
With the ConnectionCallback and Session Observer configured, you now build a WebRTC Session Controller session using the session Builder method.
Example 13-13 Building the Session Object
Log.i(MyApp.TAG, "Creating a WebRTC Session Controller session...");
WSCSession.Builder builder = null;
try {
  builder = WSCSession.Builder.create(new java.net.URI(webSocketURL))
           .withUserName(userName)
           .withPackage(new CallPackage())
           .withHttpContext(httpContext)
           .withConnectionCallback(new MyConnectionCallback())
           .withIceServerConfig(new MyIceServerConfig())
           .withObserver(new MySessionObserver());
} catch (URISyntaxException e) {
  e.printStackTrace();
}

WSCSession session = builder.build();
In Example 13-13, note that the withPackage method registers a new CallPackage with the session that will be instantiated when creating voice or video calls. Also registered are the ConnectionCallback, IceServerConfig, and SessionObserver objects created earler.
Configure Session Properties
You can configure additional properties when creating a session using the withProperty method.
For a complete list of properties and their descriptions, see the Oracle Communications WebRTC Session Controller Android SDK API Reference.
Adding WebRTC Voice Support to your Android Application
This section describes adding WebRTC voice support to your Android application.
Initialize the CallPackage Object
When you created your Session, you registered a new CallPackage object using the Session object's withPackage method. You now instantiate that CallPackage.
Example 13-15 Initializing the CallPackage
String callType = CallPackage.PACKAGE_TYPE;
CallPackage callPackage = (CallPackage) session.getPackage(callType);
Note:
Use the default PACKAGE_TYPE call type unless you have defined a custom call type.Place a WebRTC Voice Call from Your Android Application
Once you have configured your authentication scheme, created a Session, and initialized a CallPackage, you can place voice calls from your Android application.
Initialize the Call Object
With the CallPackage object created, initialize a Call object, passing the callee's ID as an argument.
Note:
In a production application you may wish to integrate with the Android contacts provider or another enterprise directory system, rather than passing a bare string to the createCall method. For more information on integrating with the Android contacts provider, seehttp://developer.android.com/guide/topics/providers/contacts-provider.html.Configure Trickle ICE
To improve ICE candidate gathering performance, you can choose to enable Trickle ICE in your application using the Call object's setTrickleIceMode method. For more information see "Enabling Trickle ICE to Improve Application Performance."
Create a Call Observer Object
You next create a CallObserver object so you can respond to Call events. Example 13-18 provides a skeleton with the appropriate call update, media, and call states, which you can use to handle updates to, and input from, your application accordingly.
Example 13-18 Creating a CallObserver Object
Create a Call Observer Object
You next create a CallObserver object so you can respond to Call events. Example 12–18 provides a skeleton with the appropriate call update, media, and call states, which you can use to handle updates to, and input from, your application accordingly.
Creating a CallObserver Object
public class MyCallObserver extends oracle.wsc.android.call.Call.Observer {
  @Override
  public void callUpdated(final CallUpdateEvent state, final CallConfig callConfig, Cause cause) {
    Log.i(MyApp.TAG, "Call updated: " + state);
    runOnUiThread(new Runnable() {

      @Override
      public void run() {
        switch (state) {
          case SENT:
            break;
          case RECEIVED:
            break;
          case ACCEPTED:
            break;
          case REJECTED:
            break;
          default:
           break;
        }
      }
    });
  }

  @Override
  public void mediaStateChanged(MediaStreamEvent mediaStreamEvent, MediaStream mediaStream) {
    Log.i(MyApp.TAG, "Media State " + mediaStreamEvent
                                           + " for media stream " + mediaStream.label());
  }

  @Override
  public void stateChanged(final CallState state, Cause cause) {
    runOnUiThread(new Runnable() {
      @Override
      public void run() {
        switch (state) {
          case ESTABLISHED:
          Log.i(MyApp.TAG, "Update the UI to indicate that the call has been accepted...");
          break;
        case ENDED:
          Log.i(MyApp.TAG, "Update the UI and possibly close the activity...");
          break;
        case REJECTED:
          break;
        case FAILED:
          break;
        default:
          break;
        }
      }
    });
  }
}
Register the CallObserver with the Call Object
Once you've implemented the CallObserver, register it with the Call object.
Create a CallConfig Object
You create a CallConfig object to determine the type of call you wish to make. The CallConfig constructor takes two parameters, both named MediaDirection. The first parameter configures an audio call while the second configures a video call:
CallConfig(MediaDirection audioMediaDirection, MediaDirection videoMediaDirection)
The values for each MediaDirection parameter are:
-
NONE: No direction; media support disabled.
-
RECV_ONLY: The media stream is receive only.
-
SEND_ONLY: The media stream is send only.
-
SEND_RECV: The media stream is bi-directional.
Example 13-20 shows the configuration for a bi-directional, audio-only call.
Configure the Local MediaStream for Audio
With the CallConfig object created, you then configure the local audio MediaStream using the WebRTC PeerConnectionFactory. For information on the WebRTC SDK API, see http://www.webrtc.org/reference/native-apis.
Example 13-21 Configuring the Local MediaStream for Audio
Log.i(MyApp.TAG, "Get the local media streams...");
PeerConnectionFactory pcf = call.getPeerConnectionFactory();
mediaStream = pcf.createLocalMediaStream("ARDAMS");
AudioSource audioSource = pcf.createAudioSource(new MediaConstraints());
mediaStream.addTrack(pcf.createAudioTrack("ARDAMSa0", audioSource));
Receiving a WebRTC Voice Call in Your Android Application
This section configuring your Android application to receive WebRTC voice calls.
Create a CallPackage Observer
To be notified of an incoming call, create a CallPackageObserver and attach it to your CallPackage. The CallPackageObserver lets you intercept and respond to changes in the CallPackage object's state.
Example 13-23 A CallPackage Observer
public class MyCallPackageObserver extends oracle.wsc.android.call.CallPackage.Observer {
  @Override
  public void callArrived(Call call, CallConfig callConfig, Map<String, ?> extHeaders) {

    Log.i(MyApp.TAG, "Registering a call observer...");
    call.setObserver(new MyCallObserver());

    Log.i(MyApp.TAG, "Getting the local media stream...");
    PeerConnectionFactory pcf = call.getPeerConnectionFactory();
    MediaStream mediaStream = pcf.createLocalMediaStream("ARDAMS");
    AudioSource audioSource = pcf.createAudioSource(new MediaConstraints());
    mediaStream.addTrack(pcf.createAudioTrack("ARDAMSa0", audioSource));

    Log.i(MyApp.TAG, "Accept or reject the call...");
    if (answerTheCall) {
      Log.i(MyApp.TAG, "Answering the call...");
      call.accept(callConfig, mediaStream);
    } else {
      Log.i(MyApp.TAG, "Declining the call...");
      call.decline(StatusCode.DECLINED.getCode());
    }
  }
}
In Example 13-23, the callArrived event handler processes an incoming call request:
-
The method registers a CallObserver for the incoming call. In this case, it uses the same CallObserver, myCallObserver, from the example in "Create a Call Observer Object."
-
The method then configures the local media stream, in the same manner as the example in "Configure the Local MediaStream for Audio."
-
The method determines whether to accept or reject the call based upon the value of the answerTheCall boolean using either Call object's accept or decline methods.
Note:
The answerTheCall boolean will most likely be set by a user interface element in your application such as a button or link.
Adding WebRTC Video Support to your Android Application
This section describes how you can add WebRTC video support to your Android application. While the methods are almost completely identical to adding voice call support to an Android application, additional preparation is required.
Find and Return the Video Capture Device
Before your application tries to initialize a video calling session, it should verify that the Android device it is running on actually has a video capture device available. Find the video capture device and return a VideoCapturer object. For more information on handling an Android device's camera, see http://developer.android.com/guide/topics/media/camera.html.
Example 13-24 Finding a Video Capture Device
private VideoCapturer getVideoCapturer() {
  Log.i(MyApp.TAG,
      "Cycle through likely device names for a camera and return the first "
      + "available capture device. Throw an exception if none exists.");

  final String[] cameraFacing = { "front", "back" };
  final int[] cameraIndex = { 0, 1 };
  final int[] cameraOrientation = { 0, 90, 180, 270 };

  for (final String facing : cameraFacing) {
    for (final int index : cameraIndex) {
      for (final int orientation : cameraOrientation) {
        final String name = "Camera " + index + ", Facing "
                           + facing + ", Orientation " + orientation;
        final VideoCapturer capturer = VideoCapturer.create(name);
        if (capturer != null) {
           Log.i(MyApp.TAG, "Using camera: " + name);
           return capturer;
        }
      }
    }
  }
  throw new RuntimeException("Failed to open a capture device.");
}
Note:
Example 13-24 is not a robust algorithm for video capturer detection is not recommended for production use.Create a GLSurfaceView in Your User Interface Layout
Your application must provide a container to display a local or remote video feed. To do that, you add an OpenGL SurfaceView container to your user interface layout. In Example 13-25 a GLSurfaceView container is created with the ID, video_view. For more information on GLSurfaceView containers, see http://developer.android.com/reference/android/opengl/GLSurfaceView.html.
Note:
You, of course, customize the GLSurfaceView container for the requirements of your specific application.Example 13-25 A Layout Containing a GLSurfaceView Element
<LinearLayout xmlns:android="http://schemas.android.com/apk/res/android"
  xmlns:tools="http://schemas.android.com/tools"
  android:layout_width="match_parent"
  android:layout_height="match_parent"
  android:paddingBottom="@dimen/activity_vertical_margin"
  android:paddingLeft="@dimen/activity_horizontal_margin"
  android:paddingRight="@dimen/activity_horizontal_margin"
  android:paddingTop="@dimen/activity_vertical_margin"
  tools:context=".MyActivity"
  android:orientation="vertical" >

  <android.opengl.GLSurfaceView
    android:id="@+id/video_view"
    android:orientation="horizontal"
    android:layout_width="fill_parent"
    android:layout_height="0dp"
    android:layout_weight="1" />
</LinearLayout>
Initialize the GLSurfaceView Control
Next, you initialize the GLSurfaceView container by finding its ID in your Android application's resource list, video_view, and creating a VideoRenderer object using the control ID as an argument.
Example 13-26 Initializing the GLSurfaceView Control
Log.i(MyApp.TAG,"Initialize the video view control in your main layout...");
mVideoView = (GLSurfaceView) findViewById(R.id.video_view);
myVideoRenderer = new VideoRendererGUI(mVideoView);
localRender = myVideoRenderer.create(70, 70, 25, 25);
Note:
The VideoRendererGUI class is freely available. Use Google Code search to find the latest version.Placing a WebRTC Video Call from Your Android Application
To place a video call from your Android application, complete the coding tasks contained in the following sections:
-
Configuring Interactive Connectivity Establishment (ICE) (if required)
In addition, complete the coding tasks for an audio call contained in the following sections:
-
Configure Trickle ICE (if required)
Note:
Audio and video call work flows are identical with the exception of media directions, local media stream configuration, and the additional considerations described earlier in this section.Create a CallConfig Object
You create a CallConfig object as described in "Create a CallConfig Object," in the audio call section, setting both arguments to MediaDirection.SEND_RECV.
Configure the Local MediaStream for Audio and Video
With the CallConfig object created, you then configure the local video and audio MediaStream objects using the WebRTC PeerConnectionFactory. For information on the WebRTC SDK API, see http://www.webrtc.org/reference/native-apis.
Example 13-28 Configuring the Local MediaStream for Video
Log.i(MyApp.TAG, "Get the local media streams...");
PeerConnectionFactory pcf = call.getPeerConnectionFactory();
mediaStream = pcf.createLocalMediaStream("ARDAMS");

Log.i(MyApp.TAG, "Attach the audio source...");
AudioSource audioSource = pcf.createAudioSource(new MediaConstraints());
mediaStream.addTrack(pcf.createAudioTrack("ARDAMSa0", audioSource));

Log.i(MyApp.TAG, "Attach the video source...");
videoCapturer = getVideoCapturer();
videoSource = pcf.createVideoSource(videoCapturer, new MediaConstraints());
final VideoTrack videoTrack = pcf.createVideoTrack("ARDAMSv0", videoSource);

videoTrack.addRenderer(new VideoRenderer(localRender));
mediaStream.addTrack(videoTrack);
In Example 13-28, of note is that the WebRTC SDK PeerConnectionFactory adds both an audio and a video stream to the MediaStream object. For the VideoStream object, a videoCapturer object is returned from the getVideoCapturer method described in Example 13-24. In addition, the VideoTrack object is bound to the localRender object created in Example 13-26.
Start the Video Call
Finally, start the audio/video call using the Call object's start method and passing it the CallConfig object and the MediaStream object.
Receiving a WebRTC Video Call in Your Android Application
Receiving a video call is identical to receiving an audio call as decribed here, "Receiving a WebRTC Voice Call in Your Android Application." The only difference is the configuration of the MediaStream object, as described in "Configure the Local MediaStream for Audio and Video."
Upgrading and Downgrading Calls
This section describes how you can handle upgrading an audio call to an audio video call and downgrading a video call to an audio-only call in your Android application.
Handle Upgrade and Downgrade Requests from Your Application
To upgrade from a voice call to a video call, you can bind a user interface element such as a button or link to a class containing the Call update logic using the interface object's setOnClickListener method:
myButton.setOnClickListener(new CallUpdateHandler());
You handle the upgrade or downgrade workflow in the onClick event handler of the CallUpdateHandler class. In Example 13-31 the myButton object simply serves to toggle video support on and off for the current call object. Once the CallConfig object is reconfigured, the actual state change for the call is initiated using the Call object's update method.
Example 13-31 Handling Upgrade Downgrade Requests from Your Application
class CallUpdateHandler implements View.OnClickListener {
  @Override
  public void onClick(final View v) {
    // Toggle between video on/off
    MediaDirection videoDirection;
    if (call.getCallConfig().shouldSendVideo()) {
      videoDirection = MediaDirection.NONE;
    } else {
      videoDirection = MediaDirection.SEND_RECV;
    }

    Log.i(MyApp.TAG, "Toggle Video");
    CallConfig callConfig = new CallConfig(MediaDirection.SEND_RECV,
                                           videoDirection);
    MediaStream mediaStream = getLocalMediaStreams(call
                                    .getPeerConnectionFactory());
    try {
       call.update(callConfig, mediaStream);
    } catch (IllegalStateException e) {
       Log.e(MyApp.TAG, "Invalid state", e);
    }
  }
}
Handle Incoming Upgrade Requests
You configure the callUpdated method of your CallObserver class to handle incoming upgrade requests in the case of a RECEIVED state change. See Example 13-18 for the complete CallObserver framework. In Example 13-32, a simple Yes/No dialog is presented when an upgrade request is received. Clicking the Yes button accepts the upgrade request, while clicking no declines it.
Example 13-32 Handling an Incoming Upgrade Request
case RECEIVED:
  String mediaConfig = "Video - " + callConfig.getVideoConfig().name();
  new AlertDialog.Builder(CallProgressActivity.this)
      .setIcon(android.R.drawable.ic_dialog_alert)
      .setTitle("Incoming Call Update")
      .setMessage("Do you want you accept this update: " + mediaConfig + " ?")
      .setPositiveButton("Yes", new DialogInterface.OnClickListener() {
        @Override
        public void onClick(
          DialogInterface dialog, int which) {
            MediaStream mediaStream = getLocalMediaStreams(call.getPeerConnectionFactory());
            call.accept(callConfig, mediaStream);
        }
      })
      .setNegativeButton("No", new DialogInterface.OnClickListener() {
        @Override
        public void onClick(DialogInterface dialog, int which) {
          call.decline(StatusCode.DECLINED.getCode());
        }
      }).show();
  break;