| Oracle® Health Sciences Network Installation Guide Release 2.0.0.0 E65879-01 |
|
|
PDF · Mobi · ePub |
| Oracle® Health Sciences Network Installation Guide Release 2.0.0.0 E65879-01 |
|
|
PDF · Mobi · ePub |
This chapter provides the instructions to install the Platform services of the Health Sciences Network (HSN).
This chapter contains the following sections:
This section contains the following topics:
To create tablespace for the HSN database, perform the following:
Edit hsnp_create_tablespace.sql.
Enter the following details:
appropriate path for data file (line starting with data file)
size and auto extend size (line starting with SIZE)
Log in to the database as a user with privilege to create tablespace and execute the script.
Enter the name of the tablespace you want to create when prompted.
See also Section 3.1.
To create HSN database user, perform the following:
Log in to the database as a user with privilege to create user using SQLPlus.
In the SQLPlus prompt, execute the @hsnp_create_user.sql script.
Enter the corresponding values as prompted.
Note:
Ensure that you specify the tablespace name created in Section 2.1.1 when prompted.Exit SQLPlus.
This section describes how to create database objects for HSN and initialize the database with seed data.
To install the HSN database objects, perform the following:
Log in to the database as HSN user (created in Section 2.1.2) using SQLPlus.
In the SQLPlus prompt, execute the HSNP_ddl.sql script.
This creates the required database objects.
Update the SOA and ManApp service URL in the BPEL_PROCESS_MASTER and MANAGEMENT_CONFIGURATION tables as per the environment in HSNP_seed.sql.
Execute the HSNP_seed.sql script.
This inserts the seed data in the database objects created.
Exit SQLPlus.
Running Post-Installation Scripts
During schema creation, access rights are granted to the schema user which are required only for database configuration. Post database schema creation, the access rights need to be revoked. The access rights can be revoked using the post installation scripts.
Connect to the database as a user with sysdba privilege.
Execute the @hsnp_post_install.sql script.
This section contains the following topics:
To enable JPA 2.0, perform the following:
Edit the <MIDDLEWARE_HOME>/wlserver_10.3/common/bin/commEnv.sh file to add the PRE_CLASSPATH variable at the end of the file.
Verify the JAR version number in the <MIDDLEWARE_HOME>/modules folder and update the following statement accordingly:
PRE_CLASSPATH=${MODULES_DIR}/javax.persistence_1.1.0.0_2-
0.jar:${MODULES_DIR}/com.oracle.jpa2support_1.0.0.0_2-
1.jar
export PRE_CLASSPATH
To configure data source, perform the following:
Log in to the Oracle WebLogic server console for the HSnP domain.
Create data source using the schema created in database setup steps.
Enter the jndi name as jdbc/HAFDBDS and assign it to the HSnPManApp server as target.
Restart the server.
To set the transaction timeout for the WebLogic application server, perform the following:
Go to Services > JTA in the WebLogic console.
Update timeout seconds to 600 and save.
To deploy EAR, perform the following:
Note:
Ensure that the application name is set to HSnPMan-EAR during deployment.Extract the HSnPManApp EAR file from the media pack.
Deploy the EAR file to the Oracle WebLogic server, where HSnPManApp need to be installed.
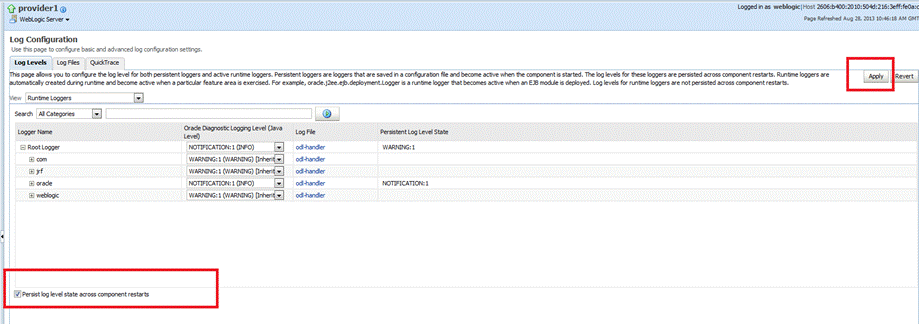
To configure logging, perform the following:
Log in to the Enterprise Manager of WebLogic server.
In the pane on the left side of the window, click the HSnPManApp domain in the WebLogic Domain folder and select the target HSnPManApp server.
For example, provider1.
From the WebLogic Server drop-down list, select Logs and then select Log Configuration.
Expand Root Logger.
For Oracle, change the log level and select Inherited from Parent.
Select Persist log level state across component restarts and click Apply Changes.
To execute the following commands you need to set the JAVA_HOME environment variable to point to JDK referred in the HSnP domain:
export JAVA_HOME=<Path to JDK referred with hsnp domain>
export PATH=$JAVA_HOME/bin:$PATH
Generate private key to be used in the HSnP ManApp and SOA servers using keytool utility available in the JDK bin directory.
In the following command, replace the <KEY_LOCATION> as required.
keytool -genkey -alias hsnp-key -keyalg "RSA" -sigalg "SHA1withRSA" -dname "cn=HSNP, ou=HSGBU, o=ORACLE, c=US" -keystore <KEY_LOCATION>/hsnpkey.jks -validity 3650
Enter the keystore password and the key password when prompted.
Copy the generated keystore hsnpkey.jks to the <HSNP_DOMAIN_HOME>/config/fmwconfig folder.
Open the <HSNP_DOMAIN_HOME>/config/fmwconfig/jps-config.xml file.
Search for default-keystore.jks in the file.
It should be similar to <serviceinstance name="keystore" provider="keystore.provider" location="./default-keystore.jks">.
Replace ./default-keystore.jks with ./hsnpkey.jks and save the file.
Restart the WebLogic server instances for the HSnP domain.
Copy the HSnP_OWSM_Config.py and GrantIdentity_to_HSnP.py files from the media pack to a location to which the operating system user has read and execute permissions.
Execute the following commands on the command prompt:
cd <MIDDLEWARE_HOME>/oracle_common/common/bin
./wlst.sh <ABSOLUTE FILE_PATH to HSnP_OWSM_Config.py>
Enter the corresponding values as prompted by the script.
./wlst.sh <ABSOLUTE FILE PATH to GrantIdentity_to_HSnP.py>
Enter the corresponding values as prompted.
The HSnP_OWSM_Config.py script adds credentials for the hsnpkey.jks file. The GrantIdentity_to_HSnPMan.py file grants identity permission to the HSnPMan-Ear application.
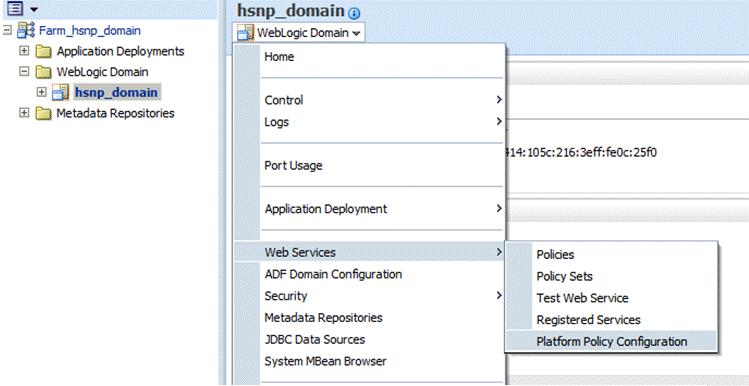
Login to the Enterprise Manager of the HSnP domain.
In the left pane, click the HSnP domain in the WebLogic domain folder.
From the WebLogic Domain drop-down list, select Web Services and then select Platform Policy Configuration.
Figure 2-4 WebLogic Domain Drop-down List
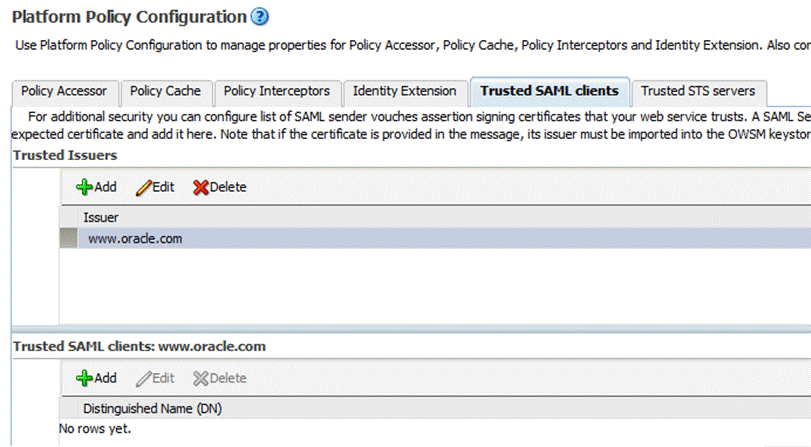
Click the Trusted SAML clients tab in the Platform Policy Configuration page.
Select www.oracle.com issuer in the Trusted Issuers pane.
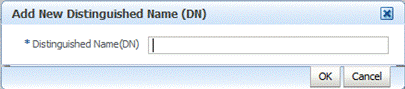
Click Add in the Trusted SAML clients: www.oracle.com pane.
The Add New Distinguished Name (DN) window is displayed.
Figure 2-6 Add New Distinguished Name (DN) Window
Add text cn=HSN-PVPR, ou=HSGBU, o=ORACLE, c=US and click OK.
Repeat steps 14 and 15 to add cn=HSNP, ou=HSGBU, o=ORACLE, c=US as trusted SAML client.
Click Apply.
Log out of the Enterprise Manager.
Create the WebLogic user hsn_system to be used for the HSnP domain.
Restart the WebLogic server instances for the HSnP domain.
This chapter contains the following topics:
To increase PermGen memory, perform the following:
Edit the <HSNP-SOA_DOMAIN_HOME>/bin/setSOADomainEnv.sh file to increase the permgen memory allocation.
Increase the following values:
if [ "${JAVA_VENDOR}" != "Oracle" ] ; then DEFAULT_MEM_ARGS="${DEFAULT_MEM_ARGS} -XX:PermSize=128m -XX:MaxPermSize=256m" PORT_MEM_ARGS="${PORT_MEM_ARGS} -XX:PermSize=256m -XX:MaxPermSize=512m"fi
to these values:
if [ "${JAVA_VENDOR}" != "Oracle" ] ; then DEFAULT_MEM_ARGS="${DEFAULT_MEM_ARGS} -XX:PermSize=512m -XX:MaxPermSize=1024m" PORT_MEM_ARGS="${PORT_MEM_ARGS} -XX:PermSize=1024m -XX:MaxPermSize=1024m"fi
To install SOA security patch, perform the following:
Install the SOA Security Patch 16622432 for SOA version 11.1.1.6.0.
Download the patch from the following link and follow the install procedure for the Oracle SOA Platform:
To configure logging, perform the following:
Log in to the Enterprise Manager.
In the pane on the left side of the window, click the SOA domain in the WebLogic Domain folder and select the target SOA server.
From the WebLogic Server drop-down list, select Logs and then select Log Configuration.
Expand Root Logger.
For Oracle, change the log level and select Inherited from Parent.
Select Persist log level state across component restarts and click Apply Changes.
To configure Oracle Web Services Manager, perform the following:
Copy the hsnpkey.jks keystore file generated as part of OWSM configuration in the HSnP domain to the <HSNP-SOA_DOMAIN_HOME>/config/fmwconfig folder.
Open the <HSNP-SOA_DOMAIN_HOME>/config/fmwconfig/jps-config.xml file.
Search for default-keystore.jks in the file.
It should be like <serviceinstance name="keystore" provider="keystore.provider"location="./default-keystore.jks">
Replace ./default-keystore.jks with ./hsnpkey.jks and save the file.
Restart the WebLogic server instances for the HSnP-SOA domain.
Copy the HSnP_OWSM_Config.py file from the media pack to a location to which the operating system user has read and execute permissions.
Execute the following commands on the command prompt:
cd <MIDDLEWARE_HOME>/oracle_common/common/bin
./wlst.sh <ABSOLUTE FILE_PATH to HSnP_OWSM_Config.py>
Enter the corresponding values as prompted by the script.
Log in to the Enterprise Manager of the HSnP-SOA domain.
In the left pane, click the HSnP-SOA domain in the WebLogic Domain folder.
From the WebLogic Domain drop-down list, select Web Services and then select Platform Policy Configuration.
Figure 2-10 WebLogic Domain Drop-down List
Click the Trusted SAML clients tab in the Platform Policy Configuration page.
Select www.oracle.com issuer in the Trusted Issuers pane.
Figure 2-11 Platform Policy Configuration
Click Add in the Trusted SAML clients: www.oracle.com pane.
The Add New Distinguished Name (DN) window is displayed.
Figure 2-12 Add New Distinguished Name (DN) Window
Add text cn=HSN-PVPR, ou=HSGBU, o=ORACLE, c=US and click OK.
Repeat steps 12 and 13 to add cn=HSNP, ou=HSGBU, o=ORACLE, c=US as trusted SAML client.
Log out of the Enterprise Manager.
Create the WebLogic user hsn_system to be used for the HSnP-SOA domain.
Restart the WebLogic server instances for the HSnP-SOA domain.
To configure HSN-SOA MDS, perform the following:
Extract the soa_mds_<<buildNumber>>.zip file and soa_mds_endpoint_<<buildNumber>>.zip file for MDS from the media pack.
Create a folder named apps on your local system and extract the JAR file from the soa_mds_<<buildNumber>>.zip file in the folder.
Zip the apps folder.
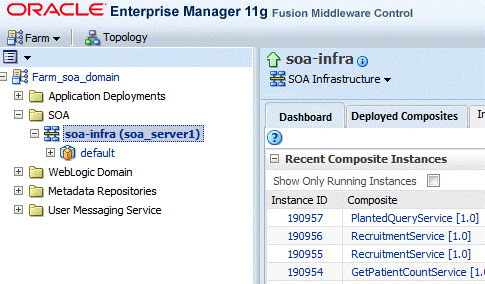
Log in to the Enterprise Manager of the SOA server.
Expand SOA under Farm_soa_domain and click soa-infra (soa_server1).
The SOA Infra Home Page screen is displayed.
Click SOA Infrastructure.
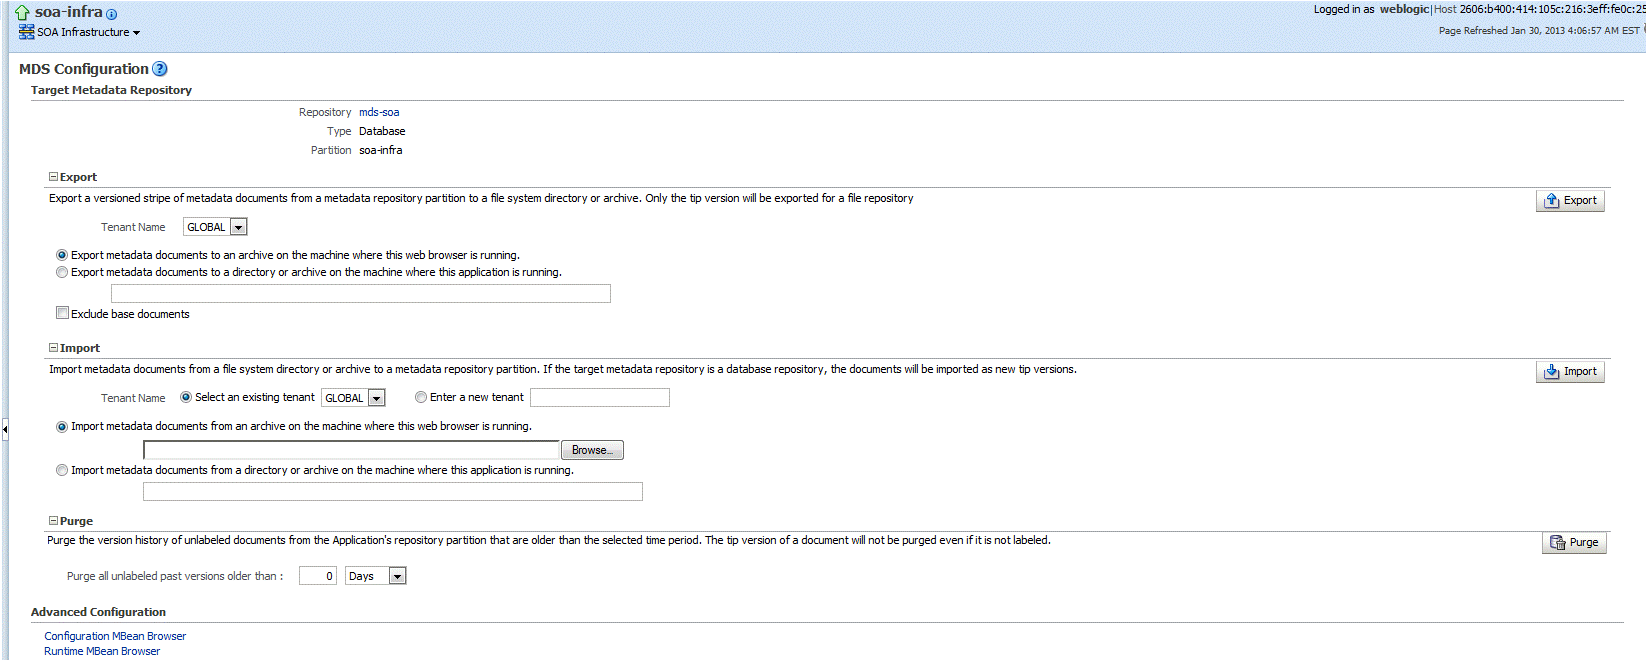
Select Administration and then select MDS Configuration.
The MDS Configuration screen is displayed. This screen lets you import and export MDS archives.
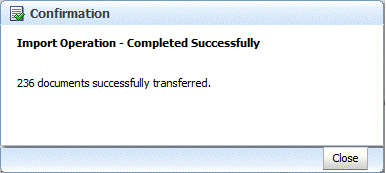
Click Import and select the apps.zip folder.
Note:
You cannot cancel the import operation once it is initiated.You have successfully imported the archives.
Create a folder named apps on your local system and extract the JAR file from the soa_mds_endpoint_<<buildNumber>>.zip file in the folder.
Navigate to the apps\soa_mds\Reference\dvm path within the apps folder.
Edit the SOAServiceEndpoint.dvm file.
This file contains endpoint URL for the SOA and registry services.
For SOA services, update the domain and port as per the SOA server details.
For registry services, update the domain and port as per the target server where HSnPManApp is deployed.
Update the URLs of SOA services as per the target SOA server and registry services as per the ManApp deployment server.
Repeat steps 3 through 8 to import the new apps.zip file.
This section contains the following topics:
To configure data source, perform the following:
Log in to the WebLogic console of the SOA server.
Create a data source using the ManApp schema credentials.
Enter jdbc/HAFDBDS as jndi name and assign it to the SOA server as target server.
Restart the SOA server.
To configure SOA server, perform the following:
Extract the HsnSensor JAR from the media pack.
Shut down the server.
Copy the HsnSensor-<<buildNumber>>.jar file to <MIDDLEWARE_HOME>/Oracle_SOA1/soa/modules/oracle.soa.ext_11.1.1 on target server.
Navigate to <MIDDLEWARE_HOME>/Oracle_SOA1/soa/modules/oracle.soa.ext_11.1.1.
Execute the following commands:
/bin/sh
source <MIDDLEWARE_HOME>/wlserver_10.3/server/bin/setWLSEnv.sh
ant
Wait for the build successful message.
Start the server.
To set transaction timeout for SOA, the administrator need to set the SyncMaxWaitTime property value in seconds using the following steps:
To set timeout for BPEL:
Log in to the Enterprise Manager.
On the left of the navigation menu, expand the SOA folder and select soa-infra (soa_server1).
On the right top of the Details screen, expand the SOA Infrastructure drop-down menu and select SOA Administration, BPEL Properties.
The BPEL Service Engine Properties screen is displayed.
Click More BPEL Configuration Properties.
The Application Defined MBeans: BPELConfig:bpel screen is displayed.
Edit the SyncMaxWaitTime setting in the list to set timeout to 720 seconds.
To set timeout in the SOA EJBs:
Log in to the WebLogic console.
On the left of the navigation menu, click Deployments.
Click soa-infra in the list of deployments.
The Settings for soa-infra screen is displayed.
In the Modules and Components list, click each of the following EJBs to increase the transaction timeout value in the corresponding Configuration tab.
BPELEngineBean
BPELDeliveryBean
BPELActivityManagerBean
BPELServerManagerBean
BPELProcessManagerBean
BPELInstanceManagerBean
BPELFinderBean
Set the timeout to 960 seconds.
To set timeout for JTA:
On the left side of the navigation menu, select soa_domain and increase the JTA timeout.
Select JTA in the Configuration tab.
Set the timeout to 1200 seconds.
You can deploy the following SOA services from their respective JAR files:
GetNetworkCountService
PlantedQuerySerrvice
RecruitmentService
GetPatientCountService
GetCriteriaAnalysisCountService
To deploy SOA services, perform the following:
Extract the following files from the media pack:
sca_NetworkCountService_rev<<buildNumber>>.jar
sca_PlantedQueryService_rev<<buildNumber>>.jar
sca_RecruitmentService_rev<<buildNumber>>.jar
sca_GetPatientCountService_rev<<buildNumber>>.jar
sca_CriteriaSetAnalysisService_rev<<buildNumber>>.jar
Log in to the Enterprise Manager of the SOA server.
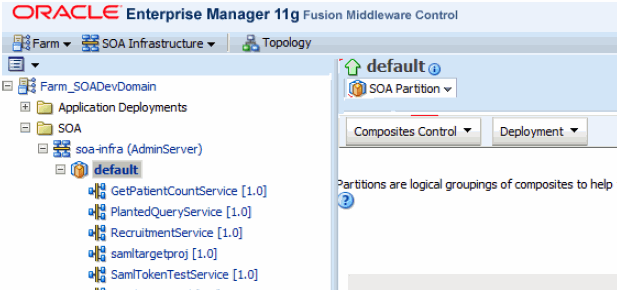
Expand SOA and select default.
The Enterprise Manager - SOA Default Node screen is displayed.
Figure 2-16 Enterprise Manager - SOA Default Node
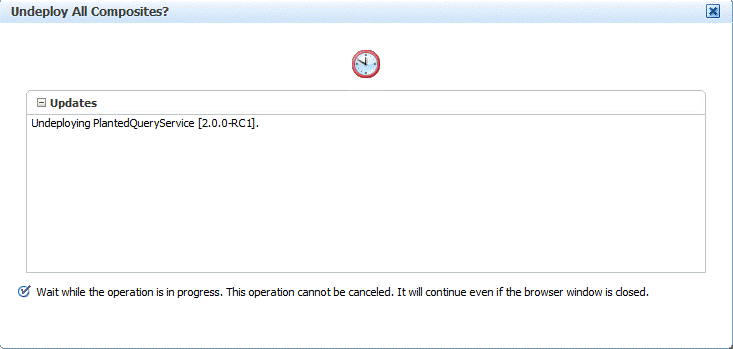
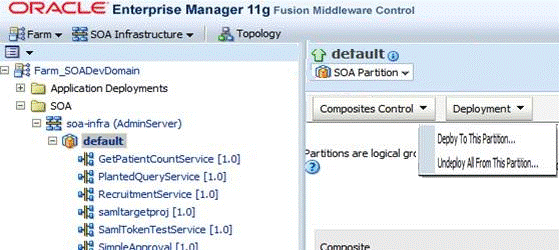
From SOA Partition, select Deployment and then select Undeploy All From This Partition.
Figure 2-17 Undeploying Composites from a Partition
All the available composites are undeployed from the server.
Note:
You cannot stop the undeploying operation once it is initiated.From SOA Partition, select Deployment and then select Deploy To This Partition.
Select the deployable composite JAR from your system and keep clicking Next.
The selected JAR file is deployed on the SOA server.
Repeat step 6 to deploy all the required services.
|
Copyright © 2014, 2015, Oracle and/or its affiliates. All rights reserved. Legal Notices |
|