Contents
This topic describes how to upgrade your existing
11.1.2.x
installation and migrate your data to API Gateway
version 11.1.2.3.0. API Gateway 11.1.2.3.0 provides a sysupgrade script to export your data
from an existing installation, upgrade it, and import it into a new API Gateway 11.1.2.3.0 installation.
The sysupgrade script enables you to upgrade the following from version
11.1.2.x
to version 11.1.2.3.0:
-
Configuration (policies, filters, certificates, and so on) – Configuration data for API Gateway instances, Node Managers, and groups.
-
Domain topology – Domains, hosts, API Gateways, and groups.
-
Client Application Registry – The Client Application Registry is used to store OAuth 2.0 client applications.
-
KPS – The key property store (KPS) is used to store metadata for policies, and OAuth client application data.
-
Databases – Databases can be used to store OAuth tokens and codes, and as a persistent store for the key property store.
-
Cassandra - Embedded Apache Cassandra database.
-
LDAP directory services – LDAP directory services can be used instead of the API Gateway user store to store user authentication information.
-
Administrator users – Users who were created in the API Gateway Manager web interface, including the default administrator user (
admin/changeme). -
Ext/lib – Contents of the
ext/libdirectory. This directory contains any external JAR files that have been added to the API Gateway CLASSPATH. -
System configuration – Java virtual machine arguments and other configuration in
jvm.xml.
Upgrade is supported on Linux and Windows platforms.
![[Tip]](../common_oracle/images/admon/tip.png) |
Tip |
|---|---|
|
To upgrade from a version of API Gateway earlier than 11.1.2.x, see the Upgrade from version 11.1.1.x topic. |
The steps involved in an upgrade are summarized as follows:
-
Back up the old installation and databases on all nodes.
![[Note]](../common_oracle/images/admon/note.png)
Note Do not shut down the old installation.
-
Install API Gateway 11.1.2.3.0 (new installation) on each node.
Note Do not create or start any groups, Node Managers, or API Gateways.
-
Set up the upgrade tools on the old installation on all nodes.
-
Export the data from the old installation on all nodes.
Tip The exported data can also be used as a backup.
-
Copy the exported data from the old installation to the new installation on each node, and then upgrade the data on each node of the new installation.
-
Apply the upgrade to the new installation on all nodes.
Note Shut down any Node Managers or API Gateways on the old installation before applying the upgrade.
This section describes the steps involved in an upgrade from version 11.1.2.x (old installation) to version 11.1.2.3.0 (new installation).
Back up the old 11.1.2.x installation on all nodes, including any databases.
-
Back up the
apigatewayorapiserverdirectory. -
Back up any databases by creating a DMP file of the tables in use.
For more information on backing up the system, see the API Gateway Administrator Guide.
Install API Gateway 11.1.2.3.0 in a different directory to your old
11.1.2.x
installation on all nodes. For example, if the old installation is installed in
OLD_INSTALL_DIR, you should install the new installation in
NEW_INSTALL_DIR. For more information on installation, see the Installation topic.
|
Note |
|---|---|
|
|
To copy the upgrade tools from the new 11.1.2.3.0 installation to the old installation, copy the
upgrade directory from the 11.1.2.3.0 installation to the old installation.
Copy this directory from your 11.1.2.3.0 installation:
Windows
NEW_INSTALL_DIR\apigateway\upgrade
UNIX/Linux
NEW_INSTALL_DIR/apigateway/upgrade
After copying, the old installation should contain the following directory:
Windows
OLD_INSTALL_DIR\apigateway\upgrade
UNIX/Linux
OLD_INSTALL_DIR/apigateway/upgrade
|
Note |
|---|---|
|
On API Gateway versions earlier than
11.1.2.2.1
the |
The exporter tool differs based on the version of your old installation. Ensure you install the correct tool for your version.
Perform these steps to install the exporter tool on your old installation:
-
If your old installation is version 11.1.2.0.x or 11.1.2.1.x, open a command prompt at the following directory in your old installation:
Windows
OLD_INSTALL_DIR\apigateway\upgrade\legacy\7.1x
UNIX/Linux
OLD_INSTALL_DIR/apigateway/upgrade/legacy/7.1x
-
If your old installation is version 11.1.2.2.x, open a command prompt at the following directory in your old installation:
Windows
OLD_INSTALL_DIR\apigateway\upgrade\legacy\7.2x
UNIX/Linux
OLD_INSTALL_DIR/apigateway/upgrade/legacy/7.2x
-
Run the
installcommand. -
Repeat on each node of the old installation.
|
Note |
|---|---|
|
Before you export, ensure that the Node Managers and API Gateways are running on the old installation. |
Perform these steps to export the data from your old installation:
-
Open a command prompt at the following directory in your old installation:
Windows
OLD_INSTALL_DIR\apigateway\Win32\bin
UNIX/Linux
OLD_INSTALL_DIR/apigateway/posix/bin
-
Delete the
outdirectory if it already exists. -
Run the
sysupgradecommand to export the data.Windows
sysupgrade export
UNIX/Linux
./sysupgrade export
The data is exported to the
outdirectory. -
Repeat on each node of the old installation.
To copy the exported data from the old installation to the new 11.1.2.3.0 installation, copy the
out directory from the old installation to the 11.1.2.3.0 installation.
Copy this directory from your old installation:
Windows
OLD_INSTALL_DIR\apigateway\Win32\bin\out
UNIX/Linux
OLD_INSTALL_DIR/apigateway/posix/bin/out
After copying, the new installation should contain the following directory:
Windows
NEW_INSTALL_DIR\apigateway\Win32\bin\out
UNIX/Linux
NEW_INSTALL_DIR/apigateway/posix/bin/out
Perform these steps to upgrade the data exported from your old installation:
-
Open a command prompt at the following directory in your new 11.1.2.3.0 installation:
Windows
NEW_INSTALL_DIR\apigateway\Win32\bin
UNIX/Linux
NEW_INSTALL_DIR/apigateway/posix/bin
-
Run the
sysupgradecommand to upgrade the exported data in theoutdirectory.Windows
sysupgrade upgrade
UNIX/Linux
./sysupgrade upgrade
The data in the
outdirectory is upgraded to version 11.1.2.3.0. -
Repeat on each node of the new installation.
|
Note |
|---|---|
|
You must shut down any Node Managers or API Gateways on the old installation before applying the upgrade. |
Perform these steps to apply the upgraded data to your new 11.1.2.3.0 installation:
-
Open a command prompt at the following directory in your new 11.1.2.3.0 installation:
Windows
NEW_INSTALL_DIR\apigateway\Win32\bin
UNIX/Linux
NEW_INSTALL_DIR/apigateway/posix/bin
-
If KPS or OAuth tables in your system are backed by a database, run the
sysupgradecommand to apply the database upgrades in theoutdirectory.Tip If KPS or OAuth tables in your system are not backed by a database, you do not need to perform this step.
Follow these steps:
-
Ensure the required database driver files are copied into:
Windows
NEW_INSTALL_DIR\apigateway\ext\lib
UNIX/Linux
NEW_INSTALL_DIR/apigateway/ext/lib
-
Run the
sysupgradecommand to apply the database upgrades.Windows
sysupgrade applyDB
UNIX/Linux
./sysupgrade applyDB
The database upgrades are applied to the new 11.1.2.3.0 installation.
-
-
Run the
sysupgradecommand to apply the upgrades in theoutdirectory.Windows
sysupgrade apply
UNIX/Linux
./sysupgrade apply
The upgrades are applied to the new 11.1.2.3.0 installation.
-
Repeat on each node of the new installation.
To verify that the upgrade was successful, perform the following steps:
-
Use the
managedomaintool to:-
Print the topology.
-
Download a deployment archive.
For more information on using
managedomain, see the API Gateway Administrator Guide. -
-
Start Policy Studio and connect to an Admin Node Manager. For more information, see the API Gateway User Guide.
-
Start API Gateway Manager and view the topology, administrator users, and key property stores. For more information, see the API Gateway Administrator Guide.
-
Start the Client Application Registry web interface and view the client applications. For more information, see the API Gateway OAuth Guide.
This section details some common upgrade scenarios.
To upgrade a single node from 11.1.2.x to 11.1.2.3.0, follow these steps:
-
Back up the 11.1.2.x installation. For more information, see the section called “Back up old installation”.
-
Install 11.1.2.3.0 alongside your 11.1.2.x installation. For more information, see the section called “Install API Gateway 11.1.2.3.0”.
-
Set up the upgrade tools in your 11.1.2.x installation. For more information, see the section called “Copy upgrade tools to old installation” and the section called “Install the exporter tool on the old installation”.
-
Export the data from your 11.1.2.x installation. For more information, see the section called “Export data from the old installation”.
-
Copy the data to your 11.1.2.3.0 installation and upgrade the data. For more information, see the section called “Copy exported data to new installation” and the section called “Upgrade the exported data”.
-
Apply the upgrade to your 11.1.2.3.0 installation. For more information, see the section called “Apply the upgrade”.
To upgrade a single node from 11.1.1.x to 11.1.2.3.0, follow the steps in the section called “Upgrade API Gateway from 11.1.1.x to 11.1.2.3.0”.
For node 1, follow these steps:
-
Back up the 11.1.2.x installation. For more information, see the section called “Back up old installation”.
-
Install 11.1.2.3.0 alongside your 11.1.2.x installation. For more information, see the section called “Install API Gateway 11.1.2.3.0”.
-
Set up the upgrade tools in your 11.1.2.x installation. For more information, see the section called “Copy upgrade tools to old installation” and the section called “Install the exporter tool on the old installation”.
-
Export the data from your 11.1.2.x installation. For more information, see the section called “Export data from the old installation”.
-
Copy the data to your 11.1.2.3.0 installation and upgrade the data. For more information, see the section called “Copy exported data to new installation” and the section called “Upgrade the exported data”.
-
Apply the upgrade to your 11.1.2.3.0 installation. For more information, see the section called “Apply the upgrade”.
For node 2, follow the same steps as for node 1.
|
Note |
|---|---|
|
If database upgrades were applied to node 1, you do not need to apply the database upgrades again to node 2. |
The --host option is necessary to connect to the Admin Node Manager. For example:
Windows
sysupgrade export --host=10.142.58.144 --port=8090
UNIX/Linux
./sysupgrade export --host=10.142.58.144 --port=8090
To upgrade two nodes from 11.1.1.x to 11.1.2.3.0, follow the steps in the section called “Upgrade API Gateway from 11.1.1.x to 11.1.2.3.0” on each node.
The following additional steps might be required, depending on your configuration:
-
RBAC – Administrator users are imported into the new 11.1.2.3.0 installation. However, if you have made changes to the Role-Based Access Control (RBAC) files in your API Gateway to modify roles and permissions, you must reapply these changes manually in the new API Gateway installation.
-
Inconsistent Group – You might get a message to say that the groups are inconsistent. This is because all
.fedfiles are deployed directly to each instance. It should not cause any issues. To resolve the issue of inconsistent groups, save a.fedfile of the group and redeploy to the group. -
Node Managers and API Gateways as a service – If any of your processes are running as a service, you must manually update the services with the new settings.
This section provides some advice on troubleshooting the upgrade process.
If you have customizations in your ext/lib directory they might cause problems in the new 11.1.2.3.0 installation.
Customizations might need to be reapplied against the latest installation.
As each component completes, it marks the component as done by creating a done file in the component’s
directory. To run a single component again, you must first delete the done file and then run
the sysupgrade command with the --component option, for example:
sysupgrade upgrade --component=db
|
Note |
|---|---|
|
Running a single component is not supported for applying the upgrade. |
When running any of the commands you can add the following options to the command-line to generate more debug information:
--tracelevel=DEBUG
--tracelevel=VERBOSE
Trace files are located in the following directories:
INSTALL_DIR/posix/bin/out/export/sysexport.trc
INSTALL_DIR/posix/bin/out/upgrade/sysupgrade.trc
INSTALL_DIR/posix/bin/out/applydb/sysapplydb.trc
INSTALL_DIR/posix/bin/out/apply/sysapply.trc
To perform an upgrade from version
11.1.2.x
to version 11.1.2.3.0, a Python script called sysupgrade is provided. The sysupgrade
script is located in the following directory:
Windows
NEW_INSTALL_DIR\apigateway\Win32\bin
UNIX/Linux
NEW_INSTALL_DIR/apigateway/posix/bin
This script is used for running all upgrade tasks. It supports four main tasks:
-
Export – Exports the data from the existing API Gateway into an
exportdirectory with a directory for each component's data.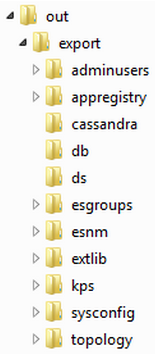
Note Requires the old API Gateway installation to be running.
-
Upgrade – Upgrades the data in the export directory structure and creates an
upgradedirectory with the upgraded data in it.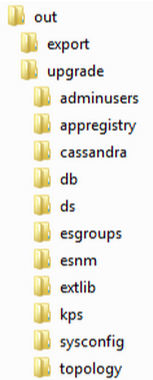
-
Apply DB – Applies any required database updates to the API Gateway 11.1.2.3.0 installation.
Tip You only need to run this task if KPS or OAuth tables in your system are backed by a database. Otherwise, you can skip this task.
-
Apply – Applies the upgraded data to the running API Gateway 11.1.2.3.0 installation.
For a description of all the available command-line options and their default settings, run the
sysupgrade command with the --help option.
The following table summarizes some of the more common options:
| Option | Description |
|---|---|
--help |
Display available options and default settings. |
| System upgrade details: | |
|
|
Specify the components to execute the task on. The allowed values are:
|
--indir=INDIR |
Root directory of the API Gateway instance. Defaults to INSTALL_DIR.
|
--outdir=OUTDIR |
Directory location in which the exported and upgraded data is stored. Defaults to out.
|
| Node Manager details: | |
|
|
Scheme for Node Manager (for example, https). The default is https.
|
--host=HOST |
Host name for Node Manager (for example, localhost). The default is localhost.
|
--port=PORT |
Port for Node Manager (for example, 8090). The default is 8090.
|
--username=USERNAME |
User name for authenticating to the Node Manager (for example, admin). The default
is admin.
|
--password=PASSWORD |
Password for authenticating to the Node Manager (for example, changeme). The default
is changeme.
|
| Tracing details: | |
--tracelevel=TRACELEVEL |
Trace level to use for system upgrade process. The default is INFO.
The available options are:
|
