Producing an Online Academic Advisement Transcript Report
This section discusses how to:
Select the transcript type and general parameters.
Select student and what-if data for processing.
Specify send to information.
View and print advisement report results.
Check for report errors.
|
Page Name |
Definition Name |
Navigation |
Usage |
|---|---|---|---|
|
Request Header |
SA_REQUEST_HEADER |
|
Select the type of transcript and set other general parameters of the report request. |
|
Request Detail |
SA_REQUEST_DETAIL |
|
Select a student ID and, as necessary, what-if options. |
|
Send To Information |
SA_REQUEST_DTL_SEC |
Click the Send button on the Request Detail page. |
Specify the recipient to whom you want to mail the advisement report. |
|
Report Results |
SA_REPORT_RESULTS |
|
View the results of your transcript request process. Depending on the transcript type, you may see a transcript only, a transcript and an audit report, or only an audit report. |
|
Report Errors |
SA_REQ_REPORT_ERR |
|
View the reporting errors. If the Report Results page is blank or incomplete after you click the Process Request button on the Request Detail page or the word Errors rather than Successful appears next to the Print button, check this page. All of the report errors are described in detail in the Message Text field. |
Access the Request Header page ().
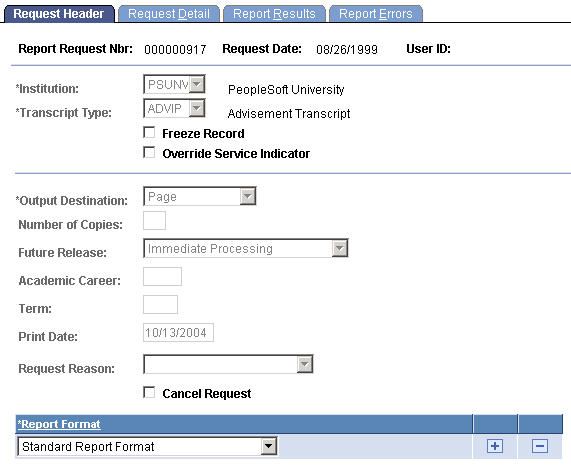
Image: Request Header page
This example illustrates the fields and controls on the Request Header page. You can find definitions for the fields and controls later on this page.
|
Field or Control |
Definition |
|---|---|
| Report Request Nbr (report request number) |
Displays the identification number for this report request . |
| Request Date and User ID |
Displays system-supplied values. The request date reflects the date that the report was requested. The user ID identifies the person who requested the report. |
| Institution |
Enter the institution to which both the transcript type data and the students that you process are associated. |
| Transcript Type |
Enter the type of transcript (for example, advising) that you want to process. You created transcript types using the Transcript Type component. Degree audit information displays only on transcript types for which you selected the Advising Report check box on the Basic Data page. You can use a special usage value as an academic advisement transcript type. See Setting Up Special Requirement Usage Values. Note: Any modified usage value can be associated with a transcript type and then entered in the Transcript Type field. Modified usage values are established on the Requirement Usage page and attached to a transcript type on the Basic Data page. These values are effective-dated and match the student's requirement term. |
| Freeze Record |
Select to prevent this request from being purged during a subsequent transcript purge process. |
| Override Service Indicator |
Select to have the system ignore student-specific service indicators when you process the request. If this check box is not selected, then service indicators are evaluated. For instance, some service indicators prevent a student from receiving a transcript. |
| Output Destination |
Select the output destination of the transcript. This value determines where the system sends the electronic results of the process. Values for this field are delivered with your system as translate values. Do not modify these values in any way. Any modifications to these values will require a substantial programming effort. Values are: Page: Sends the transcripts to the Report Results page to be viewed online before printing. You can then click the Print button to initialize Crystal, where you can view and print transcripts using a new window. Printer: Like the Page option, sends the transcripts to the Report Results page to be viewed online before printing. You can then click the Print button to initialize Crystal, where you can view and print transcripts using a new window. Values for this field are delivered with your system as translate values. Do not modify these values. Any modifications to these values require a substantial programming effort. |
| Number of Copies |
Enter the number of copies that you require. When the output destination is Printer, the default value of 1 also serves as the default value on the Request Detail page. On the Request Detail page, you can override this value on a student-by-student basis. Note: The Number of Copies and Print Date fields are available only if the Output Destination field value is Printer. |
| Future Release |
Select the future release value that triggers when the system processes the transcript request through a batch generation process running in the background. Values are: Immediate Processing: Indicates that no specific future release transcript request exists. Degree Confer Date: Indicates that when the degree is conferred, a transcript or degree audit is produced. The Career and Term fields become available for entry. Grades Post: Indicates that when a fully graded date is reached, a transcript or degree audit is produced. The Career and Term fields become available for entry. Specific Date: Indicates that a transcript request is produced on the user-specified date. Hold: Indicates that the production of a transcript or degree audit is on hold. A report is not produced until you click the Process Request button on the Request Detail page. For example, this field value could be used if transfer work is due to be received for a student. An advisor could set up the parameters for a transcript or degree audit report and wait until all of the work has been posted before running the report. Transfer Credit Post: Indicates that a transcript request is produced when transfer credit is posted. |
| Academic Career |
Displays the academic career in which the future release is valid. The field is available when you enter a future release value of Degree Confer Date or Grades Post. |
| Term |
Enter the term in which the future release is valid. The field is available when you enter a future release value of Degree Confer Date or Grades Post. |
| Print Date |
The current date appears by default as the print date. You can modify this value, as necessary. The field is unavailable if you enter a future release value of Immediate Processing, Degree Confer Date, or Grades Post. |
| Request Reason |
Enter the request reason code for this request. Values for this field are delivered with your system as translate values. You can modify these translate values. Values are None, Data Change, End of Term Print, External Request, Graduation, Student's Request, and Web Transcript Request. |
| Cancel Request |
Select to cancel the print request. |
Report Format
|
Field or Control |
Definition |
|---|---|
| Report Format |
Select the format for the report. For this field to be available, the Advising Report check box on the Basic Data page must be selected and the transcript type must be an advisement report type or a special usage report type. Values are: Standard Report Format: The report is printed as hard copy or delivered to a page. The analysis database does not refresh when the Report Format field value is Standard Report Format. This value is the default. Analysis Database: The report is written to the analysis database. The report is stored in computer-readable format; therefore, application programs can be written against the tables to create modified reports. This is the only field value that refreshes the database tables. Completed Only: The report contains only those requirements that have been wholly completed. Normally, the degree audit report applies bold type to incomplete requirement groups and requirements, but not to completed requirement groups and requirements. Incompleted Only: The report contains only those requirements that have not been totally completed. This field value can help a counselor determine exactly what requirements a student needs to satisfy to graduate. Note: Enter Analysis Database in the Report Format field to write the degree audit report to the analysis database for future use by other Crystal and SQR reports or COBOL programs. Data stored in these academic advisement analysis tables can be reused. The tables can be queried for data. These tables do not automatically purge and must be updated to remain current. Note: Use multiple report format rows to both print and write a report to the analysis database. |
Access the Request Detail page ().
Image: Request Detail page
This example illustrates the fields and controls on the Request Detail page. You can find definitions for the fields and controls later on this page.
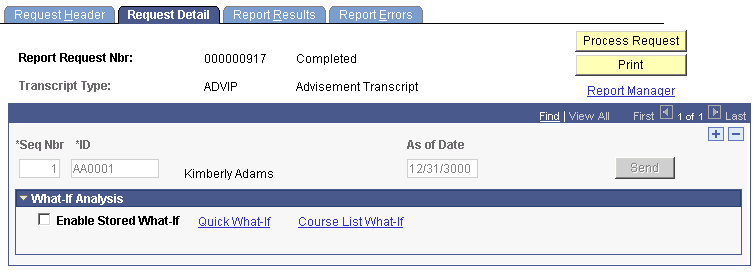
Use this page to enter student and what-if data.
Important! To define what-if analysis data, you must be in Add mode. If the page is in the Update/Display mode, you can view an existing report, but you can not update or change the report. Each report is dated, so there is no reason to update a report when you can run the report again using today's date as the request date on the Request Header page.
Note: To improve degree audit run times, limit the number of individual reports (request detail records) for online display to 10 per transcript request header. You must retrieve all of the detail report lines for a transcript request header, and if you have a large amount of individual requests, the system attempts to load all of the data.
Note: You do not have to use a what-if scenario to run a report. In fact, a what-if scenario may not be used often.
Under what-if analysis, these what-if functions are available: Stored What-If, Quick What-If, and Course List What-If.
|
Field or Control |
Definition |
|---|---|
| Seq Nbr (sequence number) |
Displays a sequence number. This system-supplied number is sequential. This number determines the order in which the individual report requests are processed. The user can override this number, if necessary. |
| ID |
Enter the ID of the student for whom the report is to be run. |
| As of Date |
The audit report accurately reflects all of the relevant student data as of this date. The date 01/01/3000 appears by default, but you can modify it at each runtime. To set the field default to the current date, leave the Transcript Default As of Date field blank on the Installation Student Administration page. A value in this field is required. This field is used to include or exclude future-dated programs, plans, sub-plans, conditions, and entity groups when you run an academic advisement transcript report. When you run the audit report, all of the student data except course work as of the As of Date field value is included in the audit. Regardless of the value in the As of Date field, all of the courses on a student's transcript are used. |
What-if Analysis
|
Field or Control |
Definition |
|---|---|
| Enable Stored What-If and Stored What-If |
Select to enable the Stored What-If option. Click the Stored What-If link to create a new stored what-if scenario or run the degree audit report based on previously stored what-if information for the student. |
| Quick What-If |
Clear the Enable Stored What-If check box to enable this option. Click to run a simulated academic advisement report that compares the student's transcript against a proposed academic career, program, plan, and sub-plan that you enter using the Quick What-If Analysis Report page. |
| Course List What-If |
Clear the Enable Stored What-If check box to enable this option. Click to select an existing course from the course catalog to use during a what-if analysis. |
Important! The Course List What-If option can be used in combination with the Stored What-If option or the Quick What-If option. You cannot use the Stored What-If option and the Quick What-If option at the same time. These combinations are possible: Course List What-If option alone, Course List What-If option and Stored What-If option, Course List What-If option and Quick What-If option, Stored What-If option alone, and Quick What-If option alone.
|
Field or Control |
Definition |
|---|---|
| Send |
If the report is to be sent to a recipient, click to access the Send To Information page and enter the recipient information. |
Access the Send To Information page (Click the Send button on the Request Detail page).
|
Field or Control |
Definition |
|---|---|
| Specify External Org ID (specify external organization ID) |
Select to send the transcript to an external organization that is already in your database. Enter the appropriate organization number and location. If you do not select this check box, enter the address of the requester. |
| OK |
Click to exit the page and return to the Request Detail page. |
| Process Request and Output Destination |
Click the Process Request button on the Request Detail page when you are ready to submit the requests for processing. The system sends the degree audit report to the specified output destination on the Request Header page. |
|
Click to print all of the reports listed on the page. Use the Report Manager to view the Crystal report. When multiple sequence number rows are present, all of the listed reports print. |
Access the Report Results page ().
Image: Report Results page (1 of 3)
This example illustrates the fields and controls on the Report Results page (1 of 3). You can find definitions for the fields and controls later on this page.
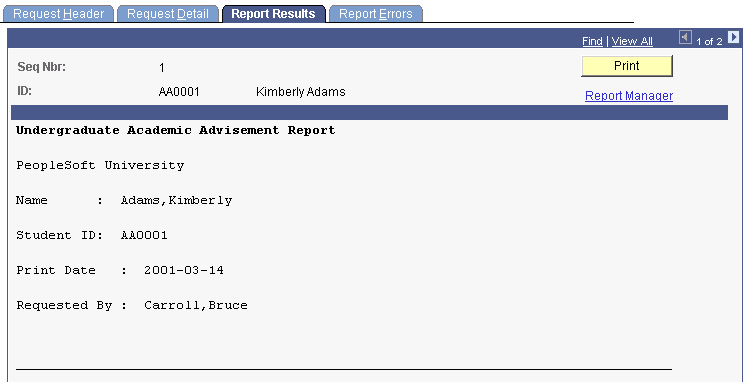
Image: Report Results page (2 of 3)
This example illustrates the fields and controls on the Report Results page (2 of 3). You can find definitions for the fields and controls later on this page.
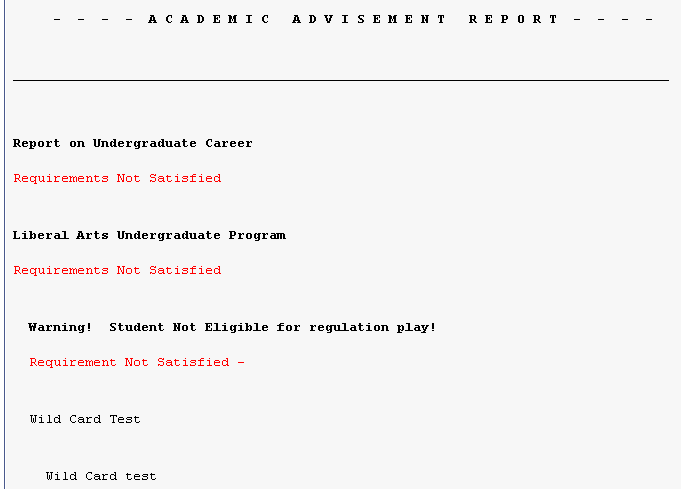
Image: Report Results page (3 of 3)
This example illustrates the fields and controls on the Report Results page (3 of 3). You can find definitions for the fields and controls later on this page.
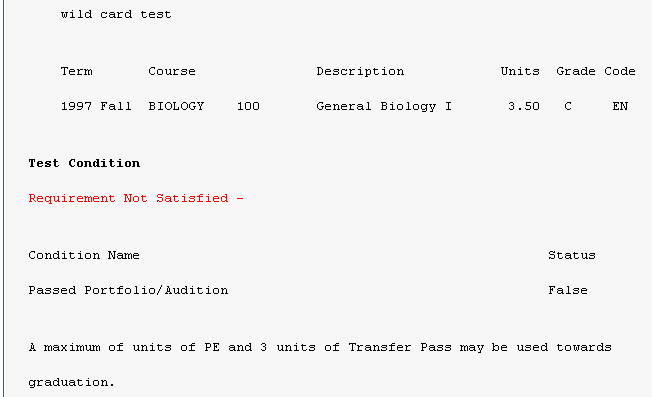
The academic advisement report prints in academic structure order. The career, program, and plan are listed. Depending on the print controls and options in force, specific requirements, requirement details, and courses used or needed to satisfy requirements print on the report.
Career level requirements print under the program levels on reports. Most students have only one career and one program. However, if a student has two programs (for example, LAU and FAU), then the UGRD level requirement prints under each declared program rather than under undergraduate requirements. As a result, a single requirement may appear more than once in an audit report even though it is required only once.
Note: Processing order and reporting order are different. Processing order refers to the order in which courses are processed by the audit engine. Academic structure, requirement group number, and reporting sequence number affect processing order. Reporting order refers to the order in which courses, requirements, and requirement groups are printed in the audit report.
In general, the long description of the requirement groups, requirements, and requirement lines appear. Under each long description of the requirement groups and requirements, the report contains information about grade point average (GPA) and units. If the student has not met a requirement, the heading is printed in bold type. If the requirement has been met, the heading is not printed in bold type.
When courses are printed, information about the term, course, course description, units, grade, and code appears in the report. (Courses are always printed in chronological order based on term.) Additionally, if any courses were transferred from an external organization, detail is listed. Codes include EN (regularly enrolled course credit), IT (internal transfer course credit), TE (test credit), OT (other credit), and TR (external transfer course credit).
Note: Course substitutions and overrides appear on the academic advisement transcript report. If a requirement group or requirement with a usage of Student Individualized Plan is overridden, this information appears at the bottom of the advisement report. Also, any discrepancy between the units that appear and the GPA calculation is noted. A discrepancy occurs if the units earned differ from the units taken.
Click the Print button to store a printable PDF version of the Report Results page in Report Manager.
Access the Report Errors page ().
|
Field or Control |
Definition |
|---|---|
| Seq Nbr (sequence number) |
Displays a system-supplied sequential number. This number determined the order in which the individual report requests were processed. |
| Sequence |
Displays the message sequence number. |
| Message Text |
Displays the error description. |