Understanding Staged Admission Transactions Processing
Use the Constituent Staging and Application Transactions components to review or edit the admissions transaction data stored in the staging tables. In addition, you can use these components to post the staged transactions into the production records of the Campus Solutions database.
A constituent in an admission transaction is the person record (applicant). Use the Constituent Staging component to handle the constituent data. The Constituent Staging component is a Campus Community CTM component. Use the Application Transactions component to handle the admissions application transaction data. To help you review the staged data using both the components for a particular Temporary ID, the components display a link that helps you navigate from one component to the other.
An admission transaction might have an error status for the constituent (person) or the application record. For error indicators, use both the components to find the corresponding field and enter a valid value.
Use the Constituent Staging component to review and correct the constituent errors.
Use the Application Transactions component to review and correct the application errors.
Note: For File Parser, only after the CTM Transaction Management process runs, any errors appear in the components. In the case of AAWS, errors can appear either when the user saves or submits an admission application.
An example of an error message that the Application Transactions staging component displays: Suppose you selected the Manual Reconciliation option for Home Schools on the School Setup page. If the applicant has indicated that a school of attendance is a home school and submitted the application, the Application Transactions component displays an error message.
Image: Example of an error message in the Application Transactions component
This example illustrates an error message in the Application Transactions component.
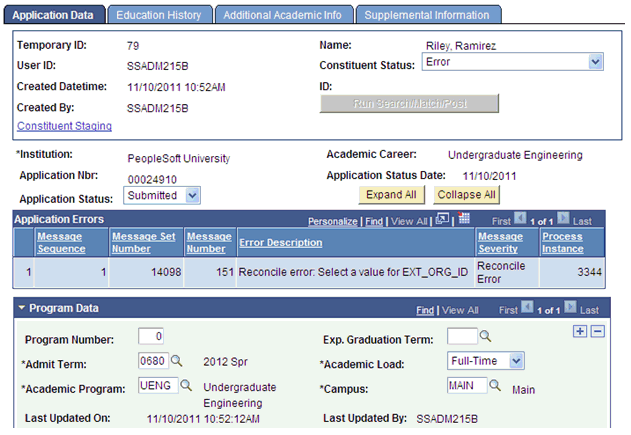
To resolve such an error, you can click the Education History tab, then select the valid external organization ID for the home-schooled applicant and finally click the Save button.
After you have reviewed a transaction and corrected the errors, you can run the search/match/post process from the components itself by clicking the Run Search/Match/Post button. On clicking this button, you can run both processes at once: to search for matching people in your database and to post the transaction according to the Search/Match parameters you set up on the Transaction Setup component. The latter happens if Search/Match identifies an ID that needs to be created or updated or if the applicant was a returning user and used a User ID already tied to an ID. In either way, the system uses the identified ID (EMPLID) to post the data. Alternatively, you can use the Constituent Staging and Application Transactions components to correct multiple transactions and then run the Transaction Management process to post the multiple transactions to the Campus Solutions database.
To process transactions in batch, use the Transaction Management process. If you had defined your admission transaction as either offline or online with the Process Search/Match option set to Batch, use the Transaction Management batch process to process these transactions. However, if the system knows the EMPLID for the applicant, then the transaction is effectively treated as realtime. The Transaction Management Process component offers different options on how you can process one, all or only a certain set of transactions. For processing a certain set of transactions, Population Selection can be used.
Regardless of how the application is posted (manually or in batch), the system looks at the Prospect Setup page of the Application Configuration component to determine if a prospect should be created and if 3Cs should be inserted into the 3C Trigger Results table for the ID created or updated. In addition, the system determines if additional actions should be taken on the prospect record based on the Update Data check box in the From Application to Prospect section of the Installation Defaults - AD page. For more information on updating an existing prospect record: