Setting Up Admission Installation Defaults
To set up admission installation defaults, use the Installation Defaults - AD component (INSTALLATION_AD).
This section discusses how to set up admission installation defaults.
|
Page Name |
Definition Name |
Navigation |
Usage |
|---|---|---|---|
|
Installation Defaults - AD |
INSTALLATION_AD |
|
Set up defaults, such as for copying information between application and prospect records. For example, when you add an application record, and a prospect record exists for that applicant, you might want to copy some of the information from the prospect record to the application record. |
Access the Installation Defaults - AD page ().
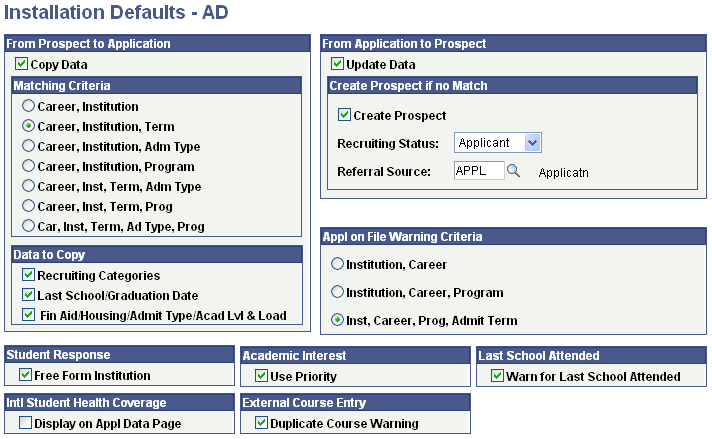
Image: Installation Defaults - AD page
This example illustrates the fields and controls on the Installation Defaults - AD page. You can find definitions for the fields and controls later on this page.
Note: You must exit and reenter the application for installation defaults to take effect.
From Prospect to Application
|
Field or Control |
Definition |
|---|---|
| Copy Data |
Select this check box if you want prospect information copied to the application record. Clear this check box if you don't want prospect information copied to a new application. |
Matching Criteria
If you selected the Copy Data check box, choose the criteria that the system uses to update an application with prospect information. Choose which data elements in your user defaults must match those of the prospect record. When you add a new application, the system compares your user defaults to the criteria that you select here. For example, if you select Career, Institution, and Admit Type, the system compares the prospect's career, institution, and admit type to your user defaults. If it finds a match, the system copies the prospect data into the new application. You must have defined user defaults for this functionality to work.
Data to Copy
If you selected the Copy Data check box, specify those data categories that you want carried to the application from the prospect record. You can choose one or more of the following three categories:
Recruiting categories.
Last school attended and graduation date.
Financial aid, housing, admit type, and academic level and load.
The system updates the application with the selected data at the matching criteria level.
Only those matching recruiting categories with the Move to Application check box selected on the Prospect/School Recruiting page are copied to the application record.
See Adding Prospects Through the Create/Update Prospects Component.
The preceding information is copied to the application initially, but if you later edit the application, the prospect record does not change. Conversely, if you later edit the prospect record, the application does not change.
Note: If you do not select the Copy Data check box, the choices under the Matching Criteria and Data to Copy group boxes do not affect anything in the system.
From Application to Prospect
If a prospect submits an application, you can update the prospect record with the relevant application number for the career and program. If the application is for a program that is not included on the prospect record, the system adds the new program information to the existing prospect record, including the career and program to which the application pertains.
|
Field or Control |
Definition |
|---|---|
| Update Data |
When you receive an application from an applicant with an existing prospect record, select this check box to copy the application number into the prospect record. The application number appears on the Prospect Program Data page in the Create/Update Prospects component. On the Prospect Career Data page in the Create/Update Prospects component, the Applied field is selected. Also, on the Prospect School/Recruiting page, the Last School Attended, Graduation Date, and Region fields are populated if they had no data in them on the prospect record. |
Note: If the prospect record does not include the program being applied to, the system adds that program to the prospect record and updates it with the application information.
Create Prospect if no Match
You can receive applications from people for whom you have no existing prospect records. For historical purposes, you might want to have a prospect record for all applications stored in your system. The Student Administration system enables you to create prospect records retroactively for all such applications.
|
Field or Control |
Definition |
|---|---|
| Create Prospect |
Select this check box to create a retroactive prospect record for an applicant. You must have selected the Update Data check box. When you save the new application, the system automatically creates a prospect record. The new record contains the following data from the application: admit term, admit type, campus, academic level, academic load, academic program, academic plan and sub-plan, recruiting status, application number, status date, last school attended, graduation date and region. Recruiting center comes from your user defaults. Additionally, the application number appears on the Prospect Program Data page in the Create/Update Prospects component, and the Applied field is selected on the Prospect Career Data page in the Create/Update Prospects component. The system only creates a prospect if a recruiting center is defined in your user defaults. |
| Recruiting Status and Referral Source |
If you selected the Create Prospect check box, enter a recruiting status and a referral source on the new prospect record. Recruiting status values are delivered with your system as translate values. You can modify these translate values. Define referral sources on the Referral Source Table page. |
Appl on File Warning Criteria
Avoid entering duplicates when adding new applications. You can specify at what level the system warns you that a potential duplicate application exists. For example, when saving an application, you might want the system to notify you that an application with the same institution, career, program, and admit term already exists for the person. Alternatively, you might want the system to warn you at a higher level, when only the institution and career match. When the system warning appears, you can either save the application or return to the application page without saving. Select your preference for being warned that a potential duplicate application exists for a person.
|
Field or Control |
Definition |
|---|---|
| Institution, Career |
If an application for this person exists with the same institution and career as the application that you are saving, a warning message appears. |
| Institution, Career, Program |
If an application for this person exists with the same institution, career, and programs as the application that you are saving, a warning message appears. |
| Institution, Career, Program, Admit Term |
If an application for this person exists with the same institution, career, program, and admit term as the application that you are saving, a warning message appears. If the system detects a potential duplicate when you save an application, you get a warning such as the following: "An application with Career (UGRD), Program (LAU), Admit Term (0450) and Institution (PSUNV) already exists. If you would like to create a new application with the same Career, Program, Admit Term and Institution click the OK button, otherwise click the Cancel button." |
Student Response
|
Field or Control |
Definition |
|---|---|
| Free Form Institution |
Select this check box to allow your users to enter a free-form institution name on the Student Response page and to allow students to enter a free form name on the self-service Accept Admissions page. If you want users to select from a list of external organizations that your institution has, clear this check box. You can use the Student Response page to capture reasons why a prospect or applicant chose or rejected your institution. This is important information that your institution might want to track and report on. Your institution has the option of allowing end users to enter the free-form name of a school when they capture data on the Student Response page. You might want to enable this option (on the Installation Defaults - AD page) because a student can choose to attend an institution that is not loaded as an external organization in your system. |
Academic Interest
|
Field or Control |
Definition |
|---|---|
| Use Priority |
Select this check box to enable the Academic Interest Priority feature. To disable the Academic Interest Priority feature for your institution, clear this check box. The Academic Interest Priority feature enables you to capture and view a prospect's or applicant's academic interest priority ranking level. For example, pre-law could be their first level academic interest priority and technology could be their second level academic interest priority. This feature can help in your enrollment management, recruiting efforts, and reporting program evaluation. If you enable this feature, the Priority field becomes active on the Academic Interests page. See Prerequisites for Tracking Supporting Prospect and Applicant Information |
Last School Attended
|
Field or Control |
Definition |
|---|---|
| Warn for Last School Attended |
Select this check box to have the following warning message appear: "The Last School Attended will not be automatically added to the academic history record." This message appears if you enter a value in the Last School Attended field on the Prospect School/Recruiting page or the Application School/Recruiting page at the time of updating a prospect or applicant record. You should use the External Education page to update an applicant's or prospect's academic history. The warning message does not appear if you enter a value in the Last School Attended field on the Prospect School/Recruiting page or the Application School/Recruiting page at the time of prospect or applicant creation. |
External Course Entry
|
Field or Control |
Definition |
|---|---|
| Duplicate Course Warning |
Select this check box to warn the user that a duplicate external course has been entered in the Education component. The following message appears: "Warning - Duplicate row for Subject (Subject) and Course Nbr (Course Number) in Organization (Ext Org ID) (14200, 456)". A duplicate course is defined as the same school subject and course number for an external organization. |