Updating Applications
After you have entered and saved an application, you must use the Application Maintenance component to update the application. Use the Application Maintenance component to program, recruiting data and more. You can also use this component to calculate an application fee, calculate an enrollment deposit, and matriculate an applicant.
Data in this component is stored at the application level, as opposed to the applicant or program level. This data is relevant to all academic programs being applied to with this application. You can enter and edit information in this component.
This section lists prerequisites and discusses how to:
Update or add application program data.
Capture student response – why the student selected another institution.
Add a program to an existing application.
Before you can edit or add any additional information in the Application Maintenance component, an application must first be entered into the system through the Application Entry component.
The Process Applications, Application Maintenance component is the third of three very similar components:
Student Recruiting, Add/Update a Prospect component.
Student Admissions, Add Application component.
Student Admissions, Maintain Applications component.
For example, Add/Update a Prospect and Add Application have a Bio/Demo (biographic/demographic) page and a Regional page. All three components have pages with similar names such as Prospect Academic Program Data page and Application Program Data page. You use these components to enter or maintain similar information at different times in your business process: for prospects, for entering application data, and for maintaining application data.
|
Page Name |
Definition Name |
Navigation |
Usage |
|---|---|---|---|
|
Application Program Data |
ADM_APPL_PROG_MNT |
|
Edit or update program and plan data for an application. You can also create an enrollment deposit and matriculate an applicant from this page. All applications must be tied to an academic career and program. Any lower level tracking depends on your office's policies. |
|
Application Data |
ADM_APPL_DATA |
|
Update information for an application. |
|
Application School/Recruiting |
ADM_APPL_RECRUIT |
|
Update or add recruiting information data. |
|
Application Student Response |
ADM_APPL_STDNT_RSP |
|
Capture the reason why a prospect or applicant chose to attend another institution and what institution he or she will be attending. |
|
Program Addition |
ADM_APPL_ADD_PROG |
|
Add a program to an existing application if you have already created an application number for that person within the same career. This page is only for adding an academic program and program-related information. You perform all modifications to existing academic programs using the Application Program Data page in the Maintain Applications component. |
Access the Application Program Data page ().
Note: Admissions application records use the Last Admit Term to determine if the program, plan, or subplan should appear in the prompt. If the Last Admit Term is populated on the Academic Program Table (ACAD_PROG_TBL), Academic Plan Table (ACAD_PLAN_TBL), or Academic SubPlan Table (ACAD_SBPLN_TBL) and the term is less than or equal to the term selected for the ID, the system does not display the value in the prompt.
|
Field or Control |
Definition |
|---|---|
| Sequence |
The default of the sequence is 1. The sequence appears in the field to the right of the Effective Date field. When you enter more than one row for the same effective date, the system automatically increments the sequence. |
|
Field or Control |
Definition |
|---|---|
| Program Action |
If you are adding a new row, the Program Action field is blank, because the system is assuming you want to update the status of this application. Edit or add the appropriate program action value. Program actions are stored on the Admissions Action Table page and will display based on your Admissions Action security. |
Access the Application Student Response page ().
Image: Application Student Response page
This example illustrates the fields and controls on the Application Student Response page. You can find definitions for the fields and controls later on this page.
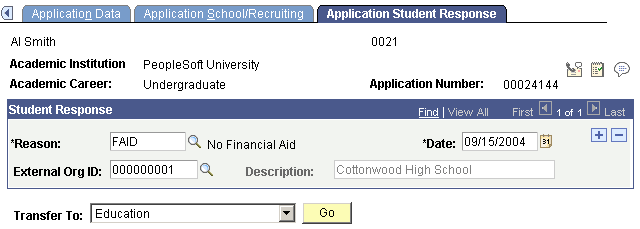
Student response information is important information your institution might want to track and report on. You can choose from a series of adapted reason response codes that your institution can set up to capture the exact information you want to track. However, you can use this page however you want to. For example, you can capture why students chose not to attend your school and where they are going. Alternatively, you can capture the reason why a student did select your school. If a student has multiple applications on file, each application can have its own corresponding student response. You can enter multiple reasons per application.
|
Field or Control |
Definition |
|---|---|
| Reason |
Enter a Student Response Reason code, for example FAID (financial aid). Define reason codes on the Response Reason Table page. |
| External Org ID (external organization ID) |
Enter the external organization ID of the institution that the student has decided to attend. The system displays the external organizations for which you selected the Student Response - School Type check box. You can enter a free-form institution name by tabbing out of the External Org ID field without entering a value and entering an institution in the field to the right. This way, the institution does not have to enter in all possible external institution codes. To enter a free form institution, you must select the Free Form Institution check box on the Installation - AD page. |
| Date |
The date the response reason was entered. The default date is your system date. |
Access the Program Addition page ().
Image: Program Addition page
This example illustrates the fields and controls on the Program Addition page. You can find definitions for the fields and controls later on this page.
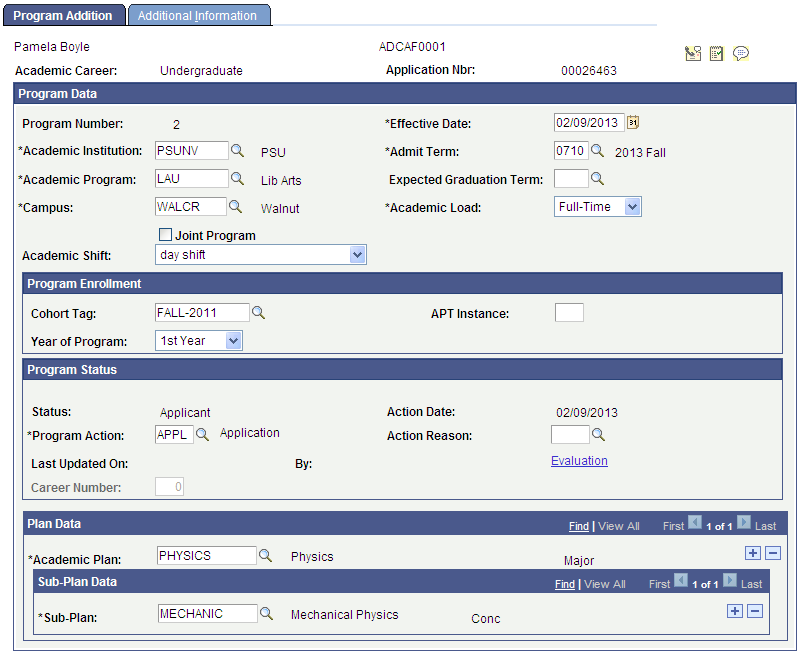
This component allows you to enter another program for an existing application. You may choose this option instead of creating a whole new application. The Program Number will increment by one based on the previous Program Number used for the application. For example, the student has one application on file with Program Number 0 for Liberal Arts and Program Number 1 for Fine Arts. Upon adding a new program from this component, the Program Number will increment to 2. After you have added the additional program, you maintain it through the Application Program Data page in the Maintain Applications component. You are prompted to choose the appropriate program number on the search page before accessing the Application Program Data page. To edit a different academic program for that application, you would need to click the Return to the Search button and choose the correct program number.
Note: Admissions application records use the Last Admit Term to determine if the program, plan, or subplan should appear in the prompt. If the Last Admit Term is populated on the Academic Program Table (ACAD_PROG_TBL), Academic Plan Table (ACAD_PLAN_TBL), or Academic SubPlan Table (ACAD_SBPLN_TBL) and the term is less than or equal to the term selected for the ID, the system does not display the value in the prompt.
For documentation about the fields on the Program Addition page,
See Entering Application Program Data
For documentation about the Additional Information page,