Functional Flow for SOLA
This section discusses the functional flow of how an applicant registers for a user ID and uses SOLA.
Steps:
The applicant registers and authenticates to access your system.
The applicant should be allowed to access your system by using an existing user ID or by creating a new one. Delivered with your system is a New User Registration login sample page (). The page is a sample user interface that shows how security can be handled to access your system, provision a new or an existing user ID with the security to access your Online Application page and be automatically transferred to that page.
While the New User Registration login sample page requires a kiosk to be deployed (where the anonymous user gets logged in as a true user), also delivered with your system is a New User Registration Tester page (SCC_NUR_TESTER) (). This page allows you to evaluate the benefits of integrating a self-service transaction such as Online Application to New User Registration framework.
Note: Do not deploy the New User Registration Tester page in a production environment.
Image: New User Registration Tester page
This example illustrates the fields and controls on the New User Registration Tester page.
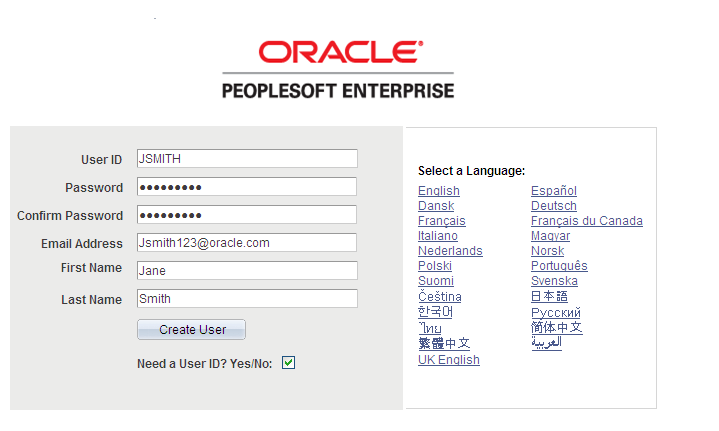
The applicant can use an existing user ID and password, or can create a new one by selecting the Need a User ID? Yes/No check box. When doing so the Confirm Password and any other constituent fields you may want to add to the page are displayed. When the applicant clicks the Create User button, the system invokes the SCC_USERREG_CREATEACCT web service operation. This operation provisions an applicant with an ID and password as well as some generic roles. If set up with a New User Registration Context, the New User Registration framework provisions the new or existing user ID with some specific security roles to access the Online Application page and transfers the applicant directly to that page.
Steps:
The applicant signs in to access the institution's Admissions Application home page. The system invokes the web service operations SCC_USERREG_AUTHENTICATE when the applicant signs into the system and SAD_GETAPPLS when the applicant reaches the Admissions Application home page.
Because this is the first time the applicant is visiting the institution’s Application Home page, the web service operation SAD_GETAPPLS will not return any application data.
SOLA includes a sample Application Home page (SAD_OLA_HOME) ().
Image: Application Home page
This example illustrates the fields and controls on the Application Home page.
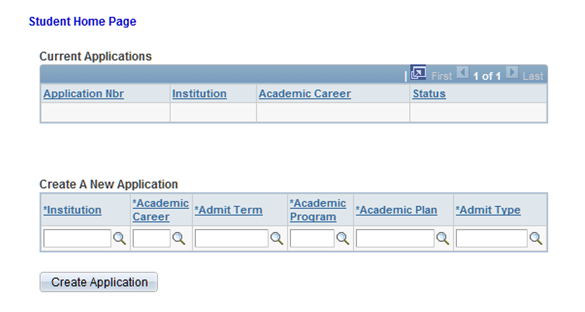
The applicant selects the institution, academic career, admit term, academic program, academic plan, and admit type he or she wishes to apply for.
The applicant clicks the Create Application button. This invokes the SAD_CREATEAPPL web service operation.
Because this is the first interaction with the institution (from an admissions perspective), the web service operation SAD_CREATEAPPL minimally creates row(s) in both the constituent record (SCC_STG_NAMES) and the academic program stack (SAD_APL_DAT_STG, SAD_APL_PLN_STG, SAD_APL_PRG_STG, and SAD_APP_CSQ_STG).
When the applicant clicks the Create Application button, the system displays the first of six pages that the applicant uses to fill out the application. At this point, the applicant can fill out the application and submit the application. When the Submit button is clicked, the system invokes the SAD_SUBMITAPPL service operation.
Image: One of the six pages for application data entry
This is an example of one of the six pages for application data entry.
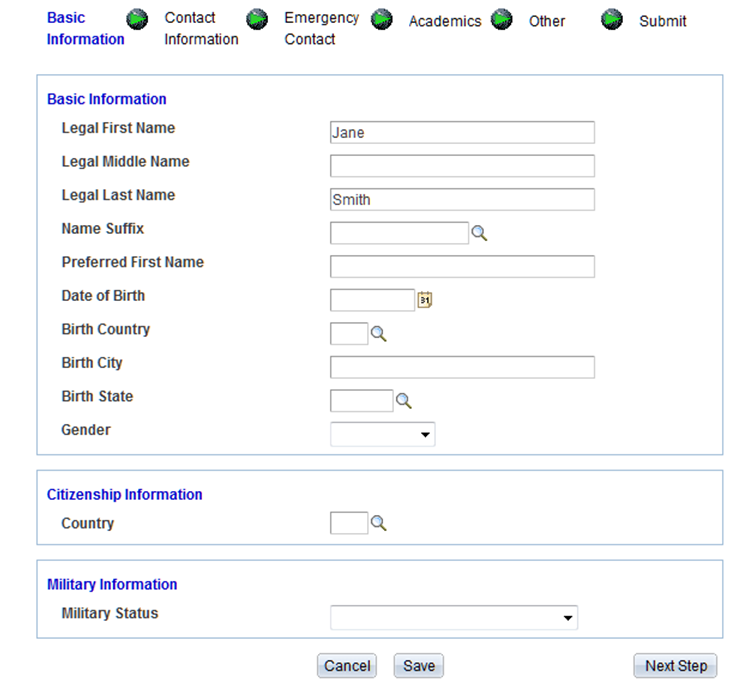
Instead of entering data in all the six pages at one time, the applicant can fill out the application over several sessions. To do this, the applicant can click the Save button and the application data is saved to the staging tables. When the Save button is clicked, the system invokes the SAD_SAVEAPPL service operation.
If the applicant elects to cancel the application process, a warning message appears to confirm the cancellation. The applicant can either continue to cancel the application and nothing will be saved and the applicant returns returned to the Application Home page. Else, the applicant can go back to the page where he or she clicked the Cancel button and continue with the application.
When SAD_SAVEAPPL or SAD_SUBMITAPPL is invoked by the applicant's actions, the system captures all the data that has been entered and saves it to the appropriate staging tables.
Steps:
Again through the New User Registration login page (or a custom version of it), the applicant signs in using an existing user ID. The applicant is automatically transferred to the Online Application page and the system invokes the SAD_GETAPPLS service operation. This service operation returns all the applications that pertain to the applicant. To keep this scenario simple, let us assume that there is only one application that the applicant is working on and therefore the home page displays that application.
Image: Application Home page displaying one saved application
This is an example of the Application Home page displaying one saved application.
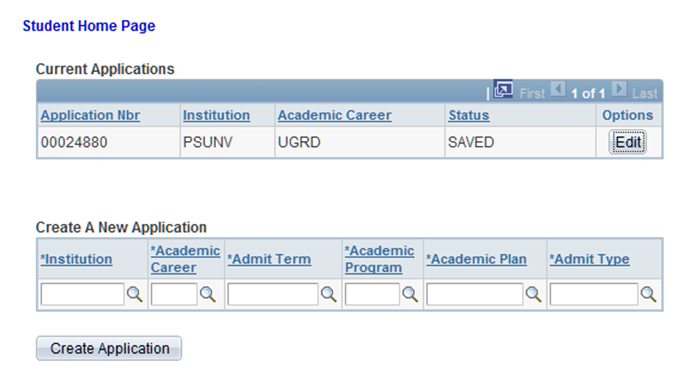
When the applicant clicks the Edit button, the system invokes the SAD_GETAPPL service operation.
Note: The service operation SAD_GETATTCH also gets fired. SAD_GETATTCH will retrieve any attachments that the applicant submitted in an earlier session.
When the applicant clicks the Edit button, the system displays the first of six pages that the applicant uses to fill out or correct any previously entered data for the application. At this point, the applicant can fill out the application.
The applicant can repeat the above steps as many times as he or she would like until the application is finally submitted.
Steps:
The applicant signs into the institution's Admissions Application home page. The system invokes the SAD_GETAPPLS service operation. This service operation returns all the applications that pertain to the applicant. This time, let us assume that there are several applications in various states and statuses.
The Current Applications grid displays all the applications of the applicant. Let us assume that from this list of applications, one application has been Submitted. Depending on how you have defined how the application is to be treated upon submission, the application can either be in Submitted or Posted status. If the application is in Submitted or Posted status, the only action available to the applicant is to view that specific application (the applicant cannot edit the application).
Image: Application Home page with multiple applications
This is an example of the Application Home page with multiple applications.

If the applicant clicks the View button for the submitted or posted application, the Application View page (SAD_OLA_VIEW) appears. This page presents in a display-only, linear format, all of the information the applicant submitted. If the applicant wants to update this application, the Application View page requests the applicant to contact the Admissions office to initiate any updates. When the applicant clicks the View button, the system invokes the SAD_GETAPPL service operation.
Image: Application View page (1 of 3)
This example illustrates the fields and controls on the Application View page (1 of 3).
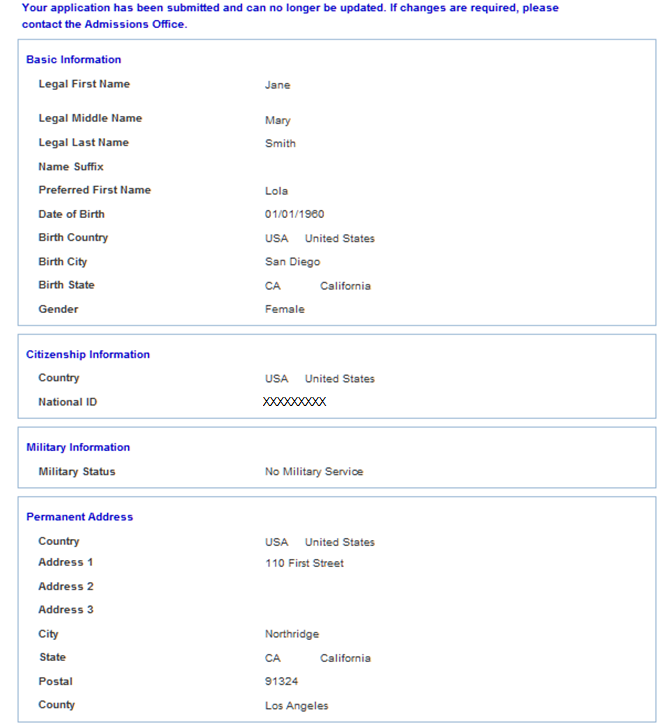
Image: Application View page (2 of 3)
This example illustrates the fields and controls on the Application View page (2 of 3).
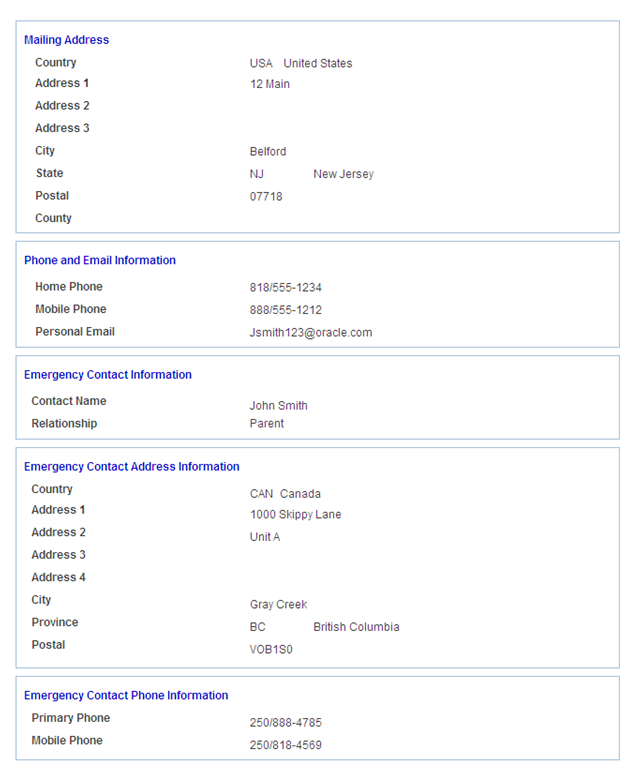
Image: Application View page (3 of 3)
This example illustrates the fields and controls on the Application View page (3 of 3).
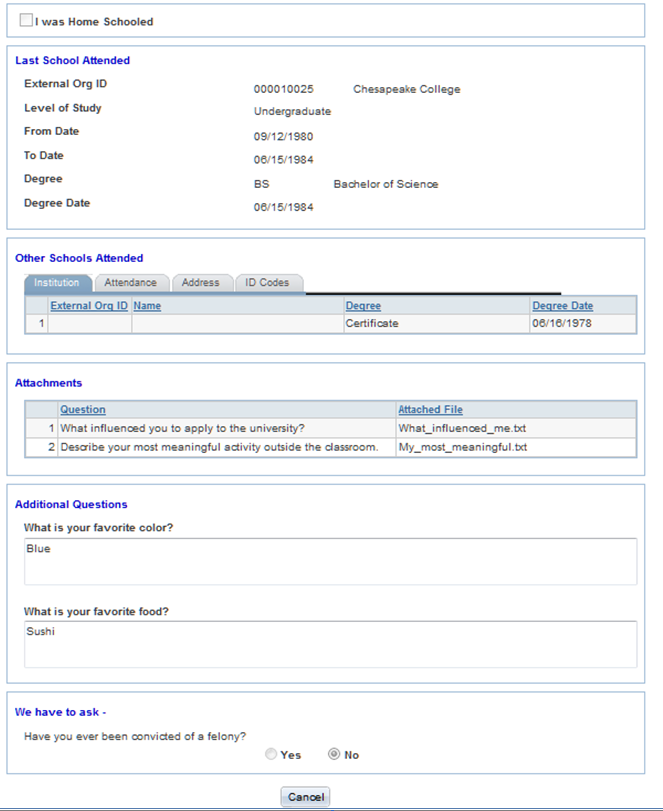
Note: Notice that External Org ID and Name are blank in the Other Schools Attended section. This is because the applicant indicated that he or she was unable to locate the school from the External Org ID list and the School Setup page does not have a default External Org ID.
For the remaining application(s) that have yet to be submitted, the applicant can update them as outlined in the previous Editing Existing Application subsection.
This subsection discusses the six SOLA pages that the applicant can use to enter application data.
Basic Information page (SAD_OLA_BASIC)
Image: Basic Information page
This example illustrates the fields and controls on the Basic Information page.
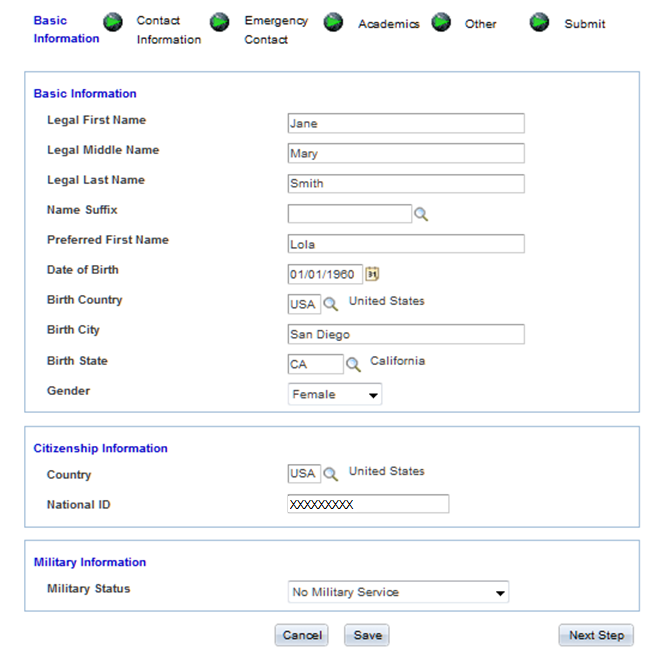
This SOLA page captures basic biographical data (that is, name, gender, and birth information). The system saves the legal name entered here with the name type of Primary. If the applicant enters a name in the Preferred First Name field, an additional row is written to the SCC_STG_NAMES with a name type of Preferred.
When the applicant accesses this page for the first time, the page hides the National ID field. When the applicant enters a value for Country, the system executes the determineNIDType method. This method determines whether to display the National ID field based on the setup within NID_TYPE_TBL.
Note: If the National ID field appears, then the page applies the validation associated with that country's national ID number during the save process.
Contact Information page (SAD_OLA_CONTACT)
This is how the system presents the Contact Information page when the applicant accesses it for the first time. Note that the page hides the permanent and mailing address fields:
Image: Contact Information page
This example illustrates the fields and controls on the Contact Information page.
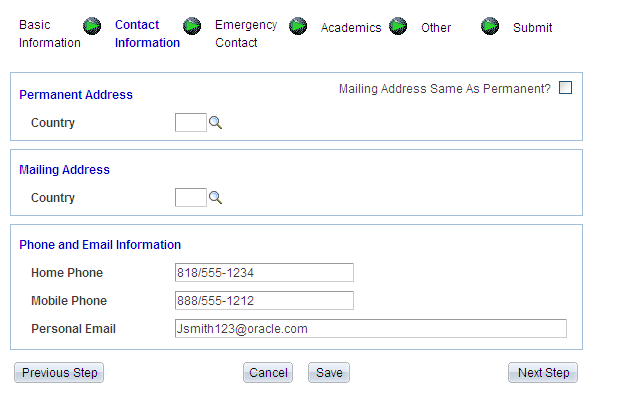
The page hides the address fields to support address formats based on a specific country. SOLA supports address formats for the following countries:
(ARG) Argentina
(AUS) Australia
(BRA) Brazil
(CAN) Canada
(CHN) China
(FRA) France
(IND) India
(SNG) Singapore
(USA) United States
When the applicant selects anyone of these countries, SOLA will display the address format specific to that country:
Image: Contact Information page for a particular country
This example illustrates the fields and controls on the Contact Information page for a particular country.
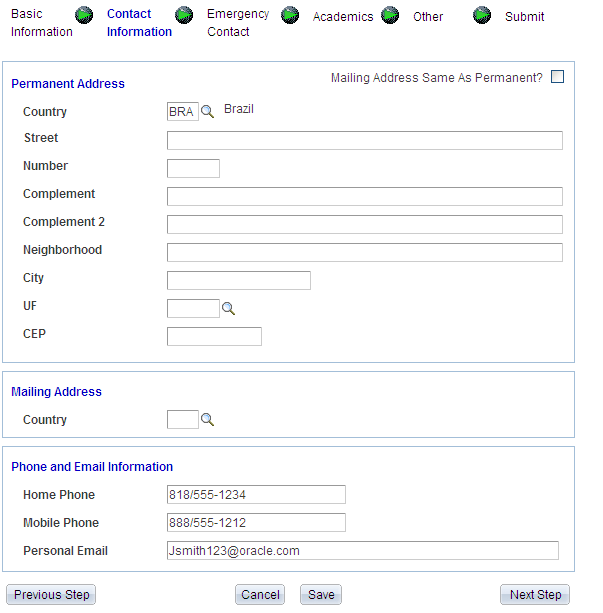
If the applicant selects a country other than those mentioned previously, the page renders a default address format.
To copy the permanent address values to the mailing address fields, the applicant can select the Mailing Address Same as Permanent check box. When the applicant selects this check box, the system executes the copyPermAddressToMailAddress method to copy the values supplied in the Permanent Address fields to the Mailing Address fields. After copying, the page hides this check box. However, on any subsequent return to this page, the check box will again appear.
Note: If the applicant changes the country value for any of the address types, this SOLA page will blank out any previously saved address information for that address type. The handling of name, address and other personal information in SOLA represents design examples of how delivered web services can support a user interface.
Emergency Contact page (SAD_OLA_CONTACT)
Image: Emergency Contact page
This example illustrates the fields and controls on the Emergency Contact page.
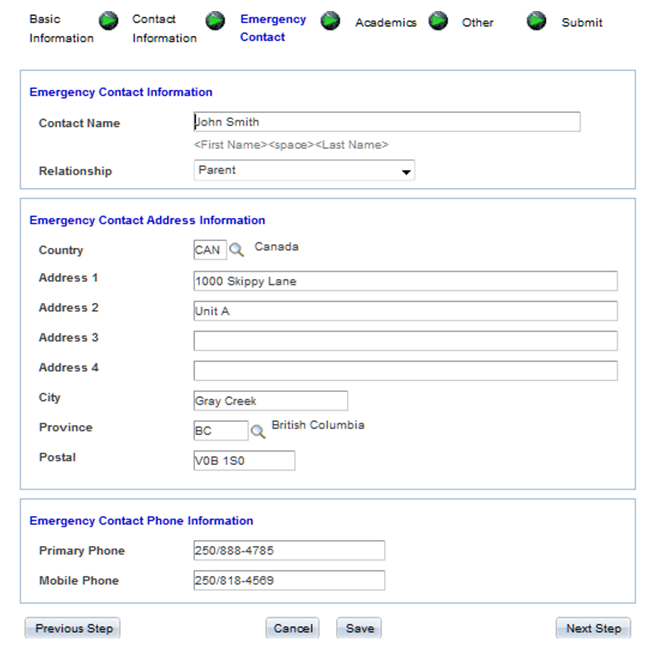
The address functionality on this page is similar to the Contact Information page.
Academics page (SAD_OLA_ACAD)
Image: Academics page
This example illustrates the fields and controls on the Academics page.
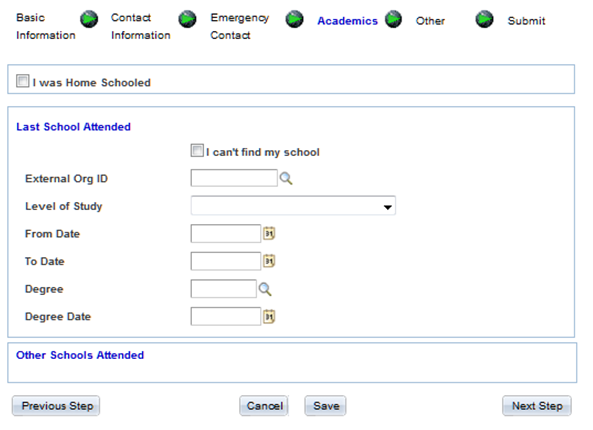
This is an example of how the Academics page is displayed when an applicant accesses it for the first time. This is done to preserve a predefined sequence numbering schema associated with the admissions application history.
If the applicant indicates that he or she was home schooled, the system writes a row to SCC_STG_ACADHST with a sequence number of one. Information pertaining to the Last School Attended will be assigned a sequence number of 2. The system will increment the sequence number for each Other Schools Attended record that the applicant adds.
If the applicant does not indicate that he or she was home schooled, then the information pertaining to the Last School Attended will get a sequence number of one.
If the applicant is unable to find his or her institution in the External Org ID drop down list, then they have the option of indicating such by selecting the I can't find my school check box. When the applicant selects this check box, the page displays additional fields that the applicant can use to specify the school details.
Image: Academics page with the I can’t find my school check box selected
This is an example of the Academics page with the I can’t find my school check box selected.
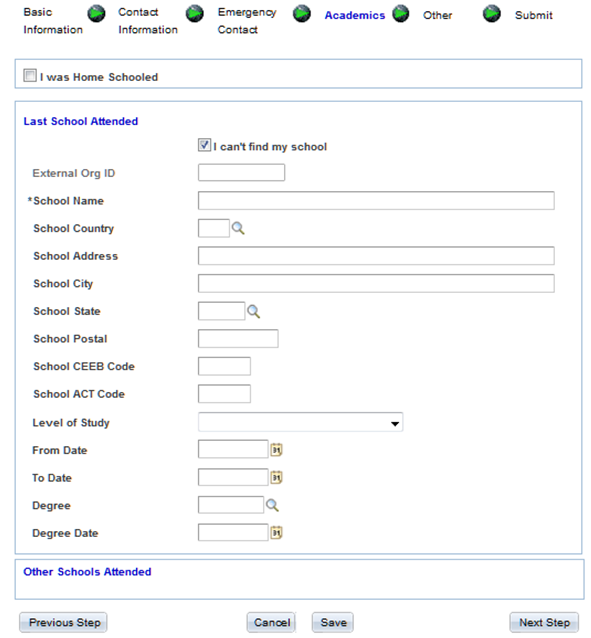
When the applicant selects the check box, the system disables the External Org ID field and marks the School Name field as a required field. All other fields are optional.
Note: Suppose you have indicated that the application requires manual reconciliation for both home school and unlisted school on the School Setup page of the Application Configuration component. In such a case, if the applicant indicates that he or she was either home schooled or is unable to locate his or her institution or indicates both, then the application will get a status of Error when submitted.
Suppose you have specified a default External Org ID for both home school and unlisted school on the School Setup. In such a case, if the applicant indicates that he or she was either home schooled or is unable to locate his or her institution or indicates both, then the system automatically populates the default External Org ID when application is submitted.
Note: If the applicant provides more than one school identified as I can’t find my school, only the first will receive the default Org ID and the subsequent schools Org IDs will be set to blank and a reconciliation error will be generated.
If the applicant has entered the level of study and the dates attended, the system writes a row to SCC_STG_EXACDDT.
Note: The applicant must supply all three values: level of study (external career), and both to and from dates in order to write to SCC_STG_EXACDDT.
If the applicant has entered a degree and the date in which the degree was obtained, the system writes a row to SCC_STG_EXTDEGR.
Note: The applicant must supply both the degree and degree date values to write to SCC_STG_EXTDEGR.
When the applicant enters an External Org ID or a school name, then the fields in the Other Schools Attended group box become available. Same rules mentioned previously apply to the fields in the Other Schools Attended group box
The applicant can enter as many additional Other Schools Attended records by clicking the plus sign button. Conversely, clicking the minus sign button will delete an Other Schools Attended record.
Note: The system performs duplicate checking on Org IDs when the applicant supplies both a Last School Attended and at least one Other Schools Attended. In addition, SOLA checks for duplicate Org IDs in the Other Schools Attended when more than one is supplied by the applicant.
Other page (SAD_OLA_OTHER)
Image: Other page
This example illustrates the fields and controls on the Other page.
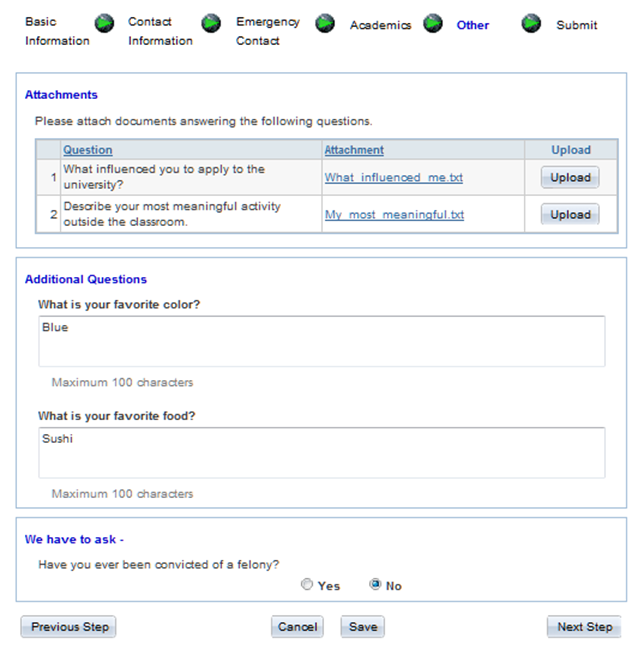
The questions that appear in the Attachments and Additional Questions group boxes are derived from the PeopleTools message catalog.
The Additional Questions group box uses the sample Q&A Application Extension entity.
Submit page (SAD_OLA_SUBMIT)
Image: Submit page
This example illustrates the fields and controls on the Submit page.
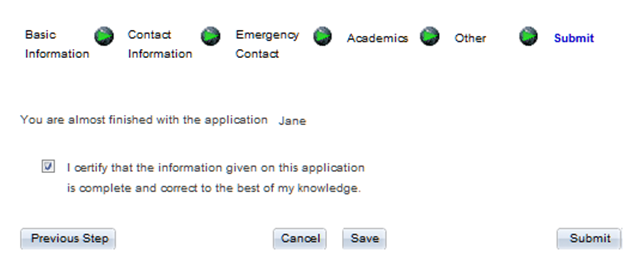
When the applicant electronically signs the application (that is, selects the I certify check box on the Submit page), the Submit button becomes available.
Clicking the Submit button submits that application. Depending on how you have defined the application to be processed during submission, the application can take many routes. Refer to the discussion on “Setting Up Application Processing Centers” in the “Setting Up Your Recruiting Structure” section to fully understand the submit process.
To understand application fee processing on submission, see Setting Up Application Processing Centers
Note: The handling of attachments, additional questions, and messaging regarding the completion of an application illustrated by SOLA represents design examples of how delivered web services can support a user interface and these design examples are not intended to be deployed for your applicants.
Steps:
Once the applicant completes the application and is ready to submit the application, the applicant clicks the Submit button.
If a fee is required with the option to pay later as defined on the Application Center Table setup page, the applicant is presented with a message to pay the fee/request a waiver now or defer payment until later. If the student selects the Yes button, they are taken to the Fee/Waiver Page. If they select the No button, they are taken to the Submit Page.
Image: Message for payment options
This is an example of the message for payment options.

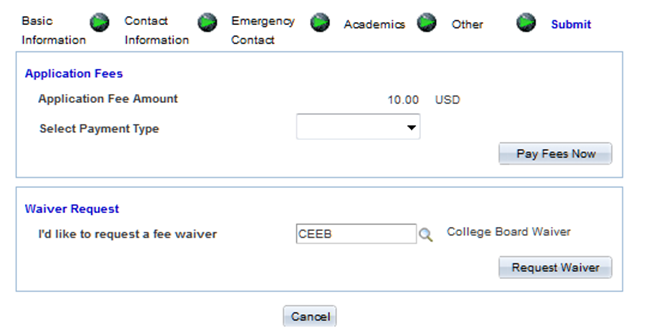
If a fee is required as defined on the Application Center Table setup page, the applicant is presented with the Fee/Waiver page (SAD_OLA_FEECALC), where he or she may request a waiver or pay the fee. Actions allowed on this page are governed by the options defined on the Application Center Table setup page.
Image: Fee/Waiver page (Paying Application Fees)
This example illustrates the fields and controls on the Fee/Waiver page (Paying Application Fees).
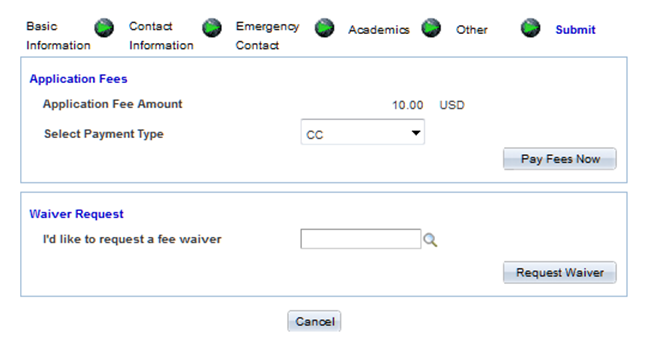
When the applicant clicks the Pay Fees Now button, the system invokes the SSF_INITIATE_EPAYMENT service operation. The system uses the information from the response of this service operation to redirect the applicant to the third party payment provider, where additional payment information is collected to pay the fees. This is accomplished by setting the value of the HTML_AREA on page SAD_OLA_3RDPARTY to the value of the element SCC_HTML_STRING from the SSF_INITIATE_EPAYMENT response. A transfer to page SAD_OLA_3RDPARTY will launch the applicant to the third party payment provider.
For an example of the SCC_HTML_STRING, see Payment Integration Web Service Operations
Note: The third party payment provider will require return URLs in order to navigate the applicant back to Campus Solutions after processing the transaction. These return URLs should correspond to the Weblib functions defined in the Hosted Payment Adapter Settings. The system delivers iScripts for SOLA to handle the post back from the third party payment provider.
Image: Hosted Payment Adapter page
This example illustrates the fields and controls on the Hosted Payment Adapter page.
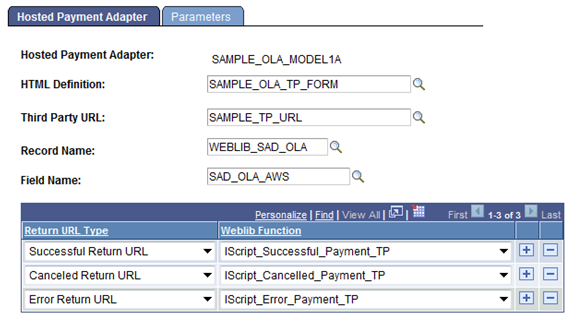
In the above example graphic, the success URL can be defined in the third party payment provider site as https://schoolserver/psc/ps/EMPLOYEE/HRMS/s/WEBLIB_SAD_OLA.SAD_OLA_AWS.FieldFormula.IScript_Successful_Payment_TP.
Important! If the school is already using the Hosted Payment feature in Self Service Make a Payment or Cashiering, a new Hosted Payment Adapter needs to be created in order to use the delivered iScripts for SOLA. The new Hosted Payment Adapter may point to the same Application Class ID the school is already using.
Image: Adapter Table page
This example illustrates the fields and controls on the Adapter Table page.

For more details, refer to the Campus Solutions 9.0 Electronic Payment Integration Developer’s Reference Guide on how to set up the Hosted Payment Adapter Setting. In addition to creating a new adapter, the new iScripts will need to be defined in the permission list security for the applicant.
The new SOLA iScripts will invoke the SSF_COMPLETE_EPAYMENT service operation. This service operation will authorize the payment and complete the application.
If a fee waiver option has been selected within the Application Center Table component, then the applicant can request a waiver and click the Request Waiver button.
Image: Fee/Waiver page (Requesting Waiver)
This example illustrates the fields and controls on the Fee/Waiver page (Requesting Waiver).
Note: The display of captured data and the use of application fee payment illustrated by SOLA represent design examples of how delivered web services can support a user interface.