Generating an XML File to Send to SMS
This section discusses how to:
Generate an extract.
Review an extract.
Create an XML file from an extract.
Validate an XML file.
|
Page Name |
Definition Name |
Navigation |
Usage |
|---|---|---|---|
|
Create Extract Data |
SAD_PB_CRT_EXT |
|
Generate the Upload, Update, or Report extract data. |
|
Upload Extract Data |
SAD_PB_UPL_EXT |
|
Review and edit the upload extract data. |
|
Update Extract Data |
SAD_PB_UPD_EXT |
|
Review and edit the update extract data. |
|
Report Extract Data |
SAD_PB_REP_EXT |
|
Review and edit the report extract data. |
|
Create XML |
SAD_PB_GXML |
|
Generate the XML file from the extract data. |
|
Validate XML |
SAD_PB_VALX_PRC |
|
Validate the XML file. |
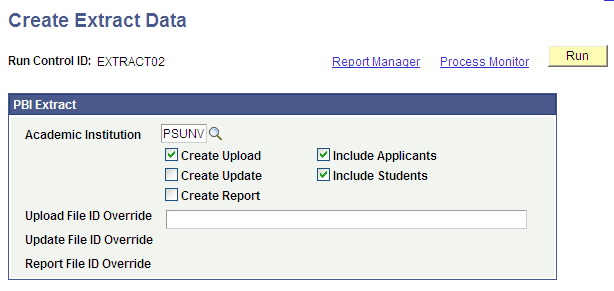
Access the Create Extract Data page ().
Image: Create Extract Data page
This example illustrates the fields and controls on the Create Extract Data page. You can find definitions for the fields and controls later on this page.
|
Field or Control |
Definition |
|---|---|
| Create Upload |
Select to create Upload extract data. If you select this check box, the process selects CAS Details records with an Upload status of Upload Ready. |
| Create Update |
Select to create the Update extract data. If you select this check box, the process selects CAS Details records with an Update status of Update Ready. |
| Create Report |
Select to create the Report extract data. If you select this check box, the process selects CAS Details records with a Report status of Report Ready. |
| Include Applicants |
Select to create extract data for only applicants. If you select this check box, the process selects CAS Details records with record type Applicant. |
| Include Students |
Select to create extract data for only students. If you select this check box, the process selects CAS Details records with record type Student. Note: You should not clear both the Include Applicants and the Include Students check boxes. You must select one of the check boxes to run the process. Also, you can select both the check boxes to include both applicant and student records. |
| Upload File ID Override |
If you do not enter an override value, the process automatically generates a value in the format INST_UPLOAD_YYYY_MM_DD_nn where INST is your institution code and nn is a sequence number that begins 01 and is incremented for new runs of the extract process on that date. For example, a File ID of PSUNV_UPLOAD_2010_06_26_01 will be generated for the first upload extract for institution PSUNV on the 26th June 2010. Enter a File ID value to be used in place of the automatically generated value if required. The value must not have already been used for an Update or Report extract. If an extract for the File ID entered has already been run any existing extract data records will be deleted before the process is re-run. |
| Update File ID Override |
If you do not enter an override value, the process automatically generates a value in the format INST_UPDATE_YYYY_MM_DD_nn where INST is your institution code and nn is a sequence number that begins 01 and is incremented for new runs of the extract process on that date. Enter a File ID value to be used in place of the automatically generated value if required. The value must not have already been used for an Upload or Report extract. If an extract for the File ID entered has already been run any existing extract data records will be deleted before the process is re-run. |
| Report File ID Override |
If you do not enter an override value, the process automatically generates a value in the format INST_REPORT_YYYY_MM_DD_nn where INST is your institution code and nn is a sequence number that begins 01 and is incremented for new runs of the extract process on that date. Enter a File ID value to be used in place of the automatically generated value if required. The value must not have already been used for an Upload or Update extract. If an extract for the File ID entered has already been run any existing extract data records will be deleted before the process is re-run. |
Create Upload check box
If the Create Upload check box is selected, CAS Details records with an Upload Status of Upload Ready are selected. The process selects applicant records, if the Include Applicants check box is selected. The process selects student records, if the Include Students check box is selected. If you have selected both the Include Students and Include Applicants check boxes, the process selects both applicant and student records.
If an Upload File ID Override value is selected, any existing extract records are deleted before new records are selected.
If you have selected both Include Applicants and Include Students check boxes, the process includes one record for each applicant or student. If there is more than one CAS Details record with an Upload Status of Upload Ready, the first record selected is included and a message is logged for any subsequent records selected by the process. The additional records can be included in a future extract or the Upload Status can be set to the appropriate status to prevent the record from being included if a second CAS request is not required.
After a CAS Details record is included by the process, a new effective dated record is created to set the Upload Status to Upload Complete and to populate the Upload File ID.
Create Update check box
If the Create Update check box is selected, CAS Details records with an Update Status of Update Ready and the CAS Number populated are selected. The process selects applicant records, if the Include Applicants check box is selected. The process selects student records, if the Include Students check box is selected. If you have selected both the Include Students and Include Applicants check boxes, the process selects both applicant and student records.
If an Update File ID Override value is selected any existing extract records are deleted before new records are selected.
The same value is derived for each record in the Upload extract for the Update File ID field.
After a CAS Details record is included by the process, a new effective dated record is created to set the Update Status to Update Complete and to populate the Update File ID.
If an Event ID is set up on the PBI Configuration page for Record Type = Applicant or Student and Notification Type = Fee Update, the process creates the 3C Engine Trigger result for the Event ID and person.
For steps that you should perform after the process creates the 3C Engine Trigger result, see Generating PBI Communications
Create Report check box
If the Create Report check box is selected, CAS Details records with a Report Status of Report Ready and the CAS Number populated are selected. The process selects applicant records, if the Include Applicants check box is selected. The process selects student records, if the Include Students check box is selected. If you have selected both the Include Students and Include Applicants check boxes, the process selects both applicant and student records.
If a Report File ID Override value is selected any existing extract records are deleted before new records are selected.
The same value is derived for each record in the Upload extract for the Report File ID field.
After a CAS Details record is included by the process, a new effective dated record is created to set the Report Status to Report Complete and to populate the Report File ID.
Refer to the PBI Field Derivation documentation for information about derivation of each field in the extract.
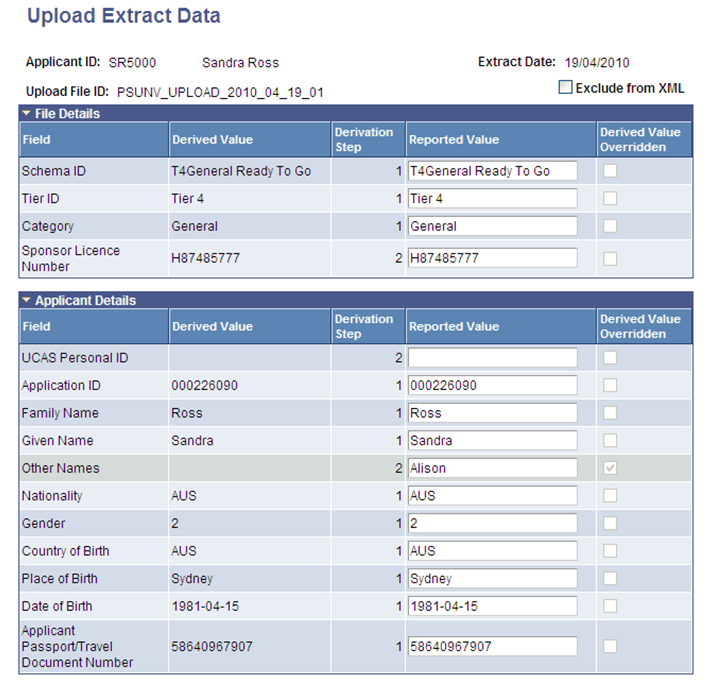
Use the Upload Extract Data, Update Extract Data, and Report Extract Data pages to review the extract data that the Create Extract process has generated prior to creating the XML file.
Image: Upload Extract Data page (part)
This example illustrates the fields and controls on the Upload Extract Data page (part). You can find definitions for the fields and controls later on this page.
|
Field or Control |
Definition |
|---|---|
| Exclude from XML |
Select to prevent an individual record from being included in the XML file when the Create XML process is run for the File ID. |
| Reported Value |
Displays the derived value for the field. You can change this value if a different value is required in the XML file to be sent to SMS. If the derived value is overwritten in the extract data you should ensure that the corresponding data in the CAS Details record is also updated. In cases where both General and Child category records are included in the upload extract data the Schema ID and Category values can be overridden for the Child records in the Reported Value field. |
| Derived Value Overridden |
The system automatically selects the check box if you use the Reported Value field to change the derived value. |
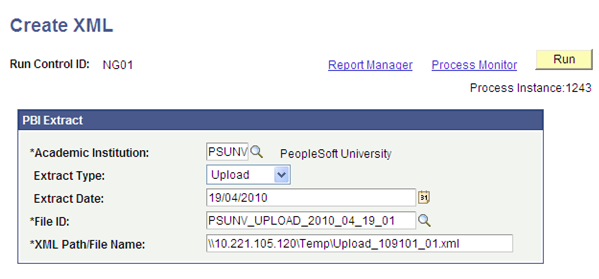
Access the Create XML page ().
Image: Create XML page
This example illustrates the fields and controls on the Create XML page. You can find definitions for the fields and controls later on this page.
|
Field or Control |
Definition |
|---|---|
| Extract Type |
Select an extract type to filter the prompt values for the File ID field. |
| Extract Date |
Select an extract date to filter the prompt values for the File ID field. |
| File ID |
Select the extract that you want to process. |
| XML Path/File Name |
Enter the file path and file name that you want the system to use to save the XML file. You must enter a valid directory path that maps to a folder with appropriate Read/Write permissions. If you cannot locate such a folder, consult your system administrator. If defined the file name element must include the lower case .xml extension:
If you enter the file path and do not specify the file name, the process uses the File ID value to name the XML file. The format without the file is as follows:
|
Upload Extract XML
For the upload extract the process creates a separate XML file for each combination of the header fields found in the extract data for the File ID:
<BulkUploadFileId>
<SchemaID>
<TierID>
<Category>
<SponsorLicenceNumber>
In cases where there are multiple Sponsor Licence Numbers in the upload extract data multiple XML files are created. If there are both General and Child category records multiple XML files are created. If multiple XML files are required a sequence letter (A, B, C etc) is added to the file name to distinguish between the files.
For cases where the process is being re-run, if there is an existing file for the specified path/file name then that file is overwritten.
Update and Report Extract XML
A single XML file is created for each File ID for update and report extract data.
For cases where the process is being re-run, if there is an existing file for the specified path/file name then that file is overwritten.
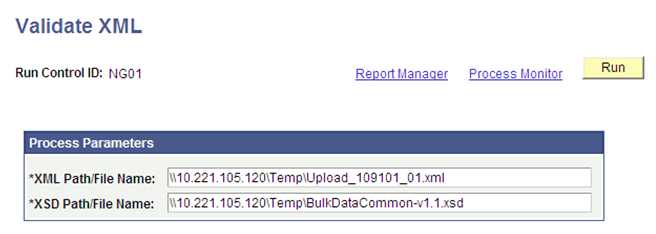
Access the Validate XML page ().
Image: Validate XML page
This example illustrates the fields and controls on the Validate XML page . You can find definitions for the fields and controls later on this page.
|
Field or Control |
Definition |
|---|---|
| XML Path/File Name |
Enter the path and file name of the XML file that you want to validate. |
| XSD Path/File Name |
Enter the complete path and file name of the primary XSD file. The process uses all of the XSD files to validate your XML file. The XSD files are available from the UKVI website. |
The process validates the XML and checks that it is well formed in the context of the defined schema.
If any errors are reported by the Validate XML process, correct the errors by amending the Reported Value in the Extract Data pages or by amending the CAS Details or related records.
If you have corrected the errors using the Extract Data pages, re-run the Create XML process and validate the file. If you have corrected the errors in the CAS Details or related records, re-run the Create Extract process, re-run the Create XML process and validate the file.
Once the XML file passes schema validation, submit the XML file to SMS via the UKVI portal.