Importing CAS Details
After you send one or more CAS number requests to SMS, use the Import CAS Details process to import the CAS details from the Bulk Export XML file retrieved from SMS.
When you run the process:
Initially it processes the XML file and creates CAS records in the staging tables.
Then it processes the staging table records to either update an existing CAS record with the CAS number and status details or create a new CAS record where you have submitted the CAS request directly via the UKVI portal.
Each CAS record in the staging table has an import status. The following table describes how the process determines which import status to assign to a CAS staging record.
|
Condition |
Status Set By the Import Process |
|---|---|
|
The status is initially set to this value for each new record imported to the staging table from the XML file. |
New (N) |
|
The import process did not find a matching CAS Details record. |
Pending (P) |
|
The import process encountered a problem when identifying a CAS Details record (for example, there is an existing CAS Details record but it is future dated). |
Error (E) |
|
The status is set to this value for each staging record where the corresponding CAS record has been created or updated with the imported CAS details. |
Imported (I) |
Use the CAS Staging Data pages to review the staging records that have Pending or Error status. For records with Pending status, you can use the CAS Staging Data page to match the record with an existing application or student program record and create a new CAS record. For records with Error status, you can use the CAS Details page to correct or update the existing records to allow the staging record to be re-processed.
This section discusses how to:
Import and create CAS records in bulk.
Review and edit the CAS staging data.
|
Page Name |
Definition Name |
Navigation |
Usage |
|---|---|---|---|
|
Import CAS Details |
SAD_PB_IMPC_PRC |
|
Import the CAS details from the Bulk Export XML file provided by SMS. |
|
CAS Staging Data |
SAD_PB_I_CAS |
|
Review the records that the Import CAS Details has loaded into the staging tables. |
Access the Import CAS Details page ().
Image: Import CAS Details page
This example illustrates the fields and controls on the Import CAS Details page. You can find definitions for the fields and controls later on this page.

|
Field or Control |
Definition |
|---|---|
| Add Attachment |
Click to browse to the XML file that you want to import, and click Upload. You can browse your local drive and select a file. When you click Upload, the system automatically copies the file to the application server and the XML Path/File Name field automatically displays the server path and file name. Note: The upload process creates a files subdirectory to store and process the XML files. This subdirectory is created in the server directory location that is specified in the PS_SERVDIR system parameter in the Application Server/Process Scheduler configuration file psappsrv.cfg/psprcs.cfg. Ensure that PS_SERVDIR is set up with an appropriate value in the configuration file and that users have the correct permission to access the files subdirectory. |
| XML Path/File Name |
Enter the path and file name of the XML file that you want to import. You must store this XML file on an application server that the import process can access. If you want to reprocess the staging records, leave the field blank. |
Processing steps
The process performs the following steps to create new staging table records if the XML Path/File Name parameter has been provided:
Deletes any existing staging records with a status of Obsolete.
Deletes any existing staging records with a status of Imported
Opens the XML file. If the XML file cannot be found a message is logged and the re-processing of any existing staging records continues.
Creates staging records with a status of New for each record found in the XML file.
The process then performs the following steps to process staging records that have an import status of Pending from a previous run of the process:
Create: If the application or student program details have been added via the CAS Staging Data page and there is no existing CAS Details record, a new record is created using the application or student program details added and the CAS Number, CAS Status, CAS Status Date and Export File ID from the staging record. The Upload Status is set to Upload Complete and the Nationality value is populated if a country value exists in the staging record.
Update: If the application or student program details have been added via the CAS Staging Data page and there is an existing CAS Details record without the CAS Number populated, a new effective dated record is created for the current date with the CAS Number, CAS Status, CAS Status Date and Export File ID from the staging record.
Pending: If the full application or student program details have not been added via the CAS Staging Data page a message is logged and the record remains with a status of Pending.
Error: If the applicant or student details have been added via the CAS Staging Data page and there is an existing CAS Details record with a different CAS Number already populated then an error message is logged and the status is set to Error.
The process performs the following step to process New staging records and Error records from a previous run of the import process:
Update CAS Status: If the staging record can be matched to an existing CAS Details record using Applicant ID (EMPLID) and CAS Number, a new effective dated record is created with the CAS Status, CAS Status Date and Export File ID from the staging record.
This processing will occur when the CAS Number has already been imported and the CAS Status is being updated from, for example, Assigned to Used.
Note: If the most recent existing effective dated record is in the future or there are multiple matching records, a message is logged and the import status is set to Error.
Update Applicant: If Application ID is populated and the staging record can be matched to an existing applicant CAS Details record using Applicant ID (EMPLID) and Application ID (the combination of Admission Application Number and Application Program Number), a new effective dated record is created with the CAS Status, CAS Status Date and Export File ID from the staging record. This processing will occur when the CAS Number is being imported for the first time and the CAS request has been generated from an existing CAS Details record.
Note: If the most recent existing effective dated record is in the future or there are multiple matching records, a message is logged and the import status is set to Error.
Update Student: If the Application ID is not populated and the staging record can be matched to an existing student CAS Details record using Applicant ID (EMPLID) and Course ID (either Academic Plan or Academic Sub-Plan if sub-plan reporting is enabled on the PBI Configuration page), a new effective dated record is created with the CAS Status, CAS Status Date and Export File ID from the staging record.
Note: If the most recent existing effective dated record is in the future or there are multiple matching records, a message is logged and the import status is set to Error.
No Match: If no match is made to an existing CAS Details record the status is set to Pending. The staging record can be reviewed via CAS Staging Data page and the application or student program details can be added to allow the record to be re-processed.
Assigning Event IDs to the Applicant or Student for CAS Number Notification
If you have defined an event ID for a notification type of CAS Number on the PBI Configuration page, the import process assigns the event ID when it creates a new CAS record or when it creates a new effective dated row for an existing CAS record and the CAS Number is being populated for the first time. If the process is updating an existing CAS record where the CAS number is already populated the Event ID is not created.
To assign the event details to the applicant or student, the process creates a results record in the 3C Engine Trigger Results table for Institution, Event ID and Function (CASN) for the applicant or student EMPLID. The variable data associated with the CASN administrative function (Academic Career, Student Career Number and CAS Number) are also populated.
Access the CAS Staging Data page ().
Image: CAS Staging Data page
This example illustrates the fields and controls on the CAS Staging Data page. You can find definitions for the fields and controls later on this page.
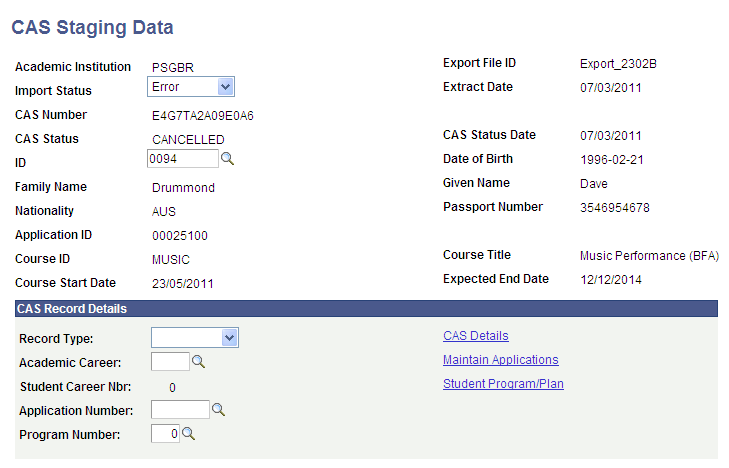
Use the search page to retrieve Pending or Error status records for review and update.
Use the Maintain Applications or Student Program/Plan links to search for and review existing application or student program records.
Use the CAS Details link to search for and review any existing CAS Details records.
For a record with an import status of Error, you can correct the existing CAS Details record to allow the staging record to be re-processed when the Import CAS Details process is next run (Use the CAS Record Details region and CAS Details link for the correction). You can also match an error record with a different ID and then have the system re-process the record when the Import CAS Details process is next run. The ID field is available for entry only if the record has an import status of Error.
The system enables the CAS Record Details region if the import status is either Pending or Error. If you want to match the staging record with an existing application or student program record for re-processing:
Specify whether the new CAS Details record is for an applicant or student by selecting a value in the Record Type field.
Select the Academic Career for the applicant or student from the prompt.
Select the Student Career Number for the applicant from the prompt.
If the record type is applicant, select the Application Number from the prompt.
If the record type is applicant, select the Program Number from the prompt.
Save the record.
Deleting CAS Staging Records
You can delete records that are no longer required for processing. To delete a record:
Change the import status to Obsolete.
Save the record.
When you run the Import CAS Details process, the system deletes the records with the Obsolete status.
Note: Imported staging records cannot be deleted.