Processing Imported UCAS and UTT Applications and Applicant Data
This section provides an overview of processing the imported admissions data, and discusses how to:
Define conditions for an offer.
Review key UCAS application information.
Add attachments and review 3C information for UCAS application.
Delete incorrect UCAS applicant records.
Enter an initial admission decision for a UCAS application choice.
Enter or update an admission decision for a UCAS application choice.
Enter a decision for multiple UCAS application choices.
Approve or reject a UCAS decision.
Approve or reject multiple UCAS decisions.
Determine whether applicants satisfy the offer conditions.
Enter or update a UCAS Confirmation decision.
Enter multiple UCAS Confirmation decisions.
Approve or reject a UCAS Confirmation decision.
Approve or reject multiple UCAS Confirmation decisions.
Enter a decision to release an applicant into Clearing.
Approve or reject the Release into Clearing decision.
Enter UCAS Clearing and Adjustment details.
Review and update UCAS qualifications.
Generate, export, and update UCAS and UTT transactions
Review UCAS transactions.
Review UCAS Clearing and Adjustment transactions.
Handle UCAS applicant enquiries.
Review key UTT application information.
Add attachments and review 3C information for UTT application.
Delete incorrect UTT applicant records.
Enter an initial admission decision for a UTT application choice.
Enter or update an admission decision for a UTT application choice.
Enter a decision for multiple UTT application choices.
Approve or reject a UTT decision.
Approve or reject multiple UTT decisions.
Enter or update a UTT Confirmation decision.
Enter multiple UTT Confirmation decisions.
Approve or reject a UTT Confirmation decision.
Approve or reject multiple UTT Confirmation decisions.
Enter UTT Clearing details.
Review and update UTT qualifications.
Review UTT transactions.
Review UTT Clearing transactions.
After you import and review the applicants and their applications, delete any applicant records that UCAS has sent in error or UCAS has cancelled. The UCAS ivStarW view and the UTT ivgStarW view contain the data related to applicants and application choices that have been sent to UCAS by mistake or subsequently cancelled at UCAS. When you use the Import Applicant Data process to import the applications and applicant data, the import process also imports the data from these two views. Use the Remove Wrong Applicants components to review the ivStarW and ivgStarW data and delete them from your database. You can also use the Remove Wrong Applicants components to manually un-match an applicant record which is incorrectly matched to an existing person record.
After reviewing and removing incorrect applicant records, use the Decision Processing or Initial Decision Entry pages to enter admission decisions for the remaining applications. The UCAS and UTT Initial Decision Entry pages require less data entry as compared to the Decision Processing pages for making an admission decision. You can use the Initial Decision Entry pages for the quick entry of standard decisions. If decision approval is set up, use the Decision Approval pages to approve the decision.
Next, your institution communicates the admission decisions and approvals to UCAS. The following steps describe how the Campus Solutions system communicates this data to UCAS:
After entering or updating a decision, run the Transaction Processing process to generate a transaction . If decision approval is set up, use the Decision Approval page to approve the decision before you generate a transaction.
Use the Transaction Processing process to export transactions to the TRANIN view at UCAS and to import error codes once UCAS has processed the transactions. Transactions that the system loads into TRANIN include the transaction ID generated by UCAS and an error code of -1 to indicate that UCAS has not yet processed the transaction. Once UCAS fully processes the transaction, the error code is either 0 (success) or is a code that UCAS defines in the cvRefError reference data view.
UCAS runs a batch process approximately every five minutes to process incoming transactions. As a result, the Campus Solutions system may delay in reading the error codes and return1 value from TRANIN and updating its transaction records.
The following (1 and 2) describes how the system processes standards decisions which are not related to Confirmation or Clearing:
1.) When you run the Transaction Processing process for UCAS applications, the process selects each UCAS decision record where the system code equals U, transaction flag equals Y, and the approval status is either Approved or Not Required. For each decision record:
If the latest transaction for an application has a transaction type other than LD, LA, LC, RA, or RD, the process does not generate a transaction. In these cases, you should use the UCAS Transactions page to manually create a transaction.
If there is no previous transaction for an application and you had entered C (Conditional Offer), U (Unconditional Offer), W (Withdrawal) or R (Rejection), the process generates a LD (initial decision) transaction.
If the most recent transaction is LD or LA (amended decision):
If the application is not UF and either the new decision value is different from the decision value of the existing transaction or the course details have changed, the process generates a new LA transaction.
If the application is UF and the new decision is equal to withdrawal, the process generates a RW transaction.
If the application is UF and any of the course details of the decision have changed, the process generates a RA transaction.
If the most recent transaction is LC and there is no previous transaction, the process generates an LD transaction. If there is a previous transaction then the process generates a LA transaction.
When the process completes processing the decisions, it sets the transaction flag for the decision record to N to indicate that transaction processing has completed.
2.) When you run the Transaction Processing process for UTT applications, the process selects each UTT decision record where the system code equals G, transaction flag equals Y, and the approval status is either Approved or Not Required. For each decision record:
If the latest transaction for an application has a transaction type other than LD, LA, LC or RA, the process does not generate a transaction. In these cases, you should use the UTT Transactions page to manually create a transaction.
If there is no transaction for an application and you enter I, C, U, W, R, E, M, S, or G decision, the system generates a LD (initial decision) transaction.
If the most recent transaction is LD or LA (amended decision), then processing is same as UCAS applications and the process generates a LA, RW or RA transaction.
When the system completes processing the decisions, it sets the transaction flag for the decision record to N to indicate that transaction processing has completed.
When the Transaction Processing process generates a new transaction record, it automatically updates the Campus Solutions application (linked to the UCAS application choice) with the program action and action reason values. For example, if transaction type equals LD and decision is I for a UTT application, the system looks at the program action reason mapping for the decision Interview you have set up in the UTT Program Actions page. The system then attaches the program action and action reason to the application. But in Schools Direct applications, that is, when the local institution is identified as the Accrediting Provider in ivgStarG, the Import Applicant Data process makes direct updates to the corresponding Campus Solutions applications based on updated decision values in ivgStarG.
Use the Standard Offers page to define conditions for an offer to send to UCAS. For example, you can define a condition three A Levels at Grade B that can be used for multiple application decisions. Subsequently, you can enter this condition in the Decision Processing pages when making a conditional offer. When you generate transactions for the conditional offers, the system includes this condition in the transactions to send to UCAS.
The following example is a scenario for UCAS application processing.
Enter a decision and generate a transaction:
Use the Initial Decision Entry pages to enter a decision. For example, enter a decision of unconditional offer.
Run the Transaction Processing process to generate the transaction for the unconditional offer decision. (Select the Generate Transactions check box on the Transaction Processing page.)
Use the UCAS Transactions page to review the transaction. For example, because you entered a decision of Unconditional Offer, the Transaction Details section of the page displays the Transaction Type LD and Decision of U.
Now you want to export this decision to UCAS and also want to know that UCAS has received this transaction.
It is recommended that you first generate transactions, review the sent transactions, and then request UCAS for acknowledgement. Normally, a time delay occurs between Campus Solutions writing the transaction to UCAS and UCAS updating the transaction with an error code. Therefore, we recommend that you do not run the transaction processing process with both the Export Transactions and Update Transactions from UCAS check boxes selected. Run the transaction processing process with the Generate Transaction check box selected first and review the sent transactions. Then, run the transaction processing process with the Update Transactions from UCAS check box selected and review the transaction for acknowledgement.
Run the Transaction Processing process to export the applicant's LD transaction to UCAS (select the Export Transactions check box on the Transaction Processing page.)
In the UCAS Transactions page, review the exported transaction (the Sent check box appears as selected).
Run the Transaction Processing process to receive the acknowledgment from UCAS for the exported transaction (select the Update Transactions from UCAS check box on the Transaction Processing page).
Use the UCAS Transactions page to review the error code for the applicant's LD transaction sent to UCAS. The error code is 0 (success) in the UCAS Transactions page, which indicates that UCAS received the institution's decision.
Finally, to know the UCAS applicant's response, complete these steps:
Run the Import Applicant Data process. If the applicant has responded to the offer, the offer response will be in ivStarC.
On import, Campus Solutions sets the Reply as F (for a Firm response) or I (for an Insurance response) on the UCAS Decision Processing page of the applicant if the applicant has accepted the offer. If the applicant has declined the offer, Campus Solutions sets the Reply as D.
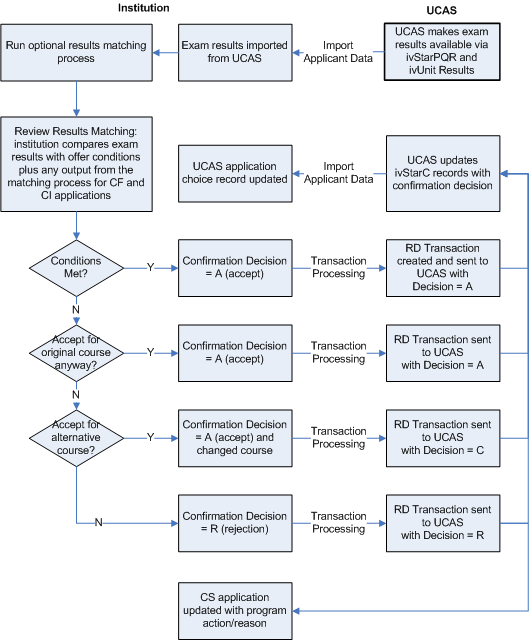
When exam results are available, your institution will confirm conditional offers for UTT and UCAS applications:
For UCAS applications, make sure you have imported cvRefTariff data (by running the Import Reference Data process) if you want to use the Results/Offer Matching process to evaluate tariff offers. This step is not applicable for UTT applications.
Run the Import Applicant Data process to import the exam results.
Compare the applicant exam results with the offer conditions. You can do the comparison manually or run the Results/Offer Matching process. This process is not available for UTT applications.
Use the Quick Confirmation page or the Confirmation Entry page to accept or reject the conditional offer.
Run the Transaction Processing process to generate and export the RD transaction.
Image: Confirmation Processing Flow
This diagram illustrates the Confirmation process flow.
The following is an example of processing the Delayed Conditional decisions:
Use the Decision Processing page to enter the Delayed Conditional decision for a CF application.
If you have selected the Conditional Offer check box on the UCAS Configuration component, use the Decision Approval page to approve this decision.
Run the Transaction Processing process to generate and export the RD transaction with the decision code of D.
A decision code of D is only valid in an RD transaction during September or October for a CF applicant. Once the results are known, use the Confirmation Entry page to confirm the DF application.
If you have selected the Confirmation Acceptance check box on the UCAS Configuration component, use the Confirmation Approval page to approve this decision.
Run the Transaction Processing process to generate and export another RD transaction for the application.
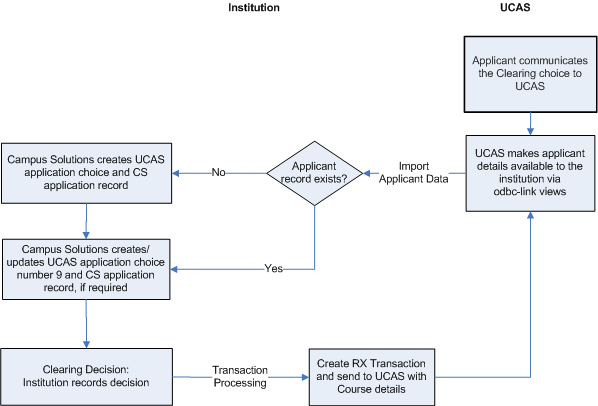
An applicant who may not have got admission in any institution is eligible for Clearing. To process Clearing applications for UCAS applicants:
Use the Import Applicant Data to import the Clearing application choices.
Use the UCAS Initial Decision Entry or the UCAS Decision Processing page to enter an admission decision for the Clearing application. To search for the Clearing applications, enter 9 in the UCAS Choice Number field of the decision search page. Note that the decision search pages do not display accepted Clearing applications (that is UCAS applications with choice number = 9 and the decision value = A).
Use the UCAS Enquiry Entry page to create enquiry records and record RQ Clearing transactions to request the details of a Clearing applicant. If your institution wants to offer admission to the Clearing applicant, use the UCAS Enquiry Entry page to record the RX transaction.
Run the Transaction Processing process to generate and export the RQ or RX transaction to UCAS. The RX transaction must have a decision value.
Use the Import Applicant Data process to import the application choices for Clearing if you have sent a RQ transaction.
To process Clearing applications for UTT applicants:
Use the UTT Enquiry Entry page to collect student contact address and exam results while the institution is negotiating with the student. The personal ID and application code values can be looked up from the cvgName UCAS view.
If the institution decides to accept or make a conditional offer to the student, enter the course, campus, entry year, entry month, transaction type (RX), decision (U or C) and decision maker.
Run the Transaction Processing process to generate and export the RX transaction to UCAS. The RX transaction must have a decision value.
Run the Import Applicant Data process to import the applicant data and application choices for the students you have sent RX transactions for.
Image: Clearing Processing Flow Example
This diagram illustrates an example of the Clearing process flow.
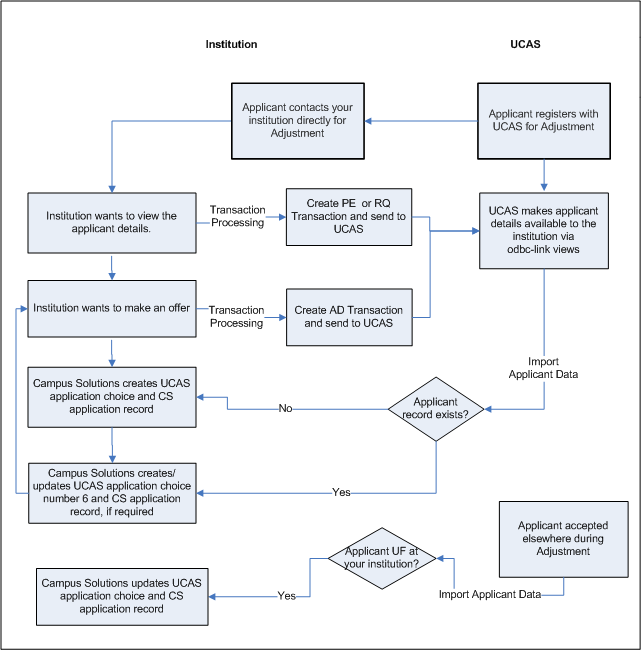
For processing Adjustment records (not applicable for UTT applications):
Use the UCAS Enquiry Entry page to create Adjustment records and record RQ or PE transactions. Use this page to record the AD transaction.
Run the Transaction Processing process to generate and export the RQ, PE, AD, LA or RA transaction to UCAS.
Run the Import Applicant Data process. The process imports the Adjustment application choice if you have sent an AD transaction. If you have sent a RQ or PE transaction, the process imports only Adjustment applicant data such as biographical data, and ivStarN, ivStarA and ivStarK data.
Use the UCAS Release to Clearing page to release an applicant into Clearing.
After your institution has accepted an applicant through Adjustment (that is, your institution has sent an AD transaction), the system updates the application choice to UF. If the applicant subsequently withdraws the applicant, then the institution may either release the application to clearing (RR transaction) or withdraw the applicant (RW transaction). Use the UCAS Release to Clearing page to record the RR transaction or use the UCAS Transactions page to record the RW transaction.
Image: Adjustment Processing Flow Example
This diagram illustrates an example of the Adjustment initial decision process flow.
When a service indicator is assigned to a person ID, the corresponding negative or positive service indicator button appears on the UCAS or UTT decision processing pages for that person ID.
See Understanding Service Indicators
Note that the UCAS and UTT processing pages discussed in this section (except the Wrong Applicant, Standard Offer, and Result/Offer Matching Process pages) enforce application center security. The system restricts the search results on the UCAS and UTT processing pages based on the application centers defined for the user (Set Up SACR, Security, Secure Student Administration, User ID, Application Center Security). You can view the UCAS or UTT application only if your User ID has access to the application center of the related Campus Solutions application. For example, suppose that user ID SATRN11 does not have access to the UGRD application center. In such a case, the UCAS Decision Processing page does not allow SATRN11 to access an application associated with the UGRD application center.
The system applies the same application center security to UCAS and UTT processing pages and the Maintain Applications component.
|
Page Name |
Definition Name |
Navigation |
Usage |
|---|---|---|---|
|
Standard Offers |
SAD_UC_STD_OFF |
|
Define conditions for an offer that UCAS sends to the applicant. |
|
UCAS Application Notes |
SAD_UC_APPLNOTES |
|
View the key information for a UCAS application choice, on a single page. Enter notes for the application choice. |
|
3C/Attachments |
SAD_UC_3C_ATTACH |
|
Add or view attachments for the Campus Solutions application record. Enter or view the 3C information for the person ID. |
|
UCAS Wrong Applicants |
SAD_UC_STARW |
|
Review the imported applicant records from ivStarW and delete records if required. You can also use this page to un-match an applicant record that is incorrectly matched to a person record. |
|
UCAS Initial Decision Entry |
SAD_UC_DECENTRY |
|
Enter an admission decision for a UCAS application choice. |
|
UCAS Decision Processing |
SAD_UC_DECISN |
|
Enter or update an admission decision for a UCAS application choice. Find out whether your institution has confirmed the applicant's admission offer or released the applicant into Clearing. |
|
UCAS Quick Decision Entry |
SAD_UC_QDEC |
|
Enter a decision simultaneously for multiple UCAS applications. |
|
UCAS Decision Approval |
SAD_UC_DECAPR |
|
Approve or reject the admission decision for a UCAS application choice. |
|
UCAS Quick Decision Approval |
SAD_UC_QDAPR |
|
Approve or reject simultaneously the admission decisions for multiple UCAS applications. |
|
Results/Offer Matching Process |
SAD_UC_MATCH_PROC |
|
Match exam results with conditional offer details for Confirmation. The process determines whether the applicants have satisfied the offer conditions. You can run this process for all applicants in an institution, for all applicants of a particular course, or for specific applicants. This process is optional for confirming conditional offers. You can use the Confirmation Entry page to manually determine whether an applicant has satisfied the offer conditions. |
|
UCAS Confirmation Entry |
SAD_UC_CNFDEC |
|
Accept or reject the conditional offer of an applicant. If you have not run the Results/Offer Matching process for the applicant, manually match the applicant's exam results with the conditional offer details and indicate whether the applicant has satisfied the conditions for admission. |
|
UCAS Quick Confirmation |
SAD_UC_QCONF |
|
Accept or reject the conditional offer of multiple applicants. |
|
UCAS Confirmation Approval |
SAD_UC_CNFAPR |
|
Approve or reject the Confirmation decision for an applicant. |
|
UCAS Quick Confirmation Approval |
SAD_UC_QAPR |
|
Approve or reject the Confirmation decision for multiple applicants. |
|
UCAS Release To Clearing |
SAD_UC_RELDEC |
|
Release an applicant into Clearing. |
|
UCAS Release to Clearing Approval |
SAD_UC_RELAPR |
|
Approve or reject an applicant's release into Clearing. |
|
UCAS Enquiry Entry |
SAD_UC_CLEARING |
|
Create or update an applicant's Clearing or Adjustment record. Specify whether you want the Transaction Processing process to generate an RX, RQ, PE, or AD transaction. |
|
UCAS Qualifications |
SAD_UC_IVFRMQUAL |
|
Review and edit imported qualification and exam result records. |
|
Transaction Processing |
SAD_UC_TRN_PROC |
|
Generate, export, and update UCAS and UTT transactions. |
|
UCAS Transactions |
SAD_UC_TRANIN |
|
Review the UCAS transactions. In addition, manually add or delete transactions and set the hold flag to prevent the system from sending the transactions to UCAS. |
|
UCAS Enquiry Transactions |
SAD_UC_TRANINCLR |
|
Review the UCAS Clearing and Adjustment transactions that the Transaction Processing process has generated. Alternatively, manually add or delete Clearing or Adjustment transactions. Set the hold flag to prevent the system from sending the Clearing or Adjustment transactions to UCAS. |
|
UCAS Confirmation Enquiries |
SAD_UC_CONF_ENQ |
|
Review a summary of the Confirmation or Clearing application choice. Also, enter notes and outcome codes for an application choice while handling applicant enquiries related to Confirmation and Clearing. |
|
UTT Application Notes |
SAD_UC_GTAPPNOTE |
|
View the key information for a UTT application choice, on a single page. Enter notes for the application choice. |
|
3C/Attachments |
SAD_UC_GT3C_ATTACH |
|
Add or view attachments for the Campus Solutions application record. Enter or view the 3C information for the person ID. |
|
UTT Wrong Applicants |
SAD_UC_GSTARW |
|
Review the imported applicant records from ivgStarW and delete records if required. You can also use this page to un-match an applicant record that is incorrectly matched to a person record. |
|
UTT Initial Decision Entry |
SAD_UC_GTDECENTRY |
|
Enter an admission decision for a UTT application choice |
|
UTT Decision Processing |
SAD_UC_GTDECISN |
|
Enter or update an admission decision for a UTT application choice. |
|
UTT Quick Decision Entry |
SAD_UC_QGTDEC |
|
Enter a decision simultaneously for multiple UTT applications. |
|
UTT Qualifications |
SAD_UC_IVGFRMQUAL |
|
Review and edit imported qualification records. |
|
UTT Decision Approval |
SAD_UC_GTDECAPR |
|
Approve or reject the admission decision for a UTT application choice. |
|
UTT Quick Decision Approval |
SAD_UC_QGTDAPR |
|
Approve or reject simultaneously the admission decisions for multiple UTT applications. |
|
UTT Confirmation Entry |
SAD_UC_GTCNFDEC |
|
Accept or reject the conditional offer of a UTT applicant. |
|
UTT Quick Confirmation |
SAD_UC_QGTCONF |
|
Accept or reject the conditional offer of multiple UTT applicants. |
|
UTT Confirmation Approval |
SAD_UC_GTAPR |
|
Approve or reject the Confirmation decision for a UTT applicant. |
|
UTT Quick Confirmation Approval |
SAD_UC_QGTAPR |
|
Approve or reject the Confirmation decision for multiple UTT applicants. |
|
UTT Enquiry Entry |
SAD_UC_GTCLRING |
|
Create or update an applicant's Clearing record. Specify whether you want the Transaction Processing process to generate an RX. |
|
UTT Transactions |
SAD_UC_GTTRANIN |
|
Review UTT transactions that you have sent or not sent. In addition, manually add or delete transactions and set the hold flag to prevent the system from sending the transactions to UCAS. |
|
UTT Enquiry Transactions |
SAD_UC_GTTRNCLR |
|
Review the UCAS Clearing transactions that the Transaction Processing process has generated. Alternatively, manually add or delete Clearing transactions. Set the hold flag to prevent the system from sending the Clearing transactions to UTT. |
|
ID Delete |
RUNCTL_ID_CHANGE |
|
Delete an ID from the database after initiating the removal process of the ID in the UCAS Wrong Applicants or the UTT Wrong Applicants pages. |
Access the Standard Offers page ().
Image: Standard Offers page
This example illustrates the fields and controls on the Standard Offers page. You can find definitions for the fields and controls later on this page.
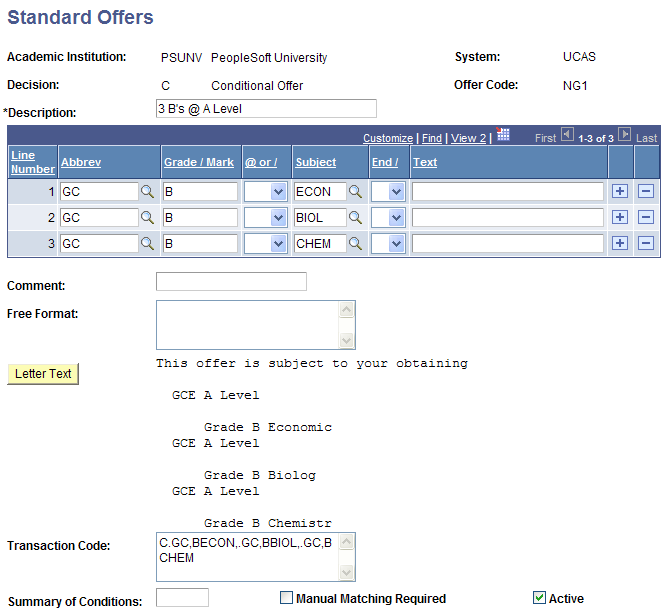
For UTT, you should enter only the interview date element in the Free Format field and not the interview time. For UCAS, you can enter both the interview date and time in the Free Format field.
You can use the Decision Code field in the Decision Processing, Initial Decision and Quick Decision pages to select a standard offer. On selecting a standard offer, the system populates the decision record with the values that you defined on the Standard Offers page.
Free Format field and the Interview decision
For Interview decisions, the value you enter in the Free Format field need not start with DDMMYY. You can define interview standard offers with or without date and time elements. Note that the generated Transaction Code should not be blank for Interview decisions. You must enter text in either the Comment field or the Free Format field to generate transaction code.
If the Free Format field on the Standard Offers page starts with a date in the format DDMMYY, then the system populates the Interview Date field in the UCAS and UTT Decision Processing and Initial Decision pages with this date. For example, suppose you have an INT01 offer with a free format text that starts with 010100 on the Standard Offers page. In such a case, when you select INT01 as a decision code on the UCAS Decision Processing page, the page automatically populates the Interview Date field as 01/01/2000.
If the Free Format field on the Standard Offers page includes a time in the format HHMM from position 8 to 11 (that is, after a hyphen - as character 7), then the system populates the Interview Time field in the UCAS Decision Processing and UCAS Initial Decision pages with this time. For example, suppose you have an INT01 offer with a free format text that starts with 010100-1300. In such a case, when you select INT01 as a decision code on the UCAS Decision Processing page, the page automatically populates the Interview Date field as 01/01/2000 and Interview Time as 13:00. UTT does not use Interview Time.
The system populates the Free Format field on the UCAS and UTT Decision Processing pages with the Free Format value from the Standard Offers page without the interview date and time elements for UCAS and without the interview date for UTT. For example, suppose you have an INT01 offer with a free format text 010100-1300 Is your interview date and time. In such a case, when you select INT01 as a decision code on the UCAS Decision Processing page, the page automatically populates the Interview Date field with 01/01/2000, Interview Time field with 13:00, and the Free Format field with Is your interview date and time. The Free Format field does not appear on the Initial Decision pages but the system applies similar logic in the background to populate the Free Format field of the decision record with the free format text from the standard offer minus any interview date and time elements.
You can change the interview date and time, comment, and the free format text values on the decision pages, if required.
Access the UCAS Application Notes page ().
Image: UCAS Application Notes page (1 of 4)
This example illustrates the fields and controls on the UCAS Application Notes page (1 of 4). You can find definitions for the fields and controls later on this page.
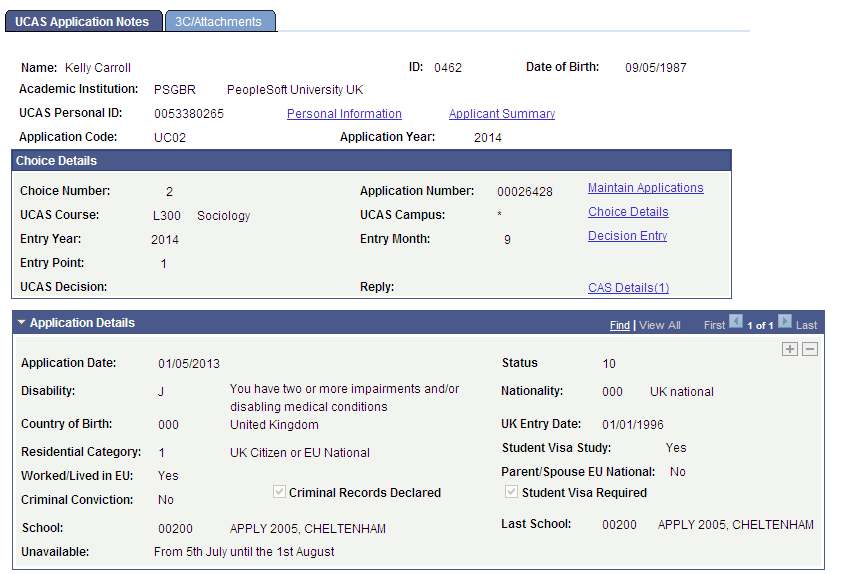
Image: UCAS Application Notes page (2 of 4)
This example illustrates the fields and controls on the UCAS Application Notes page (2 of 4). You can find definitions for the fields and controls later on this page.
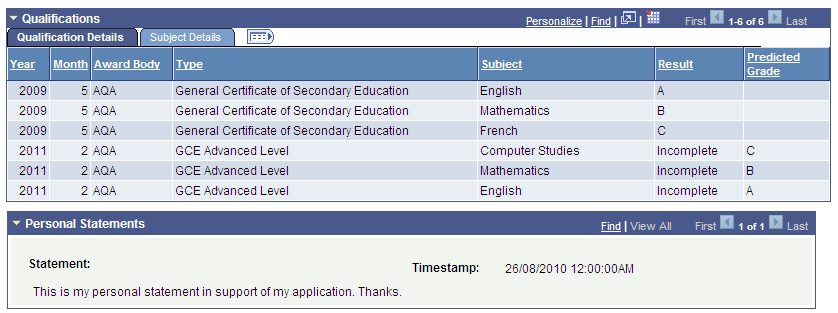
Image: UCAS Application Notes page (3 of 4)
This example illustrates the fields and controls on the UCAS Application Notes page (3 of 4). You can find definitions for the fields and controls later on this page.
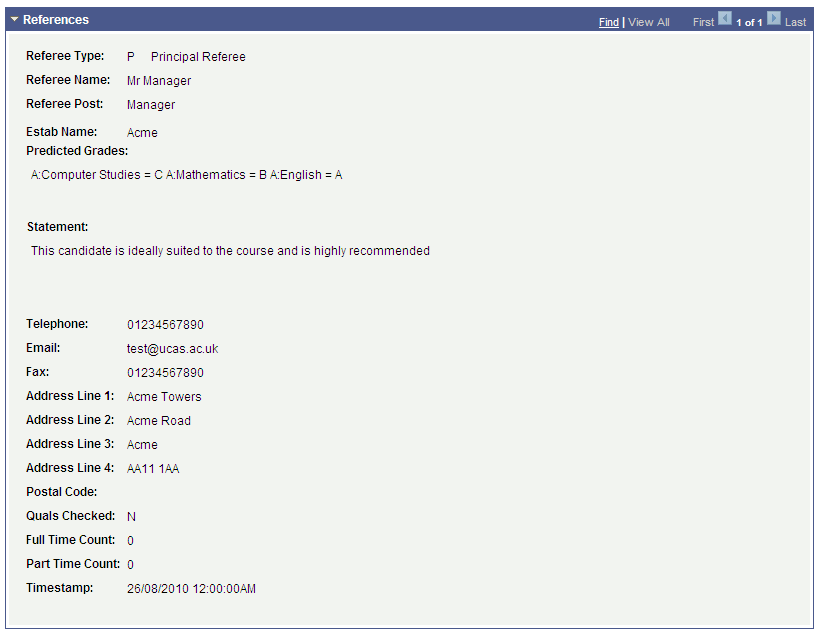
Image: UCAS Application Notes page (4 of 4)
This example illustrates the fields and controls on the UCAS Application Notes page (4 of 4). You can find definitions for the fields and controls later on this page.
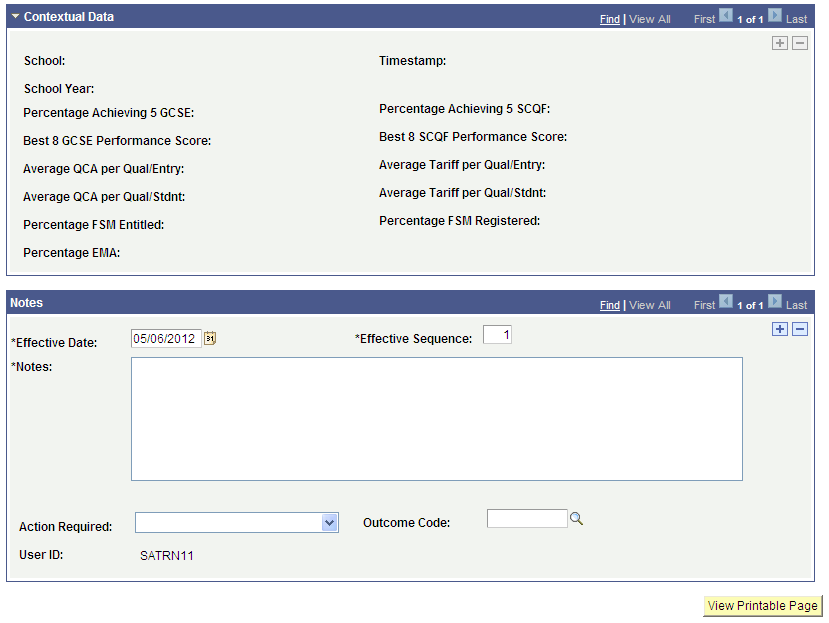
The fields on the Notes region are similar to those on the UCAS Confirmation Enquiries page. The Automatic Save and Outcome Required settings on the UCAS Configuration page affects only the UCAS Confirmation Enquiries page and does not affect the UCAS Application Notes page.
|
Field or Control |
Definition |
|---|---|
| View Printable Page |
Click to obtain a printable version of the application information. |
Access the 3C/Attachments page ().
Image: 3C/Attachments page (1 of 2)
This example illustrates the fields and controls on the 3C/Attachments page (1 of 2). You can find definitions for the fields and controls later on this page.
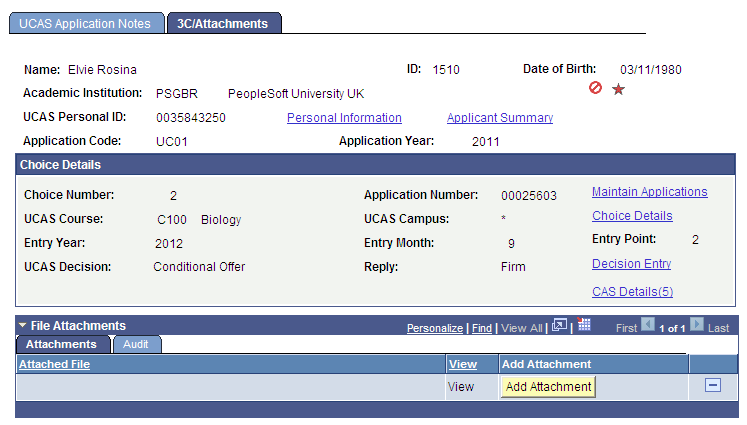
Image: 3C/Attachments page (2 of 2)
This example illustrates the fields and controls on the 3C/Attachments page (2 of 2). You can find definitions for the fields and controls later on this page.
File Attachments
Use this group box to add, delete and view attachments for the Campus Solutions application.
|
Field or Control |
Definition |
|---|---|
| Add Attachment |
Click to access standard PeopleTools functionality to browse to a file and upload it |
| View |
Click the link to open the attachment in a new window. |
The Audit tab displays all updates to attachments, including user name and date/time.
Note that you can also use the File Attachments group box on the Application Data page of the Maintain Applications component to maintain and access the attachment data.
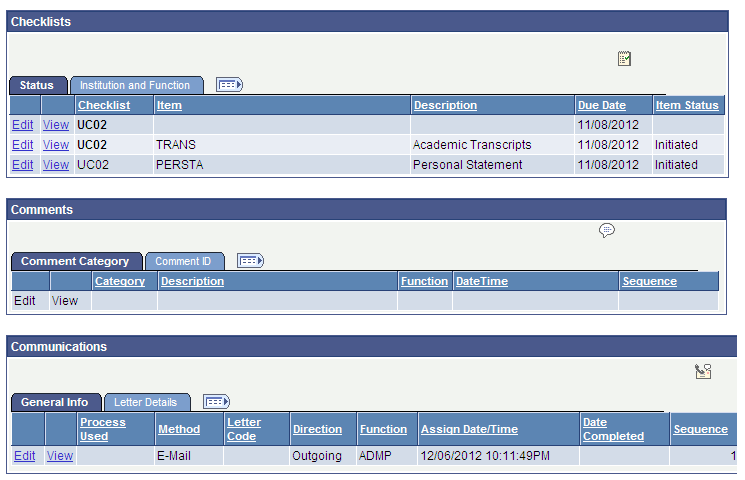
The 3C Group Boxes (Checklists, Comments, and Communications)
The fields on these group boxes are similar to the fields that appear on the Campus Community's checklist, comment, and communication pages. The group boxes display the records in a similar way to the Campus Community's checklist, comment, and communication summary pages.
See Understanding Communication Management
Note that the group boxes display a person ID's 3C records for only the ADMA and ADMP administrative functions. Also, these group boxes display only those 3C records where the application number in the variable data of the 3C record matches with the application choice that the Choice Details region of the page displays or if the application number value in the variable data is blank (3C records can be created without the application number value in variable data). Records linked to other application numbers are not displayed.
When you create a checklist, comment, or communication record by clicking the create button on any one of these group boxes, the system by default:
Populates the Administrative Function field with the value that you selected for the Default Admin Function field on the UCAS Configuration page (if the Default Admin Function field is blank, then the system will enter ADMA in the Administrative Function field).
Enters the variable data based on the application choice (that is, academic career, student career Nbr, application number, and application center).
Access the UCAS Wrong Applicants page ().
Image: UCAS Wrong Applicants page
This example illustrates the fields and controls on the UCAS Wrong Applicants page . You can find definitions for the fields and controls later on this page.
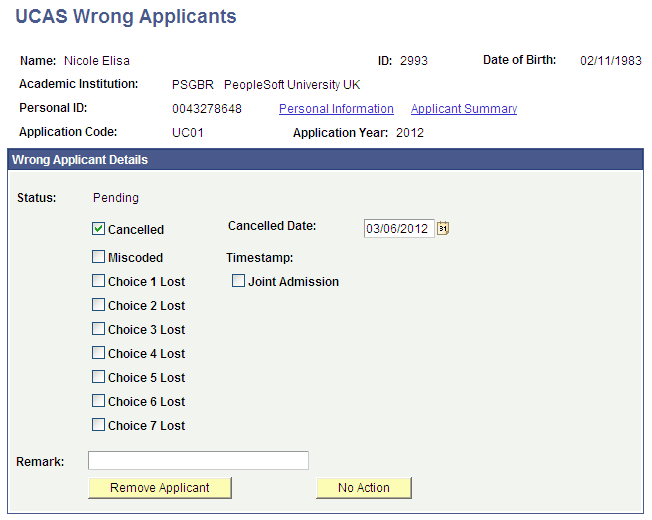
In certain circumstances, an incoming UCAS applicant record can be incorrectly matched to an existing person record during the import process or through the Transaction Data page. In such circumstances:
Use the UCAS Remove Wrong Applicants component to manually add the wrong applicant record.
Select the Cancelled check box. If needed, edit the Cancelled Date field. Optionally, enter a remark.
Save the record.
Click the Remove Applicant button to run the Remove Applicant process. This process removes the incorrectly matched applicant.
The Remove Applicant process does not alter the person-related records (for example, Disability, Ethnicity, Citizenship, National ID, External System ID and so on) that the Import Applicant Data process may have created for the incorrect ID. These records should be updated or removed using the relevant Campus Community pages. In particular, the UCAS Personal ID that the import process creates as an External System ID for the incorrect ID should be removed to prevent the record being incorrectly matched again during the re-import.
Run the Import Applicant Data process for the single applicant so that all the deleted applicant records can be re-imported and either matched to the correct person or a new person record created.
|
Field or Control |
Definition |
|---|---|
| Cancelled Date |
This field is available for edit only when you are manually adding a record. After you save the manually added record, this field becomes unavailable. |
| Remark |
This field is available for edit only when you are manually adding a record. |
| Remove Applicant |
Click to run the Remove Applicant process that will delete the ID's:
The system enables this button if the status is Pending, Partially Removed, or No Action.. When you click the button, the status changes to Removed. When you click the button for a UCAS applicant for whom only specific choices are lost, the system removes the specific lost choices but retains the overall applicant record. For a manually added record, the system enables the button only when you save the record. |
| No Action |
Click to change the record status from Pending to No Action. The No Action status indicates that the record need not be removed. For a manually added record, the system enables the button only when save the record. |
After clicking the Remove Applicant button, navigate to to remove the person record of the UCAS wrong applicant.
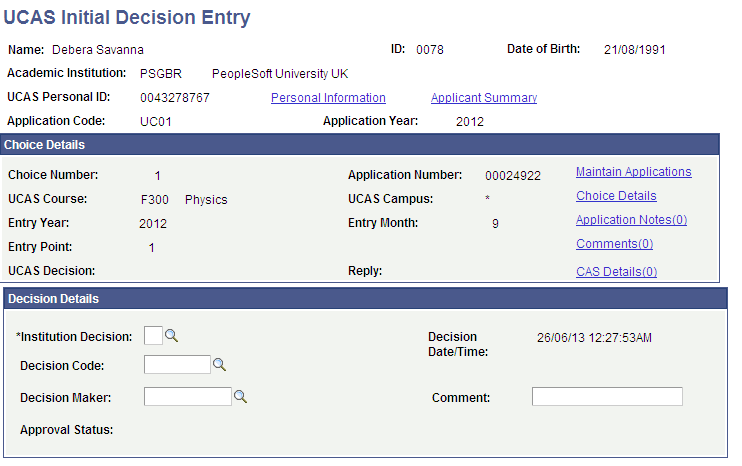
Access the UCAS Initial Decision Entry page ().
Image: UCAS Initial Decision Entry page
This example illustrates the fields and controls on the UCAS Initial Decision Entry page. You can find definitions for the fields and controls later on this page.
If you did not select the Interview Applicants option on the UCAS Initial Decision Entry search page, an application choice is included in the search results only if all the following conditions are satisfied:
An institution decision does not exist.
UCAS decision of the choice is blank.
Choice is not cancelled.
The whole application is not withdrawn.
In such a case, the UCAS Initial Decision Entry page does not allow you to modify an institution decision. If you want to modify an institution decision, use the UCAS Decision Processing page.
If you select the Interview Applicants option on the UCAS Initial Decision Entry search page, an application choice is included in the search results only if all the following conditions are satisfied:
An institution decision record exists with decision = I (interview) and decision is approved or does not require approval.
UCAS decision value of the choice (imported from StarC/StarG) is not W.
Choice is not cancelled.
The whole application is not withdrawn.
In such a case, you can then use the UCAS Initial Decision Entry to modify the Interview decision to a post-interview decision (that is, Offer, Conditional offer, or Reject).
|
Field or Control |
Definition |
|---|---|
| Institution Decision |
Select an admission decision. After you enter a decision, run the Transaction Processing process to generate the transaction to send to UCAS. If the choice number is 9 (Clearing), the valid decisions are A (Accept) or R (Rejection). If the choice number is 6 (Adjustment), the valid decision is U (Unconditional Offer). If the choice number is not 9 or 6 (standard application), the valid decisions are C (Conditional Offer), U (Unconditional Offer), R (Rejection), F (Course Full), and I (Interview). The Interview Date and Interview Time fields appear only if you select the Interview decision. You cannot enter the Delayed Conditional decision code (D) in this page or the UTT Initial Decision Entry page. This decision can be entered only in the Decision Processing page. |
| Decision Code |
Optionally, add a standard offer to the decision. |
| Interview Date |
Select the date on which the interview is to take place. |
| Interview Time |
Enter the time the interview is scheduled to begin. The time format uses a 24-hour clock. Therefore, for example, if the interview time is 2:30 PM, enter 14:30. |
| Comment |
For all decisions you can add a comment, unless a standard offer is entered. You can enter the reason for a Clearing Rejection in the Comment field. When you generate a RX transaction for the rejection, the system includes the comment text in the Free Format column of the RX transaction. |
Access the UCAS Decision Processing page ().
Image: UCAS Decision Processing page (1 of 3)
This example illustrates the fields and controls on the UCAS Decision Processing page (1 of 3). You can find definitions for the fields and controls later on this page.
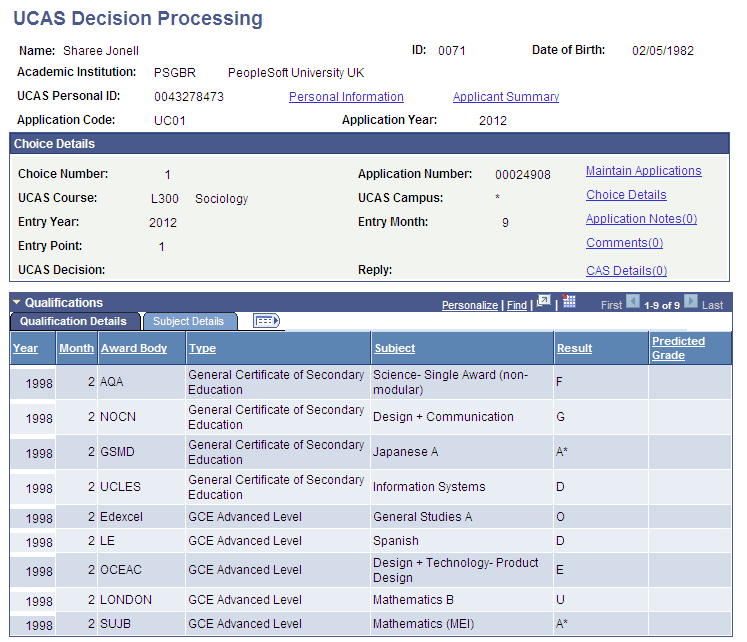
Image: UCAS Decision Processing page (2 of 3)
This example illustrates the fields and controls on the UCAS Decision Processing page (2 of 3). You can find definitions for the fields and controls later on this page.
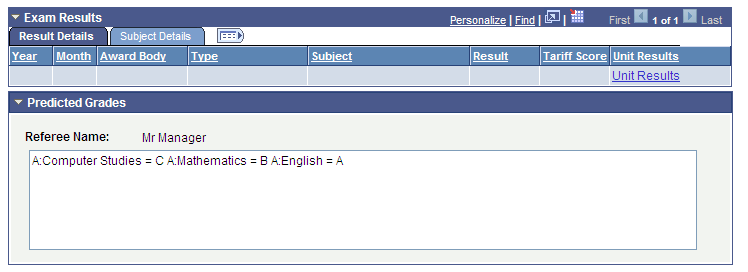
Image: UCAS Decision Processing page (3 of 3)
This example illustrates the fields and controls on the UCAS Decision Processing page (3 of 3). You can find definitions for the fields and controls later on this page.
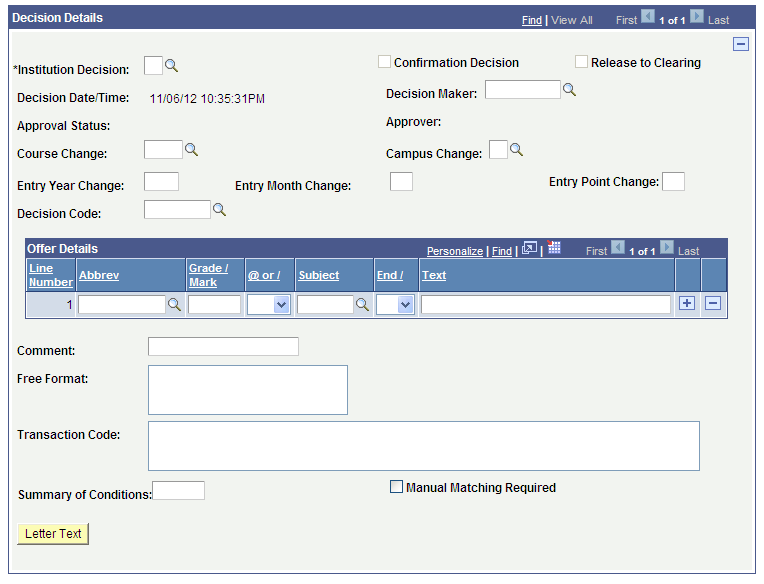
|
Field or Control |
Definition |
|---|---|
| Institution Decision |
Select an admission decision. After you enter or update a decision, if required, use the UCAS Decision Approval page to approve the decision. Then use the Transaction Processing process to generate the decision transaction to send to UCAS. The validations of this field are similar to that of the Institution Decision field on the UCAS Initial Decision Entry page. However, you can enter the Delayed Conditional (D) decision only from this page. Decision D is valid only for non-clearing CF application choices (CF means decision is Conditional Offer and reply is Firm). |
| Confirmation Decision |
The system automatically selects this check box when you enter a Confirmation decision in the UCAS Confirmation Entry page or the UCAS Quick Confirmation page. |
| Release to Clearing |
The system automatically selects this check box when you enter a Release into Clearing decision in the UCAS Release to Clearing page. |
| Decision Code |
Optionally, add a standard offer to the decision. |
| Comment |
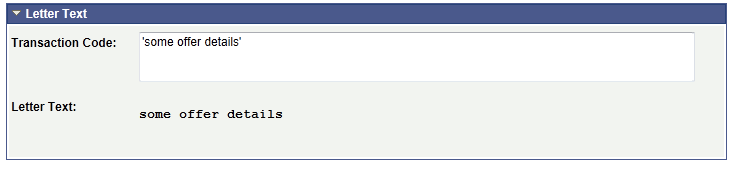
The usage of this field is similar to that of the Comment field on the UCAS Initial Decision Entry page. The only difference is that on this page you can use this field for transaction code. For example, if Interview Date is May 26, 2009 and Interview Time is 9:15 and Comment is Bring your portfolio and you click Letter Text, then the following transaction code appears 260509-0915,'Bring your portfolio' |
The offer details fields are similar to the fields on the Standard Offers page.
Access the UCAS Quick Decision Entry page ().
Image: UCAS Quick Decision Entry page
This example illustrates the fields and controls on the UCAS Quick Decision Entry page. You can find definitions for the fields and controls later on this page.
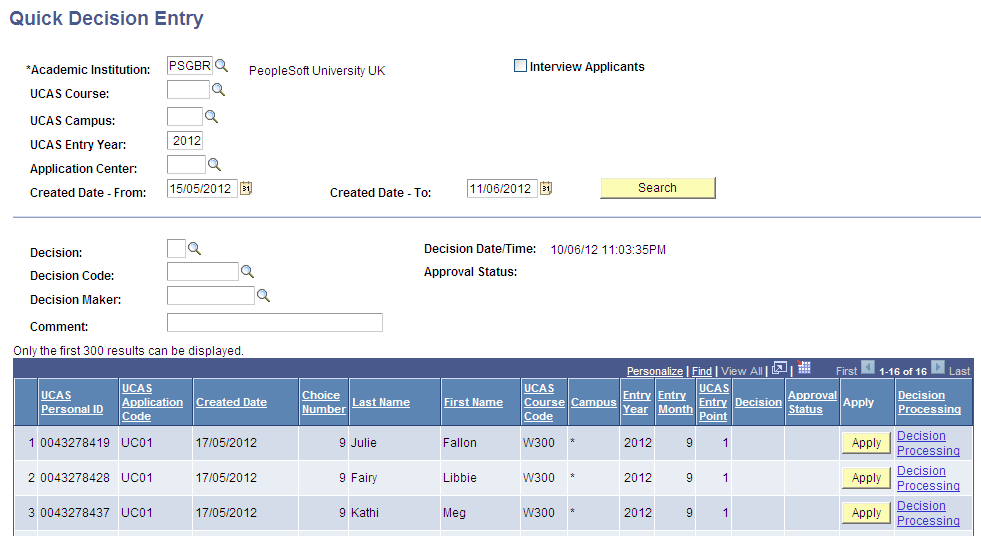
If you do not select the Interview Applicants check box on the UCAS Quick Decision Entry page, a choice is included in the search results only if all the following conditions are satisfied:
An institution decision does not exist.
UCAS decision of the choice is blank.
Choice is not cancelled.
The whole application is not withdrawn.
In such a case, the page does not allow you to modify an admission decision. If you want to modify an admission decision, use the UCAS Decision Processing page.
If you select the Interview Applicants check box on this page, a choice is included in the search results only if all the following conditions are satisfied:
An institution decision record exists with decision = I (interview) and decision is approved or does not require approval.
UCAS decision value of the choice (imported from StarC/StarG) is not W.
Choice is not cancelled.
The whole application is not withdrawn.
In such a case, you can use this page to modify the Interview decision to a post-interview decision (that is, Offer, Conditional offer, or Reject).
The system enables the Interview Date - From and Interview Date - To search fields and displays the interview date column in the search results, if you select the Interview Applicants check box. And the system enables the Created Date - From and Created Date - To search fields, if you deselect the Interview Applicants check box.
You can search for records of a particular institution, course, campus, entry year and application center or combination of those. The decision, decision code, decision maker and comment field values are used for all the records that have a decision applied and are saved.
You cannot enter the Delayed Conditional decision code (D) in this page or the UTT Quick Decision Entry page. This decision can be entered only in the Decision Processing page.
Access the UCAS Decision Approval page ().
Image: UCAS Decision Approval page
This example illustrates the fields and controls on the UCAS Decision Approval page . You can find definitions for the fields and controls later on this page.

Click Approve or Deny button to indicate whether the admission decision entered in the UCAS Decision Processing or UCAS Initial Decision Entry page is approved or denied.
Access the UCAS Quick Decision Approval page ().
Image: UCAS Quick Decision Approval page
This example illustrates the fields and controls on the UCAS Quick Decision Approval page. You can find definitions for the fields and controls later on this page.
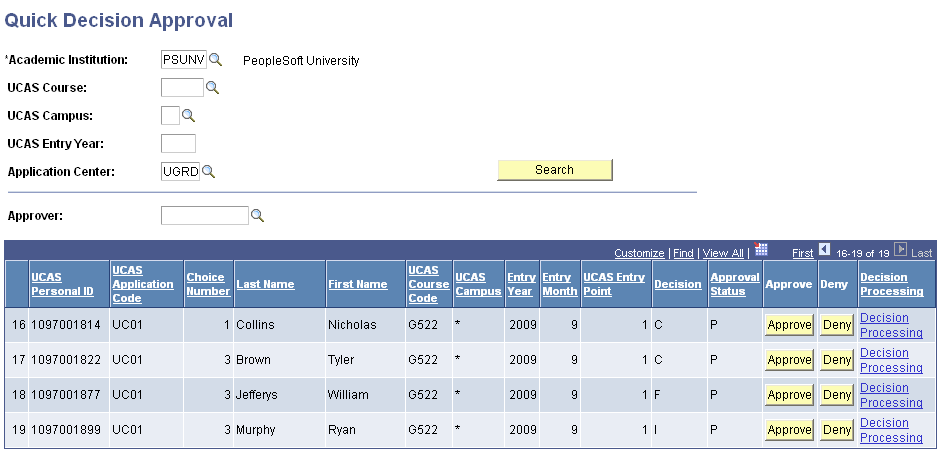
You can search for records of a particular institution, course, campus, entry year and application center or combination of those. The Approver value is used for all the records that are approved and saved.
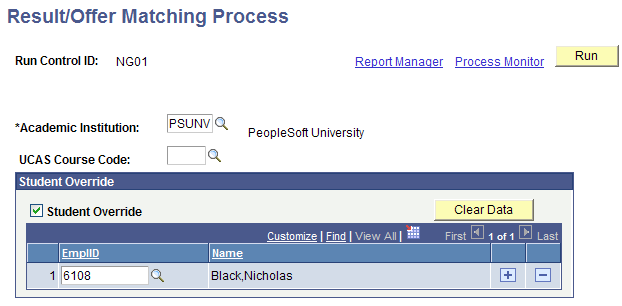
Access the Result/Offer Matching Process page ().
Image: Result/Offer Matching Process page
This example illustrates the fields and controls on the Result/Offer Matching Process page. You can find definitions for the fields and controls later on this page.
|
Field or Control |
Definition |
|---|---|
| Student Override |
Select if you want to run the process for one or more IDs selected in the EmplID field. If you select the Student Override check box, the process ignores any values entered in the UCAS Course Code field. |
For a student, the process can compare the conditions you generated (Transaction Code) on the UCAS Decision Processing page with the exam results, and determine whether the student has satisfied the conditions. The process considers the following abbreviations when comparing conditional offer details with exam results:
TO - Tariff offers
GC - GCE A Level
AS - GCE AS Level
IH - Irish Leaving Certificate (Higher Level)
SH - SQA Highers
AH - SQA Advanced Highers
EG - Excluding General Studies
AC - Alternate conditions
Any other abbreviations need to be manually reviewed before the offer is confirmed.
After running this process, navigate to the UCAS Confirmation Entry page to check whether the applicant has satisfied the conditions. If the process determines that the applicant has satisfied all the conditions, the Results Matching field displays Satisfied on the UCAS Confirmation Entry page. If the process determines that at least one condition has not been met, the Results Matching field displays Not Satisfied. If the process determines that at least one condition has not been evaluated, the Results Matching field displays Partially Evaluated. If the process determines that none of the conditions have been evaluated, the Results Matching field displays Not Evaluated.
The following example shows how the Result/Offer Matching process works for a tariff offer:
Use the UCAS Decision Processing page to enter a conditional offer for a student.
Enter abbreviation = TO (Tariff Score) and Grade Mark = 200. This condition is generated: The student must obtain a minimum of 200 UCAS tariff points.
Import the exam results from ivStarPQR.
The student has grade C for GCE A Levels in Maths, General Studies, and English.
Run the Results/Offer Matching process for the student.
The system uses the imported cvRefTariff data to translate the total tariff score to 240 (grade C is equivalent to 80 tariff points).
The UCAS Confirmation Entry page for the student shows that the condition is satisfied.
Note: The Result/Offer Matching process considers only records that have a current decision of C or D, for which the Manual Matching Required check box is cleared on the UCAS Decision Processing page.
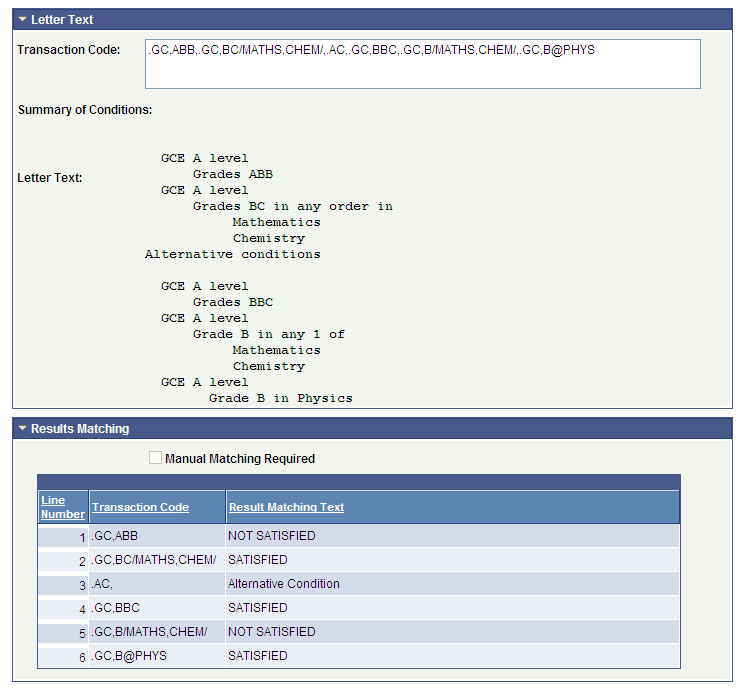
Access the UCAS Confirmation Entry page ().
Image: UCAS Confirmation Entry page (1 of 3)
This example illustrates the fields and controls on the UCAS Confirmation Entry page (1 of 3). You can find definitions for the fields and controls later on this page.
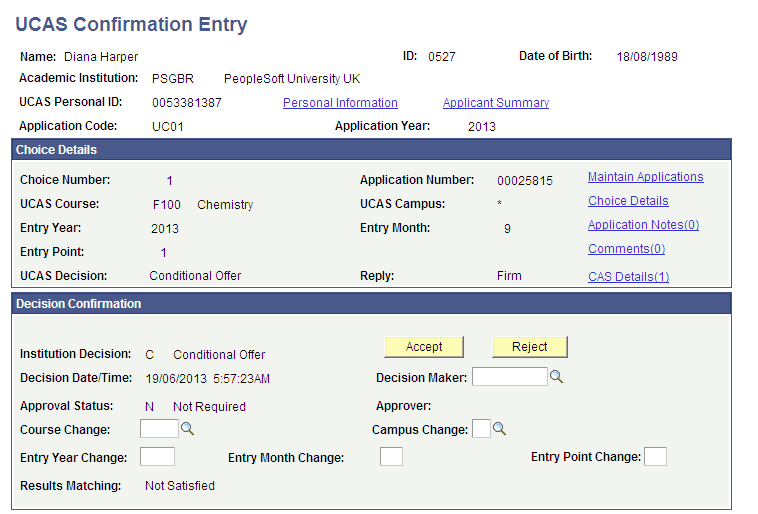
Image: UCAS Confirmation Entry page (2 of 3)
This example illustrates the fields and controls on the UCAS Confirmation Entry page (2 of 3). You can find definitions for the fields and controls later on this page.

Image: UCAS Confirmation Entry page (3 of 3)
This example illustrates the fields and controls on the UCAS Confirmation Entry page (3 of 3). You can find definitions for the fields and controls later on this page.
Click the Accept or Reject button to indicate the Confirmation decision.
To add any changes to the course details, first enter the changes, then click the Accept button, and finally save the record. For example, enter a Campus Change value, click the Accept button, and then save the record.
Note that if you decide to save the record without clicking either the Accept button or Reject button, then the system removes any course change details in the existing non-confirmation decision record.
All application records that are CF or CI (decision is conditional offer, and reply is firm or insurance) appear on the UCAS Confirmation Entry page regardless of whether a confirmation decision is pending or has been entered. Additionally, any application records that are DF (decision is delayed conditional and reply is firm) appear on the UCAS Confirmation Entry page regardless of whether a confirmation decision is pending or has been entered. You can enter or amend a confirmation decision using this page.
The system automatically selects the Confirmation Decision check box on the UCAS Decision Processing page when you click Accept or Reject.
After you enter a Confirmation decision, if required, use the Confirmation Approval page to approve the decision. Then run the Transaction Processing process to generate the RD transaction to send to UCAS.
If you amend an existing confirmation decision using this page, in most cases, the Transaction Processing process generates another RD transaction with the new Accept or Reject decision. However, in cases where you have already sent an accept decision and a course change is being made, then the process generates a RA transaction.
If the Entry Point is being changed to a foundation year with Entry Point of zero, you must enter 9 in the Entry Point Change field of this page. The system will send this value to UCAS in the confirmation transaction as zero when you run the Transaction Processing process.
Access the UCAS Quick Confirmation page ().
Image: UCAS Quick Confirmation page
This example illustrates the fields and controls on the UCAS Quick Confirmation page. You can find definitions for the fields and controls later on this page.
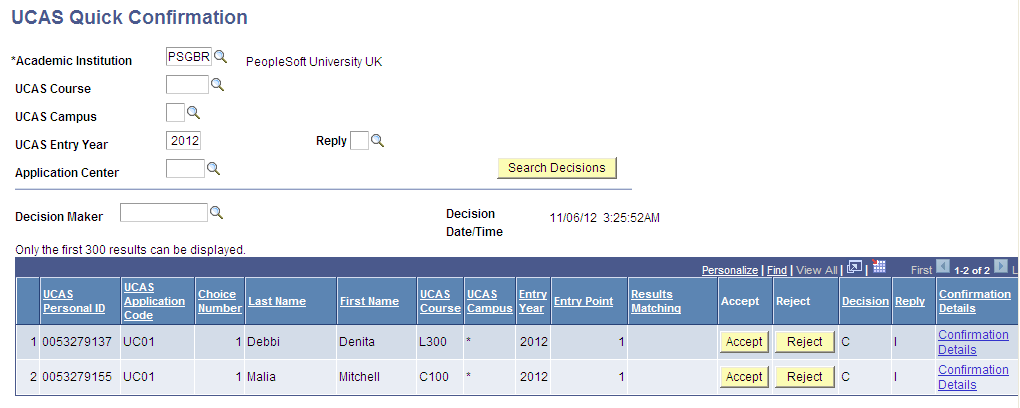
The same rules discussed in the “Entering a Confirmation Decision” topic apply to the UCAS Quick Confirmation page. However, there are two exceptions:
The Quick Confirmation page does not display a DF application choice.
The Quick Confirmation page does not display an application choice for which you already have entered a confirmation decision.
You can search for records of a particular course. Also, you can use the same Decision Maker value for all the records that appear in the search results.
A choice is included in the search results of this page only if all the following conditions are satisfied:
Institution decision is C (conditional offer)
Reply of the choice (from ivStarC) is F or I.
Choice is not cancelled.
The whole application is not withdrawn.
When you click Accept or Reject, the system automatically updates the Decision value to A or R, respectively.
Access the UCAS Confirmation Approval page ().
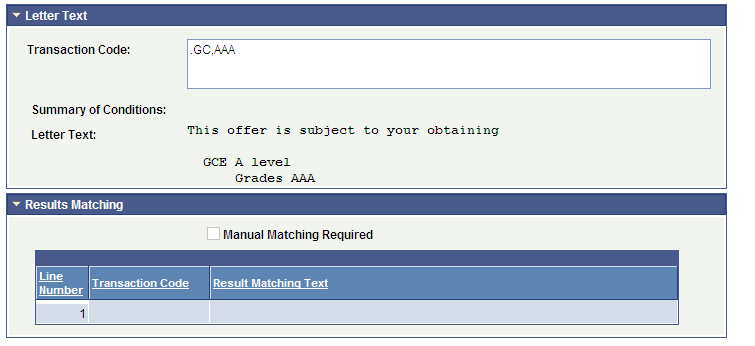
Image: UCAS Confirmation Approval page (1 of 2)
This example illustrates the fields and controls on the UCAS Confirmation Approval page (1 of 2).
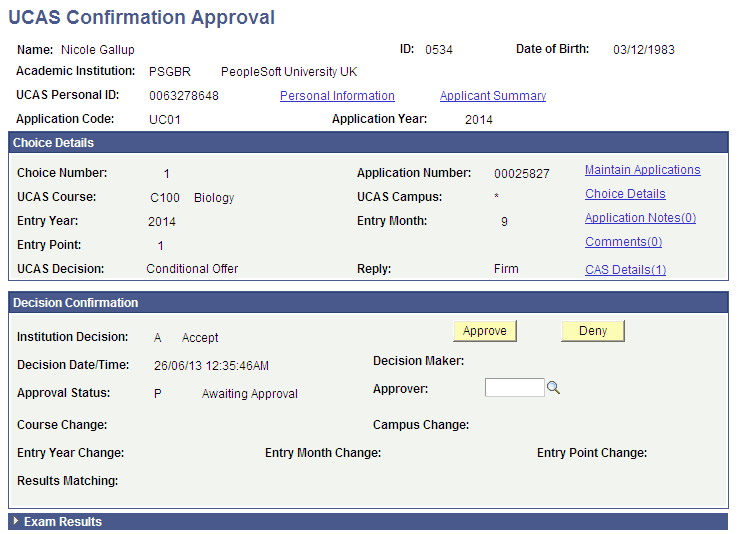
Image: UCAS Confirmation Approval page (2 of 2)
This example illustrates the fields and controls on the UCAS Confirmation Approval page (2 of 2).
Access the UCAS Quick Confirmation Approval page ().
Image: UCAS Quick Confirmation Approval page
This example illustrates the fields and controls on the UCAS Quick Confirmation Approval page. You can find definitions for the fields and controls later on this page.
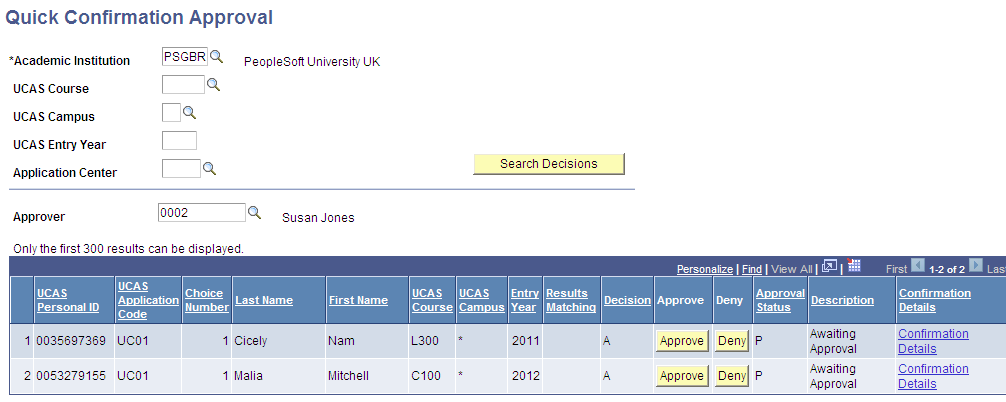
You can search for records of a particular institution, course, campus, entry year and application center or combination of those. The Approver value is used for all the records that are approved and saved.
Access the UCAS Release to Clearing page ().
Image: UCAS Release to Clearing page
This example illustrates the fields and controls on the UCAS Release to Clearing page. You can find definitions for the fields and controls later on this page.
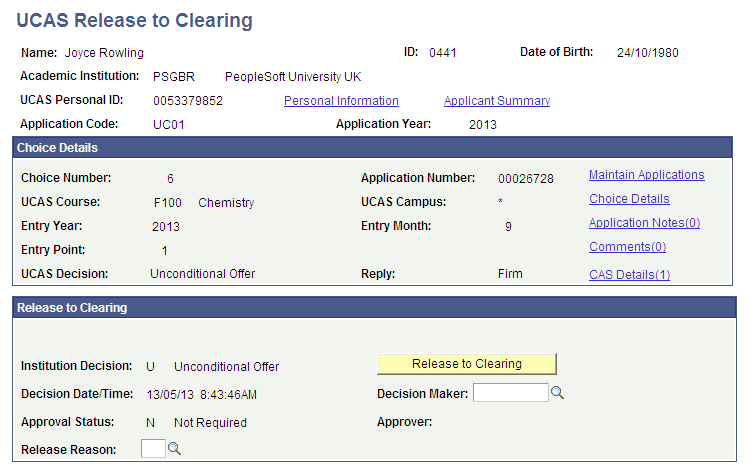
The page displays:
Application choices that have a Institution Decision of U (Unconditional), Reply of F (Firm), and the Release to Clearing check box cleared on the Decision Processing page.
All accepted Clearing and Adjustment application choices (that is, application choice number is 6 or 9, decision is A or U, and Reply is not equal to D (declined).
The system automatically selects the Released to Clearing check box on the UCAS Decision Processing page when you click Release to Clearing.
After you enter a decision to release an applicant into Clearing, if required, use the Release to Clearing Approval page to approve the decision. Then run the Transaction Processing process to generate the RR transaction to send to UCAS.
Note: The system displays a warning message if the applicant is not eligible for release to Clearing. That is, when you click the Release to Clearing button, a warning message appears if the application is for deferred entry, if the application is for a future or previous cycle, if the application is RPA (Record of Prior Acceptance), or if the application Fee Level is single fee.
Access the UCAS Release Approval page ().
Image: UCAS Release Approval page
This example illustrates the fields and controls on the UCAS Release Approval page.
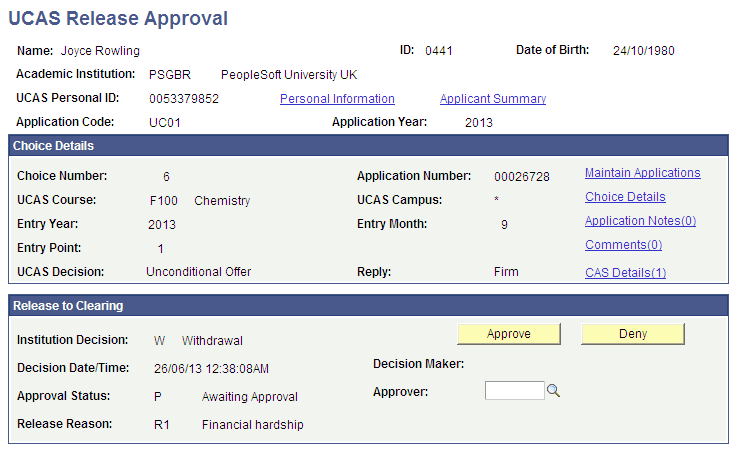
To search for only adjustment records, select the Adjustment check box on the search page. To search for only Clearing records, clear the Adjustment check box on the search page.
Access the UCAS Enquiry Entry page ().
Image: UCAS Enquiry Entry page (1 of 2)
This example illustrates the fields and controls on the UCAS Enquiry Entry page (1 of 2). You can find definitions for the fields and controls later on this page.
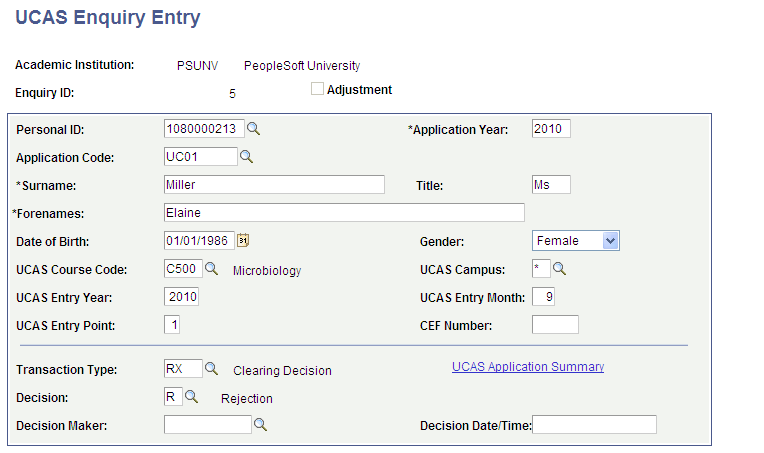
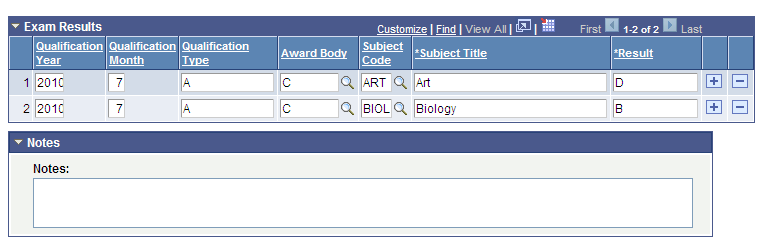
Image: UCAS Enquiry Entry page (2 of 2)
This example illustrates the fields and controls on the UCAS Enquiry Entry page (2 of 2). You can find definitions for the fields and controls later on this page.
Use the Transaction Type field to record an RQ, PE, or RX transaction for a Clearing enquiry or the RQ, PE, or AD transaction for an Adjustment enquiry. Use the Decision field to enter A (Accept) or R (Reject). After you record the Clearing or Adjustment details, run the Transaction Processing process to generate the Adjustment or Clearing transactions to send to UCAS.
If you want to record a PE transaction, the UCAS Personal ID and UCAS Application Code fields are required (UCAS Course Code is optional).
If you want to record a AD transaction, the UCAS Personal ID, UCAS Application Code, UCAS Course Code, Entry Year, and Entry Month fields are required.
The UCAS Course Code field is required for RQ and RX transactions. Also, the Decision field is required for RX transaction.
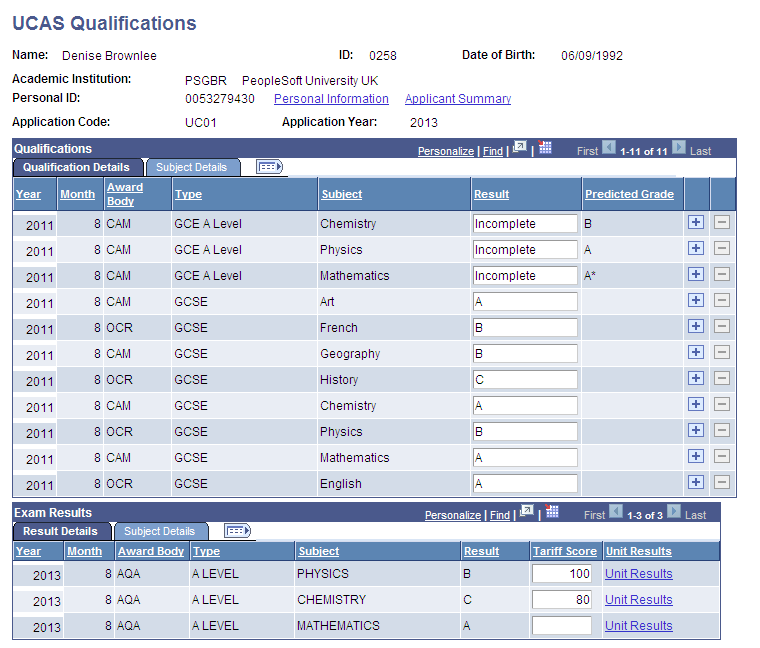
Access the UCAS Qualifications page ()
Image: UCAS Qualifications page
This example illustrates the fields and controls on the UCAS Qualifications page.
Access the Transaction Processing page ().
Image: Transaction Processing page
This example illustrates the fields and controls on the Transaction Processing page. You can find definitions for the fields and controls later on this page.
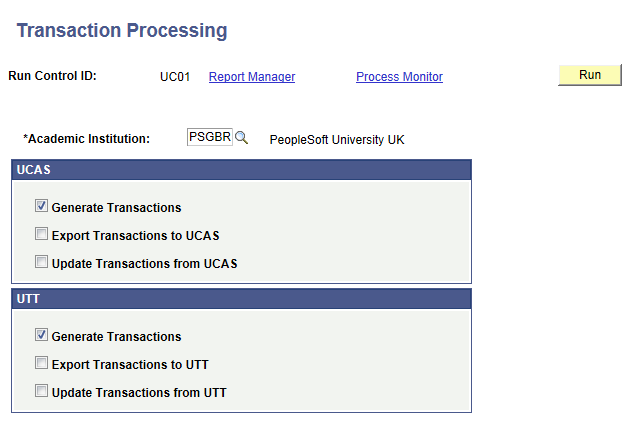
Use the check boxes in the UCAS and UTT regions to generate, export, and update UCAS and UTT transactions.
|
Field or Control |
Definition |
|---|---|
| Generate Transactions |
Select to generate transactions and update the corresponding Campus Solutions application choice records. |
| Export Transactions to UCAS |
Select to write the transactions to the TRANIN table at UCAS. |
| Update Transactions from UCAS |
Select to enable the Campus Solutions system to read back error codes from TRANIN at UCAS. |
The system disables the UTT check boxes on the Transaction Processing page if you clear the UTT check box on the UCAS Configuration page.
Access the UCAS Transactions page ().
Image: UCAS Transactions page
This example illustrates the fields and controls on the UCAS Transactions page. You can find definitions for the fields and controls later on this page.
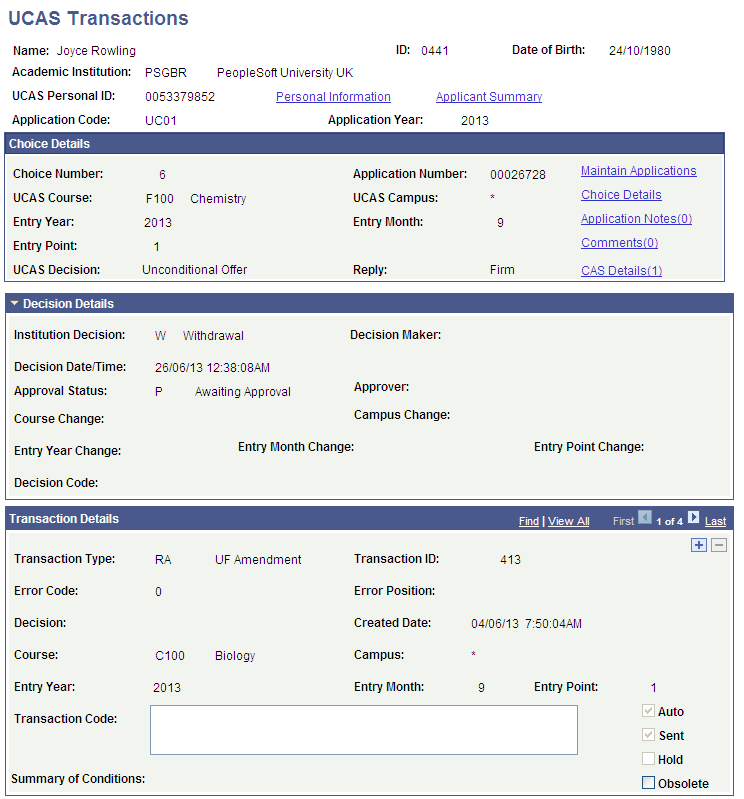
You cannot update transactions that the system has already sent to UCAS. The transaction appears in read-only mode if the system has already sent the transaction to UCAS. If the system has not sent the transaction, you can use this page to update, delete, or hold the transaction.
|
Field or Control |
Definition |
|---|---|
| Error Code |
Displays the status of a transaction that UCAS sends back to the institution. You import the error codes, descriptions, and error positions from cvRefError view when you import the reference data. An error code of:
|
| Error Position |
Indicates where the error appears in the transaction code. |
| Decision |
Select a decision for the transaction of an application choice. |
| Transaction Code |
Enter the transaction code that you want to send to UCAS. |
| Auto |
Indicates that the system has automatically generated the transaction. |
| Sent |
Indicates that the system has sent the transaction to UCAS. |
| Hold |
Select to indicate that you do not want the system to export the transaction to UCAS. |
| Obsolete |
Select if you do not want the transaction to appear in the search results when you search for error, hold, or unsent transactions. Note that you can select the Transactions in Error check box, Transaction on Hold check box, or Unsent Transaction check box on the UCAS Transactions search page to search for error, hold, or unsent transactions. Also, if you select the Obsolete check box, the system does not export the transaction to UCAS. Hold or obsolete transactions cannot be sent to UCAS. |
The following table lists the field values that are mandatory when you create a transaction manually. If you create a transaction manually, you will need to manually update the related Campus Solutions application record.
|
Transaction Type |
Mandatory Field Value |
|---|---|
|
LD (decision) LA (amended decision) RD (confirmation decision) |
Decision |
|
LC (course correction) |
At least one of the following values must be provided:
|
|
RR (release into clearing) |
Transaction Code must contain a value ranging from .R1 to .R8. |
|
PE, RA, or RW |
None |
|
RA, RR, and RW |
Application must be UF. That is, Decision must be U (Unconditional Offer) and Reply must be F (Firm). |
Use the UCAS Enquiry Transactions page to manually create an RX or RQ transaction.
To search for only adjustment transactions, select the Adjustment check box on the search page. To search for only Clearing transactions, clear the Adjustment check box on the search page.
Access the UCAS Enquiry Transactions page ().
Image: UCAS Enquiry Transactions page
This example illustrates the fields and controls on the UCAS Enquiry Transactions page.
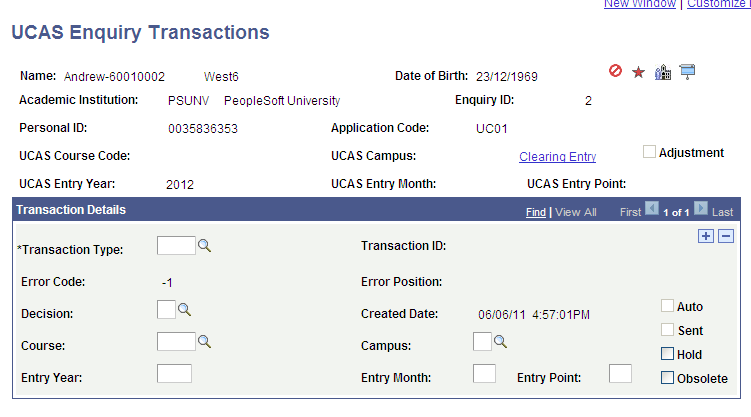
Most of the fields on the UCAS Enquiry Transactions page are similar to those on the UCAS Transactions page.
Access the UCAS Confirmation Enquiries page ().
Image: UCAS Confirmation Enquiries page (1 of 2)
This example illustrates the fields and controls on the UCAS Confirmation Enquiries page (1 of 2). You can find definitions for the fields and controls later on this page.
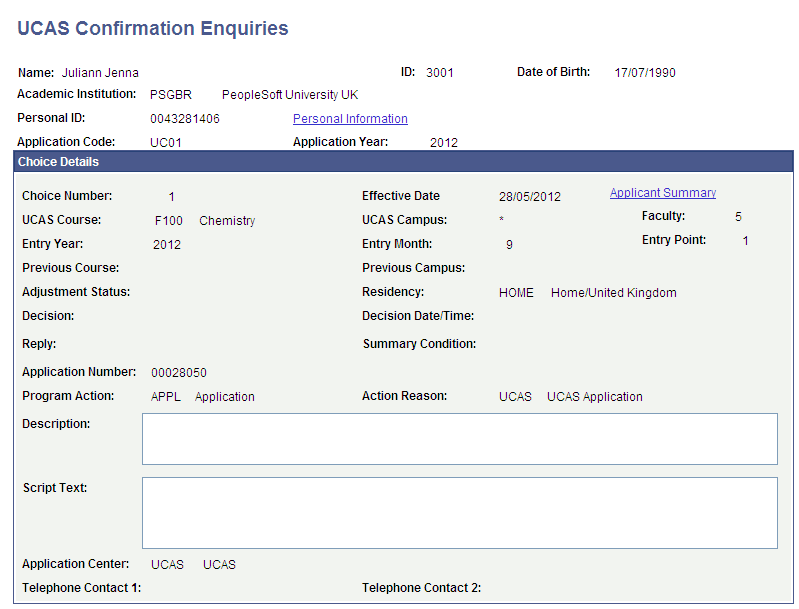
Image: UCAS Confirmation Enquiries page (2 of 2)
This example illustrates the fields and controls on the UCAS Confirmation Enquiries page (2 of 2). You can find definitions for the fields and controls later on this page.
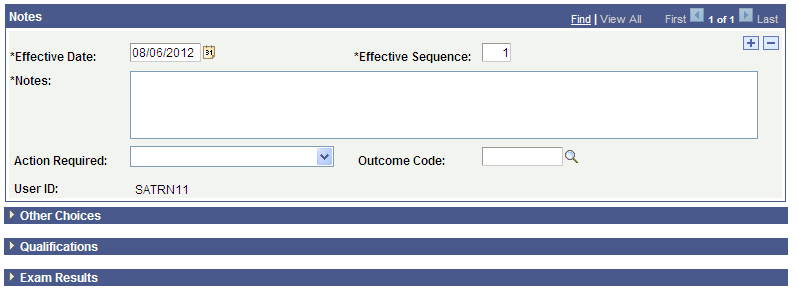
The page displays all UCAS application choices (similar to the UCAS Applications component). There is no restriction to just Confirmation and Clearing application choices. You can add multiple notes records for an effective date.
|
Field or Control |
Definition |
|---|---|
| Notes |
Enter the details of the interaction with the applicant. |
| Action Required |
Select a value to filter the codes available on the Outcome Code field. |
| Outcome Code |
Select a code to categorize the interaction with the applicant. |
Note: If you have configured Automatic Save, the system automatically saves a new record when you enter the mandatory values. The Notes field is always mandatory. The Action Required and Outcome Code fields become mandatory, if Outcome Required is configured as mandatory.
You configure Automatic Save and Outcome Required on the UCAS Configuration page.
Access the UTT Application Notes page ().
Image: UTT Application Notes page (1 of 3)
This example illustrates the fields and controls on the UTT Application Notes page (1 of 3).
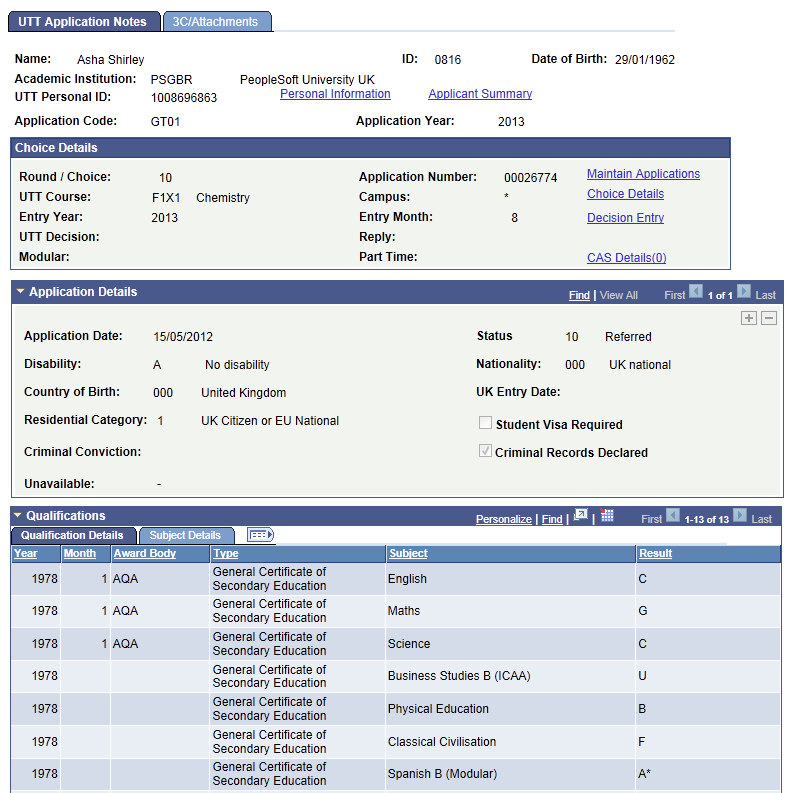
Image: UTT Application Notes page (2 of 3)
This example illustrates the fields and controls on the UTT Application Notes page (2 of 3).
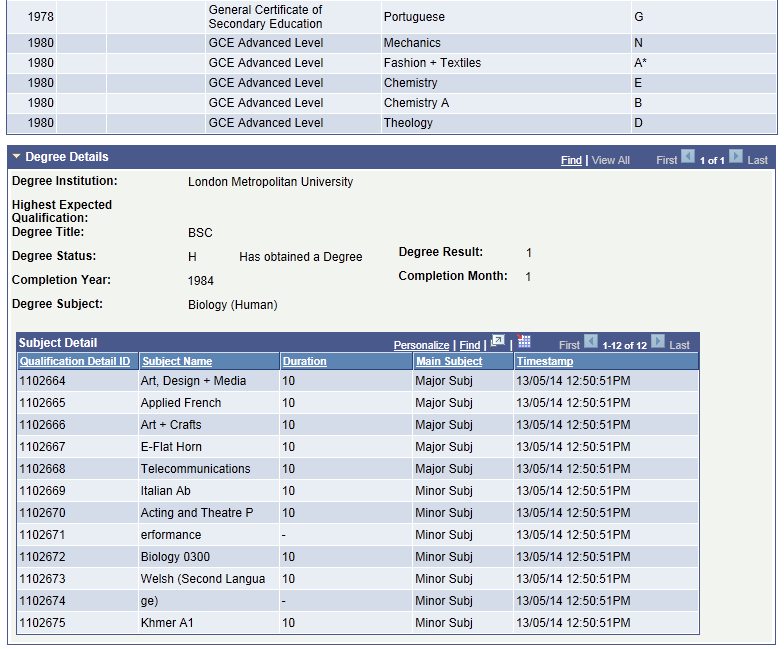
Image: UTT Application Notes page (3 of 3)
This example illustrates the fields and controls on the UTT Application Notes page (3 of 3).
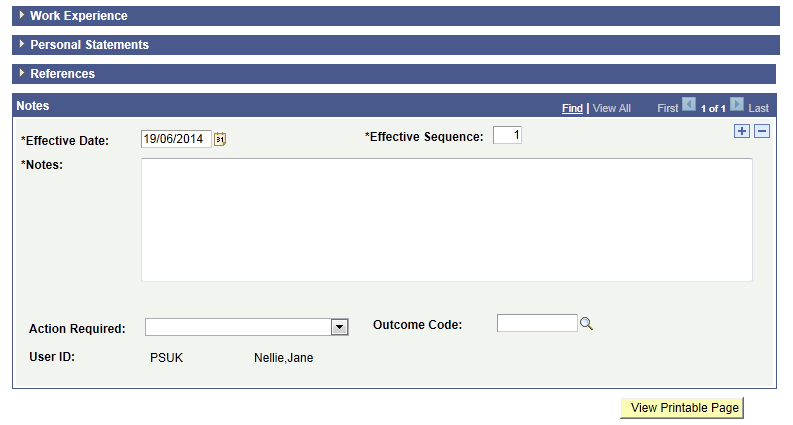
Most of the fields on this page are similar to those on the UCAS Application Notes page. The UTT Application Notes page has the Degree Details region and the Work Experience region that are not applicable to UCAS.
Access the 3C/Attachments page ().
Image: 3C/Attachments page
This example illustrates the fields and controls on the 3C/Attachments page.
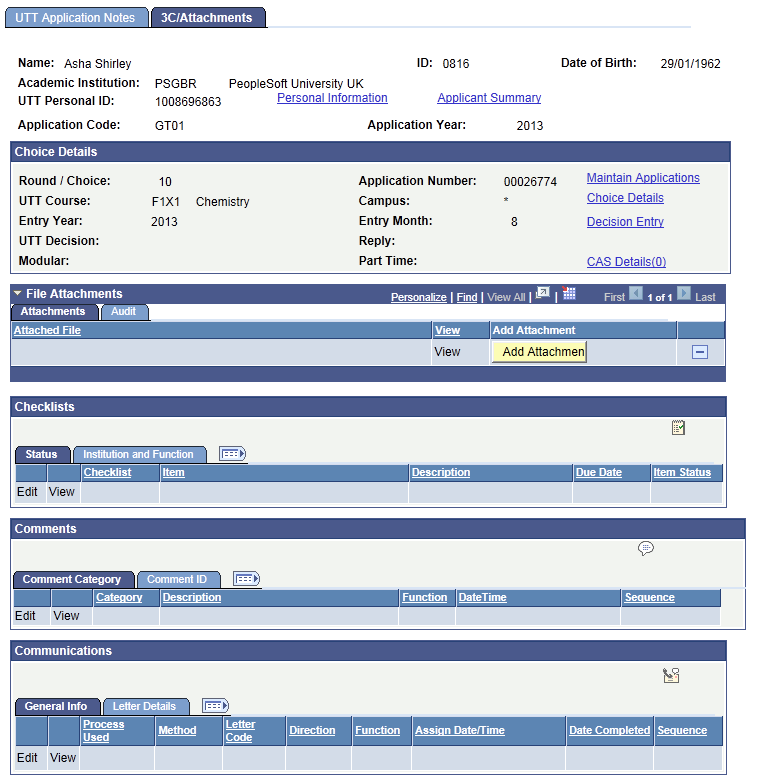
The fields on this page are similar to those on the 3C/Attachments page for UCAS.
Access the UTT Wrong Applicants page ().
Image: UTT Wrong Applicants page
This example illustrates the fields and controls on the UTT Wrong Applicants page.
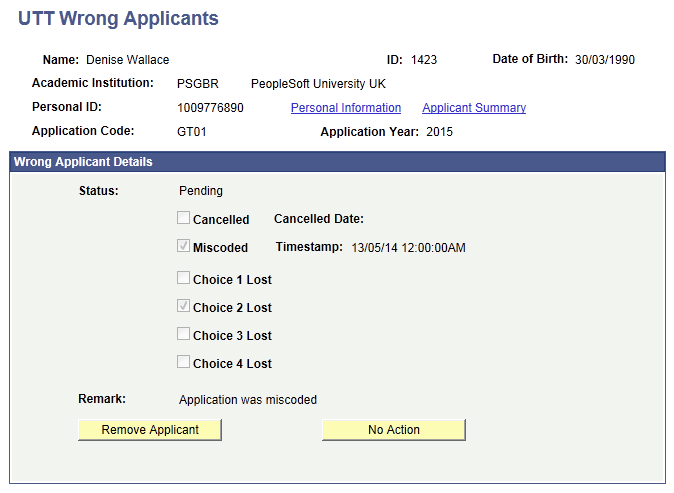
The fields on this page are similar to those on the UCAS Wrong Applicants page.
Access the UTT Initial Decision Entry page ().
Image: UTT Initial Decision Entry page
This example illustrates the fields and controls on the UTT Initial Decision Entry page.
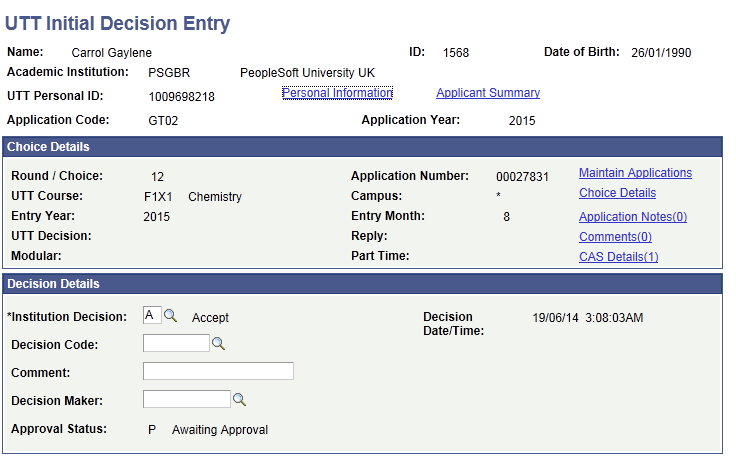
The fields on this page are similar to those on the UCAS Initial Decision Entry page. Note that the UTT Initial Decision Entry page does not display Accepted clearing choices that have a Choice Number of 99 and Decision of U.
The search results logic of the UTT Initial Decision Entry search page is similar to UCAS Initial Decision Entry search page except that the UTT search logic does not check whether the UTT choice is cancelled.
Access the UTT Decision Processing page ().
Image: UTT Decision Processing page (1 of 3)
This example illustrates the fields and controls on the UTT Decision Processing page (1 of 3).
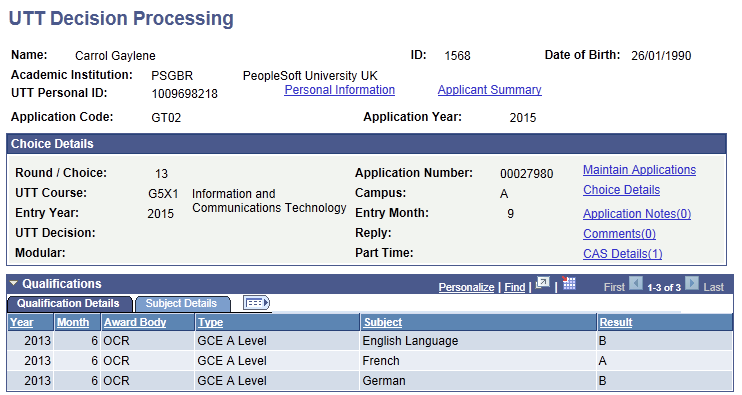
Image: UTT Decision Processing page (2 of 3)
This example illustrates the fields and controls on the UTT Decision Processing page (2 of 3).
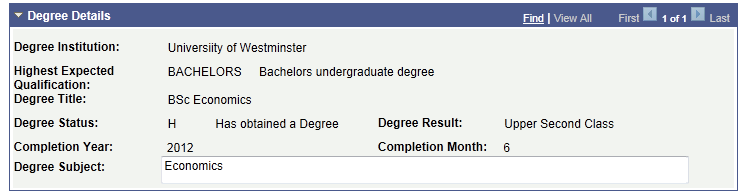
Image: UTT Decision Processing page (3 of 3)
This example illustrates the fields and controls on the UTT Decision Processing page (3 of 3).
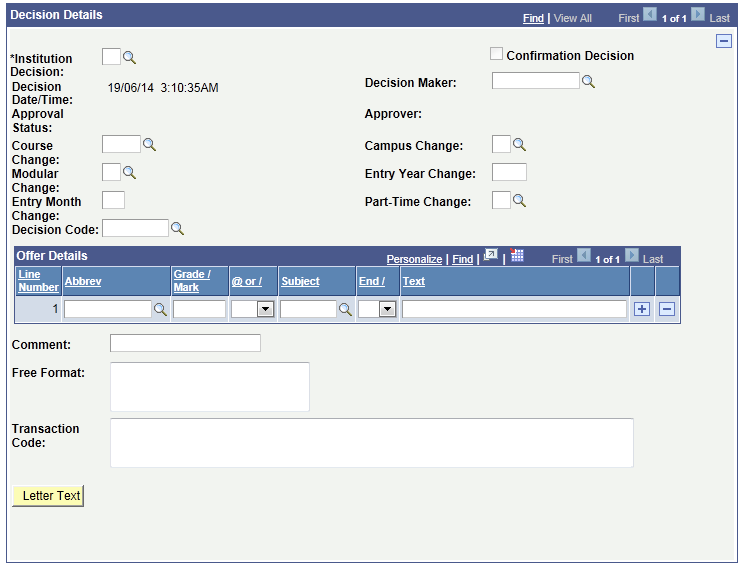
Most of the fields on this page are similar to the UCAS Decision Processing page. However, this page has a Clearing check box that does not appear on the UCAS Decision Processing page. The system selects the Clearing check box if ClearingStatus from ivgStarK is 2 (under consideration by institution) or 3 (accepted in clearing) and the ivgStarG Round Number is equal to or greater than the ivgStarK Round Number.
Access the UTT Quick Decision Entry page ().
Image: UTT Quick Decision Entry page
This example illustrates the fields and controls on the UTT Quick Decision Entry page.
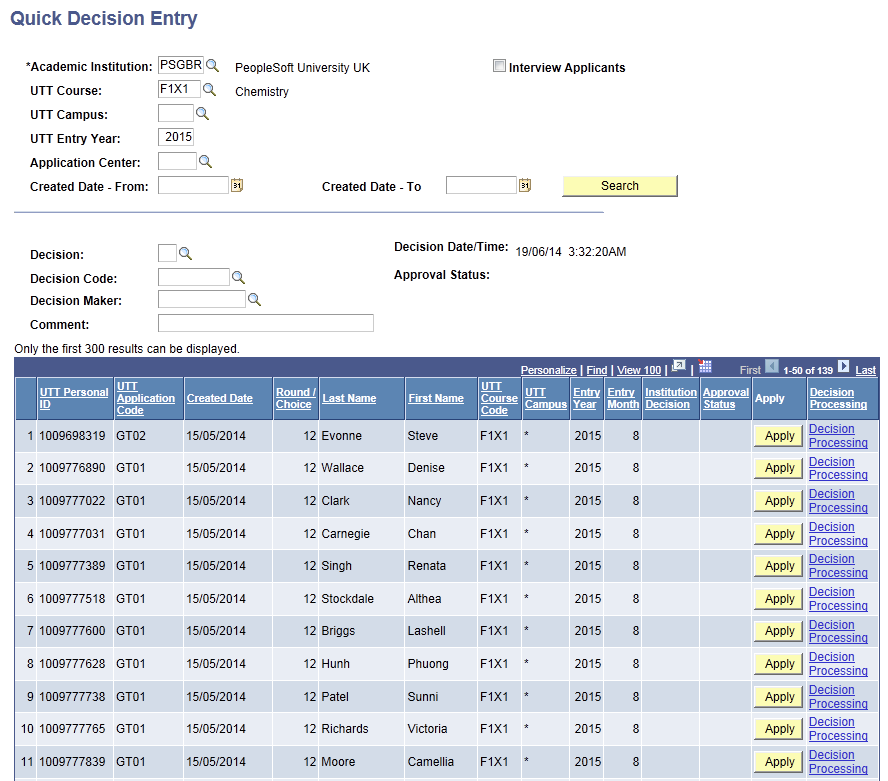
The fields on this page are similar to those on the UCAS Quick Decision Entry page.
The search results logic of the UTT Quick Decision Entry page is similar to UCAS Quick Decision Entry page except that the UTT search logic does not check whether the UTT choice is cancelled.
Access the UTT Decision Approval page ().
Image: UTT Decision Approval page
This example illustrates the fields and controls on the UTT Decision Approval page. You can find definitions for the fields and controls later on this page.
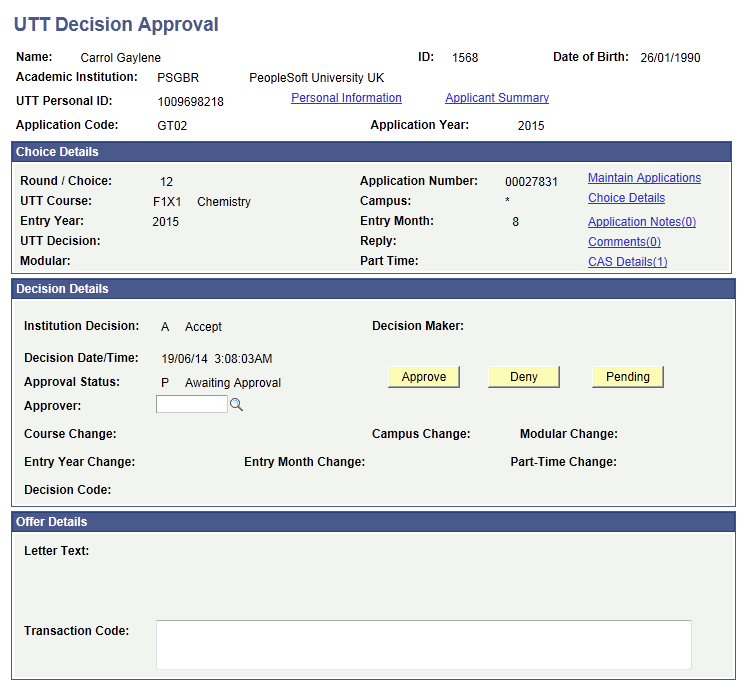
Click Approve or Deny button to indicate whether the admission decision entered in the UTT Decision Processing or UTT Initial Decision Entry page is approved or denied.
Access the UTT Quick Decision Approval page ().
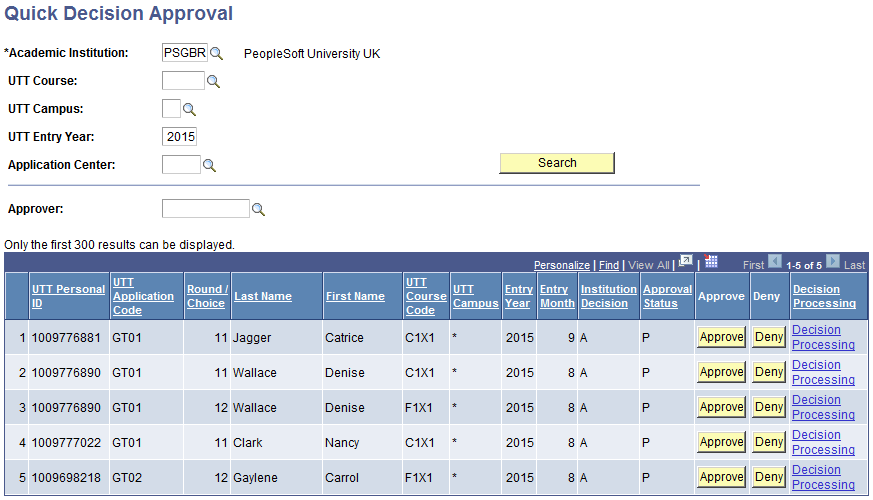
Image: UTT Quick Decision Approval page
This example illustrates the fields and controls on the UTT Quick Decision Approval page.
Access the UTT Confirmation Entry page ().
Image: UTT Confirmation Entry page (1 of 3)
This example illustrates the fields and controls on the UTT Confirmation Entry page (1 of 3).

Image: UTT Confirmation Entry page (2 of 3)
This example illustrates the fields and controls on the UTT Confirmation Entry page (2 of 3).
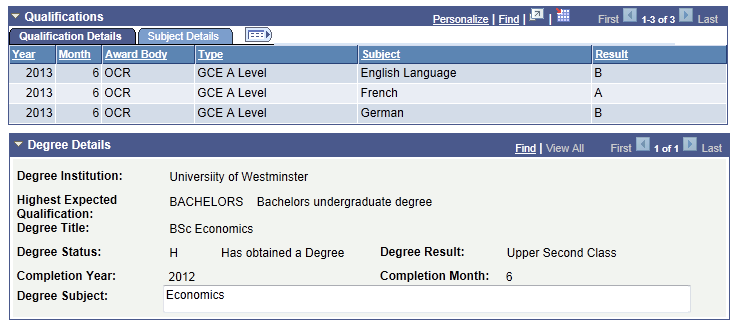
Image: UTT Confirmation Entry page (3 of 3)
This example illustrates the fields and controls on the UTT Confirmation Entry page (3 of 3).
The fields on this page are similar to those on the UCAS Confirmation Entry page. Note that only application records that are CF (decision is conditional offer, and reply is firm) or DF appear on the UTT Confirmation Entry page regardless of whether a confirmation decision is pending or has been entered. Also, application records for which a conditional offer has been made during Clearing appear on this page.
Access the UTT Quick Confirmation page ().
Image: UTT Quick Confirmation page
This example illustrates the fields and controls on the UTT Quick Confirmation page.

The fields on this page are similar to those on the UCAS Quick Confirmation page.
The search results logic of the UTT Quick Confirmation page is similar to UCAS Quick Confirmation page except that the UTT search logic does not check whether the UTT choice is cancelled.
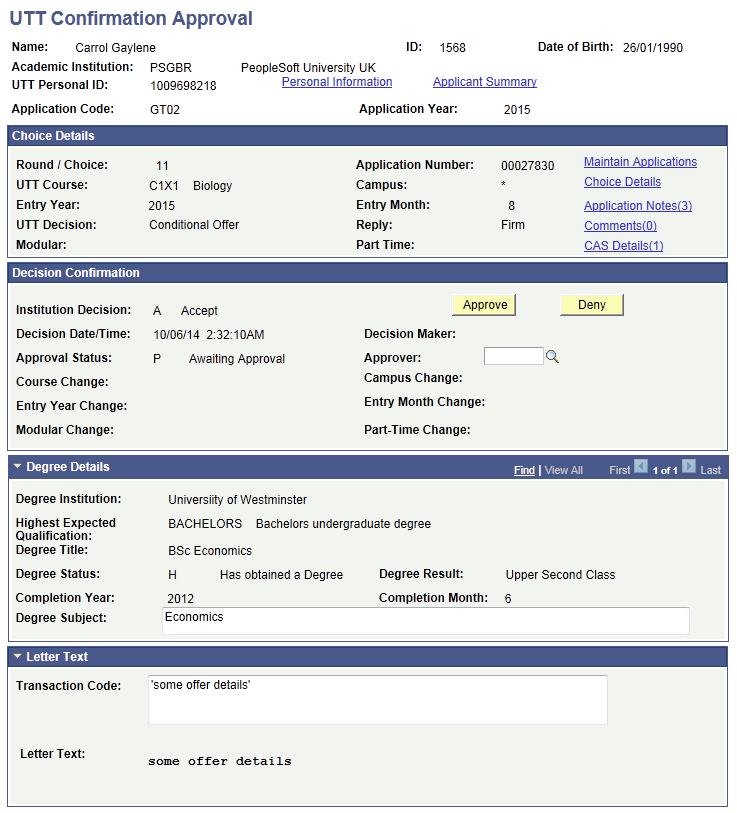
Access the UTT Confirmation Approval page ().
Image: UTT Confirmation Approval page
This example illustrates the fields and controls on the UTT Confirmation Approval page.
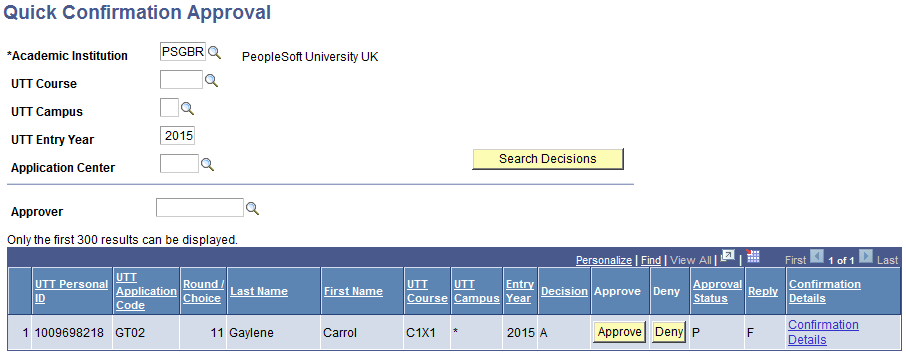
Access the UTT Quick Confirmation Approval page ().
Image: UTT Quick Confirmation Approval page
This example illustrates the fields and controls on the UTT Quick Confirmation Approval page.
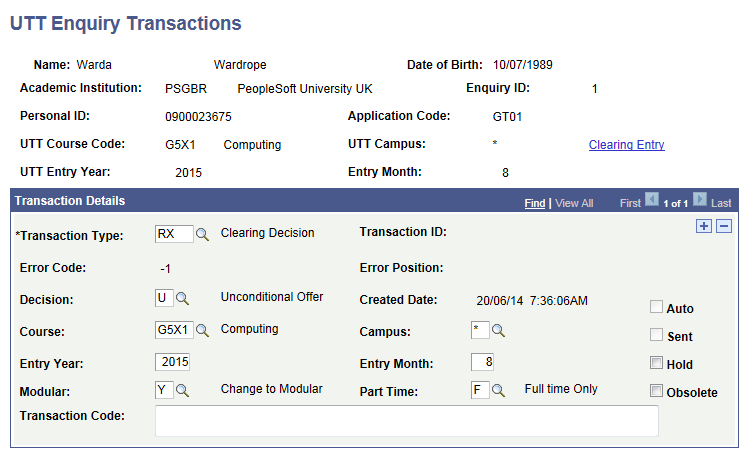
Access the UTT Enquiry Entry page ().
Image: UTT Enquiry Entry page
This example illustrates the fields and controls on the UTT Enquiry Entry page . You can find definitions for the fields and controls later on this page.
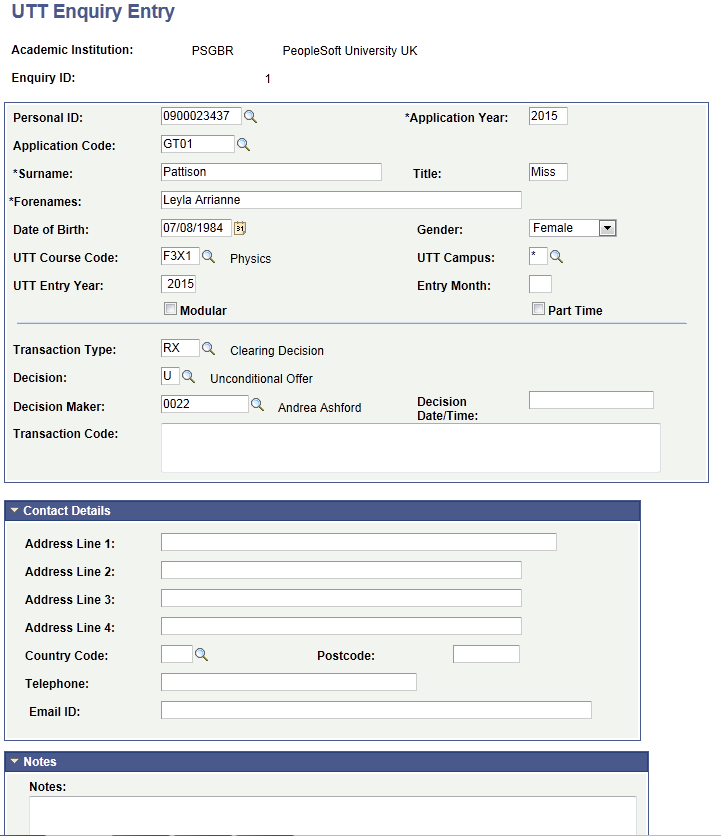
The Personal ID and Application Code fields look up values directly from the UCAS cvgName view.
Use the Transaction Type field to create a RX transaction for a Clearing enquiry. Use the Decision field to enter U (Unconditional) or C (Conditional). After you record the Clearing details, run the Transaction Processing process to generate the Clearing transactions to send to UCAS.
If you want to record a RX transaction, the UCAS Personal ID, UCAS Application Code, UTT Course Code, Entry Year, Entry Month, Modular, Part Time, and Decision fields are required.
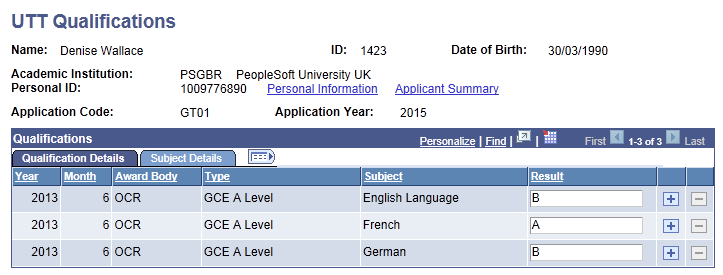
Access the UTT Qualifications page ()
Image: UTT Qualifications page
This example illustrates the fields and controls on the UTT Qualifications page.
Access the UTT Transactions page ().
Image: UTT Transactions page
This example illustrates the fields and controls on the UTT Transactions page.
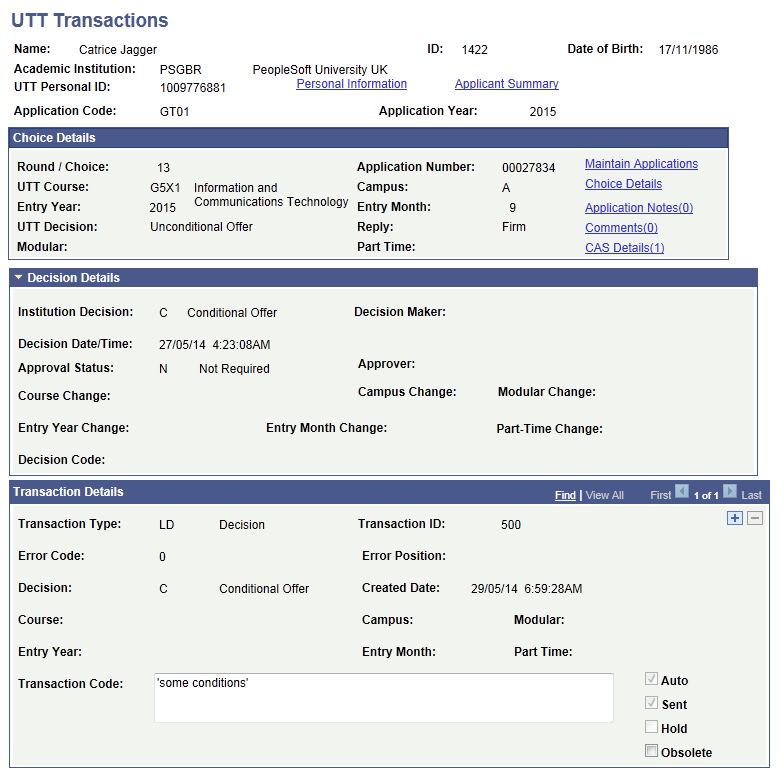
The functionality of the UTT transactions page is similar to that of the UCAS Transactions page. Additionally, most of the fields on the UTT Transactions page are similar to those on the UCAS Transactions page.
When the decision is Interview, ensure that the interview date entered in the Transaction Code area contains only the date without the time element.
Access the UTT Enquiry Transactions page ().
Image: UTT Enquiry Transactions page
This example illustrates the fields and controls on the UTT Enquiry Transactions page.
Most of the fields on the UTT Enquiry Transactions page are similar to those on the UTT Transactions page.