Setting Up Prospect Configuration
To configure the PDL Transactions, use the Prospect Configuration component (SAD_PDL_CONFIG).
This section discusses how to:
Map online PDL transactions to academic careers.
Set up prospect defaults for PDL transactions.
Set up 3C Event IDs to assign for each PDL transaction.
|
Page Name |
Definition Name |
Navigation |
Usage |
|---|---|---|---|
|
Prospect Config |
SAD_PDL_TRN_MAP |
|
Map online PDL transactions to academic careers. Note: To be used for future functionality. Do not set up at this time. |
|
Prospect Setup |
SAD_PDL_SETUP |
|
Define how the system should assign a recruiting center to a prospect. The system uses this setup when you use File Parser to load prospects in batch via a calculated field. |
|
3C Event ID Setup |
SAD_PDL_3C_SETUP |
|
Optional – Define a 3C Event ID to assign for each transaction code when the transaction is processed. |
Access the Prospect Config page ().
Image: Prospect Config page
This example illustrates the fields and controls on the Prospect Config page.

You can enter only online transactions in the Transaction field. At the time of delivering this documentation, PDL does not currently support online transactions so you should not populate this page.
Access the Prospect Setup page ().
Image: Prospect Setup page: Criteria tab (Prospect/Admissions Data Load)
This example illustrates the fields and controls on the Prospect Setup page: Criteria tab. You can find definitions for the fields and controls later on this page.
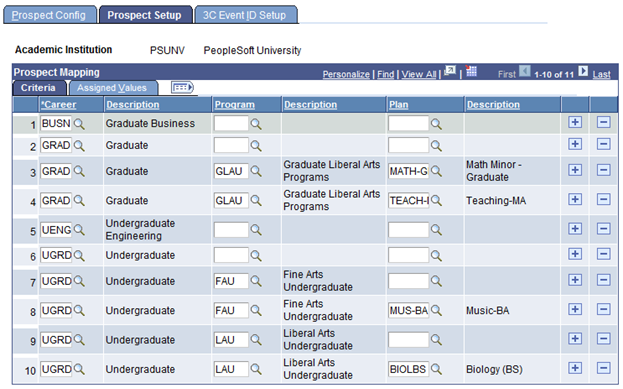
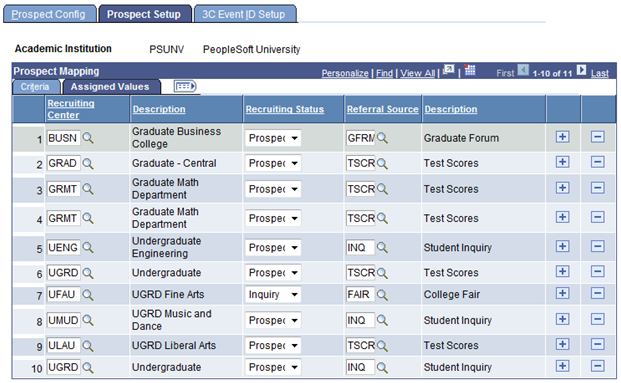
Image: Prospect Setup page: Assigned Values tab (Prospect/Admissions Data Load)
This example illustrates the fields and controls on the Prospect Setup page: Assigned Values tab. You can find definitions for the fields and controls later on this page.
Ensure that all the academic career, program, and plan combinations for File Parser PDL transactions are mapped to a valid recruiting center on the Prospect Setup page.
Use the Criteria tab to define the selecting criteria — such as academic career, academic program, and academic plan — that will constitute a particular group of prospects. Use the Assigned Values tab to define the recruiting center that the system can assign to the particular prospect group. For batch prospects loaded through File Parser, a calculated field can be built on the file mapping definition to look at this setup to determine the recruiting center to populate.
The system requires a recruiting center to create a prospect. Therefore, you must map each career with a recruiting center on the Prospect Setup page to be used with a calculated field through File Parser unless you define a default recruiting center on the File Parser mapping definition.
Criteria
|
Field or Control |
Definition |
|---|---|
| Career |
Enter the career for which you want to assign a recruiting center. |
| Program |
Optionally, enter the program for which you want to assign a recruiting center. |
| Plan |
Optionally, if you have entered a program, enter the plan for which you want to assign a recruiting center. |
Note: When determining the recruiting center assignment, the delivered calculated field example uses the following order: academic plan, academic program, and academic career.
Assigned Values
Enter the recruiting center, recruiting status and referral source for the row entered on the Criteria tab.
Access the 3C Event ID Setup page ().
Image: 3C Event ID Setup page
This example illustrates the fields and controls on the 3C Event ID Setup page. You can find definitions for the fields and controls later on this page.
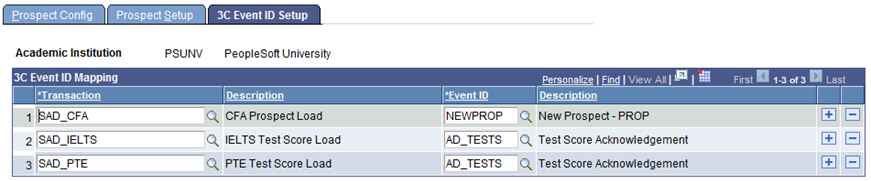
This is an optional setup. If you want to assign a 3C event ID for a specific transaction, set up this page. The 3C event ID will be inserted into the 3C Trigger Results table upon posting the PDL transaction.
Only the event IDs that have the administrative functions GEN (General), PROS (prospect) and PROP (prospect program) are available. Select an event ID for PROP only if you are certain you will be populating prospect program. Define event IDs on the Event Definition page.