Setting Up Self-Service Request Information
To set up self-service request information, use the Web Prospect Create component (ADM_WEB_PRS_SETUP).
Use the Web Prospect Create Table component to determine which information segments you want to enable in the Request Information self-service transaction and to set up academic institution and career parameters (such as which careers you want available to the visitor, and which recruiting center you want assigned to that career).
This section discusses how to:
Enable segments and prospect career fields.
Set up institution and career parameters.
|
Page Name |
Definition Name |
Navigation |
Usage |
|---|---|---|---|
|
Web Prospect Setup |
ADM_WEB_PRS_TBL |
|
Enable or disable Request Information self-service transaction segments and prospect career fields. |
|
Web Prospect Setup 2 |
ADM_WEB_PRS2_TBL |
|
Define institution and career setup parameters for the Request Information self-service transaction. The academic institutions and careers that you select on this page appear as choices on the Request Information detail page. |
Access the Web Prospect Setup page ().
Image: Web Prospect Setup page
This example illustrates the fields and controls on the Web Prospect Setup page. You can find definitions for the fields and controls later on this page.
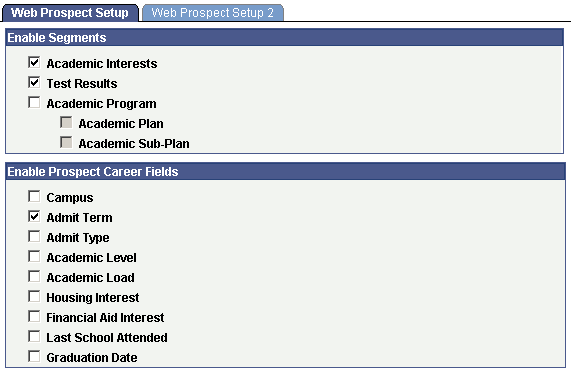
By selecting the check boxes on this page, you enable a segment or field to appear on the self-service Request Information transaction. This enables you to choose what kind of information you collect from prospects who request admissions information. The selections that you make here apply to every academic institution in your system. Therefore, in a multi-institution system, each institution should agree on how to complete this page.
Enable Segments
If you select the Academic Interests or the Test Results check boxes, the respective pages appear in the Request Information self-service transaction. Visitors requesting admissions information have the option of entering academic interest and test result information, which the system then stores in the Academic Interest and Test Scores components.
If you select the Academic Program, Academic Plan, and Academic Sub-Plan check boxes, corresponding fields appear on the Request Information detail page. Visitors can use these fields to enter the program, plan, and subplan that interests them. The system stores this information on the Create/Update Prospects - Prospect Program Data page.
Enable Prospect Career Fields
Each check box in this group box corresponds to a field on the Request Information detail page. Select the check boxes of the information that you want to collect from visitors who are requesting admissions information. Each item in this group box corresponds to an item in the Create/Update Prospects component. Thus, by selecting these check boxes, you can populate additional fields in the Create/Update Prospects component (assuming that the visitor enters the information).
Note: Clearing a check box in this group box hides its corresponding field on the Request Information detail page. For example, if you clear the Academic Level check box, visitors to your website do not see the Academic Level field on the Request Information detail page.
Access the Web Prospect Setup 2 page ().
Image: Web Prospect Setup 2 page
This example illustrates the fields and controls on the Web Prospect Setup 2 page. You can find definitions for the fields and controls later on this page.
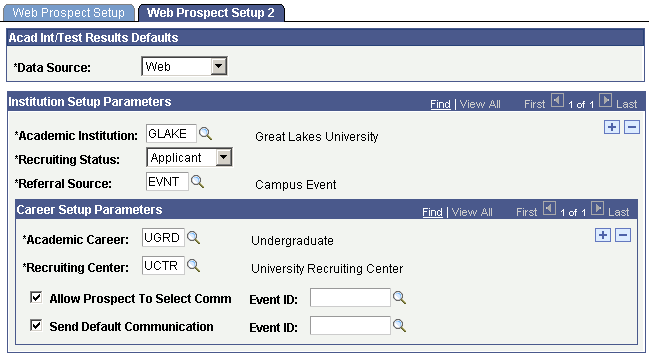
Acad Int/Test Results Defaults
|
Field or Control |
Definition |
|---|---|
| Data Source |
Web is the default. You can change this value. The data source posts to the Academic Interests and Test Results pages. |
Institution Setup Parameters
|
Field or Control |
Definition |
|---|---|
| Academic Institution |
Enter the academic institution that you want to be available to the visitor. If you enter more than one academic institution, visitors can select the academic institution that they are interested in on the Request Information detail page. The system uses the academic institution that the visitor selects to create the prospect record. If you enter only one academic institution, the system hides the Academic Institution field on the Request Information page. In this case, the system uses the one academic institution that you entered here to create the prospect record. You must enter at least one academic institution. |
| Recruiting Status |
Select the recruiting status that you want the system to assign to the new prospect record. You can enter a different recruiting status for each academic institution. The system assigns the recruiting status to new prospect records, based on information collected through the Request Information self-service transaction. |
| Referral Source |
Enter the referral source for information collected through the Request Information self-service transaction. You can enter a different referral source for each academic institution. The referral source that you enter here posts to the Prospect Career Data page. |
Career Setup Parameters
|
Field or Control |
Definition |
|---|---|
| Academic Career |
Enter the academic careers that you want to be available for the visitor to select. On the Request Information detail page, visitors can select the academic careers that interest them. The system uses the selected academic career to create the prospect record. You must enter at least one academic career. |
| Recruiting Center |
Enter the recruiting center that you want the system to assign to the new prospect record. You can enter a different recruiting center for each academic career. The system assigns the selected recruiting center to new prospect records, based on information collected through the Request Information self-service transaction. |
| Allow Prospect to Select Comm (allow prospect to select communication) |
Select this check box to enable visitors to select from a list of available communications. If you select this check box, a group box that lists the communication items contained in the event ID that you select appears on the Request Information detail page. Visitors can select which items to receive. For example, the UGRD Web Prospect event ID at PSUNV includes communications containing information on financial aid, campus housing, and undergraduate applications. Visitors can choose one or more communications from this list. However, only those events that have the User Selection check box selected on the Event Definition Setup page appear as choices in the Event ID field, next to the Allow Prospect to Select Comm field. |
| Send Default Communication |
Select this check box to send a default communication to all visitors who request admissions information for this particular academic institution and career. |
| Event ID |
Enter the event IDs that contain the communications that you want mailed to visitors (for each academic career). Enter an event ID in at least one of the Event ID fields. If both fields are blank, then a visitor could submit a Request Information request and receive a confirmation that the request went through, without receiving any communication. The event ID tells the system which communications to send to the visitor. Define event IDs on the Event page. See Creating an Event. |