Setting Up Credit Card Processing
To set up credit card processing, use the Credit Card Type component (AV_CR_CARD_TYPE), Merchant Table component (AV_MERCHANT_TBL), and Business Unit CR component (AV_BUS_UNIT).
Before you can enter gift or membership payments, or enable self-service online giving, you must set up the system for credit card processing.
This section discusses how to:
Set up a connection with a third-party processor.
Define payment methods.
Define credit card types.
Define connection parameters for a third-party processor.
|
Page Name |
Definition Name |
Navigation |
Usage |
|---|---|---|---|
|
Credit Card Type |
AV_CR_CARD_TYPE |
|
Define which credit cards are acceptable for credit card processing for each setID. |
|
CR Merchants (Contributor Relations merchants) |
AV_MERCHANT_TBL |
|
Specify site-specific service provider information for each institution in your organization. This information is sent to the defined service provider as part of every credit card transaction. |
|
Business Unit CR (business unit Contributor Relations) |
AV_BUS_UNIT_TBL |
|
Associate a merchant table with a business unit. There is a 1:1 relationship between a Merchant ID and Business Unit. |
To accept credit card payments over the internet, you must have an account with a merchant bank that offers internet credit card processing. In addition, you must establish a relationship with a credit card processing agency, such as CyberSource, and provide the identifying numbers for your bank account. After you have established these two relationships, you must configure the system to connect with the credit card processing agency.
CyberSource supports all major credit cards including: Visa, MasterCard, American Express, Discover/Novus, Diners Club, Carte Blanche, EuroCard, JCB, Visa delta, EDC/Maestro, Style, and various private label cards.
For more information, refer to the “PeopleSoft Credit Card Interlink Installation and Technical Notes” on the My Oracle Support website.
To specify credit card payments, you must use the Tender Types page to define a credit card tender type. The Tender Types page enables you to set up the monetary forms in which your organization receives gifts.
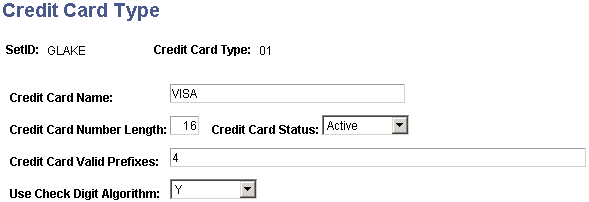
Access the Credit Card Type page ().
Image: Credit Card Type page
This example illustrates the fields and controls on the Credit Card Type page. You can find definitions for the fields and controls later on this page.
|
Field or Control |
Definition |
|---|---|
| Credit Card Name |
Enter the credit card name. This name becomes an available value on the Tender Type Detail page and the Make a Donation - Payment Information page and also is available in self-service Involvement functionality. |
| Credit Card Number Length |
Enter the number of digits for this credit card number. Users must enter a credit card account number for this credit card that is equal in length to the value you specify. Separate valid card length values with a comma. Common number length values are as follows:
|
| Credit Card Status |
Select Active to make this credit card available for selection on credit card entry pages. Select Inactive to make this credit card unavailable for selection on credit card entry pages. |
| Credit Card Valid Prefixes |
Enter all valid prefix numbers for this credit card. Separate valid prefixes with a comma. Common prefix values are as follows:
|
| Use Check Digit Algorithm |
Select Y (yes) to have the system check the validity of the credit card numbers during the credit card entry process. Select N (no) to not have the system check credit card numbers for validity. |
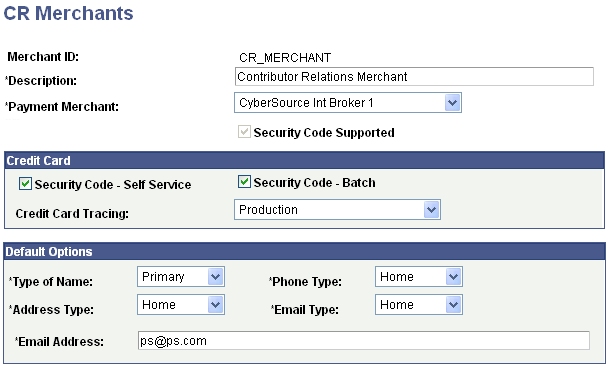
Access the CR Merchants page ().
Image: CR Merchants page
This example illustrates the fields and controls on the CR Merchants page. You can find definitions for the fields and controls later on this page.
|
Field or Control |
Definition |
|---|---|
| Payment Merchant |
Select a third-party payment merchant to be used for processing credit card transactions. There are no delivered values for this field. Consult the Campus Solutions 9.0 Electronic Payment Integration Developer's Reference Guide on the My Oracle Support website to determine how to set up your electronics payments implementation. The document explains how to set up the lower levels of the Integration Broker-based solutions, up to and including the payment merchant, which is referred to in this section. Payment merchants are defined on the Payment Merchant page |
| Security Code Supported |
This read-only check box field reflects the setting of the corresponding field on the underlying Payment Merchant page. It controls the display of the Security Code entry field and the What is a security code? link on the self-service and session entry pages. When this check box is selected, the Security Code - Self Service and Security Code - Batch check boxes appear on this page. |
Credit Card
|
Field or Control |
Definition |
|---|---|
| Security Code - Self Service |
Select this check box to enable the display of the Security Code field and associated message in the self-service Involvement payment pages. |
| Security Code - Batch |
Select this check box to enable the display of the Security Code field and associated message in the Tender Type Detail pages for gift and membership entry. |
| Credit Card Tracing |
Select a control for the output files the system produces during each transaction. Your choices are:
|
Default Options
|
Field or Control |
Definition |
|---|---|
| Type of Name |
Select the type of name (Primary, Preferred, Legal, and so on) that will be used as the default when the name fields are initially populated on the Credit Card Entry page. Name type is specified on the Names page. |
| Phone Type |
Select the type of phone (Business, Home, and so on) that will be used as the default when the name fields are initially populated on the Credit Card Entry page. Phone type is specified on the Phone Detail page. |
| Address Type |
Select the type of address (Primary, Preferred, Business, and so on) that will be used as the default when the name fields are initially populated on the Credit Card Entry page. Address type is specified on the Addresses page. |
| Email Type |
Select the type of email address (Home, Business, and so on) that will be used as the default when the name fields are initially populated on the Credit Card Entry page. Email type is specified on the Electronic Addresses page. |
| Email Address |
CyberSource requires an email address to be sent with each transaction. If an ID does not have an email address, the email address entered in this field is sent with the transmission. |