Managing Tasks
This section discusses:
Task Management Workcenter.
Assigning tasks to students in batch.
Managing tasks using the Task List component.
Managing tasks using the PeopleTools components.
Viewing or updating a student agreement.
Viewing task activity.
Using Batch Notifications process for sending reminders.
|
Page Name |
Definition Name |
Navigation |
Usage |
|---|---|---|---|
|
Task Management WorkCenter |
SCC_TM_ADMN_WRKCTR |
|
Configure and manage tasks. |
|
Assign Tasks |
SCC_TM_BAT_CREATE |
|
Run the process to assign tasks to students in batch based on Population Selection or Student Groups. You can also run this process for individual students. |
|
Task List |
SCC_TM_ADM_LIST |
|
Search for tasks assigned to students. Manage tasks assigned to students, for example, adding action items and changing the status to In Progress or Complete. |
|
View Agreements |
SCC_TM_AGRMNT |
|
Search for agreement records of students. View and update agreement records of students. |
|
View Task Activity |
SCC_TM_TASK_LOG |
|
View updates to tasks that students have made via the Student Task WorkCenter. |
|
Batch Notifications |
SCC_BAT_NTF |
|
Run the process to generate reminder notifications in batch for In Progress tasks based on Population Selection. |
Task Management WorkCenter offers you access to task transactions from one central location. You can use this workcenter to configure and manage tasks for Campus Solutions. Access the Task Management WorkCenter ().
Image: Task Management WorkCenter
This example illustrates the fields and controls on the Task Management WorkCenter.
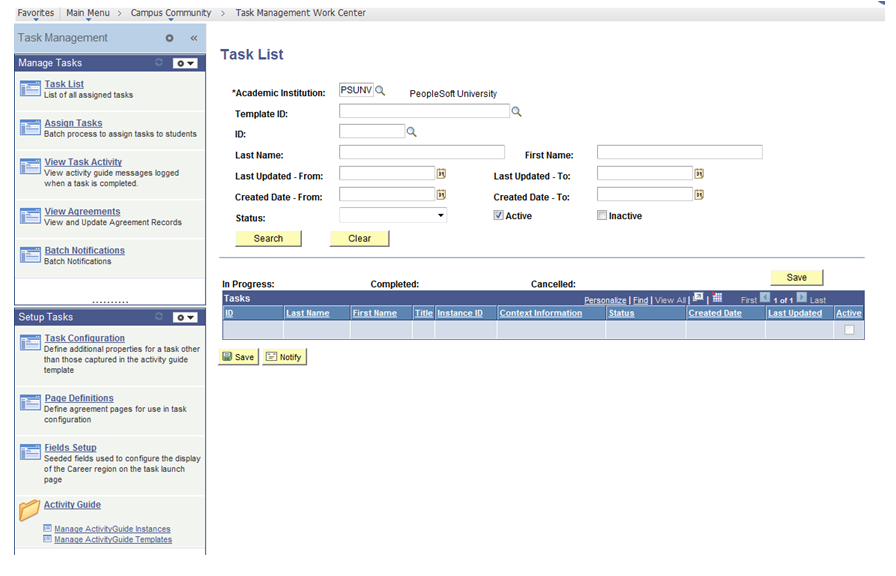
See this section and the “Configuring Tasks” section for more information about how to use the links on this page.
Task Management WorkCenter is a PeopleTools Portal – WorkCenter page.
See the product documentation for PeopleTools: Portal Technology, Creating and configuring WorkCenter pages
Access the Assign Tasks page ().
Image: Assign Tasks page
This example illustrates the fields and controls on the Assign Tasks page. You can find definitions for the fields and controls later on this page.

|
Field or Control |
Definition |
|---|---|
| Assign |
Select to run the Assign Tasks process based on the chosen request options (Population Selection, Student Group or Student Override). |
| Review |
Select to run the process in review mode. This option can be used to review the current task records against the population selection criteria originally used to create the tasks and identify students who no longer meet the criteria for the task or whose context data has changed and needs to be updated. If you select this option, only Population Selection is available (Student Group and Student Override become unavailable). When you select this option, the process compares the population and the assigned In Progress tasks to determine:
The process adds the results of this comparison in a log file that you can review. |
In Assign mode, the Assign Tasks process creates the tasks and populates the context data. The process also handles the checking of prerequisite tasks and triggering of assignment notifications.
For each record, the process performs the following:
If any prerequisite task defined in the Task Configuration component is not complete, the process does not create the task for that student, logs a message and skips to the next student record.
If there is an existing task for the student (that is, activity guide instance with all context data is matching), the process does not create a task for that student, logs a message indicating that the task already exists and skips to the next student record.
If the process passes all the above validations, it creates a new activity guide instance for the student and populates the context data, logs a message with the student details confirming that the task has been created.
For each new activity guide instance created, if a notification has been defined with Trigger = Assigned in the Task Configuration component, the process triggers a new notification for the student.
In review mode, the Assign Tasks process performs the following:
For the purposes of matching the population and In Progress tasks, the context data values for the population are taken either from the PS Query results or from the Context Data parameter fields.
Step 1. Review population against tasks
For each record in the population:
If there is a matching activity guide instance for the Template ID, Institution, EMPLID and all the context data and:
If the instance status is Cancelled, the process logs a message stating that the task is cancelled for the ID.
If the instance is In Progress or Complete, the process does not log a message.
If there is a matching activity guide instance for the Template ID, EMPLID and Institution but not all the context data matches, then the process logs a message stating that the context information of the task does not match.
If there is no matching activity guide instance for the Template ID, Institution and EMPLID, then the process logs a message stating that the task is not assigned to the student.
Step 2. Review tasks against population
For each current task (that is, activity guide instance with status In Progress) for the Template ID and institution (note: the process does not consider cancelled and completed tasks):
If the student is not in the population, the process logs a message stating that the ID, status and task context is not included in the population.
Context Data
Use this group box to specify the context data parameters.
The system dynamically displays the context data fields in this group box for the template that you have selected.
If you are using Population Selection, then the context data values can come from the query results. In such a case, you need not populate the context data fields. If you are using either Student Group or Student Override or Population Selection with a query that only returns EMPLIDs, then you will need to specify all the context data values (except Student ID and Institution) that the process will use to create the tasks.
|
Field or Control |
Definition |
|---|---|
| Student ID |
This field is unavailable for edit. The value comes from the Population Selection, Student Group or Student Override parameters that you specify on this page. |
| Institution |
This field is unavailable for edit. The value comes from the value you enter in the Academic Institution field of this page. |
Population Selection
Population selection is a method for selecting the IDs to process for a specific transaction. Currently, the Assign Tasks process supports only PS Query for selecting the IDs.
See Understanding the Population Selection Group Box
Select the Population Selection check box.
The Assign Tasks process can be run for a group of students returned by a query. The minimum a query needs to return are the EMPLID values for students. If the query also returns context data values, then those will override any context data parameters specified in the Context Data group box.
|
Field or Control |
Definition |
|---|---|
| Query Name |
Select an existing query in the system. The SCC_TM_PPL_SRCH_QRY predefined query is delivered. This example query returns all the context data required for use with the Program Registration template. |
Student Group
Use this group box if you want to run the process for a select group of students.
See Understanding Student Groups
Note: You must specify the context data parameters in the Context Data group box if you are running the process for a student group.
Student Override
|
Field or Control |
Definition |
|---|---|
| Student Override |
Select if you want to run the process for the IDs selected in the EmplID field. |
| ID (employee ID) |
Enter the IDs of one or more students to whom the process should assign the task. |
Note: You must specify the context data parameters in the Context Data group box if you are using the Student Override group box.
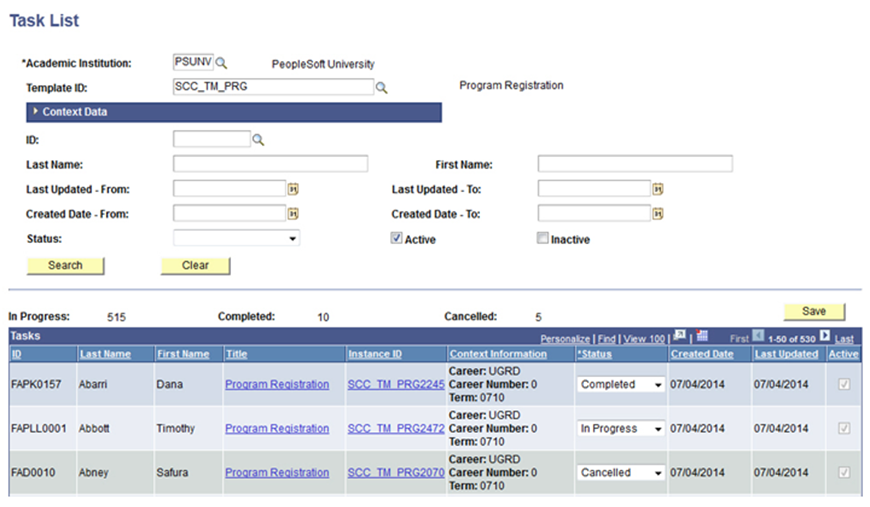
The Task List page has an enhanced functionality when compared with the PeopleTools - Manage Activity Guide Instances page. For example, the Task List page provides more search options and enables you to identify the EMPLID of the student to whom the task is assigned.
Access the Task List page ().
Image: Task List page
This example illustrates the fields and controls on the Task List page. You can find definitions for the fields and controls later on this page.
|
Field or Control |
Definition |
|---|---|
| Template ID |
The prompt values are based on the institution that you select. The system also restricts these prompt values based on security settings (member privileges) of the template. That is, you can select a template in this field only if you have the security access for the template. |
| Last Updated – From and Last Updated – To |
Use these fields to narrow the search to only those tasks that have been updated by the institution or students within this range. |
| Created Date – From and Created Date – To |
Use these fields to narrow the search to only those tasks that have been created by the institution within this range. |
Tasks
|
Field or Control |
Definition |
|---|---|
| Title |
Click to access a PeopleTools - activity guide component where you can view the action items of the instance. |
| Instance ID |
Click to access a PeopleTools - activity guide component where you can view the properties of the instance. |
| Context Information |
Displays the context data (except Institution and EMPLID) for the task. |
| Status |
If needed, change the task status. Available statuses include Cancelled, In Progress and Completed. |
If you do not have security access to the instance, the search results displays the instance with the Title and Instance ID links disabled.
See the product documentation for PeopleTools: Portal Technology, Managing activity guide instances
You can use the PeopleTools Activity Guide components to manually create an instance (task for a student), based on a template. For example, to create an instance based on a template, you can use the Create Instance button on the Activity Guide Template - Properties page. In other words, you can use the button to manually assign a task to a student that the student needs to complete.
Note that the same InstanceCreation method is used by the PeopleTools Activity Guide components when you manually create an instance and the Assign Tasks process.
Use the PeopleTools - Manage Activity Guide Instances page to manage instances, for example, adding action items to an instance or deleting instances. You can access this page from the PeopleTools menu or from the Task Management WorkCenter.
Refer to the PeopleTools: Portal Technology documentation for information on creating instances and for fields on the PeopleTools - Manage Activity Guide Instances page.
See the product documentation for PeopleTools: Portal Technology, Managing activity guide instances.
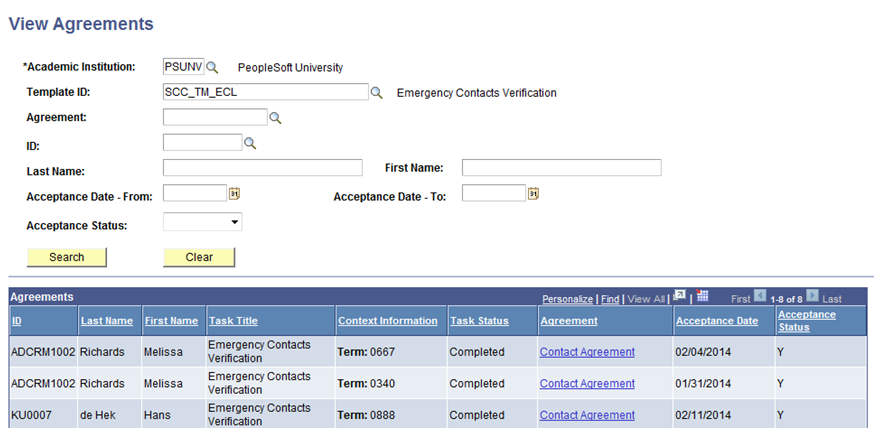
To search for agreement records, access the View Agreements page ().
Image: View Agreements page
This example illustrates the fields and controls on the View Agreements page. You can find definitions for the fields and controls later on this page.
|
Field or Control |
Definition |
|---|---|
| Template ID |
The prompt values are based on the institution that you select. The system also restricts these prompt values based on security settings (member privileges) of the template. That is, you can select a template in this field only if you have the security access for the template. |
Click the Agreement link in a search record to access the View Agreement Detail page.
Image: View Agreement Detail page
This example illustrates the fields and controls on the View Agreement Detail page. You can find definitions for the fields and controls later on this page.
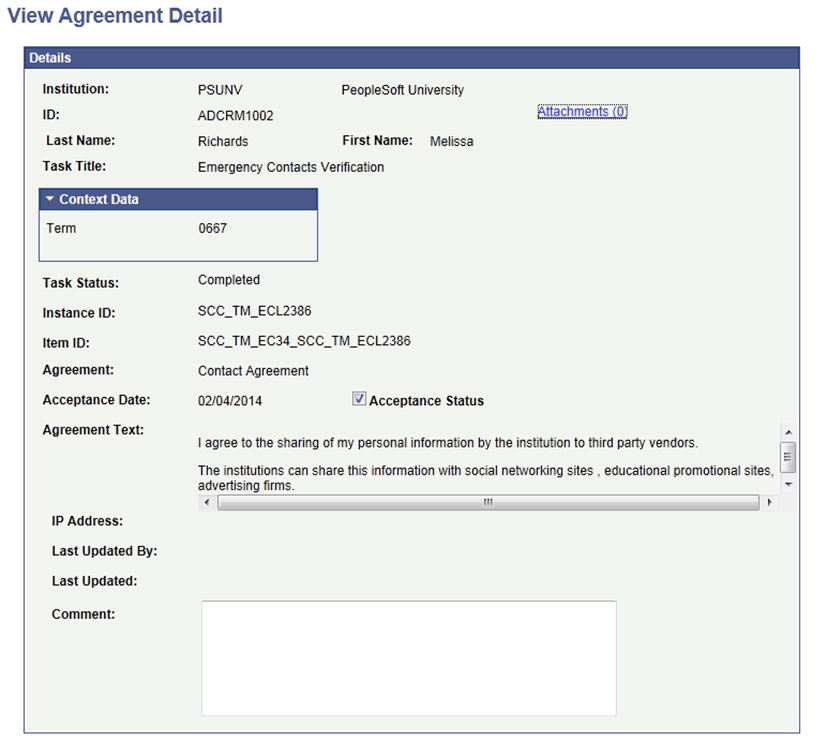
This page enables you to view an agreement for audit purposes and as an administrator complete an agreement on behalf of a student (for example, after a student has declined an agreement, printed and signed the agreement and returned a paper copy).
|
Field or Control |
Definition |
|---|---|
| Attachments |
Click to access the Agreement Attachments page where you can view, add or delete attachments related to the agreement. You can add an attachment of a scanned signed paper agreement. |
| Acceptance Status |
Use this check box if student has submitted a paper agreement. Select the check box to indicate that the student has accepted the agreement. Clear the check box to indicate that the student has not accepted the agreement. |
| Comment |
Enter any comments if you have changed the acceptance status. |
| Last Updated and Last Updated By |
The date and time at which the page was last updated and the name of the user who updated the page. |
When you click the Save button and if the Acceptance Status check box has been selected, then the system updates the status of the associated action item to Completed. If all the required action items (that is, action items with the Required check box selected on the Action Item Details page) for the task are now set to Completed, the system performs the following processing (which is the same processing the system performs when the student clicks the Finish button on the Complete Task page):
Updates instance status to Complete.
Triggers the complete notification.
Creates subsequent tasks.
Releases service indicators.
Access the View Task Activity page ().
Image: View Task Activity page
This example illustrates the fields and controls on the View Task Activity page. You can find definitions for the fields and controls later on this page.
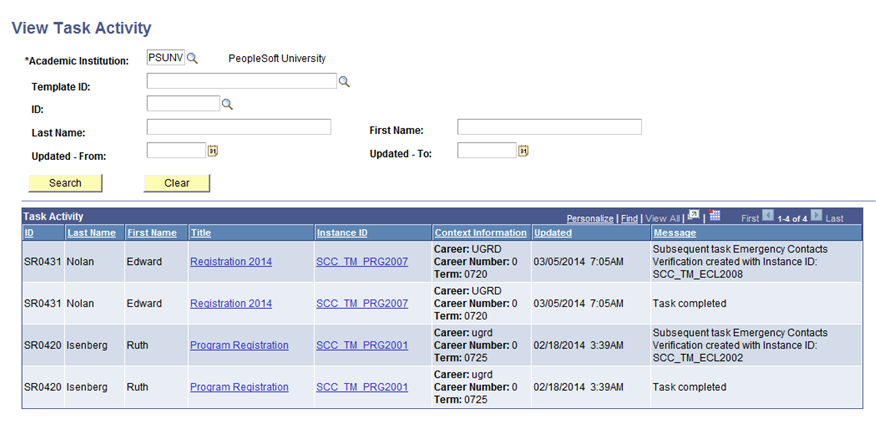
This page displays records based on the activity guide messages that the system logs when a task is completed.
Messages are logged for the following actions when a student completes a task:
The task status is updated to Complete.
A new subsequent task is created for the student.
A subsequent task cannot be created because the current task does not have all the required context data.
A subsequent task is not created because it already exists for the student.
|
Field or Control |
Definition |
|---|---|
| Template ID |
The prompt values are based on the institution that you select. The system also restricts these prompt values based on security settings (member privileges) of the template. That is, you can select a template in this field only if you have the security access for the template. |
Task Activity
|
Field or Control |
Definition |
|---|---|
| Title |
Click to access a PeopleTools - activity guide component where you can view the action items of the instance. |
| Instance ID |
Click to access a PeopleTools - activity guide component where you can view the properties of the instance. |
If you do not have security access to the instance, the search results displays the instance with the Title and Instance ID links disabled.
Access the Batch Notifications run control page ().
Image: Example of Notifications Framework Batch Notifications page (1 of 2)
This example illustrates the fields and controls on the Batch Notifications page (1 of 2)
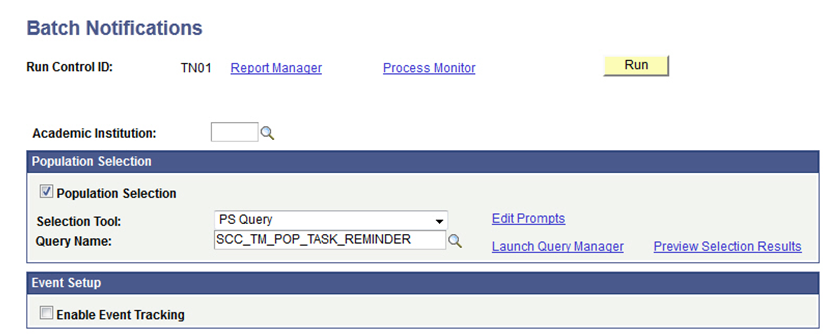
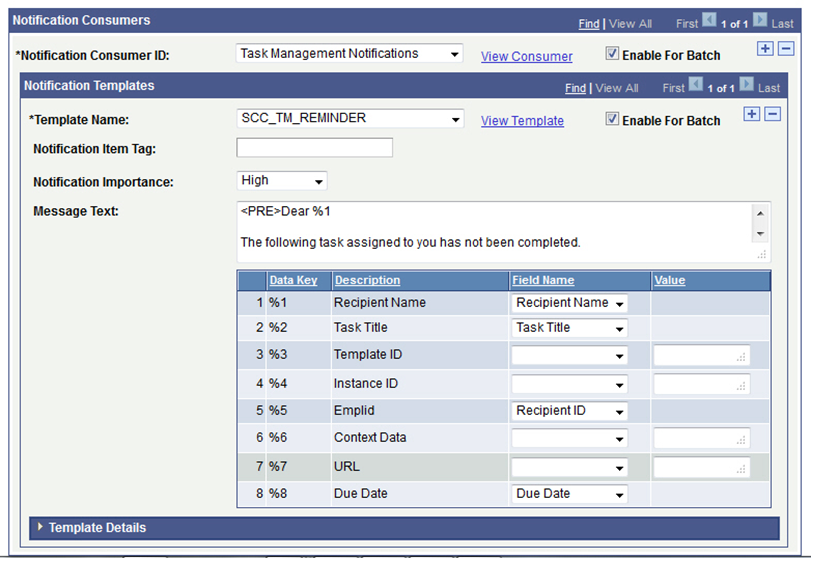
Image: Example of Notifications Framework Batch Notifications page (2 of 2)
This example illustrates the fields and controls on the Batch Notifications page (2 of 2)
You can use the Notifications Framework’s Batch Notification process for sending reminder notifications to students with incomplete tasks.
Delivered with the system are the Notification Consumer ID Task Management Notifications (SCC_NTF_CON_20130619110938) and the notification setup for an example generic template SCC_TM_REMINDER.
An example PS Query is delivered (SCC_TM_POP_TASK_REMINDER) that you can use for this process. This query returns all the In Progress tasks with the data required to populate the example generic template.
Note: If you are creating your own query, then the query needs to include PEOPLE_SRCH.
In the Batch Notification page, after selecting the Query Name, click Edit Prompts to add the Academic Institution and Template ID values for the task. After selecting the Notification Consumer ID and Template Name, define the Field Name value for each of the variables used in the Message Text region.
A PS Query cannot provide the student/task specific URL to open the Student Task WorkCenter. Therefore, if you want to include a URL in the email, then define the URL in the Value field. The URL can point to the Student Center or to the Current Tasks pagelet and the student can then click the task link to complete the task. Note that the URL cannot be defined to directly open the Student Task WorkCenter for the task because the batch process is generating notifications for multiple students.