Receiving NSI Data
This section discusses how to:
Download data from the NSI database.
Loading results data.
Review incoming suspense data.
Post NSI data.
|
Page Name |
Definition Name |
Navigation |
Usage |
|---|---|---|---|
|
Load NSI Data |
SCC_RUN_LOAD_NSI |
|
Run the Load NSI Data process (CCNSILOD) to upload data from the NSI database onto the Incoming Data page of the NSI Suspense Table to review before posting it to your Campus Solutions database. |
|
Incoming Data |
SCC_UPDATES_NSI |
|
Review NSI data received and temporarily stored data in the NSI Suspense Table before posting it to your database. |
|
NSI Returned Data Details |
SCC_UPDTES_NSI_SEC |
Click the Details button on the Incoming Data page. |
View additional details of information received from NSI. |
|
Post NSI Data |
SCC_RUN_POST_NSI |
|
Run the Post NSI Data process (CCNSIPST) to post data received from NSI. |
After the Ministry of Education has processed your extract file, download the REU result file (for example: REU1001a.txt) from the NSI to your server.
Consult the Ministry of Education website for NSI result file instructions.
See www.minedu.govt.nz.
Access the Load NSI Data page ().
Image: Load NSI Data
This example illustrates the fields and controls on the Load NSI Data. You can find definitions for the fields and controls later on this page.
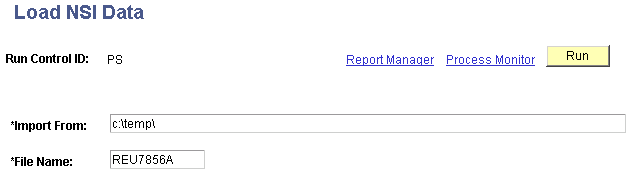
The Load NSI Data process (CCNSILOD) loads data from an NSI result file to the NSI Suspense Table. The load process writes the data to the Incoming Data page, giving each impacted record a status of Ready to Post, Select a Match, or Error.
|
Field or Control |
Definition |
|---|---|
| Import From |
Enter the path to the directory where you downloaded the file from the NSI website. |
| File Name |
Enter the name of the file to load. |
You can load a file only after all rows in of the previous files have a status of Posted, Error Corrected, or Error.
Warning! The load process will not run if it finds previous files with rows marked Extracted, Ready to Post, or Select a Match. In the latter case, you must select a match and run the Post NSI Data process (CCNSIPST) before you can run the Load NSI Data process (CCNSILOD). This protects the load data that has not yet been processed.
You cannot load a file with a number out of sequence. You can load NSI results only for the oldest file number in the NSI Suspense Table with the status of Extracted. This prevents you from loading data for extract files that you sent to NSI more recently. Files that you send to NSI must be processed in sequential order. Use the file number in the NSI Suspense Table to identify which result file to load first.
For example, if files numbered 0008 and 0009 have a status of Extracted in the NSI Suspense Table, and you try to load file 0009 before 0008, the Load NSI Data process returns an error. You can extract multiple files with different numbers, but you must load them in numerical order. You must complete the process of loading a file before you can load the next file. That file must have only rows with the status of Extracted, Loaded, or Posted before you can load the next file.
If a file number exists with status rows of Extracted, Ready to Post, or Select a Match, and you try to load a file with a higher number, the SQR aborts and displays the error "You are trying to load File Nbr XXXX, but you have older file(s) that have not been POSTED yet." This prevents you from posting data from the file with the higher number before posting the file with a lower number.
Access the Incoming Data page ().
Image: Incoming Data page
This example illustrates the fields and controls on the Incoming Data page. You can find definitions for the fields and controls later on this page.

The Incoming Data page is populated with data from NSI when the Load NSI Data process (CCNSILOD) runs.
|
Field or Control |
Definition |
|---|---|
| Status |
Indicates where the record is in the process. Status values here are the same as status values on the Outgoing Data page of the NSI Suspense Table component. |
| Row Type |
Indicates the type of row returned by NSI. The system displays different fields based on the row types returned. Row types include: M (match): When only an M row is returned, the NSI did not find a match in its database, so it created a record and assigned an NSN. In this case the system selects the Match check box and sets the status to Ready to Post. S (select a match): When an M row and one or more S rows are returned, NSI found possible matches. The system calculates and displays Match Indicator and Score values to help you determine which match to use. Click the Details button to view details of each row. If you determine that one of the S rows data is a match, select the Match check box for that row. The system changes the status to Ready to Post. When the Post NSI Data process runs, the process copies the information from this row to the Biographical Data component for the ID. If you determine that none of the S rows is a match for the individual, select the Match check box for the M row to confirm that this is the student who needs an NSN. The system changes the status to Ready to Post. When the Post NSI Data process runs, the process reinserts the record in the NSI Suspense Table with a status of Ready for Extraction. The record is reinserted and sent to NSI the second time because an M row, when accompanied by one or multiple S rows, has no NSN is associated. Instead, the NSI assigned an override code. The override code "reserves" an NSN. When NSI receives the individual's record a second time, it uses the override code to create the NSN. The override code is among the details displayed on the NSI Returned Data Details page. E (error): When an M row and an E row are returned, the NSI database encountered an error. Click Details for a description of the error. (A list of possible errors is provided at the end of this section.) You must correct the error and then select the Corrected check box to change the status to Error Corrected. |
| Match Indicator |
Appears only when NSI returns a record with an M row and one or more S rows. Displays the name type on which the NSI system found a match in the NSI database. The values are Main, Alternate, Merged, and Alt Merged. These values are translate values and should not be modified. Always select a row that has a Main name. If not, you will load into your database as the Primary name, a name that NSI considers an alternate name in their database. |
| Surname, Forename1, Forename2, Forename3, and Birthdate |
Displays the name data and the date of birth with which NSI created the record. |
| Score |
Appears only when NSI returns a record with an M row and one or more S rows. Indicates the accuracy of the returned record. The NSI search software determines this score and it is based on how close the returned record is to the original search criteria. The closer the files are, the closer the score is to 100. However, a score of 100 doesn't guarantee that the data you sent has been perfectly matched in the NSI database. In the sample page, the name Jim Taylor was found and shows a score of 100. The birthdate is different. Therefore, it might be two different individuals. |
| Details |
Click to access the NSI Returned Data Details page where you can review more details about that row. |
| Match |
The system automatically selects this if the record is a perfect match, or if among multiple possible matches, one and only one S row is returned with a score of 100. If multiple S rows are returned with a score of 100, you must select this check box for the row that you want to post. When selected, the status changes to Ready to Post. The Post NSI Data process (CCNSIPST) posts the rows in the suspense table that have a Ready to Post status. |
| Corrected |
Appears only when NSI returns a record with one or more E (error) rows. A description of the error appears on the NSI Returned Data Details page. After you correct an error, select this check box to change the status to Error Corrected so that you can identify which errors you have corrected and which still need to be corrected. The Purge NSI Suspense Table process (CCNSIPRG) deletes rows in the suspense table with a status of Error Corrected. Also, by correcting an error in an NSI field on a record with the NSI Processing Enabled check box selected on the Regional page of the Add/Update a Person component, the system automatically inserts a new row in the NSI Suspense Table with the correct data and a status of Ready for Extraction so that the corrected data will be extracted to send to NSI the next time the extract process runs. Note: In the case of a corrected error, the individual record appears in the suspense table twice—once with the status of Error Corrected and once with the status of Ready for Extraction. The file numbers, however, are different. |
Image: NSI Returned Data Details pageNSI Returned Data Details page
This example illustrates the fields and controls on the NSI Returned Data Details pageNSI Returned Data Details page. You can find definitions for the fields and controls later on this page.
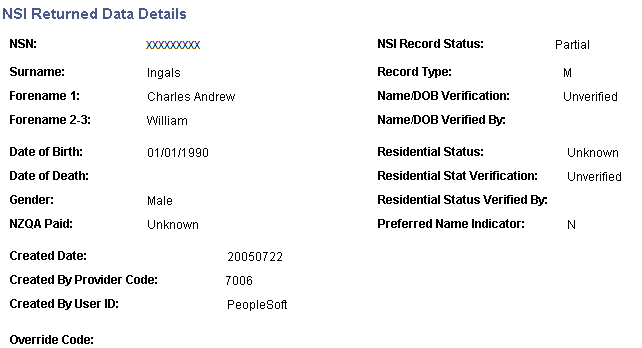
This page is for viewing purposes only. You cannot enter data here.
|
Field or Control |
Definition |
|---|---|
| Override Code |
An override code is returned only when NSI returns an M row with one or more S rows. If you select the M row to use, the individual needs to be sent a second time to the NSI to request the NSN. When the row is submitted again, NSI uses the override code to create the NSN. When the information is sent back to you, NSI will not include any S rows because you already confirmed the row to use for the NSN assignment. |
| Record Type |
Indicates the type of row that was returned by NSI. M row details include the data that you sent to NSI and additional data received from NSI for that record. If an M row does not include an NSN, it could be because NSI found more than one individual who may be the same as the one requested. S row details include data for a person who the NSI system has determined could be a match for the original data that you sent. E row details include the error code. For example, the error code might indicate that the date of birth was not supplied to the NSI database. A common error is "Cannot replace verified data with unverified data." To correct this error, you must manually access the NSI website and copy the student name to your database and ensure that the correct NSN is entered. All other NSI data can be overwritten in your database (gender, date of birth, residential data, and verification fields). Note: If the NSI database contains verified data for an individual, update your database with the NSI data. Because NSI is a central place to store student information, rely on the validity of the NSI data. |
NSI Error Codes
This table lists the NSI decimal error codes and their descriptions. Consult the Ministry of Education and the GINS document if further information is required:
|
Value (Decimal) |
Description |
|---|---|
|
256 |
%1 is invalid. |
|
257 |
Mandatory field(s) %1 were not supplied. Please enter values for the following fields: %1 |
|
258 |
Please supply an NSN(s). |
|
272 |
Invalid character in name field. |
|
273 |
Verification flag set without corresponding data. |
|
274 |
Cannot replace verified data with unverified data. |
|
275 |
Invalid Verification Flag. |
|
276 |
Verification Flag cannot be set to BDM. |
|
277 |
Cannot update BDM data without changing Verification Flag. |
|
278 |
Hyphen and Apostrophe cannot be used without another character. |
|
279 |
Cannot replace verified flag with unverified. |
|
288 |
Invalid gender. |
|
304 |
Invalid date format. |
|
305 |
Date of Death must be later than Date of Birth. |
|
306 |
Residential status is invalid. |
|
309 |
Preferred name indicator is invalid. |
|
320 |
Preferred name indicator is invalid. |
|
321 |
Preferred name indicator set for more than one name. |
|
336 |
Invalid NSN. |
|
337 |
NSN does not exist. |
|
339 |
Invalid Provider Code. |
|
369 |
BDM Verified fields cannot be changed. |
|
370 |
Cannot update an inactive student record. |
|
409 |
Unexpected validation Error. |
|
416 |
Incorrect File Format. |
|
417 |
Incorrect Format for file footer record. |
|
418 |
Incorrect Record Format. |
|
421 |
Records in footer don't match the records in file. |
|
512 |
Security Error: %1. |
|
515 |
Organization is not valid for user. |
|
516 |
First time access, please go to website to change password. |
|
529 |
Access Denied. |
|
640 |
General Security Failure. |
|
665 |
SIA Failure: %1. |
|
768 |
Unexpected Error %1. |
|
817 |
Manual intervention required. |
|
822 |
NSN records %1 have got NZQA paid flag set to Y or N. |
|
848 |
Rollback denied - no slaves exist. |
|
849 |
Failed to rollback the master record. |
|
865 |
Missing User ID and/or Provider Code. |
|
1282 |
NSN record has not been modified. |
Access the Post NSI Data page ().
Image: Post NSI Data page
This example illustrates the fields and controls on the Post NSI Data page. You can find definitions for the fields and controls later on this page.

The Post NSI Data process (CCNSIPST) posts data with the status of Ready to Post, from the NSI Suspense Table to your PeopleSoft database. The process posts data on the Biographical, Regional, and Additional NSI Data pages. The process also changes the status to Posted for each record it successfully posted.
Warning! Before posting, for each record with a status of Select a Match, you must select a match to use by checking the Match check box for that row on the Incoming Data page of the suspense table.