Requesting NSNs
This section discusses how to:
Identify individuals without NSNs.
View outgoing suspense data.
Extract data to send to NSI.
Send the extract file.
|
Page Name |
Definition Name |
Navigation |
Usage |
|---|---|---|---|
|
Request NSN |
SCC_REQUEST_NSN |
|
Run the Request NSN process (CCNSIRQN) to identify prospects, applicants, and students who need an NSN or to purge results from a previous run. |
|
Outgoing Data |
SCC_SUSPENSE_NSI |
|
Review outgoing data before extracting it to send to the Ministry of Education. |
|
Extract NSI Data |
SCC_RUN_EXTRCT_NSI |
|
Run the NSI Extraction process (CCNSIEXT) process to extract outgoing data to send to NSI. |
Important! Mass Change is a deprecated product. Support will be maintained for this product, but no new development will be produced for Mass Change. It is strongly recommended that you use Application Engine instead. For more information on PeopleSoft Application Engine, see PeopleTools: Application Engine.
Access the Request NSN page ().
Image: Request NSN
This example illustrates the fields and controls on the Request NSN. You can find definitions for the fields and controls later on this page.
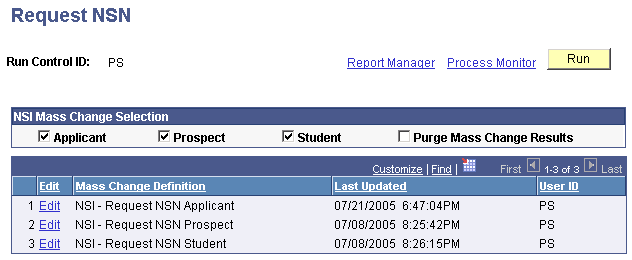
The Request NSN process (CCNSIRQN) executes a mass change to identify individuals in your database that need NSNs or to purge results of a previous run of the process. The process writes (or in the case of a purge, deletes) data for the resulting individuals on the Outgoing Data page of the NSI Suspense Table, giving them a status of Ready for Extraction. The process inserts records with the most current file number into the suspense table and selects the Inserted by Mass Change check box.
As the process copies the information from your database, it also selects (or in the case of a purge, clears) the NSI Processing Enabled check box on the individual's Regional page of the Add/Update a Person component. The NSI Processing Enabled check box sets the system to automatically report online changes made to an individual's NSI fields so that you can extract the most up-to-date data to send to the Ministry of Education.
Note: The NSI Processing Enabled check box on the Regional page of the Add/Update a Person component becomes unavailable once it is selected. The only time that a selected, unavailable check box becomes cleared and available is when the Request NSN process is run with the Purge Mass Change Results option selected to purge results of a mass change.
See Adding or Updating Biographical Details Data.
|
Field or Control |
Definition |
|---|---|
| Applicant, Prospect, and Student |
Select the types of individuals for which you want to request NSNs from the NSI database. You can select one or more check boxes at the same time. When you run the process, the system copies appropriate biographical and regional data for each individual onto the Outgoing Data page of the Suspense NSI component in preparation for extracting and sending the data to NSI. |
| Purge Mass Change Results |
Select to purge results of the Request NSN process (CCNSIRQN). When the process runs with the check box selected, the system removes all of the records added to the suspense table for the most current file number where Insert by Mass Change is selected and the suspense status is still Ready for Extraction. It also clears the NSI Processing Enabled check box on the Regional page for those records. If you ran mass change by mistake or with the wrong criteria set, you can use this to purge those records. Note: To purge processed records from the suspense table, run the NSI Purge process (CCNSIPRG). |
| Edit |
Click to modify the mass change criteria and regenerate the mass change. Warning! We recommend that you generate mass changes prior to running the request process to ensure that the mass change process uses data as of the current date. |
Important! Mass Change is a deprecated product. Support will be maintained for this product, but no new development will be produced for Mass Change. It is strongly recommended that you use Application Engine instead. For more information on PeopleSoft Application Engine, see PeopleTools: Application Engine.
Access the Outgoing Data page ().
Image: Outgoing Data page
This example illustrates the fields and controls on the Outgoing Data page. You can find definitions for the fields and controls later on this page.
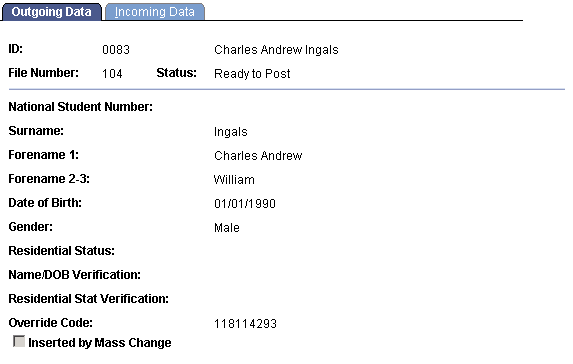
This page is for viewing purposes only. You cannot enter data here.
The Outgoing Data page is populated with data from the Biographical Details and Regional pages when the Request NSN process (CCNSIRQN) runs.
When the NSI Processing Enabled check box is selected on the Regional page of the Add/Update a Person component and online changes are made to any NSI field for an individual, the system also automatically updates the Outgoing Data page. If the individual record is already included in the Outgoing Data page awaiting assignment of an NSN and a change to an NSI field is made, the system automatically updates the record with the changed data. If not, the system adds the record to the Outgoing Data page.
See Entering Regional Specific Data.
|
Field or Control |
Definition |
|---|---|
| File Number |
Displays the file number that was current when the student, applicant, or prospect's ID was added to the suspense table. See (NZL) Reviewing or Defining Default Installation Settings for National Student Index Processing. |
| Status |
Indicates where the record is in the process. The status of Ready for Extraction is the initial status, and it is given when an ID is added to the NSI Suspense Table. The subsequent extract, load, post, and purge processes display the current status to indicate where the record is in the process. Values include: Ready for Extraction: File is ready for extraction process. The Extract NSI Data process (CCNSIEXT) only extracts these records and data is included in the extract file to send to the Ministry of Education as part of the Update Insert Request (UPI Request). Extracted: The extraction process has run and the UPI Request file is ready to send to the NSI or your institution is waiting to receive the result file Ready to Post: The Result file is received from NSI and data is loaded in the suspense table by the Load NSI Data process (CCNSILOD). Only one match is found in the NSI database and the individual record is now ready to post in the school database. Select a Match: The Result file is received from NSI and data is loaded in the suspense table by the Load NSI Data process (CCNSILOD). NSI returned multiple matches for the record sent in the UPI Request. You must manually select which match to use. Error: The Result file is received from NSI and data is loaded in the suspense table by the Load NSI Data process (CCNSILOD). An error occurred while NSI was processing the individual record. You must find the error and correct it. Error Corrected: The Load NSI Data process (CCNSILOD) returned an error, you corrected it, and selected the Error Corrected check box on the Incoming Data tab. Note: The rows with the status Error Corrected are deleted from the suspense table the next time the Purge NSI Suspense Table process (CCNSIPRG) runs. Posted: The Post NSI Data process (CCNSIPST) ran and the row is now ready to be purged from the suspense table. These are translate values and must not be changed. |
| Inserted by Mass Change |
The process selects this if the record was added to the suspense table through the mass change executed in the Request NSN process. |
Access the Extract NSI Data page ().
Image: Extract NSI Data page
This example illustrates the fields and controls on the Extract NSI Data page. You can find definitions for the fields and controls later on this page.
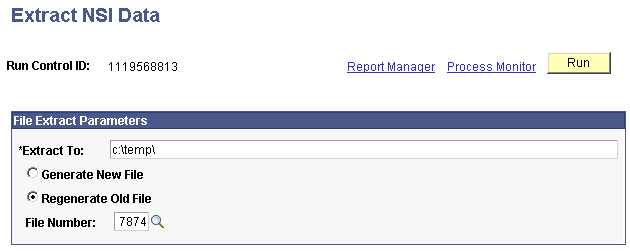
The NSI Extraction process (CCNSIEXT) extracts data with a status of Ready for Extraction from the Outgoing Data page of the NSI Suspense Table into a file ready to send to NSI. When the process completes, extracted records have a status of Extracted.
|
Field or Control |
Definition |
|---|---|
| Extract To |
Enter the path to the directory where you want the process to place the extract file. |
| Generate New File |
Select to generate an extract file for the first time. The process extracts the data in the NSI suspense table with the most current file number assigned on the Extensions page of the Campus Community Installation component. The Extract NSI Data process (CCNSIEXT) uses the file number to create the file name. When the Extract NSI Data process (CCNSIEXT) finishes running, it increments by one, the file number on the Extensions page. See Page Used to Review or Define Campus Community Installation Settings. |
| Regenerate Old File |
Select to regenerate a file. Once selected, the File Number field appears. Select the file number that you want to regenerate. You can only regenerate the files for which the data in the suspense table is in Extracted status. Files with data that has loaded or posted cannot be regenerated. |
Example: How the Extract NSI Data Process Works
If the current file number in the Extension page of the Installation Default CC component is 0001, the NSI Extraction process (CCNSIEXT) creates a file name of UPI0001a.txt where UPI is the code for the NSI process Update Insert Request. 0001 is the unique file number, "a" represents an alphabetic character used to split a file into more than one part if it includes more than 2,000 rows. The maximum number of rows per file recommended by the Ministry of Education is 2,000. A file with 5,500 rows is identified as follows:
UPI0001a.txt – 2,000 rows
UPI0001b.txt – 2,000 rows
UPI0001c.txt – 1,500 rows
Note: If your file includes more than 52,000 characters rows (26 alphabetic letters times 2000 rows), you must manually give the remaining files a different name. The NSI Extraction process (CCNSIEXT) will create 26 files and will save the rest of the data into a file call UPIEXTRa.txt. Manually split this file to have no more than 2,000 rows in each of them. You can name the files using the same concept as the NSI Extraction process (CCNSIEXT) used. For example, UPIEXTRa.txt, UPIEXTRb.txt, etc. You will need to make sure you add the proper header and footer to the files you create.
Also, each time you must send a student's record to the Ministry of Education, the current file number is assigned to it. The next time the extract process runs, it extracts all the data for the students tied to the current file number. In the example above, the NSI Extraction process (CCNSIEXT) process creates a file named UPI0001a.txt and extracts data for all records with the assigned file number of 0001.
Every time the NSI Extraction process (CCNSIEXT) runs, the file number in the Installation CC Table increases by an increments of one. The next changes made to student, applicant, or prospect's record is associated with the next file number (0002) and the next extract file to run will create the UPI0002a.txt file.
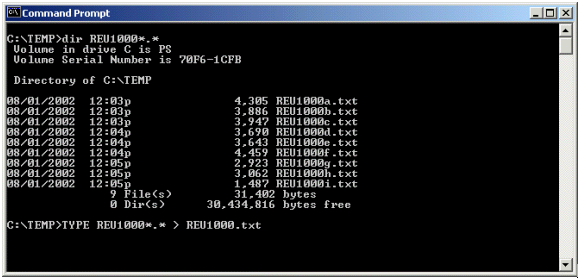
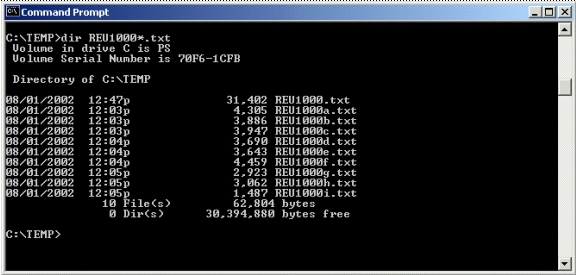
Once the data is extracted, you can login to the Ministry of Education website and upload the extract file(s). Make sure you upload all the extract files created for a same file number. For example, if the NSI Extraction process (CCNSIEXT) created UP1000a.txt, UP1000b.txt and UP1000c.txt, it is your responsibility to verify if more than one file got created and to upload all of them to the NSI website. You must then monitor the site for the results file(s) that NSI will provide for you. Based on NSI requirements, if you sent a file called UPI0001a.text, NSI will send the results file with a corresponding name: In this case it will be REU0001a.txt. REU means Result for UPI request, 0001a is the file identifier you used in your extract file, and txt is the delimited file format. In the case mentioned above, NSI will return the files called REU0001a.txt, REU0001b.txt and REU0001c.txt. It is again your responsibility to download all the result files for a same file number.
When you download result files from the NSI website, download them into one of your directories, for example c:\temp\.
If the extract process created only one file, for example UPI0001a.txt, after you download the results file for it (REU0001a.txt), you are able to load the results file (REU0001a.txt) directly into the NSI Suspense table by using the NSI UPI Load Process (CCNSILOD).
If the extract process created more than one file, for example UPI1000a.txt, UP1000b.txt and UP1000c.txt, then you must merge the files before you can load them to the NSI Suspense table.
Warning! You should merge the files only if they have the same file number. For example UP1000a.txt, UP1000b.txt and UP1000c.txt have all the same file number, which is 1000. Merging files with different file numbers causes errors when you run the NSI UPI Load process (CCNSILOD).
Image: Example of multiple extracted files (same file number, but with alphabetical designator)
This example illustrates the fields and controls on the Example of multiple extracted files (same file number, but with alphabetical designator). You can find definitions for the fields and controls later on this page.
Once you process the command, you can review that the new file has been created.
Image: Example of the merged file added with no alphabetical designator
This example illustrates the fields and controls on the Example of the merged file added with no alphabetical designator. You can find definitions for the fields and controls later on this page.
Use the name of the merged file to load data onto the Incoming Data page of the NSI Suspense table.
Upload the UPI extract file (for example: UPI0001a.txt) to NSI from your server.
Consult the Ministry of Education website for instructions on how to upload files to NSI.
See www.minedu.govt.nz.