Setting Up and Consuming the Notifications Framework
This section discusses how to set up the Notifications Framework for sending e-mail notifications using the e-mail channel. Where other notification channels differ from the e-mail channel, the differences are highlighted.
The Notifications Framework uses the generic templates of the PeopleTools Workflow Technology, and the reader is urged to review the information in PeopleTools: Workflow Technology, “Using Notification Templates,” for a more comprehensive understanding.
For each of the templates, the Notification Setup page is used to determine the e-mail address to use for sending notifications to the recipients. From there you can define which e-mail addresses to use in the ‘To’ section of the e-mail message as well as in the CC (carbon copy) or BCC (blind carbon copy) sections. E-mail addresses of CC recipients are made publicly aware of the notification. E-mail addresses of BCC recipients are made aware of the notification privately.
If you know the recipients have an EMPLID in the system, you can select to use the e-mail address that you have on file which is marked as Preferred (subject to the user’s notification preferences, if any – see below). If instead the e-mail address should be obtained from a specific place, then custom logic can be used. For example, within Delegated Access, an e-mail notification is sent to the proxies at the time they are created. At creation time, an e-mail address must be entered in the Delegated Access self-service page (Share My Information – Details page). To send the e-mail notification to the proxies, custom logic is used to retrieve the proxy’s e-mail address from that specific page. If instead you want to send the notifications to a specific e-mail address, a static address can be entered. This option should mostly be used when you are testing the notification templates.
Complete the following steps to set up and consume the Notifications Framework:
Configure the Generic Templates for Notifications Framework.
Configure Notification Setup for the Generic Templates.
Set Up a Notification Consumer.
Trigger the Notifications Framework.
Set Up the SMS Notification page.
Integration Broker set up for the SMS channel.
Set Up Push Notifications page.
Configure IB to use Socket Connector for Push channel delivered services.
Install SSL Certificates and configure platform specific server keys.
Activate all the IB objects delivered for Push channel.
Schedule APNS Feedback job.
|
Page Name |
Definition Name |
Navigation |
Usage |
|---|---|---|---|
|
Generic Template Definition |
WL_TEMPLATE_GEN |
|
Define the templates to send e-mail notifications. Define the Message Text and the variables to include. Note: The list of variables contained in each of the messages is delivered with your system and require extended coding effort to be modified. |
|
Notification Setup |
SCC_NTF_SETUP |
|
Set up the recipients for the notifications. In this page a notification template is created by associating to a generic template. The recipient’s configuration is also detailed here. |
|
Notification Consumer Setup |
SCC_NTF_CON_CFG |
|
Specify the generic templates and application classes that the system will use for sending notifications related to a specific consumer. |
|
SMS Notification Setup |
SCC_NTF_SMS |
|
Set up SMS notifications. |
|
Push Notifications Setup |
SCC_NTF_PUSH_SETUP |
|
Set up Push notifications. |
Access the Generic Template Definition page ().
Image: Generic Template Definition Page
This example illustrates the fields and controls on the Generic Template Definition Page. You can find definitions for the fields and controls later on this page.
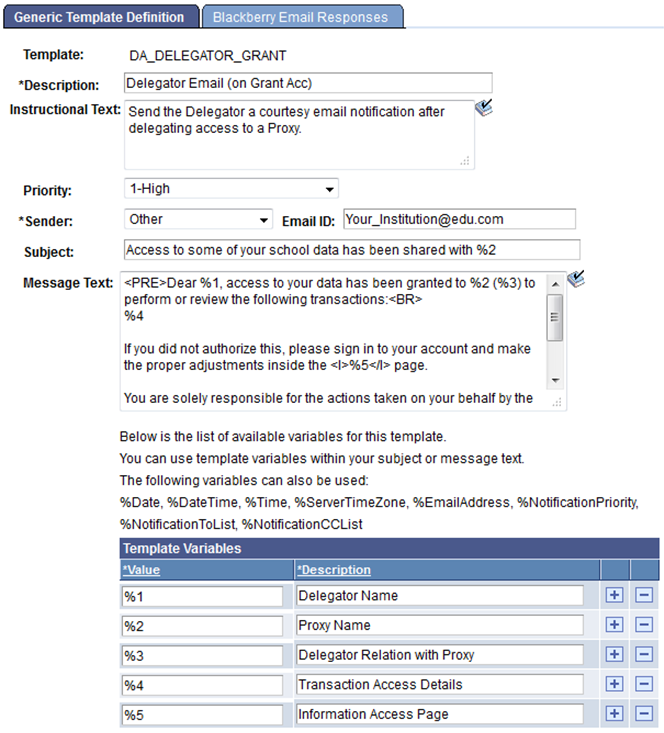
This page is used to define the basic message template along with any variables to be inserted into the message. The data for these variables is populated by the Notifications Framework consumer in its code, and the bind variables are replaced with the consumer-populated data at runtime to generate the notification’s content.
|
Field or Control |
Definition |
|---|---|
| Template |
Displays the name of the generic template to be associated to the Template Name in the Notification Setup page. |
| Description |
Enter a description of the template. |
| Instructional Text |
Notifications Framework does not use this field. Enter informational text about the generic template. |
| Priority |
Notifications Framework does not use this field. For information purposes only. |
| Sender |
Select how you want the system to derive and display the From e-mail address value in the e-mail notification:
|
| E-mail ID |
Enter an e-mail address to be used only if you have selected Other in the Sender field. |
| Subject |
Enter the subject for the e-mail message. The subject can contain variables. |
| Message Text |
Enter the message text for the e-mail message. The message text can contain variables. |
Template Variables
If bind variables are used in the Subject or Message Text, the same must be defined in the Template Variables grid. The consumer populates the list of all values that can be used in a StringHashMap having a (Key, Value) pair, with bind variable number as the key. These values are called as Notification Context Parameter values. The required values are then used in the generic template.
Template variables can be used in any order and in any quantity. You may use only 3 or 4 variables from the entire list or maybe none. These can be any values from the list - for example, %5, %13 and %17 if we are using three variables. These values are populated at runtime and the sent mail would contain these values replacing the bind variables.
Warning! When any template variables are used, their population logic also must be coded in the consumer code where the notifications are triggered. For example, Delegated Access provides a list of template variables and the logic to populate them is also delivered in the Delegated application class code. Therefore, addition of any new template variables requires substantial programming efforts.
Access the Notification Setup page ().
Image: Notification Setup Page, Email Channel Selected 1 of 2
This example illustrates the fields and controls on the Notification Setup, Email Channel Selected, page 1 of 2. You can find definitions for the fields and controls later on this page.
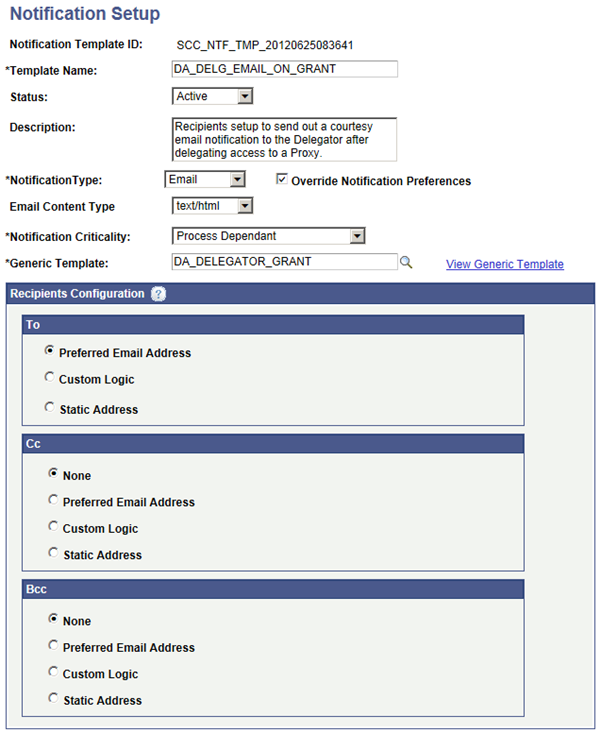
Image: Notification Setup Page, Email Channel Selected 2 of 2
This example illustrates the fields and controls on the Notification Setup, Email Channel Selected, page 2 of 2. You can find definitions for the fields and controls later on this page.
This page links the generic template discussed previously into the Notifications Framework, sets the channel, criticality, and how the recipients are determined.
|
Field or Control |
Definition |
|---|---|
| Notification Template ID |
Displays the auto-generated unique ID. When you add a new notification template record, this field displays the value NOID until you save the record. When you save the new record, the field displays the ID that the system assigned to the template. |
| Template Name |
Informative name for the Notification Template ID created above. A template created here must be associated to a generic template name. You can give the template the same name as the generic template name or a more informative name. |
| Status |
Activate or inactivate the notification template. The status must be Active for a notification to be generated from the notification template. If the status of a template is Inactive, an error message is logged for a notification criticality of Process Dependant template and information message logged for an Informative template. |
| Notification Type |
Type of notification to send. Valid values are Alerts, E-mail, SMS, Worklist and Push. This is the channel to be used by the notification. |
| Override Notification Preferences |
Only available if the Notification Type selected is E-mail or SMS. If selected, this causes the recipient’s notification preferences (set up in Self Service > Campus Personal Information > Notification Preferences) to be ignored. The system would then use the values set for the Preferred E-mail Address or Preferred Phone Number as set via Campus Community > Personal Information > Biographical > Addresses/Phones > Electronic Addresses (for E-mail Address) / Phones (for Phone Number). For most situations, the check box would be cleared, unchecked, but in circumstances where a recipient must get an e-mail, regardless of the preferences (if any), it should be selected. The primary reason for this field is that some notifications must be sent to a recipient even if they have decided to disable E-mail or SMS Notifications. An example would be e-mails sent from the system to enable a user to retrieve a password, in the case of a forgotten password. |
| E-mail Content Type |
Available when the e-mail notification type is selected – options are text/html or text/plain. If html is selected, any HTML tags in the message are respected. |
| Notification Criticality |
Indicates how critical the template is from the business process perspective, and may be set to either Informative or Process Dependant. If it is critical to the business, we advise that you select Process Dependant, otherwise select Informative. This information is later used to categorize the errors that may have happened when triggering the e-mail template and sending the e-mail notification. If there is an error with a notification template that has been set as Informative, then the system continues with the processing. This error is considered as a Normal Error. If, however, there is an error with a notification template set as Process Dependant, the system stops processing, as the business process would be impacted by this error. This is classified as a Reconcile Error. Normal errors are logged in the Notification Error logging tables. Reconcile errors are logged in the system’s App Server Logging (same as Exceptions). These would be logged only when tracing is enabled. For example, within Delegated Access framework, an e-mail notification is sent to the proxy to indicate a transaction has been delegated and to inform them of the steps to take to make use of this privilege. The e-mail notification sent to the proxy is critical for the completion of the delegation process. In this case the e-mail template set for the proxy can be marked as Process Dependant. A second e-mail is also sent to the person who delegated access as a courtesy to inform the person that access to her or his data was delegated to somebody else. The template for this second e-mail is mostly informational (Informative). The log tables holding the error and warning information in case of informational (Informative) templates are:
The App Server logs hold the error messages for Process Dependant templates, and can be found as a trace file in the App Server log folder. Consequently, a trace needs to be enabled to log these messages. |
| Notification Life (in days) |
This option becomes available if the channel (Notification type) selected is Worklist or Push. For Worklist, this option is used to time-out the worklist item notification based on the number of days set in this field. For Push, this option is used as expiry for the push message in APNS/GCM. If not set, the default value is 7 days. |
| Callback Application Class |
This option becomes available if the channel (Notification type) selected is Worklist. Allows consumers to carry out consumer specific actions when a worklist event occurs. Consumers create the callback application class by extending the base callback event handler (SCC_COMMON:NOTIFICATION:CALLBACK:BaseNotificationEventHandler). Currently the only events supported are Timeout and Reminder. Used by the Worklist Timeout and Reminder Batch process (SCC_NTFWKLTO). |
| Application Name |
This option becomes available if the channel (Notification type) selected is Push. Select the mobile Application Name (configured in Push Notifications Setup page) for which you want to use the template. |
| Generic Template |
Select the generic template for which you want to define the recipients. |
Recipients Configuration
Use this group box to indicate how the system should set the To, CC, and BCC values in the notification messages. Note that the sections (To, CC, and BCC) available in this group box vary depending on the Notification Type (channel) selected:
E-mails (To, CC, BCC)
Alerts (To)
SMS (To)
Worklists (To)
|
Field or Control |
Definition |
|---|---|
| None |
Select if you do not want to include an e-mail address in the CC or BCC section of the e-mail. Available only for CC and BCC. |
| Custom Logic |
Select if you want an application class to determine how the e-mail address of the recipient should be set. You have to create this PeopleCode application class and specify the class’s name in the Application Class field. When you select the Custom Logic option, the Application Class field becomes available. For an example of an application class containing custom logic to determine an e-mail address to use, see the Delegated Access application class called SCC_DA:NOTIFICATION:DACustomLogicProvider. |
| Preferred E-mail Address |
Select if you want to use the recipient’s e-mail address that is marked as preferred in the e-mail address record (EMAIL_ADDRESSES). Choose this option mostly if you know the recipients have an ID in your system (the e-mail address record is keyed by EMPLID). Note that if the recipient has set their notification preferences (Self Service > Campus Personal Information > Notification Preferences) to another e-mail address, then it is used for the e-mail rather than the preferred e-mail address, unless the Override Notification Preferences check box is selected on the Notification Setup page (Set Up SACR > System Administration > Utilities > Notifications > Notification Setup). |
| Static Address |
Select if you want all the e-mail messages to be sent to a particular e-mail address. Enter this e-mail address in the E-mail Address field. When you select the Static Address option, the E-mail Address field becomes available. Use this option mostly when you are testing the notification templates to verify the content of the e-mail messages generated and the required configuration is properly done. |
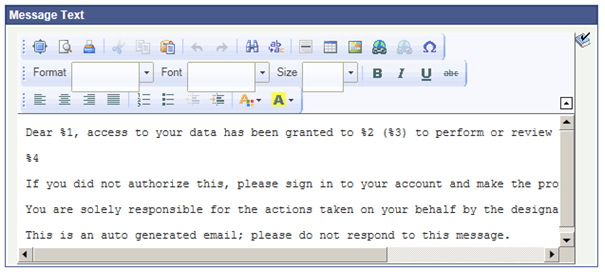
Message Text
This group box appears only if the Notification Type is Email with an Email Content Type of text/html. The formatted text is saved differently depending on the browser used. Set the Format field to Normal before creating or updating the message text.
Access the Notification Consumer Setup page ().
Image: Notification Consumer Setup Page
This example illustrates the fields and controls on the Notification Consumer Setup page. You can find definitions for the fields and controls later on this page.
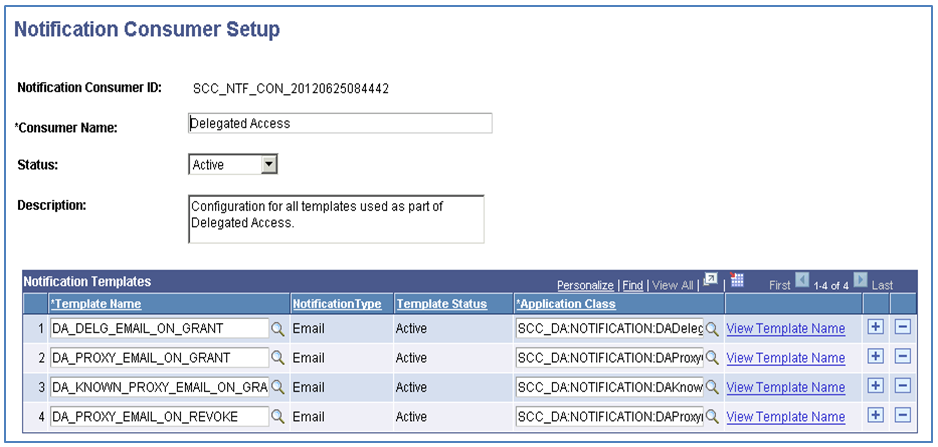
This is the point where, for a consumer, the template and notification setup are associated with the consumer code (the application class) that will populate the template fields and send the notification via the chosen channel to the recipient.
|
Field or Control |
Definition |
|---|---|
| Notification Consumer ID |
Displays the auto-generated unique ID. When you add a new notification consumer record, this field displays the value NOID until you save the record. When you save the new record, the field displays the ID that the system assigned to the consumer. |
| Consumer Name |
Enter the name of the consumer that will consume the notification framework. |
| Status |
Activate or inactivate the notification consumer. If the consumer is inactive, the system will not send any notifications. |
Notification Templates
Use this grid to specify the templates that you have configured for the notification consumer on the Notification Setup page. To process notifications, the framework needs to know which templates are valid to use for sending out emails with respect to the consumer’s business process or scenario. For each of the templates, specify the application class logic which the Notifications Framework will use to identify the valid template for triggering the notification. For example, within Delegated Access, two email notifications are sent at the time that the user delegates new access to somebody. After making the data change and saving the component, one email notification is sent to the user and one to the person to whom access has been delegated. These two notifications use two different templates and are generated under a specific logic. The logic is defined in an application class. For examples of application classes containing logic to trigger a notification, look at any of the delivered Delegated Access application classes:
SCC_DA:NOTIFICATION:DADelegGrantTemplateProvider
SCC_DA:NOTIFICATION:DAProxyGrantTemplateProvider
SCC_DA:NOTIFICATION:DAKnownProxyGrantTmpltProvider
SCC_DA:NOTIFICATION:DAProxyrevokeTemplateProvider
The Application Class, configured against each consumer Template Name, is invoked (returns true or false) to determine if that particular template is to be used for sending notifications or not.
In the same AppClass created above, include logic to populate the EMPLID property of the Notification Context with the recipient’s EMPLID. This value may be left blank if the notification recipient does not have an EMPLID (for example within Delegated Access, email notifications are sent to the proxies which may or may not have an EMPLID identified).
When the Notifications Framework is used to dynamically determine the template(s) to trigger multiple notifications, the recipient(s) may be different for each notification. Therefore, on selecting a template to trigger the notification, BaseNotificationContext.EMPLID must be populated dynamically with the respective recipient EMPLID. This must be taken care of by the NFK Consumers in their respective Template Provider App Class code (an Application Class configured for each Template Name in Notification Consumer Setup page).
During NFK processing, the provided EMPLID Context value is stored in SCC_NTFREQ_DTL.EMPLID record field. Later, this stored recipient’s EMPLID information is used as part of the Notifications Center page. The page displays the notifications sent to that specific EMPLID.
Warning! Failing to properly populate the EMPLID Context field with the proper recipient’s EMPLID may result in displaying in the Notifications Center page notifications sent to someone else.
This section describes how functionality initiates a notification and depends on the Consumer functionality involved. An example is the Delegated Access - Share My Information self-service page, from where the Notifications Framework is triggered. When the page is saved, the Notifications Framework is triggered via the Application Class code associated with it.
Image: Delegated Access Share My Information Example Page
This example illustrates the fields and controls on the Delegated Access Share My Information example.
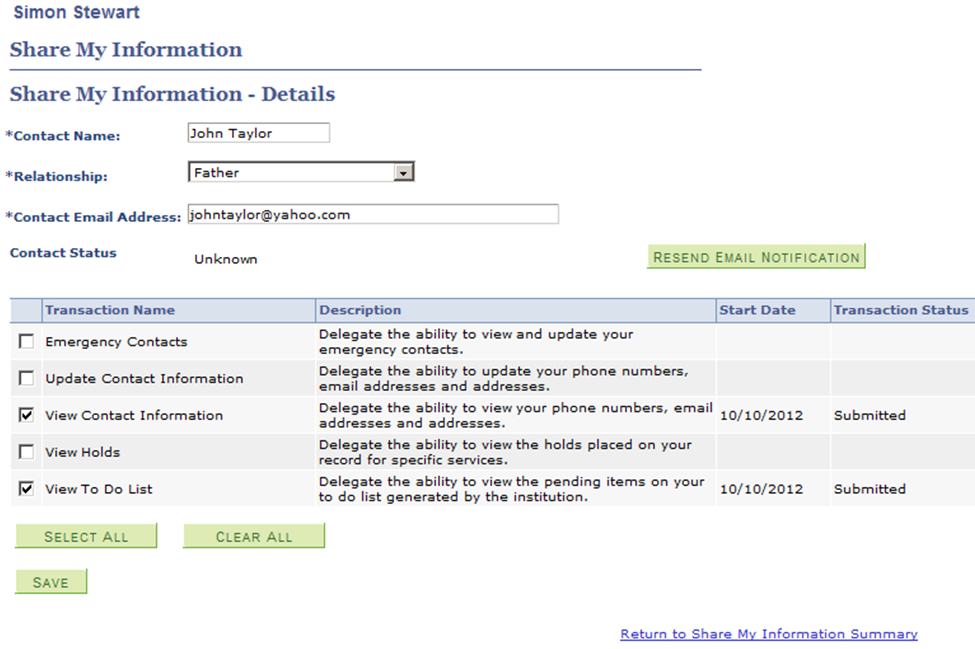
Users can refer to the Delegated Access Application Class SCC_DA:NOTIFY as a reference for how to trigger the Notifications Framework as a consumer.
See Developer Reference for Setting Up Delegated Access
Methods in Notifications Framework to be used by Consumer
Note: As of Bundle 29, consumers no longer use the NotificationManager application class; they now need to extend the AbstractNotification class.
Before invoking Notifications Framework to process or send notifications, consumers can make sure that the consumer and template set are to active. The following methods are examples of error handling:
Method is ConsumerActive(&pSccNtfConld As string) returns Boolean;
Method is TemplateActive(&pSccNtfreqTmpltid As string) returns Boolean;
This helps to avoid unnecessary processing by consumers/framework.
The methods that must be used by the consumer to consume or invoke the Notifications Framework are listed below:
Write an AppClass that extends AbstractNotification class. The Consumer ID must be passed to the Super Class constructor here, as shown in the sample code below:
%Super = create SCC_COMMON:NOTIFICATION:AbstractNotification(&Consumer_ID);
Implement the abstract method createNtfContext(). This creates the context for the consumer as already explained in the previous section.
Sample Code:
method createNtfContext
   /+ Returns SCC_COMMON:NOTIFICATION:INotificationContext +/
   /+ Extends/implements SCC_COMMON:NOTIFICATION:AbstractNotification.createNtfContext +/

   Return create SCC_DA:NOTIFICATION:DANotificationContext();

end-method;
Implement the abstract method populateNtfContext(). This method populates the context create above with the necessary values as will be required during the processing.
Sample Code:
/* Downcast */
   Local SCC_DA:NOTIFICATION:DANotificationContext &myNtfCntxt = &p_ntfContext As SCC_DA:NOTIFICATION:DANotificationContext;

   Rem Populate DANotification Context values;
   &myNtfCntxt.EMPLID = &Emplid;
   &myNtfCntxt.SCC_DA_PRXY_ID = &proxyId;
Note: If a consumer chooses to send a single notification then it can be done by directly populating the &myNtfCntxt.SCC_NTFREQ_TMPLTID with the Template ID value. If the Notification Context property: SCC_NTFREQ_TMPLTID is not populated then the Notifications Framework uses createConsumerNotificationDetailsItems() method to dynamically create single or multiple notification items based on consumer templates setup.
Invoke the send(), remind(), or resend() method.
%This.send();
During this processing, the framework creates objects such as Notifications Header, Notification Detail & Notification Item records using the Notification Context data populated by the consumer. Finally, the send() method for each notification item is invoked using the appropriate channel (like Email, SMS, Alert or Worklist) as per the Notification Template Setup.
%This.remind(Notification ID, Detail Sequence Number, Item Sequence Number)
This method is used to create a “reminder” notification for a previously generated notification. The parameters to this method are the Notification ID, Detail Sequence Number, and Item Sequence Number of an existing notification.
During this processing, the framework invokes the send() method to create a new notification. Then the framework stores the date/time and the keys of the new notification in the original notification.
%This.resend(Notification ID)
This method is used to resend a previously generated notification. The only parameter to this method is the Notification Request ID of the notification to be resent. The notification data related to that particular Notification Request ID is retrieved, and the notification is sent again. This is applicable for only previously sent notifications. A ‘isResend’ flag decides whether the current transaction is a send or resend. As with send, the resend also invokes the save() method of message log and logs the info/warning messages generated as part of the resend.
Override the OnSuccess() and OnError() for custom behavior:
Sample Code:
method onSuccess

   SQLExec("Update PS_SCC_DA_PROXY set SCC_DA_NTF_REQ_ID=:1 where  EMPLID=:2 and SCC_DA_PRXY_ID=:3", %This.ntfReqID, &Emplid, &proxyId)

end-method;

method onError
SQLExec(“Update PS_OUTPUT set RESULT= :1”, &p_excep.toString());
end-method;
The onError method in AbstractNotification, if not overridden in the implementing class, logs an error in the App Server logs – "Notification cannot be sent for Notification Consumer XXXXXXXX with Request ID YYYYYY due to following error: ACTUAL ERROR”. This behavior can be overridden in the implementing class onError method.
Access the SMS Notification Setup page ().
Image: SMS Notification Setup Page
This example illustrates the fields and controls on the SMS Notification Setup page. You can find definitions for the fields and controls later on this page.
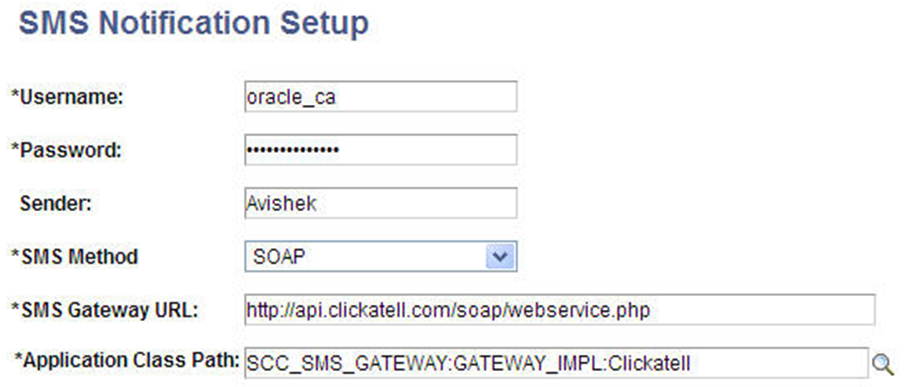
This setup is only needed for consumers using the SMS channel to send notifications.
This page stores information about the account details of the SMS Gateway that sends the SMS notification beyond the system. As well as the usual security details such as user name, password, and sender name, it also has information about the URL of the SMS Gateway, which is used to create the final URL with parameters for sending the SMS notification. These details are saved to the record SCC_NTF_SMS.
|
Field or Control |
Definition |
|---|---|
| Username, Password, and Sender |
Enter the Username, Password, and Sender for the SMS Gateway account used for sending SMS. |
| SMS Method |
Select the SMS method. SMS can be sent either by HTTP URL posting or SOAP method using HTTP protocol. |
| SMS Gateway URL |
Enter the URL of the SMS Gateway provider. |
| Application Class Path |
Enter the Customer-implemented Application Class which extends the BaseSMSChannel. This class is used primarily to create the final SOAP Message/URL which is to be sent for triggering the SMS. It needs to be updated after modifications have been made to the page. |
Note: Currently, Integration Broker setup is needed for the SMS and Push channels.
Nodes
Create a new External Node or use an existing Node. Oracles delivers the SCC-NTF_SMS node. Set up the properties of the Node as shown in the screenshots below.
Access Node Definitions
Image: Node Definitions Page SMS Notifications
This example illustrates the fields and controls on the Node Definitions page for SMS Notifications.
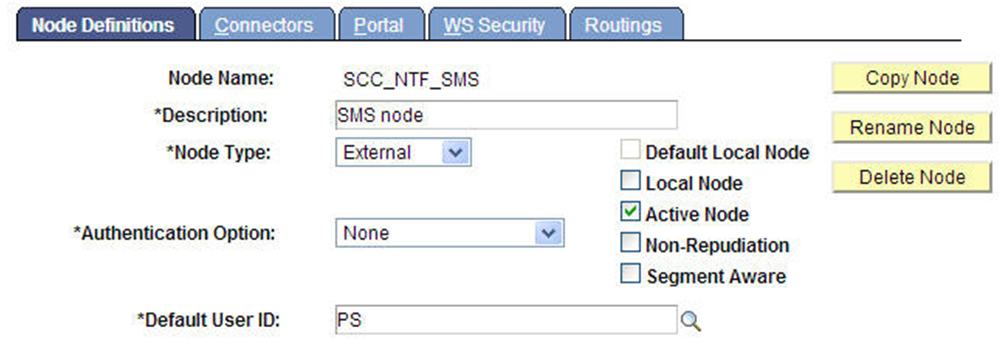
Image: Node Connectors Page SMS Notifications
This example illustrates the fields and controls on the Node Connectors page for SMS Notifications.
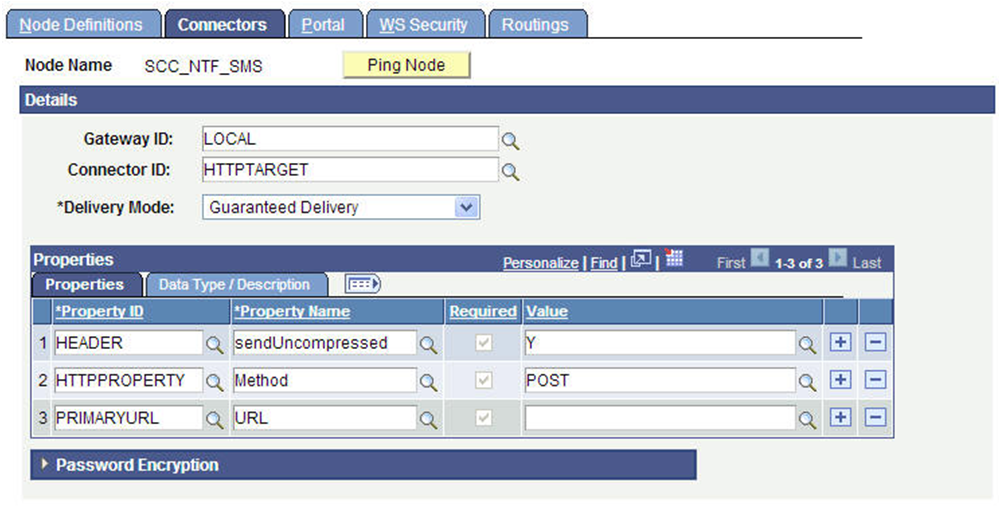
Image: Node Routings Page SMS Notifications
This example illustrates the fields and controls on the Node Routings page for SMS Notifications.

Ensure that there is an Active Outbound Routing from the local node to the external node. If not, create/generate an active routing.
Message
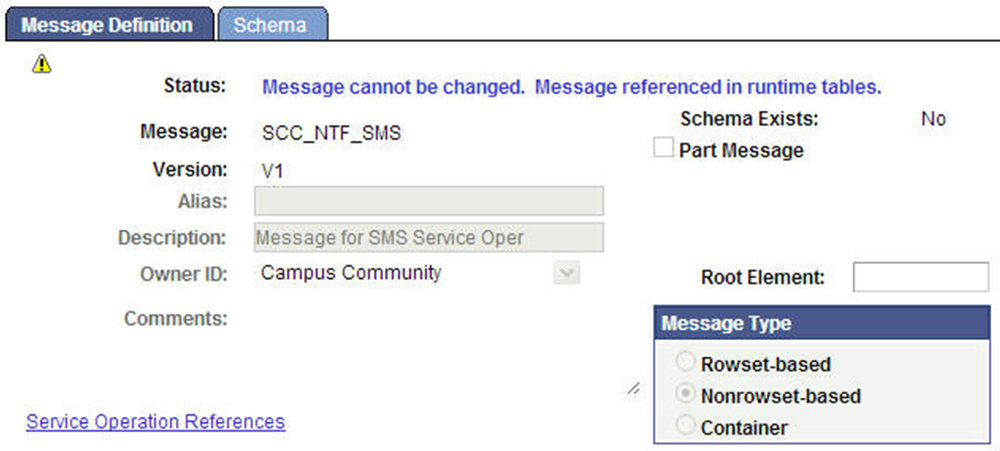
Create a new Non-Rowset based message as shown below. Access the Message Definition page ().
Image: Message Definition Page SMS Notifications
This example illustrates the fields and controls on the Message Definition page for SMS Notifications.
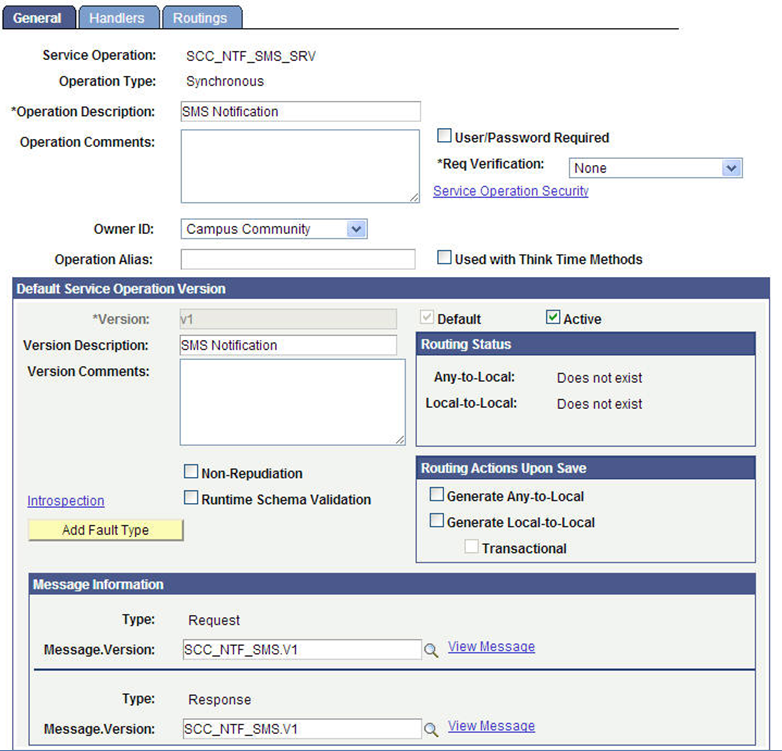
Service Operation
Create a new Service Operation, as shown below, using the message created above. Access the Service Operation General page ().
Image: Service Operation General Page SMS Notifications
This example illustrates the fields and controls on the Service Operation General page for SMS Notifications.
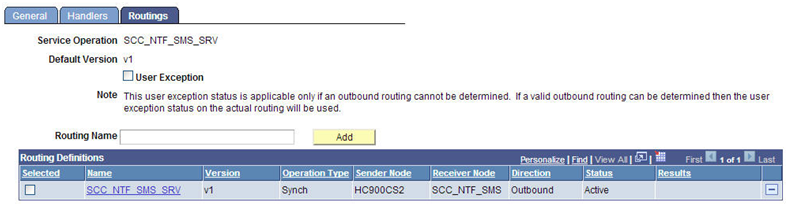
On the Routings tab, see that there is an active outbound Routing from the Local Node to the External node created above, as shown below:
Image: Service Operation Routings Page SMS Notifications
This example illustrates the fields and controls on the Service Operation Routings page for SMS Notifications.
Service
Create a new Service and add the Service Operation to the Service, as shown below. Access the Services page ().
Image: Services Page SMS Notifications
This example illustrates the fields and controls on the Services page for SMS Notifications.
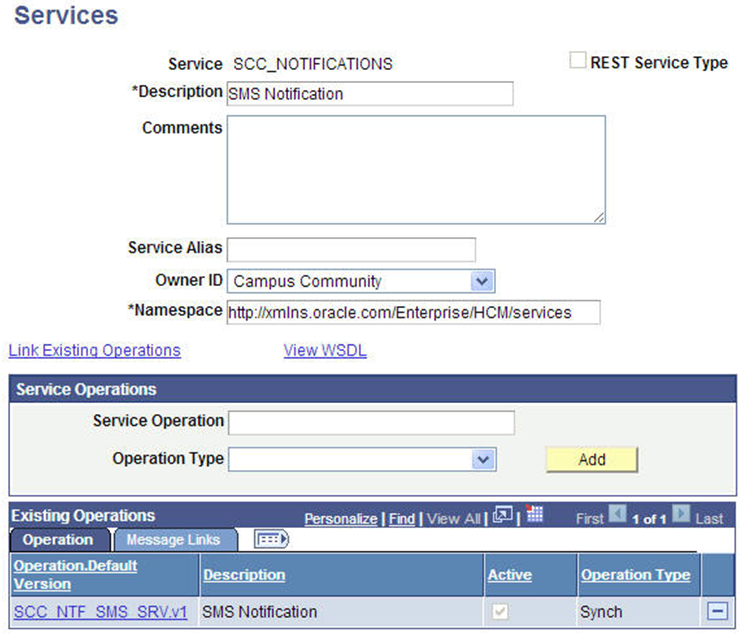
Please note that the above service needs to be called by PeopleCode in the consumer application.
Access the Push Notifications Setup page ().
Image: Push Notifications Setup Page
This example illustrates the fields and controls on the Push Notifications Setup page. You can find definitions for the fields and controls later on this page.
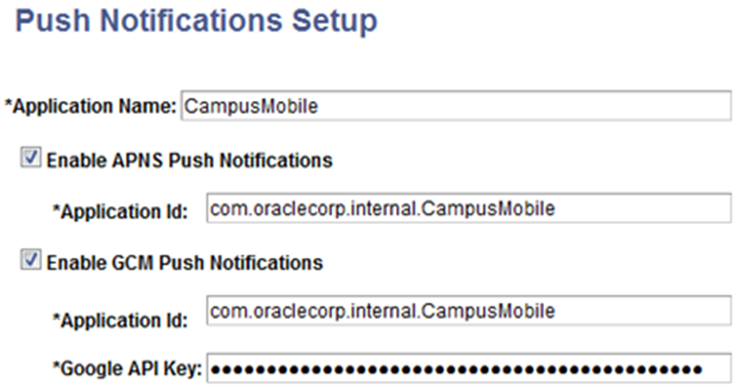
Push notifications are notifications sent from an external source, such as a server, to an application on a mobile device. They may appear as messages in the form of an alert, or as a banner, depending on the state of the application and user settings. When users are notified, they can launch the application, or they can ignore the notification, in which case the application is not activated. Notifications can also accompany an alert message with a brief, distinctive sound.
On iOS, the notification service is Apple Push Notification Service (APNS). Google Cloud Messaging (GCM) for Android provides the notification service for applications installed on Android-powered devices. A set of templates is available through the Campus Solutions Notifications Framework that enables Campus Solutions event handling through a push channel.
|
Field or Control |
Definition |
|---|---|
| Application Name |
Enter a unique value across Campus Solutions that will identify the application or module configured to send push notifications. |
| Enable APNS Push Notifications |
Select this check box to enable Apple smartphone users to receive push notifications from Campus Mobile and then enter an Application ID. |
| Application ID |
Enter a globally unique fully qualified Application Bundle ID, such as edu.myuniversity.CM. The Application ID can be any string; however it must be globally unique for all applications accessing the APNS. For more information on using the Apple Push Notification service, refer to the iOS Developer Library section “Apple Push Notification Service”. https://developer.apple.com/library/ios/documentation/NetworkingInternet/Conceptual/RemoteNotificationsPG/Chapters/ApplePushService.html. Note: For GCM push notifications, the Application ID can be the same or different from the one used for the APNS. |
| Enable GCM Push Notifications |
Select this check box to enable Android smartphone users to receive push notifications from Campus Mobile and then enter an Application ID and a Google API Key. |
| Google API Key |
Enter a generated key that gives the application server authorized access to Google services. You must obtain this key, typically using the Google API console, in order to use it for Google-based web service interaction. For information about the Google API process, see: http://developer.android.com/google/gcm/gs.html#create-proj |
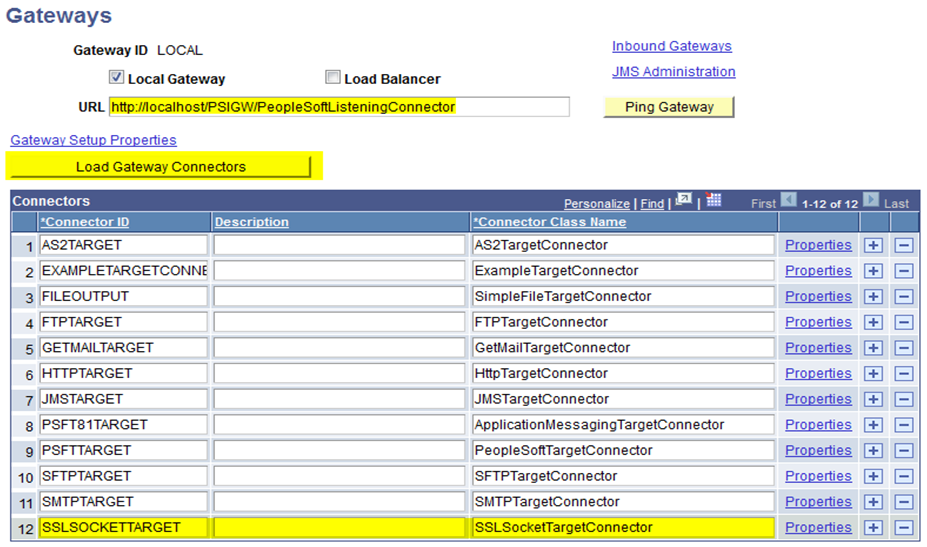
Some Campus Solutions functionality, such as Campus Mobile, uses an SSL Socket connector for Apple Push Notifications. This connector is delivered with Campus Solutions and must be loaded and configured.
To load gateway connectors:
Copy the SSLSocketTargetConnector.class and SSLSocketTargetConnector$1.class files from <PS_HOME>\class (for Windows) or <PS_HOME>/appserv/classes (for UNIX) to the following location: <PIA_HOME>\webserv\<DOMAIN>\applications\peoplesoft\PSIGW.war\WEB-INF\classes\com \peoplesoft\pt\integrationgateway\targetconnector.
Restart the web server.
Access the Gateways page ().
Enter the URL and click the Load Gateway Connectors button.
Verify that Connector ID SSLSOCKETTARGET is loaded and save the page.
To configure gateway properties:
Access the Gateways page (PeopleTools, Integration Broker, Configuration, Gateways).
Click Gateway Setup Properties.
Provide User ID and Password in the Gateway Properties page.
Click OK.
Click the Advanced Properties Page link on the PeopleSoft Node Configuration page.
On the Gateway Properties page, provide values for secureFileKeystorePath and secureFileKeystorePasswd.
Click OK.
If the web server is behind a firewall, then provide values for ig.proxyHost and ig.proxyPort on the Gateway Properties page.
Click OK.
Image: Loading Custom Gateway Connector for Push Notifications
This example illustrates the fields and controls on the Loading Custom Gateway Connector for Push Notifications example.
This setup is only needed for consumers using the PUSH channel. When making secured connections to and from the Apple and Google push notification servers, SSL certificates and platform specific server keys need to be in place and configured. Follow the steps below in order to configure SSL Certificates and server keys on Apple Push Notification Server (APNS) and Google Cloud Messaging (GCM) for Android.
For APNS
Install the SSL distribution certificate and private cryptographic key obtained on the server computer, on which the provider code runs and from which it connects with the development or production versions of APNs. To do so, complete the following steps:
Open Keychain Access utility and click the My Certificates category in the left pane.
Find the certificate that needs to be installed and disclose its contents. Both a certificate and a private key will be displayed.
Select both the certificate and key, choose File > Export Items, and export them as a Personal Information Exchange (.p12) file.
Import this .p12 into pskey keystore on the webserver.
See https://developer.apple.com/library/mac/documentation/NetworkingInternet/Conceptual/RemoteNotificationsPG/Chapters/ProvisioningDevelopment.html#//apple_ref/doc/uid/TP40008194-CH104-SW1.
For GCM
Import root ca certificate accepted by Google into pskey keystore on peoplesoft web server.
Download GCM Certificate (ex: Geo Trust Global CA) from the browser with URL https://android.googleapis.com/.
This setup is needed only for consumers using the PUSH channel. Several IB objects delivered with the Notifications Framework need to be activated when enabling applications to use the Push Channel. The following sections list out the specific service operations, routings, queues and notification handlers which need to be enabled.
Service Operations
When configuring applications which use the Push Channel capability, ensure the following service operations and routings are activated:
|
Service |
Service Operation |
Type |
Routing |
|---|---|---|---|
|
SCC_NOTIFICATIONS |
SCC_PUSH_NOTIFICATIONS |
Asynchronous |
- |
|
SCC_NOTIFICATIONS |
SCC_APNS_FEEDBACK |
Synchronous |
SCC_APNS_FEEDBACK |
|
SCC_NOTIFICATIONS |
SCC_APNS_SEND |
Synchronous |
SCC_APNS_SEND |
|
SCC_NOTIFICATIONS_CONSUMER |
SCC_GCM_SEND_POST |
Synchronous |
SCC_GCM_SEND_POST |
|
SCC_NOTIFICATIONS_R |
SCC_DEVICE_REGISTER_POST |
Synchronous |
SCC_DEVICE_REGISTER_POST |
The following screenshot is an example of the SCC_NOTIFICATIONS->SCC_APNS_SEND service operation activation. Access the Service Operation General page ().
Image: Service Operation General Page Push Channel
This example illustrates the fields and controls on the Service Operation General page for Push Channel.
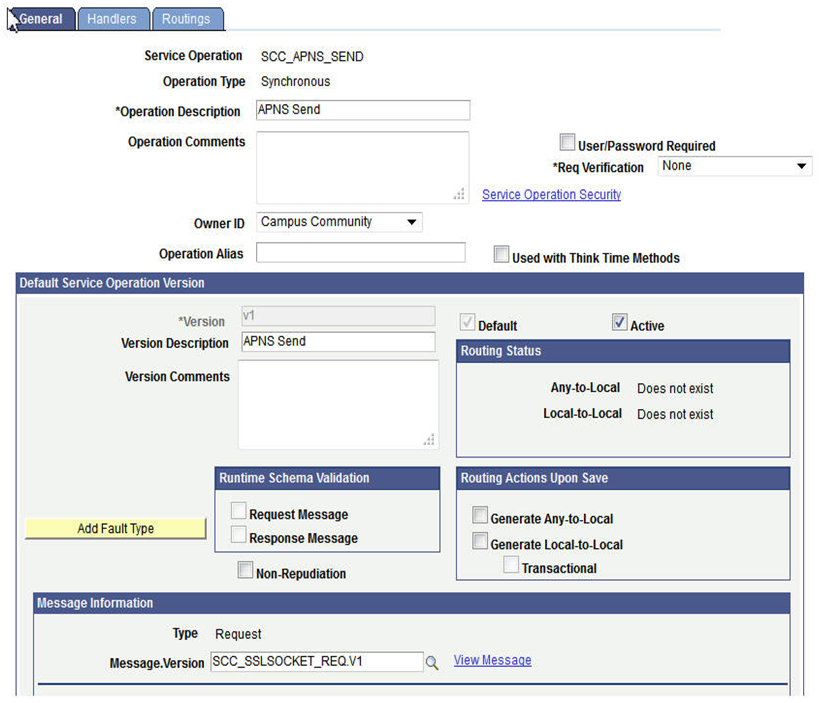
To activate the service operation, ensure the Active check box is selected.
Routings
The following screenshot is an example of the routings activation. Access the Routing Definitions page ().
Image: Routing Definitions Page
This example illustrates the fields and controls on the Routing Definitions page.
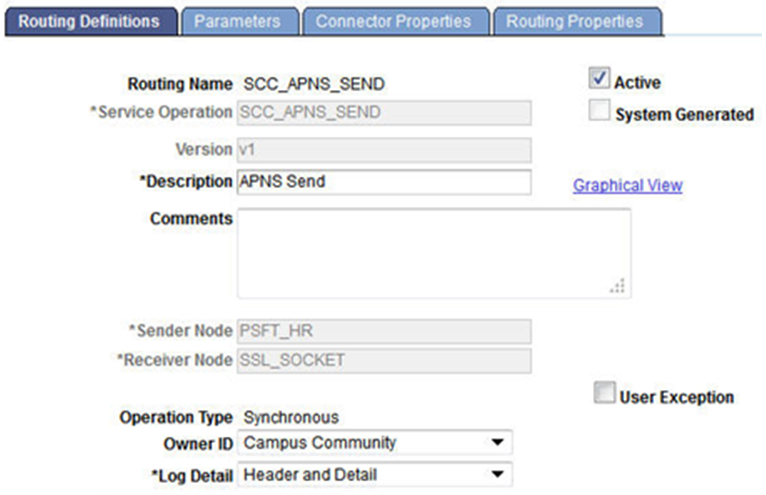
To activate the routing, select the Active checkbox, save, and continue.
Queue: SCC_NTF_QUEUE
Access the Routing Definitions page ().
Image: Queue Definitions Page
This example illustrates the fields and controls on the Queue Definitions page.
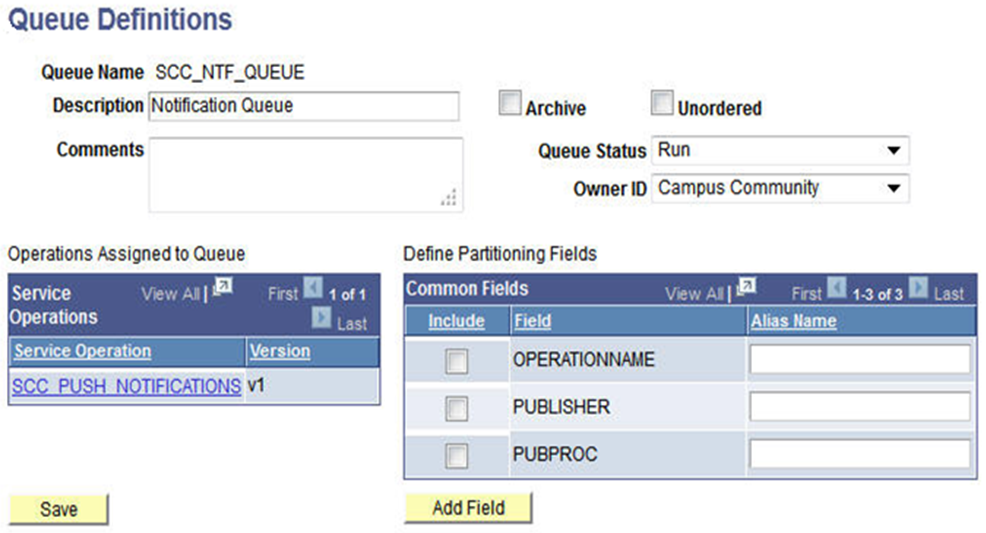
Ensure the Queue Status is set to Run, save, and continue.
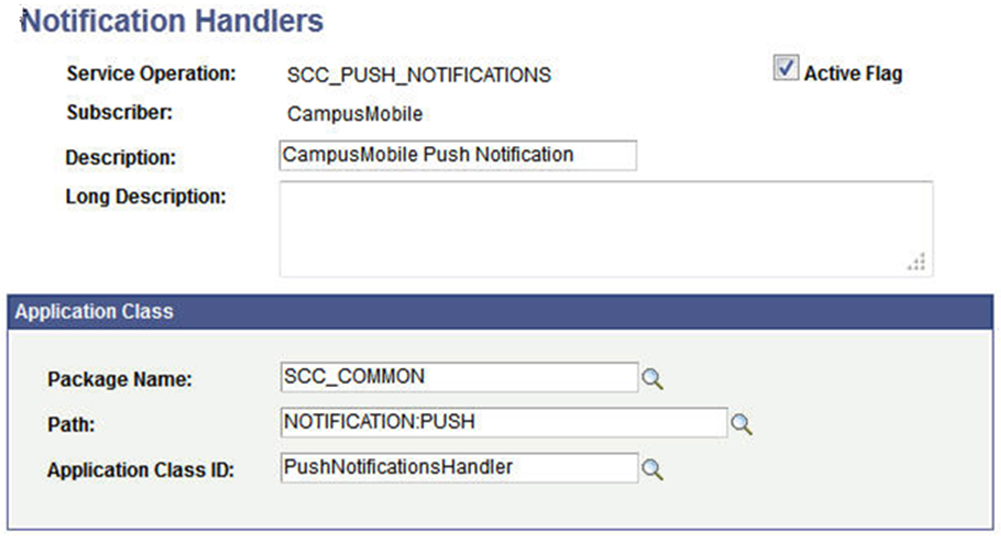
Notification Handlers
Activate the Notification Handler for SCC_PUSH_NOTIFICATIONS in SOA registry .
Image: Notification Handlers Page
This example illustrates the fields and controls on the Notification Handlers page.
This setup is only needed for consumers using the PUSH channel for APNS. APNS has a feedback service that maintains a list of devices for which there were failed-delivery attempts (that is, APNS was unable to deliver a push notification to an application on a device). The Campus Solutions Notifications Framework provides a job, APNSAE, which can be scheduled with a recurrence to periodically connect with the feedback service to see which devices have persistent failures so that it can refrain from sending push notifications to them. It is recommended to schedule the APNSAE job with a weekly recurrence.