Developer Reference for Setting Up Delegated Access
This section describes how to use the Delegated Access framework to create your own delegation transactions.
Note: Some steps to configure Delegated Access require a technical effort and require knowledge of Application Designer, web services, Integration Broker, Entity Registry and how you manage user security access at your institution.
This section discusses:
Step 2: Defining the Delegator’s Terms and Conditions Message Catalog
Step 3: Defining the Proxy’s Terms and Conditions Message Catalog
(Optional) Step 4: Setting Up the CTM Transaction for Delegated Access
Step 6: Setting Up Permission Lists and Roles for the Delegated Access Components
Step 8: Modifying the Proxy Terms and Conditions Page to Include Proper Constituent Fields
Step 9: Setting Up the URL to Access the New User Registration Login Page
Step 10: Setting Up New User Registration Framework or Required Proxy Security
Step 11: Modifying the Delegated Access Notification Templates
The Delegated Access framework assigns a unique proxy ID number (which is not EMPLID or user ID) every time a delegator creates a new proxy (new contact) in the Share My Information component. To view the latest proxy ID assigned or to enter the next proxy ID that you want the system to assign when the system automatically generates proxy IDs, use the Counter Setup page (Set Up SACR, System Administration, Utilities, Counter Setup). The proxy ID value is only used for processing purposes and is never displayed.
The delegator’s terms and conditions are displayed on the Share My Information -Terms and Conditions page (SS_CC_DA_DELEG_AGR page). Modify the message catalog number 14025, 60 to display your institution-specific terms and conditions. Each time a delegator creates a new proxy, the delegator must first accept the institution’s terms and conditions. For example, academic institutions in the United States can display their terms and conditions on this page to comply with the data privacy regulations under FERPA.
The proxy’s terms and conditions are displayed on the Proxy Terms and Conditions page. Modify the message catalog number 14025, 1 to display your institution’s terms and conditions that you want the proxy to accept prior to viewing the delegator’s data.
Access the Transaction Setup page ().
Image: Sample Transaction Setup Page for Delegated Access
This example illustrates the fields and controls on the Sample Transaction Setup Page for Delegated Access. You can find definitions for the fields and controls later on this page.
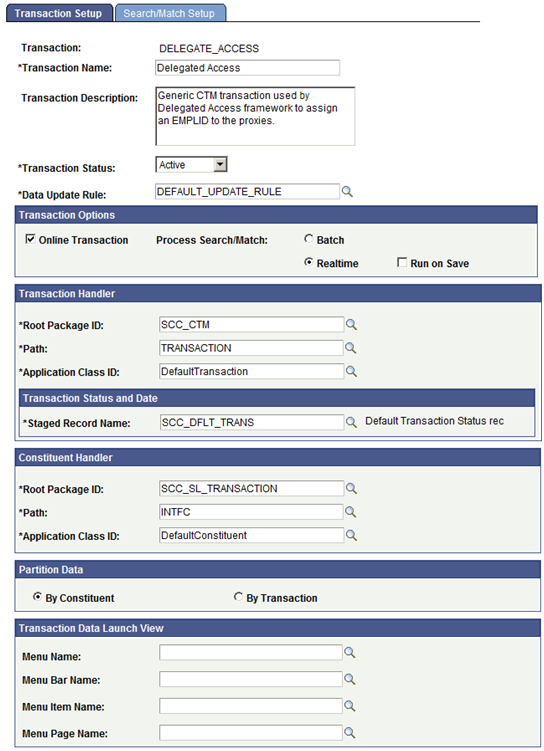
Each delegation transaction you create can be associated with a CTM Transaction Code. Consider reusing the same CTM Transaction Code. Generally, you will want to use different values only if a delegation transaction code requires a different Search/Match configuration, or if you want to use a different Data Update Rule configuration. It is recommended that you associate a delegation transaction with a CTM Transaction Code only if you want to assign an EMPLID to the proxy.
The following setup is recommended for configuring a CTM transaction for delegated access:
Transaction Options
|
Field or Control |
Definition |
|---|---|
| Online Transaction |
Select this check box because the Delegated Access business process is performed through self-service pages. |
| Process Search/Match |
Select:
|
Transaction Handler
|
Field or Control |
Definition |
|---|---|
| Root Package ID |
Select SCC_CTM. |
| Path |
Select TRANSACTION. |
| Application Class ID |
Select DefaultTransaction. |
| Staged Record Name |
Select SCC_DFLT_TRANS. |
The SCC_CTM.TRANSACTION.DefaultTransaction class allows for the processing of CTM transactions that use only constituent data and do not use any transaction-specific data. Delegated Access does not involve any transaction-specific data.
Constituent Handler
|
Field or Control |
Definition |
|---|---|
| Root Package ID |
Select SCC_SL_TRANSACTION. |
| Path |
Select INTFC. |
| Application Class ID |
Select DefaultConstituent. |
Partition Data
|
Field or Control |
Definition |
|---|---|
| By Constituent |
Select this option. The Delegated Access framework does not use transaction data. |
Transaction Data Launch Parameters
The fields in this region should be left blank because there is no transaction-specific data with delegated access and therefore there is no transaction staging component for the administrative user.
Note: Set the Search/Match Setup page using the configuration of your choice.
To enable a Campus Solutions component for delegated access:
Determine which components should be enabled for delegated access.
Evaluate your self-service components and identify the ones you would like a proxy to look at or be able to update on behalf of the delegator (for example, the delegator can be a student).
Determine if a proxy version of these components should be created. If so, these proxy components should be used in the subsequent steps.
The delivered Campus Solutions self-service components are intended to be used by the person who owns the data. For example. the self-service page where a user can enter email addresses displays: “Enter your email addresses below”. If a proxy accesses this page, the text might be confusing because it is not the proxy’s email addresses that should be entered, but the delegator’s email addresses. In this case you may want to consider creating a “proxy” version of this self-service component. The same is true if you want to hide some information. For example, it might make sense to display some information to a student, but maybe not to a proxy.
Create a menu (DA Menu) for each of the components you would like to delegate to a proxy. A menu can include one or more components related to a specific transaction.
The menu you create will be used to override the original component search record, and also to make the security to delegate more granular. Each menu can later be added to a single permission list.
You can create one menu for one component. For example, delivered with your system is a sample delegated transaction called Emergency Contacts. It only contains the emergency contacts self-service component called SS_CC_EMERG_CNTCT. This component is added to a new menu named SCC_DA_SS_EMRCNCT.
You can also create one menu for multiple components. For example, delivered with your system is a sample delegated transaction called Update Contact Information. It contains the email address self-service component (SS_CC_EMAIL_ADDR), the phone self-service component (SS_CC_PERS_PHONE) and the addresses self-service component (SS_CC_ADDRESSES). These components were added to a new menu named SCC_DA_SS_ADDRESS.
Create a menu search record override.
If you make a delivered Campus Solutions self-service component available for Delegated Access, the search record must be overridden. In fact, the component search record only returns the EMPLID for the person that is signed into your system (again, Campus Solutions self-service components display the information of the person that is logged in your system). When a proxy accesses one of these components, the search record should return the list of delegators that granted access to the component and for which the delegation status is Access Granted (not Revoked).
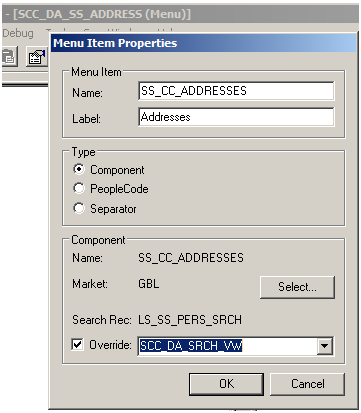
Delivered with your system is a search record called SCC_DA_SRCH_VW. This search record should be added to the menus you created for the components that you want to delegate. This search record overrides the component search record.
Image: Overriding Search Record for SCC_DA_SS_ADDRESS Menu
This example illustrates using SCC_DA_SRCH_VW to override the search record for SCC_DA_SS_ADDRESS menu. You can find definitions for the fields and controls later on this page.
When a proxy accesses one of the components that have been delegated, only the delegator names are returned. For example, Joe, Jane, and Jack are siblings attending the same school. Joe and Jane granted their mother Mary Smith access to their Emergency Contacts data. Jack granted his mother access to a different component. When the mother accepts the terms and conditions for each of her three kids, her user ID is tied to Joe, Jane and Jack’s EMPLIDs. When she navigates to the Emergency Contacts component (through the DA Menus), she sees a search record that returns only the names of her kids who granted her access to the component: Joe and Jane. Jack’s name is not listed because he did not grant his mother access to that component. Because we are using a DA Menu, if Mary was also a student at the institution, she wouldn’t see her own Emergency Contacts data from that navigation. To see her own data she will still need to navigate to the regular Self Service, Campus Personal Information, Emergency Contacts component.
Note: The search record SCC_DA_SRCH_VW returns only the delegator’s name. The system does not return the EMPLIDs to avoid giving unnecessary information to the proxy. If you created a proxy version of a student self-service component, the search record SCC_DA_SRCH_VW can be added directly to the component you created.
For information on how to create a menu, see PeopleTools: Application Designer Developer's Guide.
Create a content reference to access the menu through the portal navigation.
To create content references, go to .
Each of the DA menu and component combinations that you created ust be added to its own content reference. For example, the SCC_DA_SS_ADDRESS menu (along with its three components) was added to the “Update Address”, “Update Email Address” and “Update Phone” content references. The following table represents the sample components delivered with your system and how they were added into a specific content reference.
Content Reference Name
Content Reference Label
Menu Name
Component Name
HC_SCC_DA_ADDRESS_UPDATE
Update Address
SCC_DA_SS_ADDRESS
SS_CC_ADDRESSES
HC_SCC_DA_EMAIL_UPDATE
Update Email Address
SCC_DA_SS_ADDRESS
SS_CC_EMAIL_ADDR
HC_SCC_DA_PHONE_UPDATE
Update Phone
SCC_DA_SS_ADDRESS
SS_CC_PERS_PHONE
HC_SCC_DA_ADDR_VIEW
View Address
SCC_DA_ADDR_VW
SS_CC_ADDRESSES
HC_SCC_DA_EMAIL_VIEW
View Email Addresses
SCC_DA_ADDR_VW
SS_CC_EMAIL_ADDR
HC_SCC_DA_VIEW_PHONE
View Phone
SCC_DA_ADDR_VW
SS_CC_PERS_PHONE
HC_SCC_DA_HOLDS
Holds
SCC_DA_SS_HOLDS
SS_CC_HOLDS
HC_SC_DA_TODO
To Do List
SCC_DA_SS_TO_DO
SS_CC_TODOS
HC_SCC_DA_EMRG_CNTCT
Emergency Contact
SCC_DA_SS_EMRCNCT
SS_CC_EMERG_CNTCT
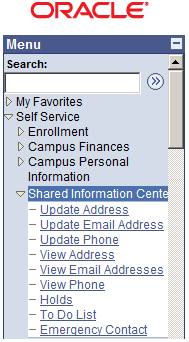
It is recommended that for each content reference you create for Delegated Access, you should add it to the Self Service, Shared Information Center portal folder. This becomes the navigation the proxy will use to see all of the components that were delegated. This also limits the number of places a proxy needs to navigate to access somebody else’s data.
Image: Example of Content References in the Share Information Center Portal
This illustrates an Example of Content References in the Share Information Center Portal.
This table shows an existing student self-service component, Emergency Contacts.
Component
Component Search Record
Menu
Menu Search Record Override
Portal folder
Content Reference
SS_CC_EMERG_CNTCT
LS_SS_PERS_SRCH
CC_PORTFOLIO
N. A.
Self Service, Campus Personal Information
Emergency Contacts
This table shows how the student self-service component, Emergency Contacts, is enabled for delegated access
Component
Component Search Record
Menu
Menu Search Record Override
Portal folder
Content Reference
SS_CC_EMERG_CNTCT
LS_SS_PERS_SRCH
SCC_DA_SS_EMRCNCT
SCC_DA_SRCH_VW
Self Service, Shared Information Center
Emergency Contacts
For more information, see PeopleTools: Portal Technology.
Use PeopleTools security components to create a permission list that contains the DA menu . To keep the security granular in order to delegate access to a specific subject at a time, consider creating one permission list per DA menu. For example, if you look at the permission list CS - DA Contact Info Update, it contains only one DA menu (SCC_DA_SS_ADDRESS). This menu grants access to several components: Addresses, Email Addresses and Phone.
After creating the permission list, you should add the permission list to a role. Again, use PeopleTools security components to create a role that includes the permission list. The role becomes the Proxy Role Name, which you use when you create the delegation transactions. It is the role that is assigned to the proxy so the proxy can perform the transaction.
The following information illustrates the permission lists and role names that contain the sample components delivered in your system.
|
Role Name |
Permission List |
Menu Name |
Component Name |
|---|---|---|---|
|
CS - DA Contact Info Update |
HCCPCSSA1141 |
SCC_DA_SS_ADDRESS SCC_DA_SS_ADDRESS SCC_DA_SS_ADDRESS |
SS_CC_ADDRESSES SS_CC_EMAIL_ADDR SS_CC_PERS_PHONE |
|
CS - DA Contact Info View |
HCCPCSSA1140 |
SCC_DA_ADDR_VW SCC_DA_ADDR_VW SCC_DA_ADDR_VW |
SS_CC_ADDRESSES SS_CC_EMAIL_ADDR SS_CC_PERS_PHONE |
|
CS - DA Emergency Contacts |
HCCPCSSA1150 |
SCC_DA_SS_EMRCNCT |
SS_CC_EMERG_CNTCT |
|
CS - DA Holds |
HCCPCSSA1170 |
SCC_DA_SS_HOLDS |
SS_CC_HOLDS |
|
CS - DA To Do List |
HCCPCSSA1160 |
SCC_DA_SS_TO_DO |
SS_CC_TODOS |
For information on creating roles and permission lists, see PeopleTools: Security Administration.
Granting access to the SCC_DA_AUTH_CHECK service operation
For each permission list that grants access to a DA menu, make sure it also grants access to the SCC_DA_AUTH_CHECK service operation. This web service is used by the Proxy Access Validation process when the proxy accesses a delegated component (PAV is triggered in realtime from the search record).
Note: If you do not grant access to the SCC_DA_AUTH_CHECK service operation, self-service users and administrators will not be able to access the Share My Information component and Review Shared Information component, respectively.
Image: Setting Up SCC_DA_AUTH_CHK Service Operation in Permission Lists
This example illustrates how to Set Up SCC_DA_AUTH_CHK Service Operation in Permission Lists.
Edit the permission list by going to . For example: HCCPCSSA1141.
Add the web service SCC_DA:
Click Edit.
For the SCC_DA_AUTH_CHK service operation, select Full Access.
Make sure the required security for SCC_DA_AUTH_CHK is granted from the permission list you use to grant delegators access to the Share My Information component, and also from the permission list you use to grant administrators access to the Review Shared Information component. This is necessary because the PAV process is also triggered in real-time when users access these components.
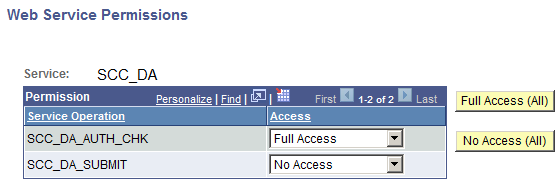
Granting access to the SCC_DA_SUBMIT service operation
Granting access to the SCC_DA_SUBMIT service operation is only needed in the permission list used to grant a proxy access to the Proxy Terms and Conditions page ( HCCPCSSA1182 - CS - DA Proxy Terms&Conditions and HCCPCSSA1180 - CS - DA Proxy Terms&Cond_TEST). Access to this service is needed so the proxy can submit the information.
For information on:
Using the SCC_DA_SUBMIT service operation, see Delegated Access Validation.
Using the permission lists with the corresponding roles in New User Registration, see New User Registration Framework and Delegated Access.
Use the Delegation Transaction Setup page to define a transaction and tie the role you created. This is the page where you identify the components, menu, and modes the delegator should have access to in order to delegate the transaction. A transaction can be tied to one or multiple components. For instance, you can create a transaction that will only delegate access to the self-service Emergency Contacts component, or a transaction that will delegate access to all the self-service personal information components at once. For examples, see the Update Contact Information and View Contact Information sample transactions.
The following is a representation of how the sample Delegated Access Transaction Codes delivered with your system were assigned a single role granting access sometimes to a collection of components, or to a single component.
|
DA Transaction Code |
DA Transaction Name |
Role Name |
Component Name |
|---|---|---|---|
|
SCC_DA_TXN_20120625080419 |
Update Contact Information |
CS - DA Contact Info Update |
SS_CC_ADDRESSES SS_CC_EMAIL_ADDR SS_CC_PERS_PHONE |
|
SCC_DA_TXN_20120626014905 |
View Contact Information |
CS - DA Contact Info View |
SS_CC_ADDRESSES SS_CC_EMAIL_ADDR SS_CC_PERS_PHONE |
|
SCC_DA_TXN_20120625080659 |
Emergency Contacts |
CS - DA Emergency Contacts |
SS_CC_EMERG_CNTCT |
|
SCC_DA_TXN_20120625080559 |
View Holds |
CS - DA Holds |
SS_CC_HOLDS |
|
SCC_DA_TXN_20120625080459 |
View To Do List |
CS - DA To Do List |
SS_CC_TODOS |
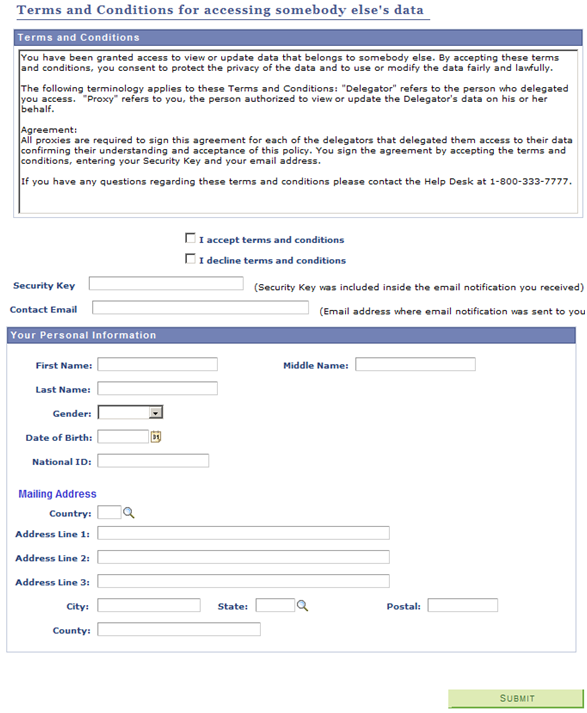
Review the Proxy Terms and Conditions self-service page and consider modifying the fields in the ‘Your Personal Information’ page (SCC_DA_PERINFO_SBP). This page is delivered as a sample. Include the desired constituent fields that you need to capture personal information about the proxy. If your delegation transactions are set to create an EMPLID for the proxies, make sure you gather enough information so Search/Match can use them as search data to identify or create an EMPLID.
The constituent fields that you can include in this page must be part of the Constituent entity or part of any of its children entities (for example, Names, Email Address, Citizenship, and so on). But you need to extend the SCC_DA:UTILS:DAUtils App Class methods to capture the data from new fields on this page.
It is recommended that you do not modify the delivered SCC_DA_PERINFO_SBP page. Instead clone it, then rename it.
Image: Proxy Terms and Conditions Page
This example illustrates the fields and controls on the Proxy Terms and Conditions Page.
The proxy receives the URL to access the New User Registration login page through an email notification, which is sent using the generic template DA_PROXY_GRANT. Use the New User Registration Installation page to let the system construct the generic URL for you. In the New User Registration Installation page, you enter your system information in order to populate the NUR constants. The constants use all the security utilities that are delivered with the NUR framework. After you enter your system information, the New User Installation page lets you generate these generic URLs:
Tester URL, which is used to transfer the guest user to the NUR Tester page.
Production URL, which is used to transfer the guest user to the NUR sample login page, or your custom version of the page. This is the login page you use in your production environment.
Use the New User Registration Context page to create a URL specific to Delegated Access that ensures the guest user (proxy) is immediately transferred to the Proxy Terms and Conditions page after being successfully authenticated into your system. The NUR context ID, SCC_NURCTXT_20120918102441 (NUR_DELEGATED_ACCESS), is available in your system. The New User Registration Context page constructs the URL by combining the generic URL and the NUR context ID SCC_NURCTXT_20120918102441. The NUR context ID value is referenced in the Delegated Access application class SCC_DA.NOTIFICATION.NOTIFY. The DA application class uses the URL marked as Active in the New User Registration Context page to replace the Access URL variable that is defined in the DA_PROXY_GRANT email template. If you want to test the Delegated Access process without setting up a Kiosk or portal environment, set the Tester URL as the active URL. The active URL transfers the proxy to the NUR Tester login page. When you are ready to deploy your application, set the Production URL as Active to transfer the proxy to your real login page, which is either the NUR sample login page or your custom version of the page.
If you prefer to manually enter a URL, then on the New User Registration Context page, select Customize URL and make sure you set this URL as active. This is especially useful if you do not use the NUR framework for your security needs. If you use a custom URL, you do not need to modify the Delegated Access application class (SCC_DA.NOTIFICATION.NOTIFY) because it uses the URL you set as active regardless of whether it is automatically generated or customized.
Note: The auto-generated URLs use the New User Registration framework security utilities such as switchUser, autologger and gatekeeper. If you customize the URL, you will not be able to use those utilities.
In step 9, the URL you created transfers the proxy to the New User Registration login page or a custom version of it. Make sure the proxy can sign into your system by either allowing the proxy to create a new user ID or reuse an existing user ID. If the proxy already has a user ID, he or she should not have to create a new one. Similarly, if multiple delegators delegated access to the same proxy, this proxy should be able to access the system with the same user ID.
If you do not plan to use the New User Registration framework, make sure your proxies (whether they are new or existing users) have access to the USER_PROFILE component interface. This is needed in order to give users access to the proper role tied to the delegated transactions. The delegated role provisioning occurs after the proxies accept the terms and conditions.
Define the text message you want to include in each of the email notifications triggered by Delegated Access. Go to , and modify the notification templates for Delegated Access.
Note: Adding or removing template variables requires intensive code changes in the way the Delegated Access framework calls the Notifications framework. The email templates should not be used for extensive communication with the proxies or delegators.
To activate the web service:
Go to . The Service Operations - Search page appears.
Search for SCC_DA service, then select the SCC_DA_SUBMIT service operation.
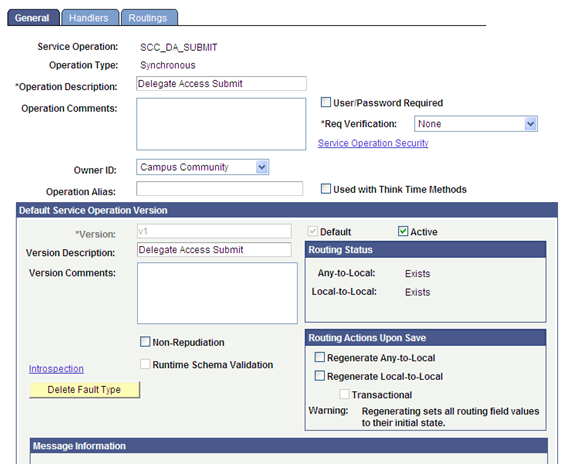
On the General page ensure that the SCC_DA_SUBMIT service operation is active and regenerate both ‘Any-to-Local’ and ‘Local-to-Local’ routing definitions.
Image: Service Operations General Page for SCC_DA
This example illustrates the fields and controls on the Service Operations General Page for SCC_DA.
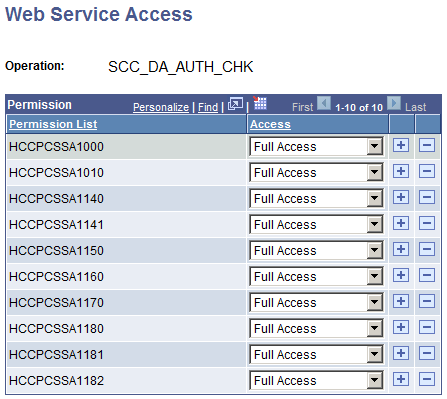
To access the Web Service Access page, click Service Operation Security.
On the Web Service Access page, make sure you select a permission list for which all users will have access. This permission list must be included in a role that is granted to all your users. The proxy can have a newly created user ID or use an existing user ID, but make sure the proxy has access to a role that contains the permission list.
Note: When you set up New User Registration, you are required to create a user ID called SCC_SS_TEMPLATE. This user ID is cloned when a new User ID is created. The user ID template needs to have access to the basic security role called Standard Non-Page Permissions. This role contains the HCSPSERVICE permission list. Proxies who create a new user ID will automatically have access to the SCC_DA_SUBMIT web service operation.
Perform steps 1–5 for the SCC_DA_AUTH_CHK service operation. In step 4, make sure all the permission lists that grant access to a delegated transaction are listed. For example, with the delivered sample delegated transactions, the following permission lists were created and should to be listed in the Service Operation Security:
Image: Web Service Access Permission List Example
This shows the Web Service Access Permission List Example.
To verify that the request handler exists:
Go to .
Search for the SCC_DA service name, then verify that the handler exists for both SCC_DA_SUBMIT and SCC_DA_AUTH_CHK service operations:
Image: Request Handler Page for SCC_DA_SUBMIT
This example illustrates the Request Handler Page for SCC_DA_SUBMIT.
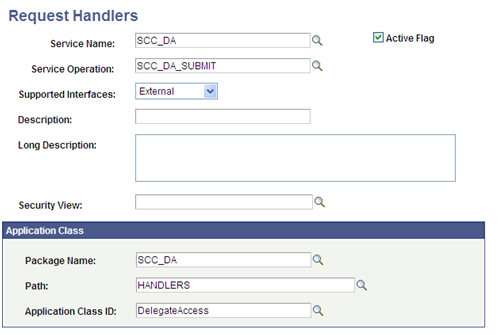
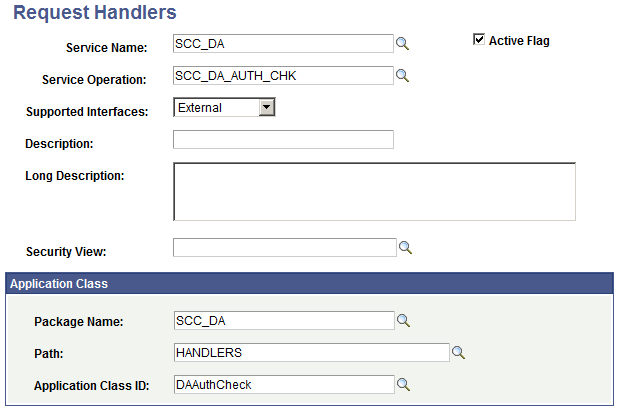
Image: Request Handler Page for SCC_DA_AUTH_CHK
This example illustrates the Request Handler Page for SCC_DA_AUTH_CHK.