Configuring Delegation Transactions
This section discusses how to:
Configure delegation transactions.
Review delivered delegation transactions.
Note: Before you configure the Delegation Transaction Setup page, you need to identify the components you want to be available for delegation, create the menus, set up the appropriate permission lists, roles, and, optionally, CTM Transaction Code. Only a security administrator who is familiar with the Campus Solutions self-services components, PeopleSoft security, and how you manage your security must set up Delegated Access.
|
Page Name |
Definition Name |
Navigation |
Usage |
|---|---|---|---|
|
Counter Setup |
SCC_AWS_FIX_CTRS |
|
Set up the max ID number for the next created proxy ID. Proxy ID is created when a delegator delegates access to a new contact in the Share My Information component. This value is used programmatically and not visible in pages. |
|
Delegation Transaction Setup |
SCC_DA_SETUP |
|
Configure transactions for delegation. |
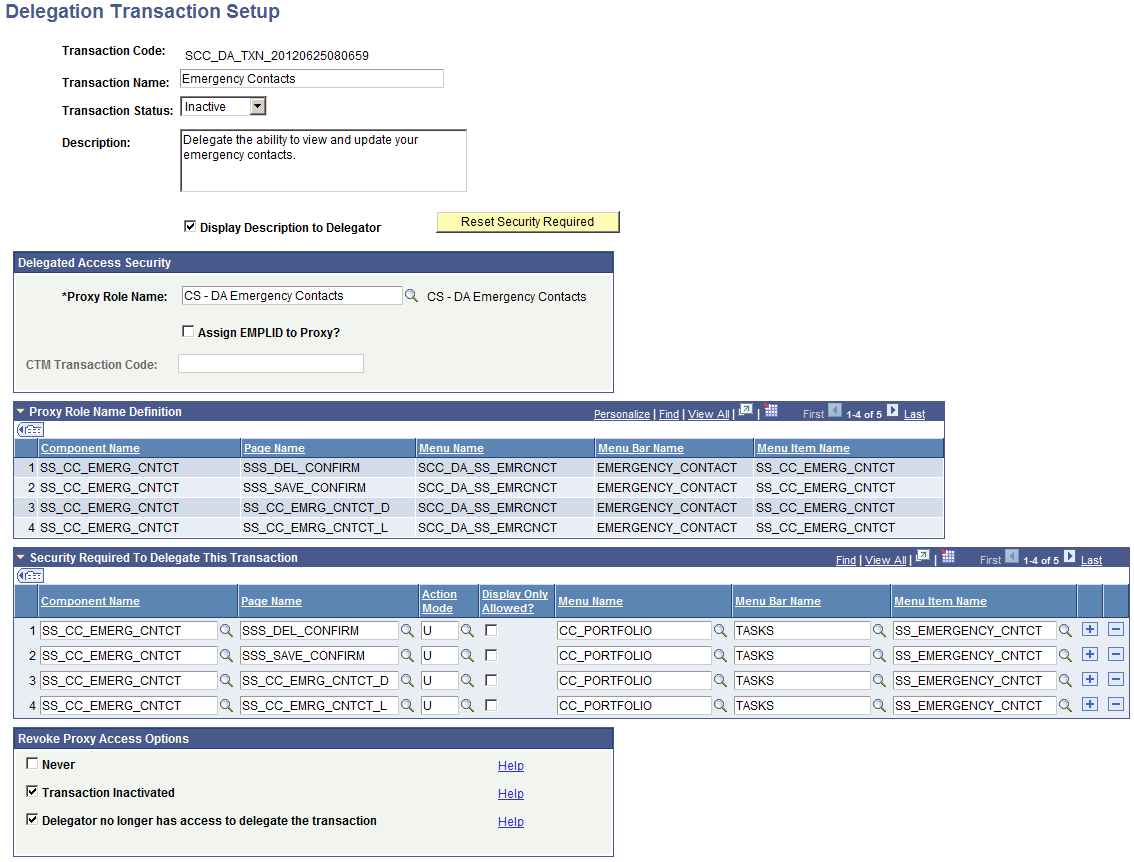
Access the Delegation Transaction Setup page ().
Image: Delegation Transaction Setup page
This example illustrates the fields and controls on the Delegation Transaction Setup page. You can find definitions for the fields and controls later on this page.
|
Field or Control |
Definition |
|---|---|
| Transaction Code |
Displays the auto-generated unique ID. When you add a new delegation transaction, this field displays the value NOID until you save the record. When you save the new delegation transaction, the field displays a unique ID that the system assigned to the delegation transaction. |
| Transaction Name |
Enter the name of the transaction. This name will appear on the Share My Information - Details self-service page where delegators can select the transaction names they want to delegate. It is strongly recommended that you always assign a meaningful transaction name because the self-service users will see it. |
| Transaction Status |
Activate or inactivate the delegation transaction. When inactivated, the transaction name is no longer displayed in the Share My Information - Details self-service page even if delegators have access to delegate it. Note: If you deactivate a transaction, consider revoking the access of proxies who have been delegated access to the transaction. To do so, in the Revoke Proxy Access Options group box, select Transaction Inactivated. The next time a proxy attempts to access a component included in the inactivated transaction, the Proxy Access Validation real-time logic will automatically revoke the proxy access. You can also revoke proxy access by batch using the Proxy Access Validation process. |
| Description and Display Description to Delegator |
Enter a description of the components that the transaction contains or for which purpose it is used. Select the Display Description to Delegator check box to display this description on the Share My Information - Details self-service page where delegators can select the transaction to delegate. |
| Reset Security Required |
Click to reset the information entered in the Security Required To Delegate This Transaction grid. The fields in this grid will be populated by default using the information defined in the Proxy Role Name you select. |
Delegated Access Security
Use this group box to establish security access for proxies who are delegated access to the given transaction and decide if an EMPLID should be assigned to the proxy.
|
Field or Control |
Definition |
|---|---|
| Proxy Role Name |
This field prompts for roles set up in the Roles component. Select the security role that will be provisioned to the proxy’s user profile once the proxy has accepted the terms and conditions for accessing a delegator’s data. The selected role must contain security information that is only relevant for the transaction. For example, if the transaction is to delegate access to a single component like the Emergency Contacts component, the role must include only a permission list that contains the Emergency Contacts component. You can quickly validate all the components included in the role by expanding the Proxy Role Name Definition collapsible grid. If instead you create a transaction that should grant access to multiple components like Update Contact Information, the role you select will need to include the collection of components to which access should be granted as part of this transaction. For example, the role could grant access to the Email Addresses, Phones, Addresses, Languages, Names components. When a proxy's delegated access is revoked, (assuming the proxy has accepted the terms and conditions and therefore has been identified), the system deletes this role from the proxy's user profile, then the proxy no longer has access to the transaction component. However, if there are other delegators that delegated the proxy access to the same transaction, the role is not deleted since the proxy still needs it to access the other delegators’ data. |
| Assign EMPLID to Proxy |
Select if you want the CTM framework to assign an EMPLID to the proxy. When selected, you must enter a CTM Transaction Code. |
| CTM Transaction Code |
Specify the CTM transaction code that the system should use to store the proxy’s constituent data. If the Assign EMPLID to Proxy check box is selected, the system uses the CTM transaction code to trigger Search/Match and assign an EMPLID to the proxy. |
Proxy Role Name Definition
When you select the Proxy Role Name value, this grid automatically displays the components, associated pages, and menus included in the selected role. This information is to show you what the proxy will be granted access to after being delegated access to the transaction. Use this grid to confirm that the right role is selected for the transaction you are creating.
Security Required To Delegate This Transaction
Note: If you do not fill out this grid, then security is not required to delegate the transaction. All users can delegate it.
By default, when you select the Proxy Role Name value, the system automatically populates this grid with the components, associated pages, and menus included in the selected role.
You can edit the fields in this grid. A delegator’s user profile must have access to all the components, pages, action modes and menus listed in this grid to be eligible to delegate the transaction, and see the transaction name on the Share My Information - Details page. What you define here is basically who has access to delegate this transaction. In most cases the delegator will need to have access to the same components and page names listed in the proxy role. However, the menus or the action modes may differ. For example, a student that has access to the Names self-service component in display-only mode should not be able to delegate access to the Names self-service component in update display mode. If the student doesn’t have access to update some data, the parents should also not have access to update the data.
Because all the components that are available for delegation must be added to a Delegated Access menu beforehand, the delegator will not have access to that menu. For example, the screen shot above shows that the Emergency Contacts component was added to the SCC_DA_SS_EMRCNCT menu in the proxy role name. The delegator (the student) will not have access to this menu. Instead he or she will have access to the CC_PORTFOLIO menu.
You can also use this grid if your institution has created a “parent version” of a student self-service component. For example, if you created a parent version of the View My Class Schedule component, the student will not have access to it. The student will have access to the student version. In this case make sure the proxy role contains the parent version of the component, and then in the Security Required To Delegate This Transaction grid, select the component name and other information for the student version.
Setting up the required security to delegate a transaction requires strong knowledge of the PeopleTools security management (Roles, Permission List, Menus, Components, Pages, and Action Modes). It also requires a good understanding of how your system’s security is configured.
|
Field or Control |
Definition |
|---|---|
| Component Name |
Enter the name of the components to which the delegator should have security access so that transactions can be delegated. |
| Page Name |
Enter the name of the associated pages to which the delegator should have security access so that transactions can be delegated. |
| Action Mode |
Enter the action mode in which you want to check for delegator security access. The action mode will be considered while checking if the delegator has security access to the page with the same action mode. If the delegator does not have security access to the page with the specified action mode, the transaction cannot be delegated. When action modes are given in a permission list, the selected values are applied to all pages in the same component. |
| Display Only Allowed |
Select this check box to allow a delegator who has display-only access to pages to be able to delegate the transaction. This check box prevents a delegator from granting a proxy access to update data when the delegator only has display-only access to pages. Within PeopleTools security, a permission list contains pages. For each page, you can decide whether or not a user should have access to the page in display-only mode. This means that you specify whether a user is allowed to only view a page, or view and update a page. Suppose the Proxy Role Name you select contains permission lists that grant access to pages that only display information (the sample transaction View Contact Information illustrates this). In most cases you would want to allow delegators with display-only and any other modes to delegate this transaction. So then you would select the Display Only Allowed check box because even users who have display-only access should be allowed to delegate this transaction. However, if the Proxy Role Name contains permission lists that grant access to pages where information can be viewed and updated (the sample transactions Update Contact Information and Emergency Contacts illustrate this), you would probably not want to allow delegators with display-only access to be able to delegate the transaction. So then, you would not select the Display Only Allow check box. To further illustrate this behavior, a student with a display-only access mode to the Names self-service component should not be able to delegate access to the Names self-service component in update or display mode. In most cases, if the student doesn’t have access to update some pages, the parents should also not have access to update the data. It is recommended that for Proxy Role Names that grant access to pages in update mode (that is, in the permission list, the Display Only flag for the page name is not selected), then delegators display-only access mode should not be allowed to delegate access to the page or transaction. This means you should not select the Display Only Allowed check box. Otherwise, for pages that only display data (that is, the values cannot be updated or selected on the page), you should allow delegators to be able to delegate the page. For more information on how permission lists are created and how pages are marked as display-only, see the product documentation for PeopleTools. |
| Menu Name, Menu Bar Name, and Menu Item Name |
Enter or select the name of the menus to which a delegator should have access in order to delegate the transaction. |
Revoke Proxy Access Options
The Revoke Proxy Access Options group box allows an institution to decide which conditions to use to revoke a proxy’s access at the transaction level. This is used by the Proxy Access Validation real time and batch logic.
|
Field or Control |
Definition |
|---|---|
| Never |
By default, this check box is deselected. If you select this option, the other options are disabled. When selected, the Proxy Access Validation logic never revokes the proxy’s access to the transaction. Use this option for transactions containing components that are generic or do not grant access to sensitive data. Note: When you select this check box and the delegator loses security access to the transaction, the proxy continues to have access to the transaction. The delegator will not be able to revoke proxy access. Only an administrator can revoke access to the transaction through the Review Shared Information component. |
| Transaction Inactivated |
By default, this check box is selected. This option indicates that when the transaction status is set to Inactive, the proxies would no longer have access to it. Delegators and administrators will be unable to delegate a transaction that is inactive. Inactive transactions do not appear in the Share My Information – Details and Review Shared Information – Details components. When this option is selected, proxies with previous access to the transaction will have their access revoked. Note: When a transaction is set to Inactive, this does not immediately revoke a proxy’s access to the transaction. Proxy access is revoked at the time the Proxy Access Validation process is run (real time or by batch). |
| Delegator no longer has access to delegate the transaction |
By default, this check box is selected. In most cases, when a delegator loses access to a transaction, the proxy should also lose access to it. This ensures that the delegator controls what a proxy has access to. For example, a student has delegated his parent access to his Addresses information. If the student loses access to the Addresses component and this option is selected, his parent will also no longer be able to access the Addresses information. |
PeopleSoft delivers several transactions that are pre-configured for the Delegated Access framework and accessible through the Delegation Transaction Setup page. The transactions serve only as samples and their status is set to Inactive.
Note: The sample transactions are configured using the delivered self-service components. These components were originally intended to be used by the person to whom the data belongs. You may want to modify these components or create a proxy version so that they make better sense for a proxy.
|
Transaction Name / Transaction Code |
Delegation Transaction Description |
Unique Role / Permission List |
Component Name |
Unique Menu Name / Search Record Override |
|---|---|---|---|---|
|
View Contact Information SCC_DA_TXN_20120626014905 |
Delegate the ability to view your phone numbers, email addresses and addresses |
CS - DA Contact Info View / HCCPCSSA1140: CS - DA Contact Info View Pages included in the permission list are defined with Display Only = Y. That way the proxy will only be able to view the delegator’s data. |
This sample shows that a collection of components can be delegated as part of a same transaction. |
SCC_DA_ADDR_VW / SCC_DA_SRCH_VW |
|
Update Contact Information SCC_DA_TXN_20120625080419 This transaction is similar to the ‘View Contact Information’ transaction and contains the same collection of components. However, it is set up to allow proxies to update the contact information. |
Delegate the ability to update your phone numbers, email addresses and addresses |
CS - DA Contact Info Update / HCCPCSSA1141: CS - DA Contact Info Update Pages included in the permission list are defined with Display Only = Y. That way the proxy will only be able to view the delegator’s data. |
This sample shows that a collection of components can be delegated as part of a same transaction. |
SCC_DA_SS_ADDRESS / SCC_DA_SRCH_VW |
|
Emergency Contacts SCC_DA_TXN_20120625080659 |
Delegate the ability to view and update your emergency contacts |
CS - DA Emergency Contacts / HCCPCSSA1150: CS - DA Emergency Contacts |
SS_CC_EMERG_CNTCT |
SCC_DA_SS_EMRCNCT / SCC_DA_SRCH_VW |
|
View To Do List SCC_DA_TXN_20120625080459 |
Delegate the ability to view the pending items on your to do list generated by the institution |
CS - DA To Do List / HCCPCSSA1160: CS - DA To Do List |
SS_CC_TODOS |
SCC_DA_SS_TO_DO / SCC_DA_SRCH_VW |
|
View Holds SCC_DA_TXN_20120625080559 |
Delegate the ability to view the holds placed on your record for specific services |
CS - DA Holds / HCCPCSSA1170: CS - DA Holds |
SS_CC_HOLDS |
SCC_DA_SS_HOLDS / SCC_DA_SRCH_VW |