Setting Up CTM
This section discusses:
Setting up counter.
Setting up a transaction.
Defining the search/match criteria.
File Parser and CTM.
Defining data updates rules.
Setting up affiliation overrides for a data update rule.
Setting up CTM transaction security.
|
Page Name |
Definition Name |
Navigation |
Usage |
|---|---|---|---|
|
Counter Setup |
SCC_AWS_FIX_CTRS |
|
Set up the max ID number for the Temporary Constituent ID. |
|
Transaction Setup |
SCC_TRANSAC_DTLS |
|
Define the transaction for an online transaction or an offline transaction. |
|
Search/Match Setup |
SCC_SEARCH_PARMS |
|
Define the Search/Match criteria for an online transaction or for running Search/Match manually from the Constituent Staging component. Not applicable for the user registration transaction. |
|
Data Update Rule Entry |
SCC_DUR_ENTRY |
|
Define the rules to update specific constituent data stored in the production tables, with incoming data from the staging records. Not applicable for the user registration transaction. |
|
Affiliation Overrides |
SCC_DUR_AFL_OVRD |
|
Override a data update rule based on the affiliation the constituent has with the academic institution. Not applicable for the user registration transaction. |
Access the Counter Setup page ().
Image: Counter Setup page
This example illustrates the fields and controls on the Counter Setup page. You can find definitions for the fields and controls later on this page.
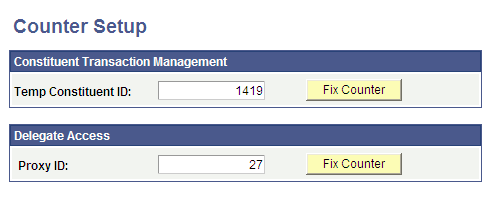
Constituent Transaction Management
The system automatically increments the Temp Constituent ID field by one when CTM generates a transaction. Set the last used number so that automatic numbering does not create numbers that already exist in the data.
|
Field or Control |
Definition |
|---|---|
| Temp Constituent ID |
Displays the last Temporary Constituent ID assigned. The system assigns a Temp Constituent ID when CTM generates a transaction. The value assigned is the value for the SCC_TEMP_ID key field. |
| Fix Counter |
Clicking this button resets the Temp Constituent ID based on the highest value of that field in the database. The field is dynamically found based on the PeopleTools metadata for the record field relationships, and the maximum possible value for that field across all possible records is set as the counter. This avoids the possibility of the system trying to reuse an ID and being polluted by pre-existing data. |
Delegate Access
The system automatically increments the Proxy ID field by one when a delegator creates a new proxy. Set the last used number so that automatic numbering does not create numbers that already exist in the data.
|
Field or Control |
Definition |
|---|---|
| Proxy ID |
Displays the last Proxy ID assigned. The system assigns a Proxy ID when a delegator creates a new proxy (new contact) in the Share My Information component. The value created is used programmatically and not displayed on pages. |
| Fix Counter |
Clicking this button resets the Proxy ID based on the highest value of that field in the database. The field is dynamically found based on the PeopleTools metadata for the record field relationships, and the maximum possible value for that field across all possible records is set as the counter. This avoids the possibility of the system trying to reuse an ID and being polluted by pre-existing data. |
Note
After you begin using the CTM functionality, you can access this page to determine the last number that was incremented for the Proxy ID or the Temporary Constituent ID. Manually changing this number is practical for the initial setup, but not recommended for further changes. If the ID entered is changed to an existing number, the system will attempt to re-use the ID. Instead use the Fix Counter button.
Access the Transaction Setup page ().
The following is an example of how a delivered CTM transaction involving both constituent and transaction-specific data can be set up (note that the Transaction Handler section contains an application class specific to the created admissions transaction):
Image: Transaction Setup page (1 of 2)
This example illustrates the fields and controls on the Transaction Setup page (1 of 2). You can find definitions for the fields and controls later on this page.
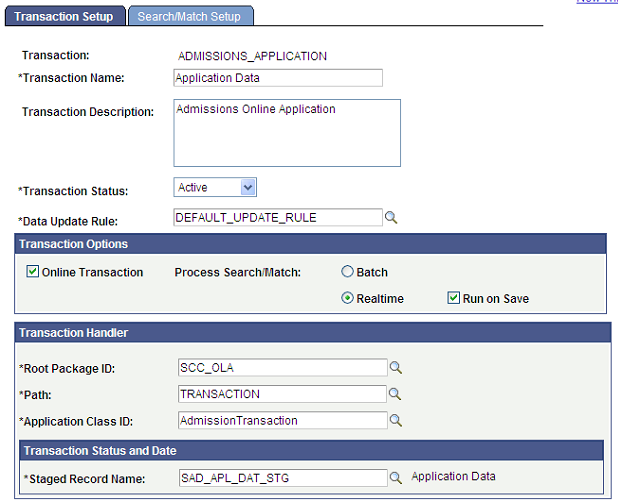
Image: Transaction Setup page (2 of 2)
This example illustrates the fields and controls on the Transaction Setup page (2 of 2). You can find definitions for the fields and controls later on this page.

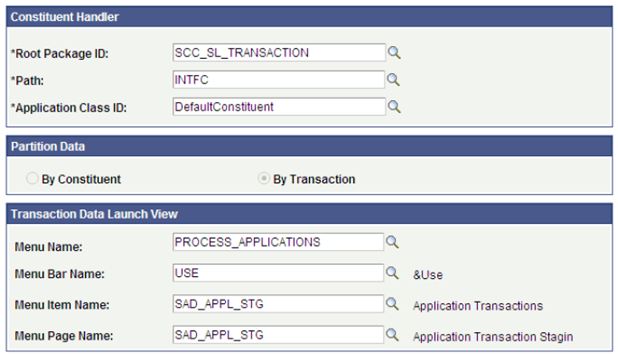
The following is an example of how a delivered CTM transaction involving only constituent data can be set up. Note that the Transaction Handler section contains the delivered application class handling only the constituent data and the data is partitioned By Constituent (because no transaction-specific data exists, selecting By Transaction is not logical):
Image: Transaction setup involving only constituent data (1 of 2)
This example illustrates the fields and controls on the Transaction setup involving only constituent data (1 of 2). You can find definitions for the fields and controls later on this page.
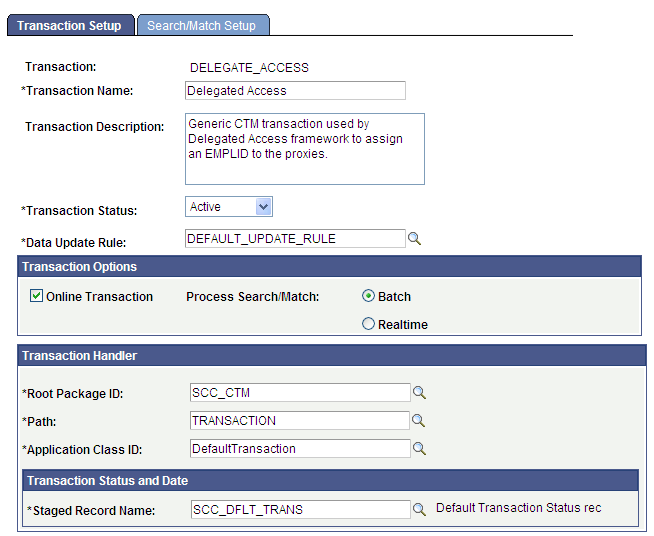
Image: Transaction setup involving only constituent data (2 of 2)
This example illustrates the fields and controls on the Transaction setup involving only constituent data (2 of 2) . You can find definitions for the fields and controls later on this page.
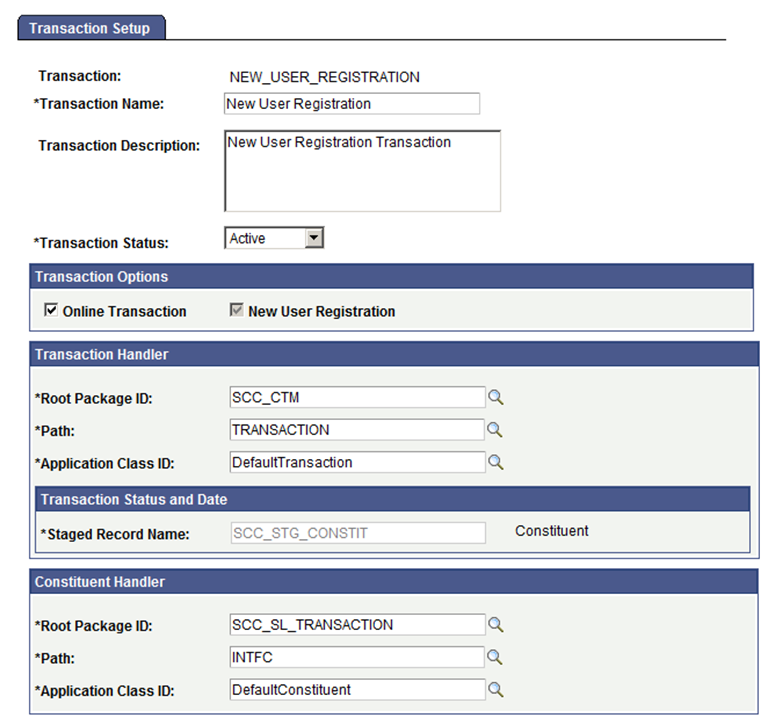
The following is how the delivered New User Registration transaction is set up:
Image: Transaction Setup page: New User Registration transaction
This example illustrates the fields and controls on the Transaction Setup page: New User Registration transaction. You can find definitions for the fields and controls later on this page.
|
Field or Control |
Definition |
|---|---|
| Transaction |
Indicates the transaction code. You specify the transaction code when you add a transaction. |
| Transaction Status |
Activate or inactivate the transaction. The field is used for informational purpose only. No coded logic is delivered with this field. |
| Data Update Rule |
Select the data update rule that you want the system to apply to the constituent data managed by this transaction. You define a data update rule in the Data Update Rule Entry page. |
Transaction Options
|
Field or Control |
Definition |
|---|---|
| Online Transaction |
Select to indicate that the transaction is performed online by a user. For example, an online transaction occurs when an applicant saves or submits an admission application through AAWS. Clear this check box to indicate that the transaction is performed offline by a user. For example, an offline transaction occurs when you use File Parser to load applications from a text file. |
| New User Registration |
Select to indicate that the transaction is used to perform registration and authentication of a new user. If you select this check box, the system hides the Search/Match Setup tab, the Partition Data group box, and the Transaction Data Launch View group box, because they are not applicable for a new user registration transaction. Note: Your system allows for only one transaction to be set as new user registration at a time. The NEW_USER_REGISTRATION transaction is delivered with your system. Because of this restriction, the system hides the New User Registration check box for all other transactions. Do not modify the NEW_USER_REGISTRATION transaction name because the system uses the name to register a user account. |
| Batch |
Select if you do not want the system to immediately process Search/Match when the data is individually submitted. If you select this option, the system stores the submitted data in staging tables and you will need to run the Transaction Management process to run Search/Match and post the submitted data to Campus Solutions. When you deselect the Online Transaction check box, the system automatically selects and disables the Batch option. In other words, because the transaction will be processed offline, Search/Match can only be processed by Batch. |
| Realtime |
Select to have the system immediately process Search/Match when the data is saved or submitted from an online transaction. |
| Run on Save |
This check box appears if the Realtime check box is selected. Select this check box if you want the system to immediately run Search/Match when a user saves a transaction. Clear this check box if you want the system to immediately run Search/Match when a user submits a transaction. Warning! Selecting Run on Save will trigger Search/Match immediately after user saves the transaction. Make sure your user interface requires sufficient personal information to be entered so that there is enough data to populate the search criteria used by Search/Match. Otherwise, Search/Match could create a new ID or update an existing record with erroneous or missing information. Any subsequent saves prior to submit will update production constituent data if an EMPLID is assigned dependent on your data update rule settings. |
Transaction Handler
A transaction can contain generic information about a constituent (such as names, addresses, and date of birth), as well as data specific to the transaction. For example, an admission online application transaction will include personal information (constituent data) and application data (transaction data). You can use the Transaction Handler group box to define how the system should handle all the transaction data. You can create your own PeopleCode application class handler for the transaction data and then associate that application class with the transaction in this group box.
For information on creating an application class, see Developer Reference for Creating a New CTM Consumer, “Step 7: Setting Up a Transaction.”
The following table lists the delivered transaction handler values and Staged Record Name value for the New User Registration transaction (NEW_USER_REGISTRATION) or for transactions that only involve constituent data. Do not change these values for New User Registration.
|
Root Package ID |
Path |
Application Class ID |
Staged Record Name |
|---|---|---|---|
|
SCC_CTM |
TRANSACTION |
DefaultTransaction |
SCC_STG_CONSTIT |
The following table lists the delivered transaction handler values and Staged Record Name value for transactions that only involve constituent data.
|
Root Package ID |
Path |
Application Class ID |
Staged Record Name |
|---|---|---|---|
|
SCC_CTM |
TRANSACTION |
DefaultTransaction |
SCC_DFLT_TRANS |
Transaction Status and Date
The system needs a record in transaction staging tables where it can store the status of the transaction (SCC_TRANS_STS) as well as the transaction status date (SCC_TRANS_STS_DT). These two fields keep track of the status of the transaction code and time stamp of any changes in staging records. The Staged Record Name field indicates the record where the transaction status and the transaction status date are stored.
The transaction staging record you select here must include the following fields:
SCC_TEMP_ID (key field)
SCC_TRANSAC_CD
SCC_TRANS_STS
SCC_TRANS_STS_DT
SCC_AUDIT_SBR record for audit tracking
Any other fields related to your transaction
Note: The NEW_USER_REGISTRATION transaction is an exception to the above rule. The transaction is set up with the Staged Record Name SCC_STG_CONSTIT that does not contain the SCC_TRANS_STS and the SCC_TRANS_STS_DT fields. The reason is that a New User Registration transaction can either be posted or not. Therefore, its transaction status gets automatically set to Posted. The record stores the constituent staging status field value (SCC_STG_STATUS) and the constituent staging status date field value (SCC_STG_STS_DT) for the New User Registration transaction. SCC_STG_CONSTIT is also used across all CTM transactions as it holds basic constituent data used inside the Constituent Staging component.
SCC_DFLT_TRANS is another delivered staged record name that can be used for transactions that only involves constituent data (the data manipulated inside the transaction is only applicable to constituent information, not to any transaction-specific data).
For an example of how a staging record name is created and used for CTM transactions involving both constituent and transaction-specific data, review the delivered AAWS admissions transaction staging record SAD_APL_DAT_STG.
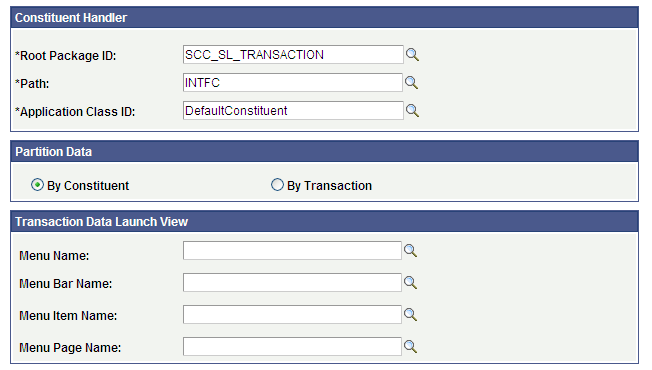
Constituent Handler
Use the Constituent Handler group box to define how the system should handle the constituent data in a transaction. You can create your own PeopleCode application class handler for the constituent data and then associate that application class with the transaction in this group box.
The default application class that handles the constituent data is delivered with the system. You can modify this application class or create a new application class.
The following table lists the default constituent handler values. You should always use these values when defining the constituent handler values for an online transaction or batch load transaction.
|
Root Package ID |
Path |
Application Class ID |
|---|---|---|
|
SCC_SL_TRANSACTION |
INTFC |
DefaultConstituent |
Partition Data
Use the following options to indicate how the system should maintain the data in the staging tables.
|
Field or Control |
Definition |
|---|---|
| By Constituent |
Select this option to have the system maintain only one instance of the constituent data for all transactions of the constituent (that is, One Constituent : Multiple Transactions ratio). This means that constituent data updates performed within a single transaction are visible across all other subsequent transactions. An example of the By Constituent impact: An applicant (user ID: Gina) has used an online application to register for a user account and then, later on, saved or submitted four admission applications. The system creates a total of five transactions for Gina, one transaction for user registration and four transactions for the four applications. For all the five transaction records, the system maintains a single constituent record. Gina updates her email address when saving or submitting the fourth application. The system updates Gina’s constituent record with the new email address. |
| By Transaction |
Select this option to have the system maintain a separate instance of constituent data for every transaction of the constituent (that is, One Constituent : One Transaction ratio). This means that constituent data updates performed within a single transaction are not visible across all other transactions. An example of the By Transaction impact: An applicant (user ID: Jason) has used an online application to register for a user account and then, later on, saved or submitted four admission applications. The system creates a total of five transactions for Jason. For all the five transaction records, the system maintains five constituent records of Jason. Jason updates his email address when saving or submitting the fourth application. The system updates Jason’s constituent record related to the fifth transaction with the new email address but does not update his other four constituent records. |
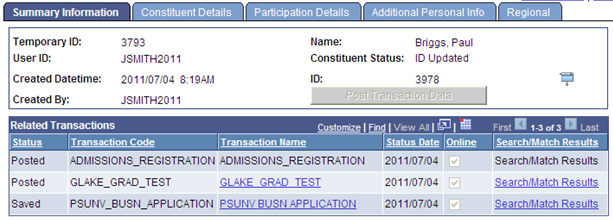
If you have selected By Constituent, the Summary Information page of the Constituent Staging component displays multiple transaction rows in the Related Transactions region (if multiple transactions exist for the constituent). When you search for transactions of a user who has multiple By Constituent transactions, the Constituent Staging component automatically displays the Summary Information page of the user with the related transactions. In the following example, the partition data by constituent option has been selected for the GLAKE_GRAD_TEST and PSUNV_BUSN_APPLICATION transactions and, therefore, the Summary Information page displays for the constituent Paul, the two application transactions he applied to, on a single page.
Image: Partition Data By Constituent (Summary Information page)
This example illustrates the fields and controls on the Partition Data By Constituent (Summary Information page). You can find definitions for the fields and controls later on this page.
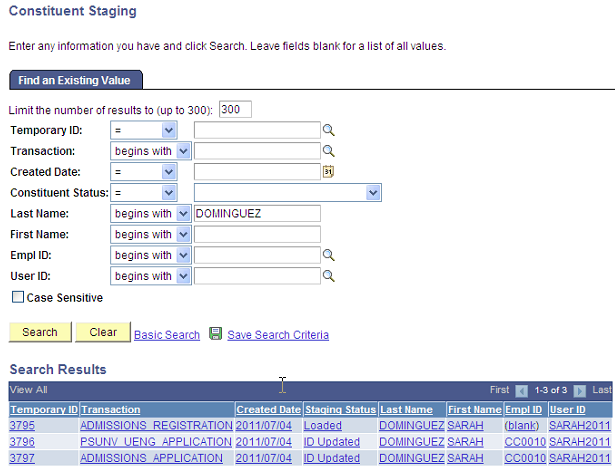
If you have selected By Transaction, the Summary Information page of the Constituent Staging component always displays only one transaction row in the Related Transaction region (even if multiple transactions exist for the constituent). When you search for transactions of a user who has multiple By Transaction transactions, the Constituent Staging component displays multiple search results. In the following example, the partition data by transaction option has been selected for the PSUNV_UENG_APPLICATION and ADMISSIONS_APPLICATION transactions and, therefore, the system displays multiple search results for the constituent Sarah Dominguez.
Image: Partition Data By Transaction (search results)
This example illustrates the fields and controls on the Partition Data By Transaction (search results). You can find definitions for the fields and controls later on this page.
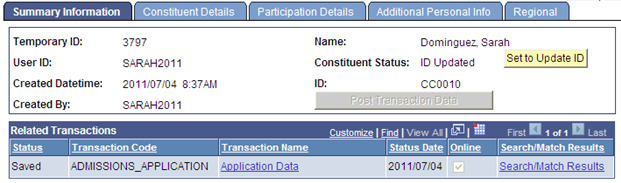
In the following example, you can see that the Summary Information page displays only one application transaction for the constituent because the partition data by transaction option has been selected for the ADMISSION_APPLICATION transaction:
Image: Partition Data By Transaction (Summary Information page)
This example illustrates the fields and controls on the Partition Data By Transaction (Summary Information page). You can find definitions for the fields and controls later on this page.
If you have selected the partition by transaction option, the system assigns a unique temporary ID to each transaction that the system generates for the constituent. If you have selected the partition by constituent option, the system assigns a unique temporary ID to all the transactions that the system generates for the constituent.
For information about the Constituent Staging component, see Processing Staged CTM Transactions.
For the New User Registration transaction, partitioning is not applicable.
Note: When using the administrator mode, the system always generates a temporary ID for each application that an administrator creates, regardless of whether you have selected the By Transaction or By Constituent option. In other words, the system does not support partition by constituent for the administrator mode.
Note: When creating multiple transactions that use the same transaction staging records, we recommend setting those transactions with the same partitioning option. For instance if you choose to partition by Transaction, do so for all of those transactions. If your choice is partition by constituent, the same applies. You create multiple transactions if you want to use different Data Update Rule values, different Search/Match configuration, or if you added your own logic based on transaction name.
Transaction Data Launch View
This group box indicates the location of the staging component created for the transaction. The information given here allows users to access the transaction staging component by clicking a link on the Constituent Staging component. This link that transfers the user to the transaction staging component is labeled with the Transaction Name. The link is displayed on the Related Transactions grid of the Summary Information page of the Constituent Staging component.
The Transaction Data Launch View group box is not available for user registration. Therefore, by default, the Summary Information page does not display a link for the user registration transaction.
For information about the transfer link, see Processing Staged CTM Transactions, “Reviewing Constituent Information.”
Access the Search/Match Setup page ().
Image: Search/Match Setup page
This example illustrates the fields and controls on the Search/Match Setup page. You can find definitions for the fields and controls later on this page.
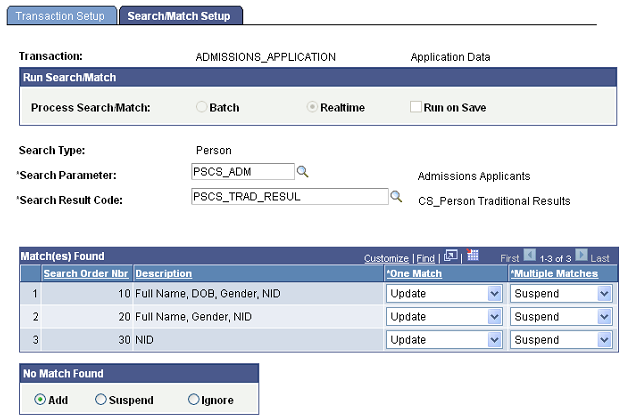
Each transaction has its own Search/Match configuration. This allows for flexibility.
Note: The words “Parameters Refreshed” appear if this is the first time you have entered this page, or if the setup of any of the parameters on this page changed since the last time you accessed this page.
|
Field or Control |
Definition |
|---|---|
| Batch, Realtime, and Run on Save |
Indicates the Search/Match options you have selected on the Transaction Setup page. For more information, see Setting Up a Transaction. |
Select a Search Type, Search Parameter, Search Result Code, and other search fields as appropriate. The values selected on this page are used behind the scenes when Search/Match or External Search/Match is processed Realtime at the time the user saves or submits an online transaction and manually from the Summary Information page when an administrator triggers Search/Match by clicking the Search/Match Results link for a specific transaction.
To set up Search/Match when set to process by Batch, the information given here is defaulted inside the Transaction Manager run control component and can be modified from there. For more information, see “Specifying Search/Match Parameters for Batch Processing.”
Regardless of how Search/Match is initiated, the SCC_SL_SM_RSLT table is created. This table stores the Search/Match results: Temporary ID, Transaction Code, number of matches found, Constituent Status, and the last matched EMPLID. If Search/Match results match multiple EMPLIDs, EMPLID is not stored. If the results match only one EMPLID and the Constituent Status is ‘Update ID’, then the EMPLID is updated with the EMPLID that was matched. To view the Search/Match results, you must query the SCC_SL_SM_RSLT table. The record SCC_SL_SM_RSLT has been added to QUERY_TREE_CC.
Note: Transaction Manager supports only person searches at this time. Therefore, the Search Type field defaults to Person and only Search Parameter and Search Result Code values set up for Person are valid.
For information about setting up Search/Match rules, order, parameters, and results, see Setting Up Search/Match.
Match(es) Found
This group box contains one row for each search rule defined in the Search Parameter selected. Define Search/Match orders and Search/Match rules on the Search/Match Rule page.
|
Field or Control |
Definition |
|---|---|
| Search Order Nbr (search order number) |
For each order number, select what you want to do with the incoming record if the search/match/post process discovers one or more matching records. |
| One Match and Multiple Matches |
Select whether you want to add, update, suspend, or ignore matching records:
|
No Match Found
Select one of the following options to specify what Search/Match should do when it does not find a matching record in your database or the external system if you use External Search/Match:
Add: Add the unmatched record, including personal data, to your database.
Suspend: Keep the unmatched record in the staging tables to be looked at manually. Use the Constituent Staging component to review the record.
Ignore: Ignore the unmatched record completely. Use the Constituent Staging component to review the record. . No changes are made to the Constituent Status. It will remain as ‘Loaded’.
Note: You cannot define a Search/Match setting for the user registration transaction. The new user registration feature does not ask the user enough personal information for creating a new ID. Also, a new user may create a user ID and password without ever coming back to fill out an online application. The information entered as part of the new user registration process is therefore kept in the constituent data staging table until the user actually performs a transaction.
When creating an offline transaction (you did not select the Online Transaction check box on the Transaction Setup page), you can take advantage of the PeopleSoft File Parser utility to load data from an external file into Campus Solutions. The external file can be a delimited file or a flat file.
To load data from an external file perform the following steps:
Set up the CTM transaction (you will need the transaction code in the next step).
Set up File Parser definitions.
Run the File Parser process to load the data into staging tables.
Review the staged data.
Run the Transaction Management Process to post the staged data into the production records.
When setting up the offline CTM transaction on the Transaction Setup page (Set Up SACR, System Administration, Utilities, Constituent Transaction Mgmt), you must deselect the Online Transaction check box. The Batch option for processing Search/Match gets automatically selected.
This is an example of a CTM transaction set up for loading data in batch into the staging tables:
Image: Transaction Setup page: File Parser batch load transaction (1 of 2)
This example illustrates the fields and controls on the Transaction Setup page: File Parser batch load transaction (1 of 2). You can find definitions for the fields and controls later on this page.
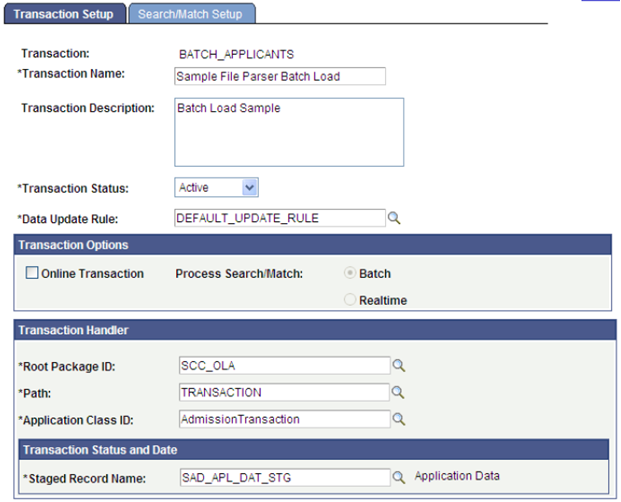
Image: Transaction Setup page: File Parser batch load transaction (2 of 2)
This example illustrates the fields and controls on the Transaction Setup page: File Parser batch load transaction (2 of 2). You can find definitions for the fields and controls later on this page.
When setting up File Parser, set up the desired transaction code for the batch load on the Mapping page of the File Mapping Definition component. You can set this code as a default value (by default, the SCC_TRANSAC_CD field in the SCC_STG_CONSTIT record stores the transaction code). The File Parser process can also retrieve the transaction code directly from the load file (in such a case, set the mapping action to Direct from file).
Also, it is required to at least include the following constituent staging records on the Context Definition page (Set Up SACR, System Administration, Utilities, File Parser, Context Definition):
SCC_STG_CONSTIT. It is required to set the following fields, even though they are not necessarily required in the record:
SUBMITTED – Default to N
SCC_TRANSAC_CD – Set according to Transaction Setup
SCC_STG_STATUS – Default to LD (Loaded)
SCC_STG_STATUS_DT – Default to %Date
SCC_SL_TRNMAP (Force Insert)
SCC_STG_NAMES
SCC_STG_PERSSA (should be set with Force Insert if no incoming fields are mapped)
Note: There might be transaction staging records that are also required to be defined on the Context Definition page. Review the related transaction entities using the Entity Registry component to determine the additional records.
Warning! When using a file to upload data into the staging records, do not populate the EMPLID field with a value that the system has not yet created in the production database. If you provide an EMPLID value that does not exist in the production database, the post process to production tables will fail (the EMPLID value passed will not be used to create a new EMPLID). The same is also true for the User ID (USERID field). The process will not create a User ID using the value entered in the file.
Data update rules allow you to define the conditions when the constituent staging data should update the constituent data in production records. Prior to promoting the staged data to production, CTM evaluates the data update rules specified for the transaction that is being processed.
A data update rule defines whether or how transactions can update constituent staging data in the constituent production tables. It is not used for the transaction-specific data. Also, the data update rule functionality is applicable only for actions performed through CTM and not for the actions that an administrative user performs using the Campus Solutions pages or components.
The following data update rule values are delivered with your system:
|
Data Update Rule |
Rule Name |
|---|---|
|
ADD_IF_BLANK_RULE |
Add If Blank Rule |
|
DEFAULT_UPDATE_RULE |
Default Update Rule |
|
DO_NOT_UPDATE_RULE |
Do Not Update Rule |
Those are samples and can be modified to accommodate your needs. When creating a new rule, you can use one of the delivered rules as a basis to create your desired update rule(s) by clicking the Copy button. To use the new rule, associate it with a transaction code on Transaction Setup page.
Data update rules are set at the entity level, not at the staging record level. Only the entities where Apply Data Update Rule is selected can be defined as part of a Data Update Rule. Therefore, when adding a new data update rule, the Data Update Rule Entry page displays all those entities for which the Apply Data Update Rule check box is selected. This check box is available on the Entity Registry page (Set Up SACR, System Administration, Entity, Entity Registry). For those entities that you are not using as part of your transaction, set the Update Action to Do Not Update so you do not unintentionally blank or zero out data that may be populated by other business processes.
In the case of effective-dated entity data such as Biographical History: If data update rules allow the data in the Campus Solutions system to be updated but the incoming data is same as the data already in the system, then a new EFFDT row is Not created (no data update occurs). Suppose, you have set up a rule that gender can be updated by an online transaction. The system has the latest biographical history record, effective-dated April 26, 2009, with information such as Gender as Female and Marital Status as Single. The applicant on April 27, 2009 submits the same biographical history information such as Gender as Female and Marital Status as Single. In this case, because the information is the same, the system does not enter a new effective-dated row. The latest effective-dated row remains the same in the PeopleSoft system, which is April 26, 2009.
Warning! You must define the data update rules for any new entity that has been added through the Entity Registry page where the Apply Data Update Rule check box is selected. Additional coding is also necessary to incorporate a new entity into the data update rules.
The following entity names are child entities of the Constituent entity. They are not applicable for data update rules due to their key structures.
|
Entity |
Keys |
Notes |
|---|---|---|
|
Person Relationship (and its child records) |
EMPLID, RELATIONSHIP_NBR and EFFDT |
A new record row is always inserted. Exception: Relationship Type = Spouse
Creation of reciprocal relationships is not included as part of CTM. |
|
Publications |
EMPLID and PUBLICATION_NBR |
A new record row is always inserted. |
|
Work Experience |
EMPLID and SEQUENCE_NBR |
A new record row is always inserted. |
|
Honors and Awards |
EMPLID and DT_RECVD |
A new record row is always inserted. |
Note: Data Update Rule is not applicable for the New User Registration transaction (NEW_USER_REGISTRATION).
Warning! Data Update Rule is only applicable for updating constituent production records with the constituent staging data. It is not applicable to update the transaction production records.
Access the Data Update Rule Entry page ().
Image: Data Update Rule Entry page (1 of 4)
This example illustrates the fields and controls on the Data Update Rule Entry page (1 of 4). You can find definitions for the fields and controls later on this page.
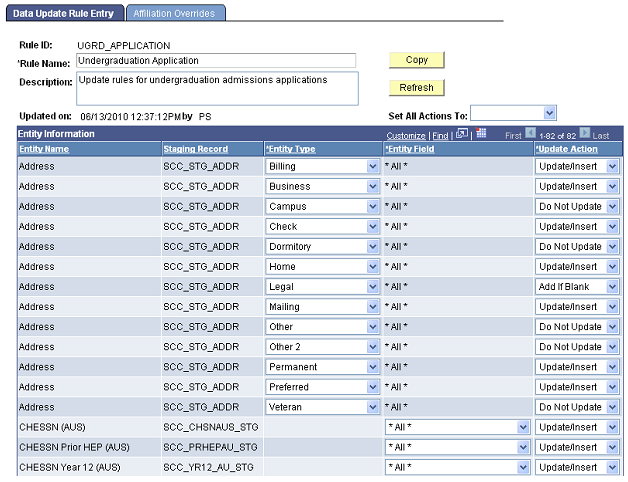
Image: Data Update Rule Entry page (2 of 4)
This example illustrates the fields and controls on the Data Update Rule Entry page (2 of 4). You can find definitions for the fields and controls later on this page.
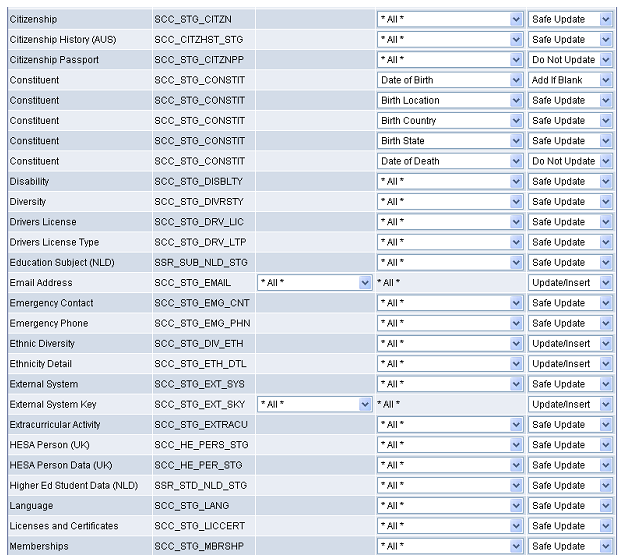
Image: Data Update Rule Entry page (3 of 4)
This example illustrates the fields and controls on the Data Update Rule Entry page (3 of 4). You can find definitions for the fields and controls later on this page.
Image: Data Update Rule Entry page (4 of 4)
This example illustrates the fields and controls on the Data Update Rule Entry page (4 of 4). You can find definitions for the fields and controls later on this page.
|
Field or Control |
Definition |
|---|---|
| Copy |
Click to access the Copy Data Update Rule page and copy an existing rule’s settings to the new rule. |
| Refresh |
Click to refresh the entities populated on the Data Update Rule Entry page. When you click the button, a message appears indicating which entities have been added or removed from the page. For example, suppose you added a new entity and selected the Apply Data Update Rule check box on the Entity Registry page. In such a case, you must click the Refresh button to populate the Data Update Rule Entry page with this new entity. Conversely, you cleared the Apply Data Update Rule check box on the Entity Registry page for an entity. In such a case, you must click the Refresh button to remove the entity from the Data Update Rule Entry page. |
| Set All Actions To |
Select an update action that you want to apply for all the entities. The update actions you can select are Add If Blank, Do Not Update, Safe Update (applicable for only non-type entities) and Update/Insert. |
| Entity Name |
Displays the name of the entity as defined on the Entity Registry page. |
| Staging Record |
Displays the staging record where the system stores the incoming entity data from a transaction. You define a staging record for an entity on the Entity Registry page. |
| Entity Type |
This field is only available for entities with multiple types, such as Address (Address Types) and Name (Name Types) entities. The default value is All. Select Show All Types to display all the types for an entity. Select this value if you want to specify a different update action for one or more types of an entity. For example, suppose you want to enter Update/Insert update action for campus address and Add If Blank update action for all the other address types (such as home or billing). In such a case, select Show All Types for the Address entity and specify the update action for each address type. Select All if you do not want to display all the types for an entity. Select this value if you want to specify the same update action for all the types of an entity. For example, select All if you want to enter Update/Insert update action for all the address types (such as campus, home and billing). Warning! Do not confuse the meaning of entity type described here with the Entity Type defined in the Entity Registry component. In the context of Data Update Rule, entity type refers to the types included inside certain data fields. For example Names has different types, so do Addresses, Phone, and Email Address. |
| Entity Field |
This field is only available for entities that do not have any types, such as Constituent and Diversity entities. Select Show All Fields to display all the non-key fields of an entity. Select this value if you want to specify a different update action rule for one or more fields of an entity. For example, suppose you want to enter Do Not Update as the update action for Date of Birth field and enter Add If Blank update action for rest of the Constituent fields (such as Birth Location or Birth Country). In such a case, select Show All Fields for the Constituent entity and specify the update action for each Constituent field. When you select Show All Fields, Entity Field displays the long description for each of the non-key fields contained in the production record listed for the Entity Name in the Entity Registry component. Note: The Show All Fields option does not display the key fields because key fields cannot be overridden or updated. |
For information about defining an entity name (entity), see Setting Up Entity Registry.
Update Action
Identify what the system should do when it posts the entity data to the production records of an existing constituent:
Select Add If Blank to add the entity data only if the constituent does not have the entity data. For example, suppose you have assigned Add If Blank to the Home Email Address entity type for the graduate application transaction. The email address staging record contains a Home email address for a particular Temporary ID. In the case where that constituent does not have a home email address on the email address production record of the database, the system adds the constituent’s home email address to the database. If the constituent already had a Home email address, the staged value will not update the production record since it is not blank (a value already exists).
Note: For the Update Action Add if Blank, an existing Gender of Unknown is considered to be blank and will be updated. As well, if the National ID is populated with the Country Default (XXX-XX-XXXX for example), it is considered to be blank and will be updated.
Select Do Not Update to prevent the constituent’s entity data from being updated. For example, suppose you have assigned Do Not Update to the National ID entity for the graduate application transaction. The National ID staging record contains a National ID for a particular Temporary ID. In the case where that constituent already has a National ID on the National ID production record of the database, the system does not update the applicant’s existing National ID.
Note: Do Not Update is the default value for all the entity names.
Note: Keep in mind the relationship of a field to another field when defining your update actions for individual fields in an entity. For example, do not set State/Province to Update/Insert if you have Country set to Do Not Update. If the system already has a Country value of Canada and a Province value of Alberta, but the incoming data has a Country value of Australia and a Province value of Tasmania, you will get an error when posting the data as Tasmania is not a valid Province for Canada.
Warning! Note that if the Do Not Update action is selected for an entity or an entity field, the data will not be posted even if data does not exist on the production record.
Select Safe Update to update or insert the constituent’s entity data only if the incoming data is populated. This action is available only for entities without a type. If the entity data has an effective date, then the system inserts new effective-dated rows but does not overwrite existing fields with blank or zero. If the entity data does not have an effective date, then the system updates the existing record only for the fields where incoming data is populated. For example, suppose you have assigned Safe Update to the Constituent entity for the graduate application transaction. The system receives a graduate application with only Date of Birth and Birth Country populated for the Constituent entity. Birth State and Birth Location are not populated as part of the incoming data. The applicant already has Date of Birth, Birth Country, Birth State and Birth Location on the production record of the database. In such a case, the system updates Date of Birth and Birth Country with the incoming data but will not update Birth State and Birth Location as these fields are not populated as part of the incoming data.
For Safe Update specifically, handling of blanks or zero values in incoming data is as follows:
For TYPED data, being entities with a built in Type (such as Names and Addresses), the blanking out of fields during update is allowed as these entities are atomic in nature and must be updated as a single unit. For this reason, Safe Update is not shown as an option for entities with a Type.
For EFFDT and non-EFFDT entities (which are not typed), we will not blank out or set an existing field to blank or zero if Safe Update is selected as the update action. For example, on your transaction, you require Birth Date and Birth Country to be completed but you do not have Birth Location or Birth State/Province on your transaction. The existing record has values populated for Birth Location and Birth State/Province. By selecting Safe Update, the values for Birth Location and Birth State/Province will not be updated to blank when the transaction data is posted.
Select Update/Insert to update or insert the constituent’s entity data, even if the incoming and existing values are the same. If the entity data has an effective date, then the system inserts a new effective-dated row if the incoming data differs from the current effective-dated row. If the entity data does not have an effective date, then the system updates the existing record.
For Update/Insert specifically, handling of blanks or zero values in incoming data is as follows:
For TYPED data, being entities with a built in Type (such as Names and Addresses), the blanking out of fields during update is allowed as these entities are atomic in nature and must be updated as a single unit.
For EFFDT and non-EFFDT entities (which are not typed), we allow the blanking or zero set of entity fields for the Update/Insert Data Update Action. For this reason, care should be taken for each entity or field when selecting this option. There may be circumstances where it is appropriate that incoming data blank out or set a field to zero and other cases where this is not appropriate.
Warning! Note that the Update/Insert action will update character-based fields to blank or null and numeric fields to zero if the field is not populated on the incoming entity. For example, suppose you have assigned Update/Insert to the Constituent entity for the graduate application transaction. The system receives a graduate application with only Date of Birth and Birth Country populated for the Constituent entity. Birth State and Birth Location are not populated as part of the incoming data. The applicant already has Date of Birth, Birth Country, Birth State and Birth Location on the production record of the database. In such a case, the system updates the applicant’s existing Date of Birth and Birth Country with the incoming data but will also update Birth State and Birth Location to blank. For this reason, use caution when selecting the Update/Insert action to prevent existing data from being updated to blank or zero. In the example above, if you do not want the Birth State and Birth Location to become blank, you should select the Update Action of Safe Update.
Access the Affiliation Overrides page ().
Image: Affiliation Overrides page
This example illustrates the fields and controls on the Affiliation Overrides page. You can find definitions for the fields and controls later on this page.
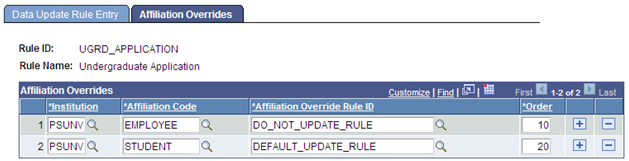
Use the Affiliation Overrides page to have the system update constituent data based on the affiliation the institution has with the constituent.
Warning! To use Affiliation Overrides, Transaction Setup must be set to Partition by Transaction, Institution must be a field for the Staged Record Name entered in the Transaction Status and Date section of Transaction Setup, and the Affiliation Overrides page must be set up.
|
Field or Control |
Definition |
|---|---|
| Rule Name |
Displays the name of the rule given in the Data Update Rule Entry tab. |
| Institution and Affiliation Code |
Enter the academic institution and affiliation for which you want to override the rule defined on the Data Update Rule Entry page. For example, suppose for a rule name UGRD_APPLICATION you have defined an Update/Insert update action for the Home Address entity type. For the same rule, UGRD_APPLICATION, you can specify that if the system receives a CTM transaction set with this rule name and the constituent has an affiliation of Employee for the PSUNV institution, apply a different rule that has an update action of Do Not Update for the Home Address entity type. |
| Affiliation Override Rule ID |
Enter the overriding rule for the academic institution and affiliation combination. |
| Order |
Indicate the order in which you want the system to check the override rule. The system applies the Affiliation Override Rule ID for the affiliation assigned to the constituent using the following criteria:
For example, if you have defined an override rule for PSUNV and Employee with order number 10 and another rule for PSUNV and Student with order number 20, the system evaluates the Employee rule before the Student rule. If the constituent has active affiliations for both Employee and Student, the system applies the override rule for Employee. If the constituent has an active affiliation for only Student, the system applies the override rule for Student. If the constituent does not have an affiliation for either Employee or Student, the system applies the base update rule. |
Access the CTM Transaction Security page ().
Image: CTM Transaction Security page
This example illustrates the fields and controls on the CTM Transaction Security page. You can find definitions for the fields and controls later on this page.
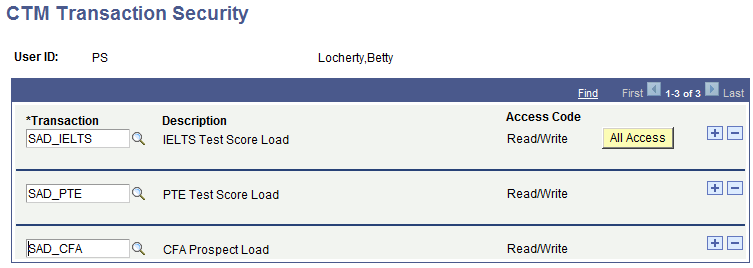
The Transaction Security page controls access to components and processes using CTM transaction codes.
|
Field or Control |
Definition |
|---|---|
| Transaction |
Select the transaction codes to which this user should have access. |
| Access Code |
The access code is set to Read/Write. You cannot change this. |
| All Access |
Click to assign this ID access to all transaction codes. |
Note: Currently, the CTM Transaction Security page controls access to only the Prospect/Admissions Staging and Constituent Staging components within the Student Recruiting, Prospect/Admissions Data Mgmt menu. In addition, the Transaction Code prompt on the CTM Transaction Purge process is controlled by this security.