Processing Staged CTM Transactions
CTM is a framework that manages staged data for a transaction and how this data gets validated and moved to the proper production tables. The staged data must be reviewed in two separate components:
The Constituent Staging component (delivered with your system).
The transaction staging component (delivered with your system for fully implemented transaction, for instance, the Application Transactions staging component delivered with AAWS, or created by you if you create your own CTM consumer).
Use the Constituent Staging component to review or edit the constituent data stored in the constituent staging tables. The component includes a link that enables you to access the transaction staging component. The transaction staging component shows the data from the staging records used for the transaction. You either create this component (if you created a CTM consumer that has not been delivered with the system) or you use the transaction components delivered with the system. For example, with AAWS we delivered the Application Transactions component (SAD_APPL_STG) to allow viewing and editing the application transaction staged data prior to posting it to the appropriate production tables.
See Developer Reference for Creating a New CTM Consumer , “Step 5: Creating a Transaction Staging Component – Optional.”
The staging tables are holding tables and are separate from the core production records. Any data changes you make in the staging components gets posted to the core production records when the posting process is executed (real time, manually, or by batch) depending on data update rules. You can use these components to review the information stored in the staging tables at any time. For example, you might prefer to look at the transaction data immediately after the system loads it into the staging tables or after posting. This data is no longer editable once all transactions related to the constituent record have a transaction status of Posted or Cancelled.
This section discusses:
Reviewing constituent information.
Reviewing constituent error messages.
Constituent statuses.
Transaction statuses.
Reviewing constituent details.
Reviewing constituent participation details.
Reviewing constituent's additional personal information.
Reviewing constituent's regional information.
Running the Transaction Management process.
Note: The search record for the Constituent Staging component is not restrictive. If your administrators have access to the component, they will see all of the transactions performed. If you want to restrict the information a user can see, you can create your own search record and add the Constituent Staging component to a menu name specific to the transactions. For example, for AAWS admission transactions, we delivered the Constituent Staging component inside an admissions menu name and the search record has been cloned to include application center security.
|
Page Name |
Definition Name |
Navigation |
Usage |
|---|---|---|---|
|
Summary Information |
SCC_STG_CONST_STG |
|
Review the constituent status for a specific Temporary ID, the constituent error messages, and the transactions performed for or by the user. Run the search/match/post process or post the transaction data. Manually trigger Search/Match to review the list of potentially matching candidates. |
|
Constituent Details |
SCC_STG_CONST_DTLS |
|
Review and edit the personal information loaded in the constituent staging records for a specific Temporary ID. Personal information includes data such as names, date of birth, national ID, and address. |
|
Participation Details |
SCC_STG_PARTICIP |
|
Review and edit the participation details loaded in the constituent staging records for a specific Temporary ID. Participation details may include information such as work experience and honors and awards. |
|
Additional Personal Info |
SCC_STG_ADDITION |
|
Review and edit the additional personal information loaded in the constituent staging records for a specific Temporary ID. Additional personal information may include citizenship details and emergency contacts. |
|
Regional |
SCC_STG_REGIONAL |
|
Review and edit the regional information loaded in the constituent staging records for a specific Temporary ID. |
|
Selection Parameters |
SCC_SL_SMP |
|
Enter selection parameters for running the Transaction Management process. You can run search, match, and post for saved and submitted transactions in the staging records. Also, you can process a transaction for a single person, all persons, or use Population Selection to select a subset of Temporary IDs in the staging records. Before you post the data, set up the Search/Match parameters on the Search/Match Parameters page. |
|
Search/Match Parameters |
SCC_SL_SMP_PARM |
|
Set up the Search/Match parameters for the Transaction Management process. These are the rules that determine what the post process should do with the staging record after the Search/Match process is complete. The page defaults the Search/Match parameters entered in the Transaction Setup component for the Transaction Code selected. |
Access the Summary Information page ().
Image: Summary Information page
This example illustrates the fields and controls on the Summary Information page. You can find definitions for the fields and controls later on this page.
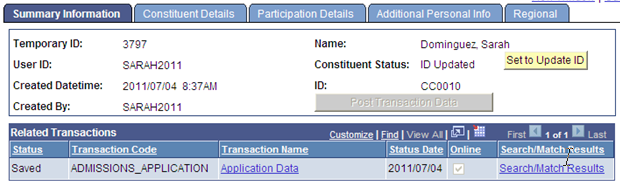
When a Search/Match is initiated, the SCC_SL_SM_RSLT table is created. This table stores the Search/Match results: Temporary ID, Transaction Code, number of matches found, Constituent Status, and the last matched EMPLID. If Search/Match results match multiple EMPLIDs, EMPLID is not stored. If the results match only one EMPLID and the Constituent Status is ‘Update ID’, then the EMPLID is updated with the EMPLID that was matched. To view the Search/Match results, you must query the SCC_SL_SM_RSLT table. The record SCC_SL_SM_RSLT has been added to QUERY_TREE_CC.
|
Field or Control |
Definition |
|---|---|
| Temporary ID |
Displays the auto-generated number. The system assigns this number depending on whether you partitioned the transaction either by constituent or by transaction on the Transaction Setup page. If you have selected the partition by constituent option, a single Temporary ID is associated to all the transactions of the individual. If you have selected the partition by transaction option, the system assigns a new Temporary ID to each transaction of the individual. Note: Temporary ID is also known as Constituent Temporary ID. It is the main key to the constituent and the transaction staging tables. Note: The auto-generated number is initially set up in the Counter Setup component. See the Setting Up CTM, “Setting Up Counter.” Note: The Temporary ID field is only used by CTM transactions whether it is in the staging records defined for CTM transactions or in the CTM logic. Its value is not reused anywhere else. For instance, the post process does not use this value to create an EMPLID. EMPLID is auto-generated and uses the Last Employee ID Assigned value. |
| Constituent Status |
Indicates the status of the constituent data in the staging table. This status controls when a transaction can be posted. See Processing Staged CTM Transactions, “Constituent Statuses.” Note: Do not modify the delivered values in any way. Any modifications to these values require a substantial programming effort. |
| ID |
Indicates the ID that will be used to post a transaction. ID value is determined either by the User ID that performs the transaction (in the case of returning users, the system retrieves the EMPLID value assigned to the user profile), the Search/Match process, or manually by an administrator if the search for duplicates was performed individually. Note that a returning user is a user that already has a User ID. |
| Run Search/Match/Post |
Click to run Search/Match and if an ID is identified, post the constituent data to the appropriate production records. The transaction data also gets posted for the transaction listed in the Related Transactions grid that are set with a Transaction Status of Submitted (indicates the transaction is ready to be posted). If Search/Match has already been run, an ID is identified and the transaction status is Submitted, the system displays the Post Transaction Data button instead of the Run Search/Match/Post button. Clicking the Post Transaction Data button posts the transactions listed in the Related Transactions grid that are set with a Transaction Status of Submitted. If all the transactions in the Related Transactions have a status of Posted, the system disables the Post Transaction Data button. |
Related Transactions
|
Field or Control |
Definition |
|---|---|
| Status |
Indicates the status of the related transactions performed for or by the Temporary ID. This status, along with the Constituent Status, controls when a transaction can be posted. Refer to the "Processing Staged CTM Transactions," Transaction Statuses section for details. Note: Do not modify the delivered values in any way. Any modifications to these values require a substantial programming effort. |
| <Transaction Name> |
Click to access the transaction staging component created for the transaction you clicked the link for. You can access the component only if you have security access to it. The system disables the link if the user does not have access to the target page. Note: The link name, by default, matches the name given to the transaction on the Transaction Setup component. In the preceding exhibit example — Summary Information page — you can see that the link is Application Data because for the ADMISSIONS_APPLICATION transaction the Transaction Name is set to Application Data on the Transaction Setup component. |
| Online (Online Transaction) |
Indicates whether this transaction was performed online or offline. For example, if the transaction is generated because a self-service user saved or submitted a transaction, the system selects this check box. If the transaction is generated because you have loaded staged data for multiple constituents using the File Parser utility (that is, offline transaction), the system does not select this check box. Note: A transaction is set up to be performed online or offline in the Transaction Setup page. |
| Search/Match Results |
Click to run Search/Match and manually review the matching candidates. Using this link, you do not need to enter any search data. Instead, the Search Parameter value defined in the Transaction Setup component for the transaction for which you clicked the link is used to identify the search fields and the data for these fields is retrieved directly from the staging records. The search results are displayed using the Search Results Code defined for that same transaction in the Transaction Setup component. If matches are found, the system displays the Integrated Search Results page. Else, a message saying that no result was found is shown. Note: The system does not display the Search/Match Results link for a New User Registration transaction. Note: The Search/Match function validates if External Search/Match is enabled or disabled. If enabled, the Search/Match function triggers External Search/Match. See: |
| Set To Update ID |
Click this button if inadvertently you or the system has created or updated the constituent data to a wrong ID and you want to repost the data with the correct ID. The button appears only when Constituent Status = New ID Created or ID Updated and none of the transactions listed in the Related Transactions grid have a status = Posted (other than the New User Registration transaction called NEW_USER_REGISTRATION). Note: If a transaction was posted with the wrong ID (transaction status = Posted), you need to first unpost the transaction, delete the created transaction and then you will be able to see the Set to Update ID button and change the ID. You unpost a transaction from the transaction staging component. |
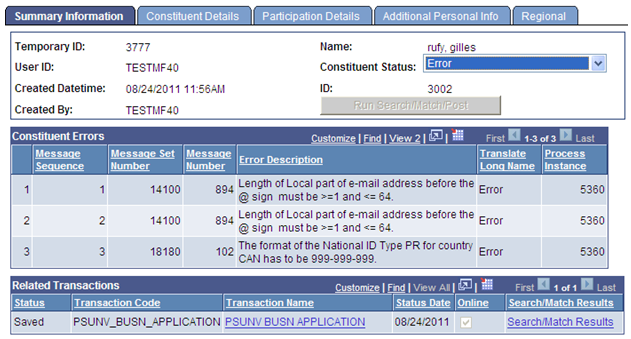
Constituent Errors
The Summary Information page displays the Constituent Errors section if the constituent status is Error.
Access the Summary Information page ().
When constituent data is loaded into the staging records, validation is in place to make sure valid data is entered. Errors can occur when a user saves or submits an online transaction, when an administrator enters data directly inside the Constituent Staging component, or when the data is loaded through batch (for example, using File Parser). When data is entered into the staging records, the system creates a transaction. A transaction might have an error status for the constituent (person) or the transaction-specific data record. For error indicators, look through both the components to find the erroneous field values and manually correct it. When an error is detected, components display an error grid with the proper error message.
For example, suppose an administrative user updates a Temporary ID’s information with an invalid email address and an invalid National ID value. At component save time, data validation is performed. If an error is found, the Constituent Status is set to Error and the Constituent Staging component displays the appropriate error messages inside the Constituent Errors grid in the Summary Information page.
Note: The Constituent Staging component only validates and displays the errors related to the constituent data. The errors related to the transaction-specific data are displayed on their respective staging component. For an example, see Understanding Staged Admission Transactions Processing.
Here is an example of constituent errors that the Constituent Staging component displays:
Image: Example of constituent errors displayed in the Constituent Staging component
This example illustrates the fields and controls on the Example of constituent errors displayed in the Constituent Staging component. You can find definitions for the fields and controls later on this page.
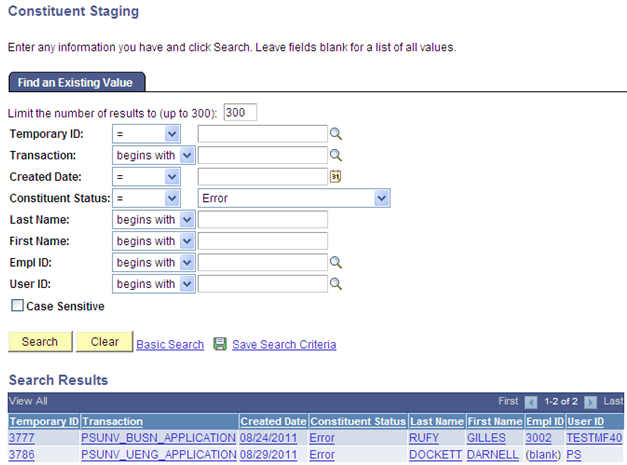
The Temporary IDs that are assigned a Constituent Status of Error need to be manually reconciled. You correct the errors directly in the component and save. If the validation process does not find further errors, the system changes the Constituent Status to Loaded, ready to go through the posting process. You can run the posting process manually by clicking the Run Search/Match/Post button (enabled when data is eligible for posting), or by running the Transaction Management process.
Note: To easily retrieve the Temporary IDs that need manual reconciliation, use the component search record and select Constituent Status of Error. The search record returns all the Temporary IDs with that status.
The following example shows the Temporary IDs with error status after a search:
Image: Example of how to search for the Temporary IDs that have a Constituent Status of Error
This example illustrates the fields and controls on the Example of how to search for the Temporary IDs that have a Constituent Status of Error. You can find definitions for the fields and controls later on this page.
The following table describes the various constituent statuses:
|
Constituent Status |
Description |
How Status is Set |
|---|---|---|
|
Loaded |
This status indicates that the system has loaded the data into the staging records and has not run Search/Match. |
Set by the system if Search/Match has not run or after an administrator corrects an error. |
|
New ID Created |
This status indicates that the system has run Search/Match and has created a new Employee ID for the staging record. The system assigns this status to a record when it adds a new Employee ID. It adds a new Employee ID when the Search/Match settings for the transaction determine that the record is new. The system also assigns this status to a record when you manually set the constituent status to Add New ID and then click the Run Search/Match/Post button or run the Transaction Management process. The system can assign this status at any time during the process depending on how the transactions are set up. If you have selected the real time option on the Transaction Setup page, the status assigns this status when the user saves or submits their transaction. |
Set by the system. |
|
ID Updated |
This status indicates that the system has run Search/Match and has found an existing Employee ID for the staging record or the transaction has been processed for a returning user where the Employee ID is known for the user. The system assigns this status to a record when it updates constituent data for an existing Employee ID. It updates an existing Employee ID when the Search/Match settings for the transaction determine that a matching record exists or if a returning user saves or submits a subsequent transaction. This can be done at any time during the process depending on how the transactions are set up. If the process is real time, it will be done at the point the user either saves or submits their transaction. |
Set by the system. |
|
Suspended |
This status indicates that the system has run Search/Match and has suspended the staging record for your review. The system suspends a record from further processing because possible matches have been found based on the Search/Match settings for the transaction. If previously you had changed the status from Suspended to any other status, you can manually change the status back to Suspended (depending on whether the constituent data has been posted to the production record). |
Set by the system. Set manually. |
|
Ignore |
This status indicates that you have determined this record should be passed over for further processing. This status can only be assigned manually. Processing of the record will not continue while this status is set. |
Set manually. |
|
Error |
This status indicates that the system has encountered a problem when processing the record. The system can assign this status to a staging record when it encounters a problem during data validation, when running Search/Match, or when the data is being posted. The system displays the error message on the Summary Information page. You must resolve the error and save the record. The system does not allow you to manually change from Error status to another status. When you resolve an error and save the record, the status automatically changes to Loaded, which indicates that you need to start the processing again by running the post process again (whether it is done by clicking the Run Search/Match/Post button or the Post Transaction Data button or by running the Transaction Management process). Notice that if an ID was already identified, the post process will use it to revalidate and to post the data. |
Set by the system. |
|
Add New ID |
This status indicates that you have determined that the constituent should be added as a new person. You can assign this status when you have determined that the staging record should be added with a new Employee ID. |
Set manually. |
|
Update ID |
This status indicates that you have determined that an existing constituent record should be updated with the staging data. You can use the Search/Match results or the ID field to choose the Employee ID whose record you want to update. After assigning this status and choosing an Employee ID, you can click the Run Search/Match/Post button or run the Transaction Management process to update the existing record. |
Set manually. |
|
Cancelled |
This status indicates that you have determined the transaction is incomplete, duplicate or should not be processed further. You cannot delete a transaction but you can cancel a constituent transaction. No further data updates by the user or the administrative user can be performed on a cancelled row. The Transaction Management process ignores the cancelled rows. Note: Cancelling a constituent implies that none of the transactions tied to it can be updated or processed further. Also if your user interface for the online transaction is configured appropriately, this status can be used when an end user has manually cancelled the transaction (for instance, closed the browser window) before saving or submitting an online transaction. |
Set by the system. Set manually. |
The following table describes the various transaction statuses:
|
Transaction Status |
Description |
|---|---|
|
Saved |
This status indicates that the system has saved the transaction to the staging records and the transaction is not ready to be processed. There are three ways to set a transaction status to Saved:
For more information about how to set up File Parser, see Setup for Loading Applications Using File Parser. |
|
Submitted |
This status indicates that system has submitted the transaction to the staging records and the transaction is ready to be processed. There are three ways to set a transaction status to Submitted:
|
|
Saved Error |
This status indicates that the system encountered problems when saving a transaction. You must resolve these errors before the transaction can be posted. You cannot manually change this status. When you resolve the error and save the staging record (from the appropriate transaction staging component), the system automatically sets the status back to Saved. |
|
Submit Error |
This status indicates that the system encountered problems when submitting a transaction. You must resolve these errors before the transaction can be posted. You cannot manually change this status. When you resolve the error and save the staging record (from the appropriate transaction staging component), the system automatically sets the status back to Submitted. |
|
Pending |
This status indicates that manual reconciliation is required for some data element which is not necessarily an error. For example, as part of AAWS, when manual reconciliation is required for application fee waiver requests, the status is set to Pending and the application fee status is set to Waiver. You can manually change this status. Note: Your transaction needs to include code to determine the conditions where this status should be assigned. |
|
Posted |
This status indicates that the system has successfully posted the transaction. The staged data got inserted inside the appropriate production records. The system runs the posting process when you click the Post Transaction Data button or the Run Search/Match/Post button, or when you run the Transaction Management process. |
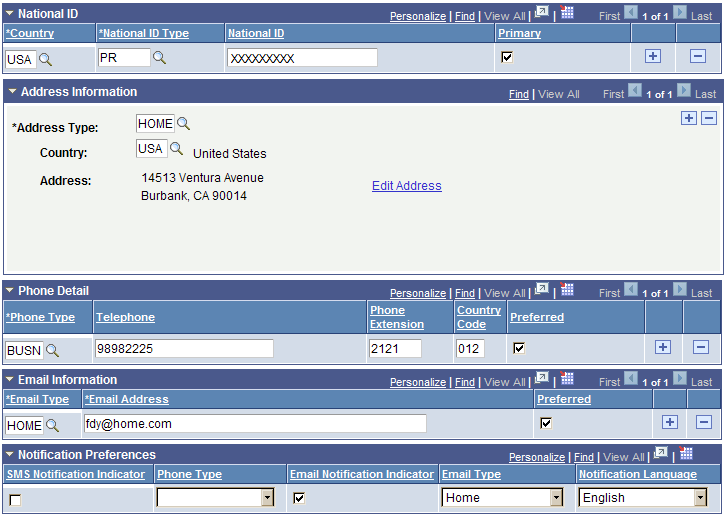
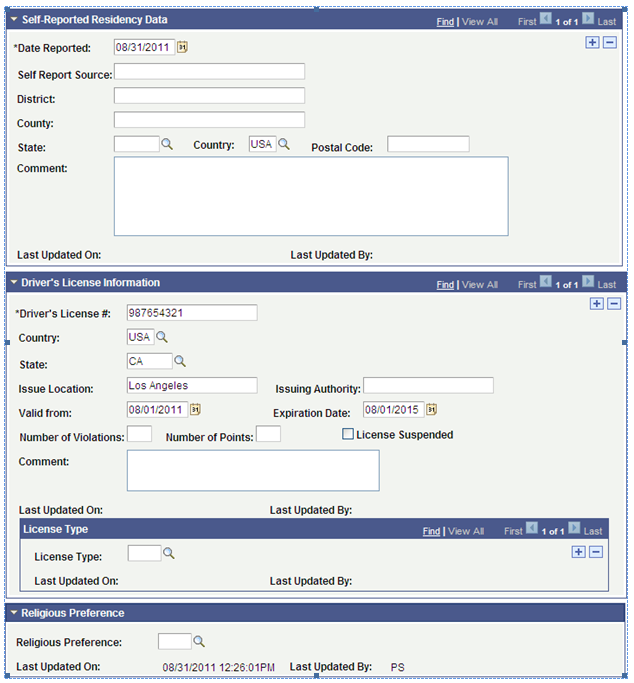
Access the Constituent Details page ().
Image: Constituent Details page (1 of 2)
This example illustrates the fields and controls on the Constituent Details page (1 of 2). You can find definitions for the fields and controls later on this page.
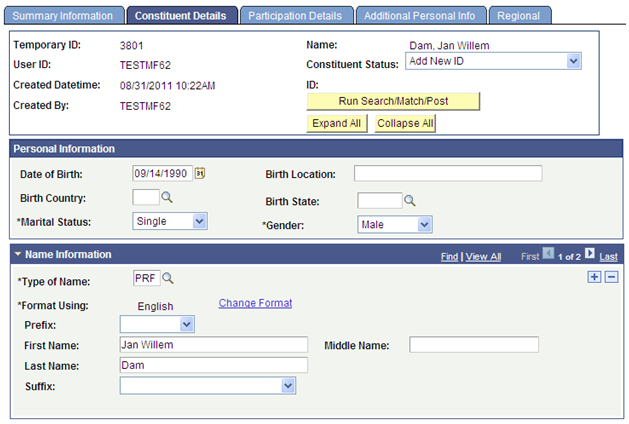
Image: Constituent Details page (2 of 2)
This example illustrates the fields and controls on the Constituent Details page (2 of 2). You can find definitions for the fields and controls later on this page.
Access the Participation Details page ().
Image: Participation Details page (1 of 5)
This example illustrates the fields and controls on the Participation Details page (1 of 5). You can find definitions for the fields and controls later on this page.
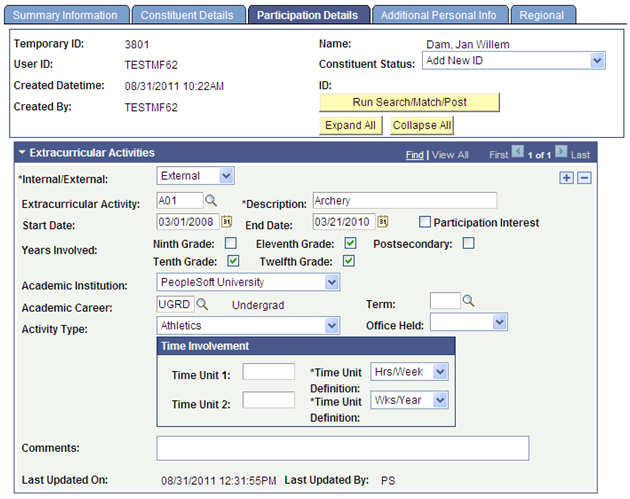
Image: Participation Details page (2 of 5)
This example illustrates the fields and controls on the Participation Details page (2 of 5). You can find definitions for the fields and controls later on this page.
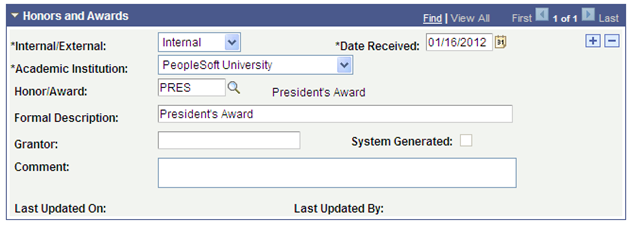
Image: Participation Details page (3 of 5)
This example illustrates the fields and controls on the Participation Details page (3 of 5). You can find definitions for the fields and controls later on this page.
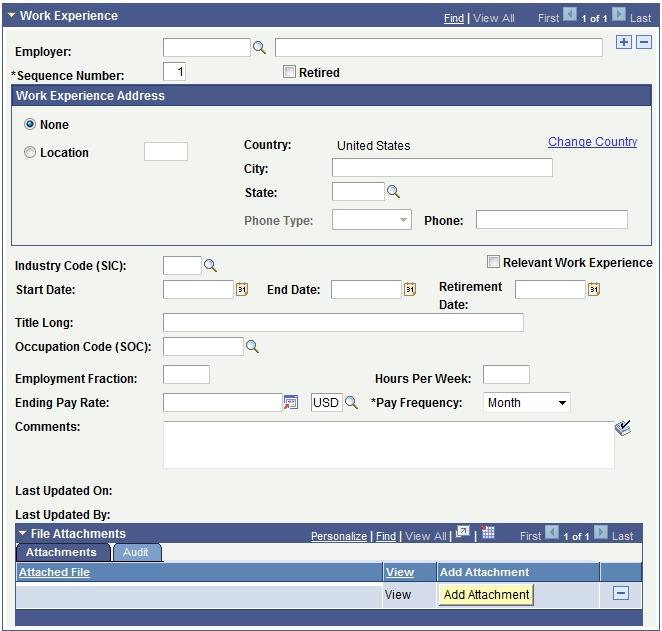
Image: Participation Details page (4 of 5)
This example illustrates the fields and controls on the Participation Details page (4 of 5). You can find definitions for the fields and controls later on this page.
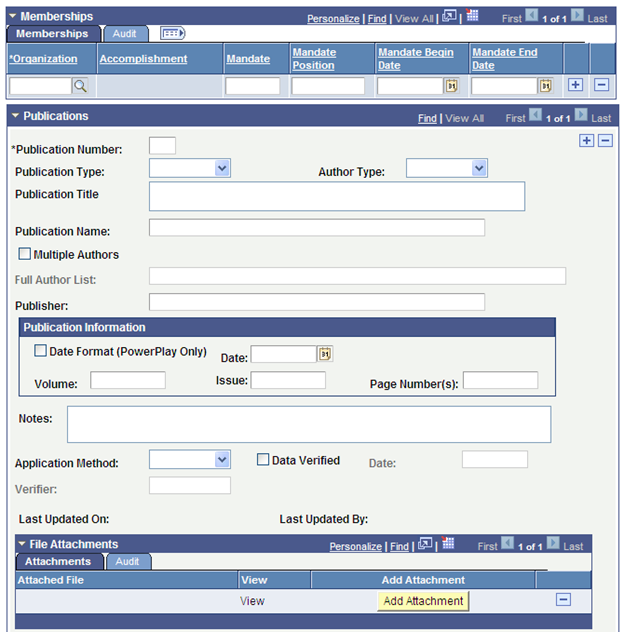
Image: Participation Details page (5 of 5)
This example illustrates the fields and controls on the Participation Details page (5 of 5). You can find definitions for the fields and controls later on this page.
|
Field or Control |
Definition |
|---|---|
| Add Attachment |
Click this button to browse for any file you want to attach to the page. After attaching the file, click the View link to open it in a separate browser window, or click Add to attach multiple files. |
Access the Additional Personal Info page ().
Image: Additional Personal Info page (1 of 7)
This example illustrates the fields and controls on the Additional Personal Info page (1 of 7). You can find definitions for the fields and controls later on this page.
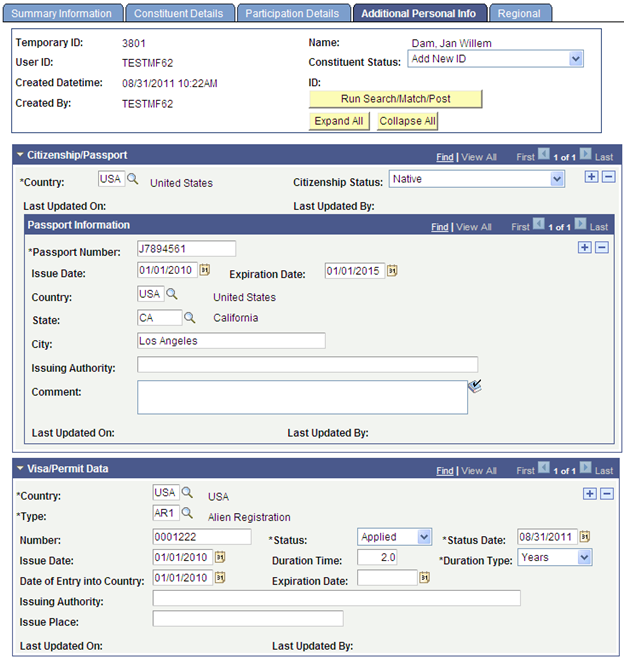
Image: Additional Personal Info page (2 of 7)
This example illustrates the fields and controls on the Additional Personal Info page (2 of 7). You can find definitions for the fields and controls later on this page.
Image: Additional Personal Info page (3 of 7)
This example illustrates the fields and controls on the Additional Personal Info page (3 of 7). You can find definitions for the fields and controls later on this page.
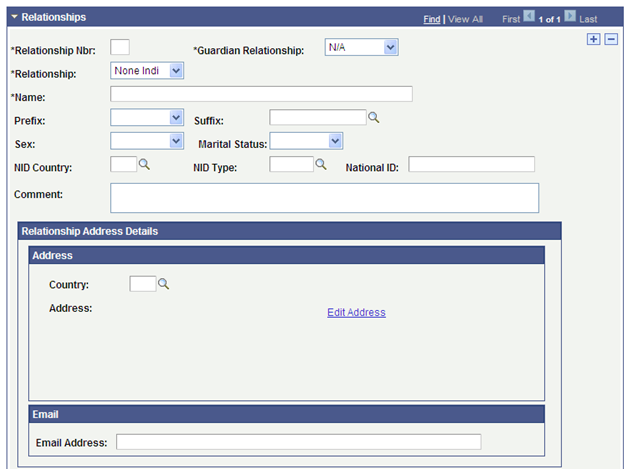
Image: Additional Personal Info page (4 of 7)
This example illustrates the fields and controls on the Additional Personal Info page (4 of 7). You can find definitions for the fields and controls later on this page.
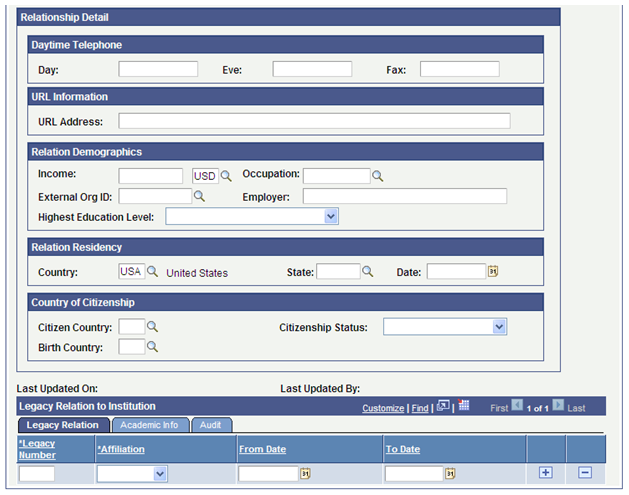
Image: Additional Personal Info page (5 of 7)
This example illustrates the fields and controls on the Additional Personal Info page (5 of 7). You can find definitions for the fields and controls later on this page.

Image: Additional Personal Info page (6 of 7)
This example illustrates the fields and controls on the Additional Personal Info page (6 of 7). You can find definitions for the fields and controls later on this page.
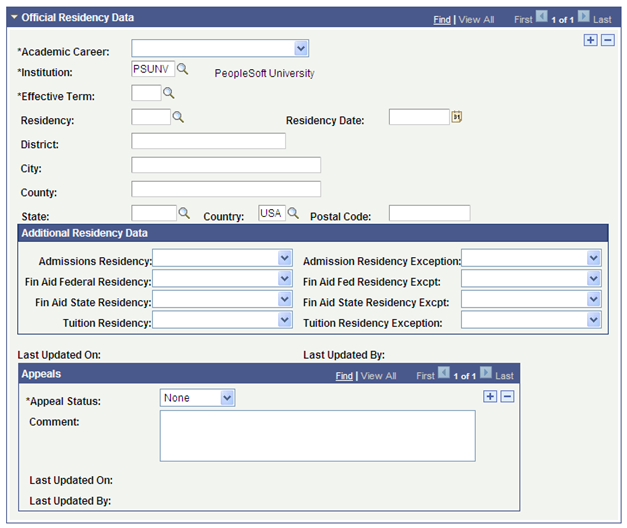
Image: Additional Personal Info page (7 of 7)
This example illustrates the fields and controls on the Additional Personal Info page (7 of 7). You can find definitions for the fields and controls later on this page.
Access the Regional page ().
Image: Regional page (1 of 9)
This example illustrates the fields and controls on the Regional page (1 of 9). You can find definitions for the fields and controls later on this page.
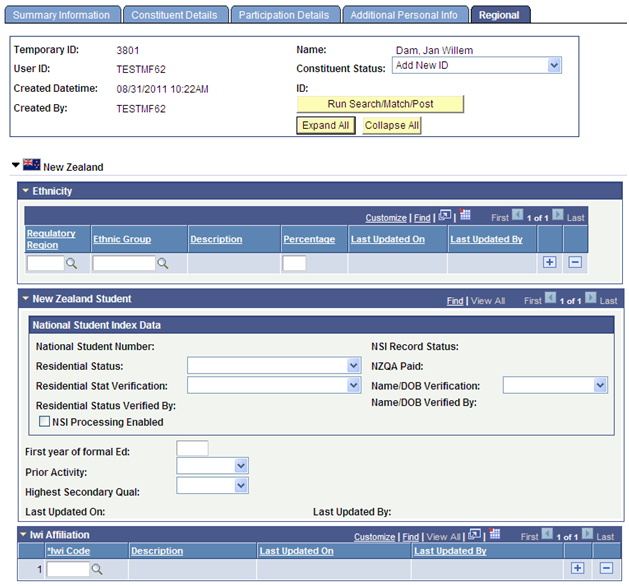
Image: Regional page (2 of 9)
This example illustrates the fields and controls on the Regional page (2 of 9). You can find definitions for the fields and controls later on this page.
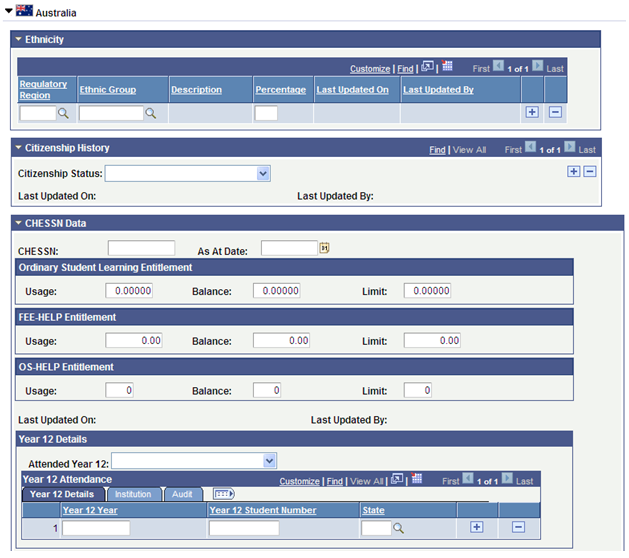
Image: Regional page (3 of 9)
This example illustrates the fields and controls on the Regional page (3 of 9). You can find definitions for the fields and controls later on this page.
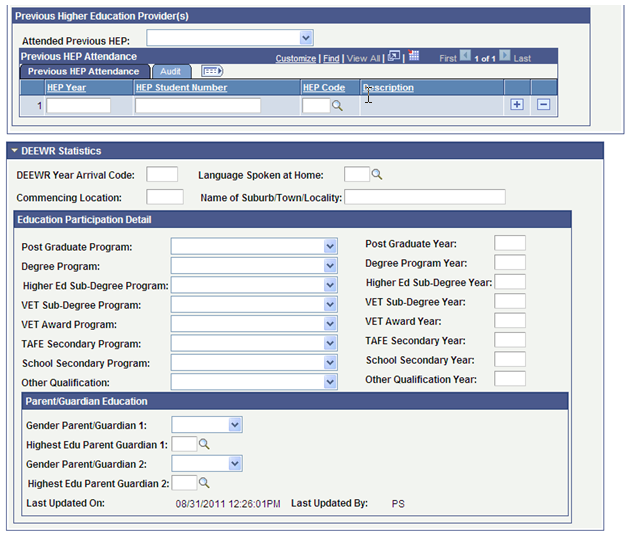
Image: Regional page (4 of 9)
This example illustrates the fields and controls on the Regional page (4 of 9). You can find definitions for the fields and controls later on this page.
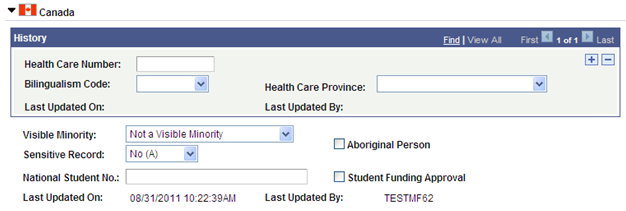
Image: Regional page (5 of 9)
This example illustrates the fields and controls on the Regional page (5 of 9). You can find definitions for the fields and controls later on this page.
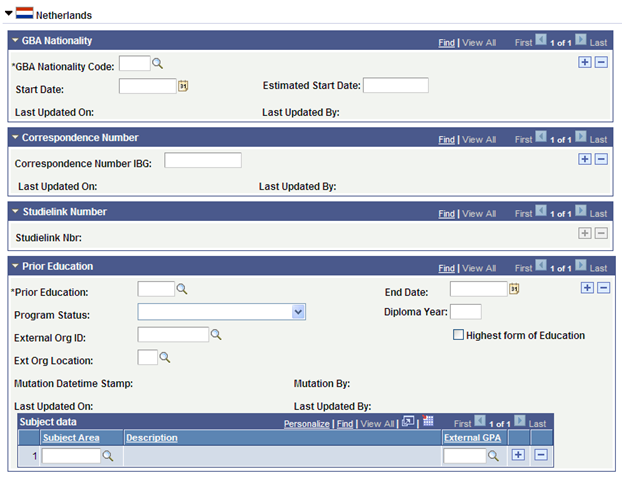
Image: Regional page (6 of 9)
This example illustrates the fields and controls on the Regional page (6 of 9). You can find definitions for the fields and controls later on this page.
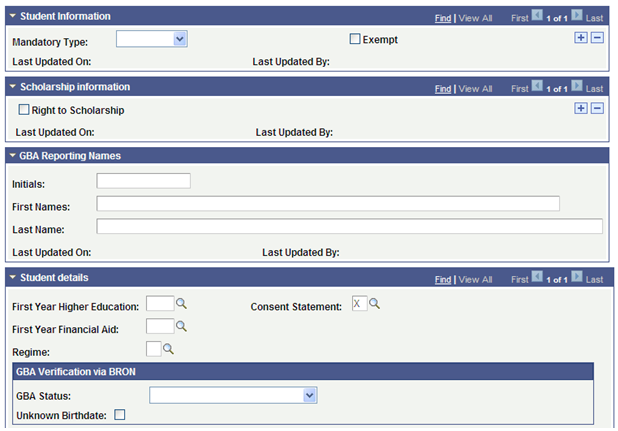
Image: Regional page (7 of 9)
This example illustrates the fields and controls on the Regional page (7 of 9). You can find definitions for the fields and controls later on this page.
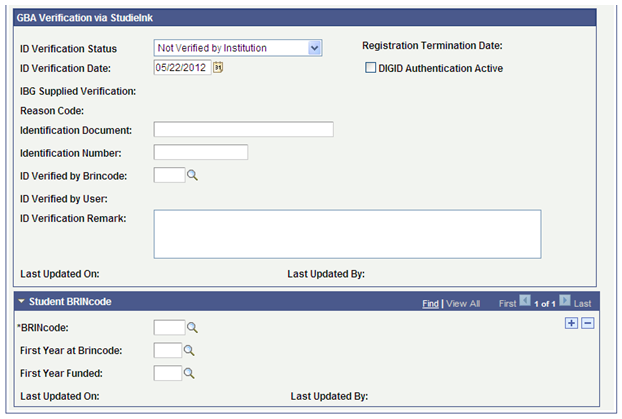
Image: Regional page (8 of 9)
This example illustrates the fields and controls on the Regional page (8 of 9). You can find definitions for the fields and controls later on this page.
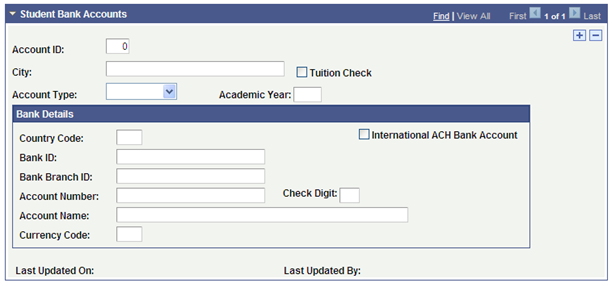
Image: Regional page (9 of 9)
This example illustrates the fields and controls on the Regional page (9 of 9). You can find definitions for the fields and controls later on this page.

Access the Selection Parameters page ().
Image: Selection Parameters page
This example illustrates the fields and controls on the Selection Parameters page. You can find definitions for the fields and controls later on this page.
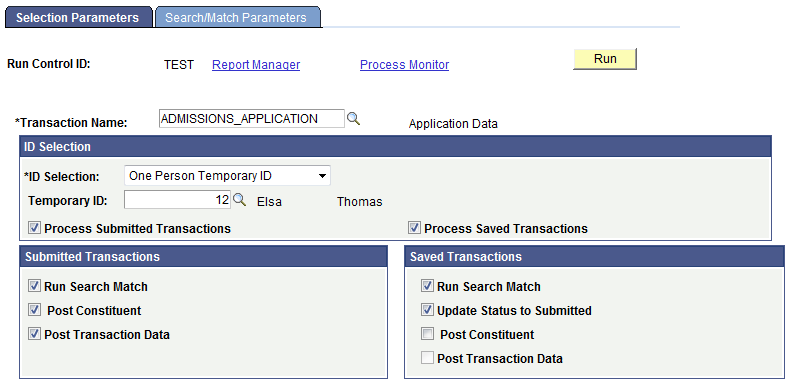
Use this functionality to process temporary constituent IDs stored inside the constituent and the transaction staging tables. You can process all IDs, just one at a time, or use Population Selection to select staged IDs meeting custom criteria. You can decide to only process the submitted transactions, the saved transactions, or a combination of both. The process allows you to change the transaction status from Saved to Submitted, run Search/Match and once an EMPLID is identified, post the constituent and transaction data to production tables. The Transaction Management process does not process IDs with a Constituent Status set to Cancelled or for which their transaction is already Posted. It also does not run the Search/Match process when an EMPLID is already identified or the Constituent Status is set to Ignored, Suspended, or Error.
When a Search/Match is initiated, the SCC_SL_SM_RSLT table is created. This table stores the Search/Match results: Temporary ID, Transaction Code, number of matches found, Constituent Status, and the last matched EMPLID. If Search/Match results match multiple EMPLIDs, EMPLID is not stored. If the results match only one EMPLID and the Constituent Status is ‘Update ID’, then the EMPLID is updated with the EMPLID that was matched. To view the Search/Match results, you must query the SCC_SL_SM_RSLT table. The record SCC_SL_SM_RSLT has been added to QUERY_TREE_CC.
When an ID is set to be suspended, you can only manually reset the status after evaluation using the Constituent Staging component. For instance, a self-service user submits an online transaction. Search/Match found one exact match and the transaction was set up to suspend the constituent if this condition is encountered. The suspended record requires manual intervention by the administrative user to validate whether the matching candidate found should be updated or not.
Regardless of how the post process is run, if it encounters any problems during processing, it will assign the record a constituent status of Error for constituent-related data, or a transaction status of Saved Error or Submitted Error for transaction-related data. Use the Constituent Staging and the transaction staging components to review these errors.
|
Field or Control |
Definition |
|---|---|
| Transaction Name |
Select the transaction for which you want to process the constituent and their transactions. |
ID Selection
|
Field or Control |
Definition |
|---|---|
| ID Selection |
Select one of these values: All Person Temporary IDs: Select to run the process for all the persons in the staging record who are associated with the selected transaction name. One Person Temporary ID: Select to run the process for a single person (constituent) in the staging record who is associated with the selected transaction name. Population Selection: Select if you want to use the population selection process for selecting the temporary IDs who are associated with the selected transaction name. |
| Temporary ID |
Available only when the ID Selection is One Person Temporary ID. You must enter the specific constituent temporary ID to process here. Note: The field prompt does not display the Temporary IDs that have a Constituent Status set to Cancelled, Ignore, or Suspended or a Transaction Status set to Posted, Saved Error, Submitted Error, or Pending. |
| Process Submitted Transactions |
Select if you want the system to process transactions that have a transaction status of Submitted. When you select this option, the Submitted Transactions box appears. |
| Process Saved Transactions |
Select if you want the system to process transactions that have a transaction status of Saved. When you select this option, the Saved Transactions box appears. The system posts only submitted transactions to the database. |
Submitted Transactions
This group box appears only when the Process Submitted Transactions option is selected.
|
Field or Control |
Definition |
|---|---|
| Run Search Match |
Select to run Search/Match for the Submitted transactions. This process sets the Constituent Status to Add New ID, Update ID, Suspend, or Ignore based on your Search/Match settings. |
| Post Constituent |
Select to post the Submitted constituent data based on the Constituent Status. Note: You must select Run Search Match in order to select Post Constituent. This ensures that you are not introducing duplicates into your database. |
| Post Transaction Data |
Select to post the Submitted transactions. |
Note: When processing submitted transactions, the component forces you to select all check boxes.
Saved Transactions
This group box appears only when the Process Saved Transactions option is selected.
|
Field or Control |
Definition |
|---|---|
| Run Search Match |
Select to run Search/Match for the Saved transactions. When the EMPLID already exists in the system, Search/Match is not invoked by the process. |
| Update Status to Submitted |
Select to change the transaction status from Saved to Submitted. Note: This option is particularly useful when loading data in batch (for example when using File Parser) and setting the File Mapping Definition to assign the value Saved as the Transaction Status. Doing so allows you to review the staged data before it is processed (Constituent Status is set to Loaded and Transaction Status is set to Saved). When ready to post the transactions, you can use the Transaction Management process to update the Transaction Status from Saved to Submitted. |
| Post Constituent |
Select this process to post the Saved constituent data based on the Constituent Status. Note: You must select Run Search Match in order to select Post Constituent. This ensures that you are not introducing duplicates into your database. |
| Post Transaction Data |
Select to post the transactions. Only submitted transactions can be posted. Therefore, to be able to select this check box, you must select all four check boxes. If you select all four check boxes, the Transaction Management process will first change the status to Submitted, then it runs Search/Match and finally depending on the Search/Match parameters it posts the constituent and transaction data. |
Population Selection
This group box appears only when the ID Selection of Population Selection is selected.
Population selection is a method for selecting the IDs to process for a specific transaction. Selection tools are available based on the selection tools that your institution selected in the setup of the Population Selection process for the Transaction Management process and on your user security. Fields in the group box appear based on the selection tool that you select. If your institution uses a specific delivered selection tool (PS Query, Equation Engine equation, or external file) to identify IDs for a specific transaction, you must use it.
Access the Search/Match Parameters page ().
Image: Search/Match Parameters page
This example illustrates the fields and controls on the Search/Match Parameters page. You can find definitions for the fields and controls later on this page.
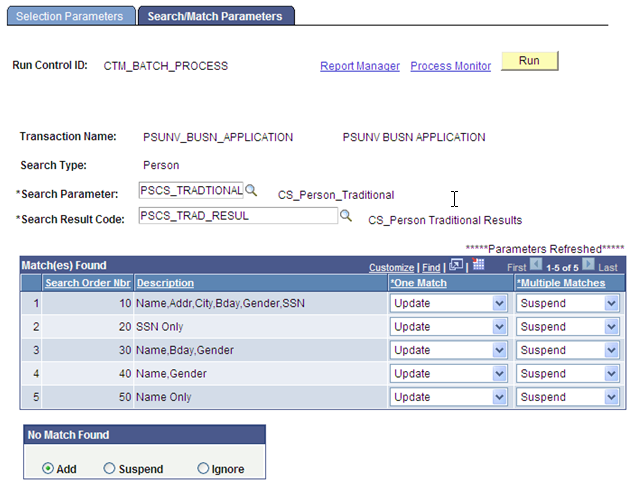
Use this page to set up your Search/Match parameters. These are the rules that determine what the post process should do with the staging record after the Search/Match process is complete. The fields on this page are similar to the Search/Match Setup page (Set Up SACR, System Administration, Utilities, Constituent Transaction Mgmt, Transaction Setup, Search/Match Setup). The Search/Match parameters that you define for the Transaction Management process overrides the Search/Match parameters set up on the Transaction Setup component.