Using the Population Selection Process
This section lists the pages used for implementing the population selection process and provides an example.
Note: You access the pages listed here from the standard Population Selection group box, wherever it exists in the database. You will use other pages depending on the values and parameters that you enter for a specific process. Those pages are documented where the specific run control page for that business process is documented.
|
Page Name |
Definition Name |
Navigation |
Usage |
|---|---|---|---|
|
Equation Editor |
EQUATION_EDITOR |
Click the Create Equation or Edit Equation link in the Population Selection group box on a run control page when the selection tool is Equation Engine. The Create Equation and Edit Equation links only appear if the user has appropriate security for creating or editing equations and the selection tool is Equation Engine. |
Create a new equation or edit the selected equation to use for a process. |
|
Equation Parameters |
SCC_EQTN_POP_PARM |
Click the Edit Prompts link in the Population Selection group box on a run control page when the selection tool is Equation Engine. The Edit Prompts link appears only if the equation is set to use prompts. |
View or enter prompts for an equation. |
|
Query Manager |
QRY_SELECT |
Click the Launch Query Manager link in the Population Selection group box on a run control page when the tool is PS Query.
|
If you have security access to Query Manager, create a new query or edit the selected query to use for a process. |
|
Preview Selection Results |
SCCPS_RESULTS |
Click the Preview Selection Results link in the Population Selection group box on a run control page. The Preview Selection Results link appears only if preview functionality is enabled on the Selection Tool page for the tool selected. |
Preview the results that will be returned by the tool. |
|
Population Selection File Mapping |
SCCFP_PS_FILE |
Click the Create File Mapping link or Edit File Mapping link in the Population Selection group box on a run control page when the tool is external file. |
Create or edit a mapping for an external file for use by the Population Selection process. |
Access the run control page for the specific process, for example, the Mass Assign service indicators process ().
Image: Example of the standard Population Selection group box on a Campus Solutions page
This example illustrates the fields and controls on the Example of the standard Population Selection group box on a Campus Solutions page. You can find definitions for the fields and controls later on this page.
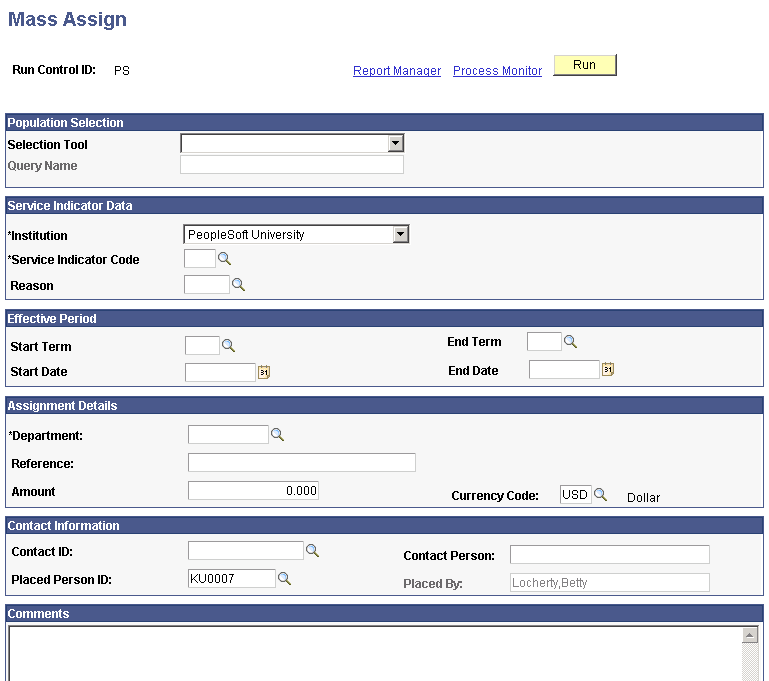
Population Selection
|
Field or Control |
Definition |
|---|---|
| Selection Tool |
Select the tool to use to identify the population for the process. Only tools set to Active on the Selection Tool setup page and the applicable selection tools defined in the context definition for the process are available in this drop-down list box. The PeopleSoft system delivers the following tools with a default status of Active: Equation Engine, External File, and PS Query. If your institution creates other tools, sets them to active status, and lists them in the context definition for a specific process, then they also will be available in this drop-down list box. Fields and links appear on the subpage based on the tool that you select. |
Equation Engine Tool
This section describes the fields and links that appear when you select the Equation Engine tool in the Population Selection group box on a page.
Image: Example of the Population Selection group box with the Equation Engine tool selected
This example illustrates the fields and controls on the Example of the Population Selection group box with the Equation Engine tool selected. You can find definitions for the fields and controls later on this page.
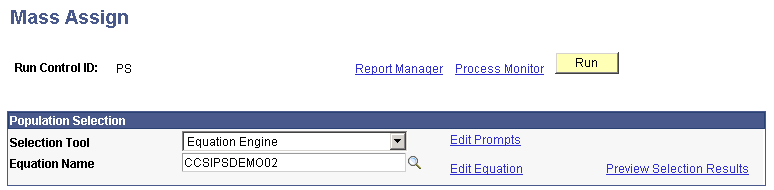
When you select the Equation Engine tool, if you have the appropriate security for creating equations a Create Equation link appears next to the Equation Name field. If you must create an equation, you can click this link to launch Equation Editor in a separate window, where you can create the equation, save it, and then enter the equation name in the Equation Name field without exiting the page that contains the Population Selection group box.
If you have the appropriate security to create and edit equations, when you enter an equation name the Create Equation link will change to the Edit Equation link. You can click the Edit Equation link to open the Equation Editor page for that equation and edit it.
Note: If you save the page with an equation name entered in the Population Selection group box and you subsequently edit and save that equation in Equation Editor, then you do not have to save the page that contains the group box again to benefit from changes to the equation.
|
Field or Control |
Definition |
|---|---|
| Selection Tool |
Displays the type of tool that you selected. In this example, Equation Engine was selected. |
| Equation Name |
Select the equation to use. Only equations valid for the specific process are available. Limiting the prompt list to valid equations ensures that users select IDs with the appropriate data needed for running the process. Valid equations include the application prompt name that is set on the Equation To Context Mapping page. The PeopleSoft system delivers predefined equations for specific processes. A list of equations delivered as of the date of this publication is provided as an appendix to this documentation. |
| Create Equation |
This link appears only if you have security access to create new equations and if no equation name is entered. Click this link to launch Equation Editor in a new window, where you can create a new equation. Warning! Never modify and save a delivered equation using the original equation name. The PeopleSoft system delivers predefined equations upon which specific processes depend. If you want to create a different version of a delivered equation, save it using a different name and then modify it. |
| Edit Prompts |
This link appears after you enter the equation name and only if the equation that you selected is set to use prompts. Click this link to access the Equation Parameters page, where you can view or enter prompts for the equation. |
| Edit Equation |
This link appears only if you have appropriate security for editing existing equations. Click this link to launch Equation Editor in a new window, where you can view and edit the specified equation. |
| Preview Selection Results |
This link appears only if the Enable Preview Results check box is selected on the Selection Tool page for the Equation Engine. Click this link to preview results based on the parameters that you selected before you run the process. |
PS Query Tool
This section describes the fields and links that appear when you select the PS Query tool in the Population Selection group box on a page.
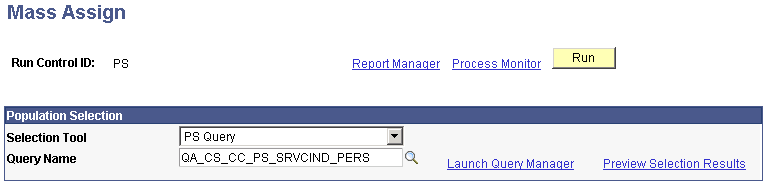
Image: Example of the Population Selection group box with the PS Query tool selected
This example illustrates the fields and controls on the Example of the Population Selection group box with the PS Query tool selected. You can find definitions for the fields and controls later on this page.
|
Field or Control |
Definition |
|---|---|
| Selection Tool |
Displays the type of tool you selected. In this example, the PS Query tool was selected. |
| Query Name |
Select the query to use. Only queries valid for the specific process are available. Limiting the prompt list to valid queries ensures that users select IDs with the appropriate data needed for running the process. Valid queries use a data source record listed in the context definition. The PeopleSoft system delivers predefined equations for specific processes. A list of equations delivered as of the date of this publication is provided as an appendix in this documentation. |
| Edit Prompts |
This link appears after you enter the query name and only if the query that you selected is set to use prompts. Click this link to access the Query Prompts page, where you can view or enter prompts for the specified query. See Creating Valid PeopleSoft Queries and Application Classes. |
| Launch Query Manager |
This link appears only if you have the appropriate security for accessing the Query Manager component. Click this link to launch Query Manager in a separate window, where you can create or update a query without exiting the Population Selection subpage. Warning! Never modify and save a delivered query using the original query name. The PeopleSoft system delivers predefined queries upon which specific processes depend. If you want to create a different version of a delivered query, save it using a different name and then modify it. See PeopleTools: Query |
| Preview Selection Results |
This link appears only if the Enable Preview Results check box is selected on the Selection Tool page for the PS Query tool. Click this link to preview results based on the parameters that you selected before you run the process. |
External File Tool
This section describes the fields and links that appear when you select the External File tool in the Population Selection group box on a page.
Image: Example of the Population Selection group box with the External File tool selected
This example illustrates the fields and controls on the Example of the Population Selection group box with the External File tool selected. You can find definitions for the fields and controls later on this page.
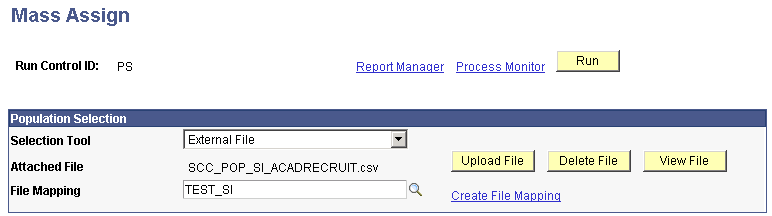
Depending on how your institution sets up the external file tool for population selection, you will be required to upload a file as an attachment or you will be required to provide a path to a file. If you upload a file as an attachment, your system will be set up to locate the attachment where the application server and Process Scheduler can access it. If you provide a path, you must be sure to provide a path that the server and Process Scheduler can access.
The example used in this section requires an uploaded file to attach.
|
Field or Control |
Definition |
|---|---|
| Selection Tool |
Displays the type of tool selected. In this example, External File was selected. |
| Upload File |
This button appears only after you select the External File tool. Click to browse to an existing file to upload. The file can be stored anywhere; however, it must be either a delimited file or a flat (fixed length) file that is compatible with PeopleSoft File Parser. Note: Proprietary file formats such as Microsoft Excel, Microsoft Word, and Lotus Software's Lotus 1-2-3 are not supported by File Parser. An Excel spreadsheet, for example, would need to be saved as a comma separated value (.csv) file format. When you upload a file, the system places the file in a path accessible to the applications server and Process Scheduler, and attaches the file to the process. |
| Attached File |
Displays the name of the uploaded and attached file. |
| Delete File and View File |
These buttons appear only after you upload a file. Click View File to view the uploaded file and verify that its contents are mapped correctly for parsing. Click Delete File to delete the uploaded file from the attachment path. |
| Create File Mapping |
Click to access the Population Selection File Mapping page, where you can map the uploaded file for use with the Population Selection process. |
| Edit File Mapping |
This link appears only after you upload a file and create or select the file mapping. Click to access the Population Selection File Mapping page, where you can view or edit the mapping created for the uploaded file. |
| Preview Selection Results |
This link appears only if the Enable Preview Resultscheck box is selected on the Selection Tool page for the External File tool. Click this link to preview results based on the parameters that you selected before you run the process. Warning! When using an external file selection tool, always preview the results to verify that the contents of your file are mapped correctly for parsing. If you don't verify the mapping, you could have misplaced columns—for example, the column labelled Institution could contain values for the names of the IDs. |
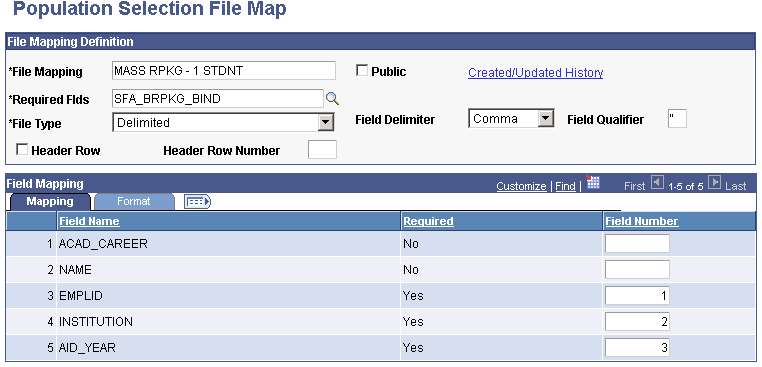
External File Mapping
This section shows a completed Population Selection File Map page.
Image: Example of the Population Selection File Map page
This example illustrates the fields and controls on the Example of the Population Selection File Map page. You can find definitions for the fields and controls later on this page.