Developer Reference for Creating a New CTM Consumer
Take advantage of the CTM framework to create your own consumers of CTM. The CTM transactions created for a consumer can be performed online or offline by your users. Use the steps discussed in this section as guidelines to do so.
Warning! Creating a CTM consumer is a technical effort and requires knowledge of Application Designer, web services, Integration Broker, and Entity Registry,
The below diagram shows all the steps in the appropriate order that need to be performed to create your own CTM consumers using the CTM framework:
Image: Creating a new consumer of CTM
Creating a new consumer of CTM

This section discusses:
Step 1: Creating or extending staging tables.
Step 2: Creating or maintaining an entity application class.
Step 3: Creating or maintaining entities.
Step 4: Creating or maintaining web services.
(Optional) Step 5: Creating a transaction staging component.
Step 6: Setting up data update rules.
Step 7: Setting up a transaction.
(Only for online transactions) Step 8: Creating a user interface.
(Optional — only for online transactions) Step 9: Setting up list of values.
(Optional — only for online transactions) Step 10: Setting up New User Registration.
(Optional — only for online transactions) Step 11: Creating a setup component for a transaction.
(Only for offline or batch transactions) Step 12: Setting up File Parser.
(Optional) Step 13. Setting up an entity profile for an online transaction.
A staging record used with CTM must be keyed by Temporary ID (SCC_TEMP_ID field) (high level key). This field is a unique identifier that helps keeping track of staged transactions. The rest of the keys for a staging record are similar to the equivalent production record. It is never effective-dated (even if the matching production record is effective-dated). This is because the data entered in staging records can be updated, modified many times prior to be posted to production. Only at that time, the data is current and therefore the production record gets set with the date the data is posted.
Example: Suppose your CTM transaction captures admissions data and you also want to ask specific questions for which the user can select from answers that are displayed on the user interface. Assume the production record to store the answers to the questions is named SCC_EXTN and its definition is as follows:
Image: Production record definition (SCC_EXTN)
This example illustrates the fields and controls on the Production record definition (SCC_EXTN). You can find definitions for the fields and controls later on this page.

Its equivalent staging record definition (for example, call it SCC_EXTN_STG record) should be defined as follows:
Image: Matching Staging record definition (SCC_EXTN_STG)
This example illustrates the fields and controls on the Matching Staging record definition (SCC_EXTN_STG). You can find definitions for the fields and controls later on this page.
The Staging table holds the staged data before it gets promoted to its matching production table.
Later, you will link the newly created staging record with its matching production record through an entity defined in the Entity Registry component. See Developer Reference for Creating a New CTM Consumer, “Step 3: Creating Entities.”
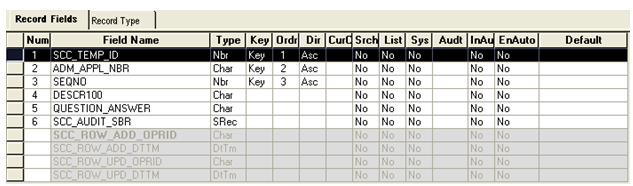
For CTM, the staging record that you select in the Entity Registry component for the parent entity is referred as the parent staging record. Other than including the SCC_TEMP_ID field as a key like the other staging records, ensure that the parent staging record also includes the following additional fields:
SCC_TRANSAC_CD (Transaction Code)
SCC_TRANS_STS (Transaction Status)
SCC_TRANS_STS_DT (Transaction Status Date)
SCC_AUDIT_SBR record for audit tracking
Any other fields related to your transaction.
Later, you will also enter the parent staging record for the Transaction Code in the Transaction Setup component. See Developer Reference for Creating a New CTM Consumer, “Step 7: Setting Up Transaction.”
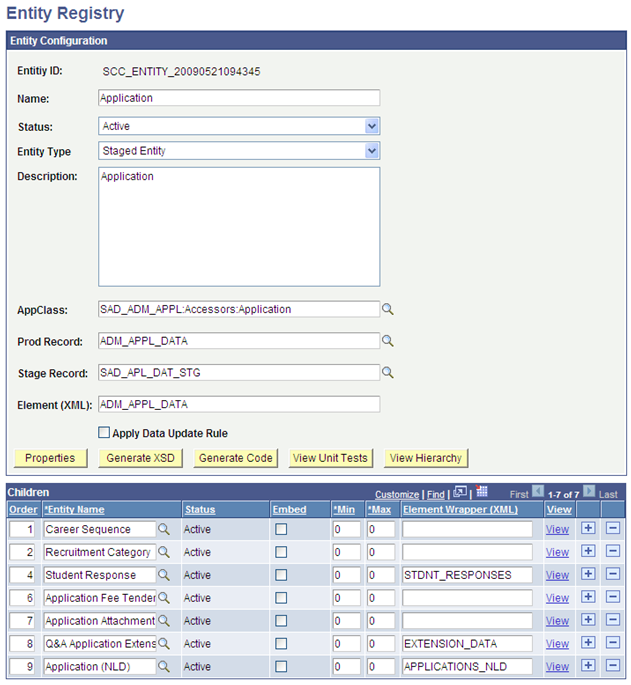
The following is an example of how the parent staging record SAD_APL_DAT_STG, contained in the Application parent entity (delivered with the AAWS admission transaction), is defined in the Entity Registry component:
Image: Example of Entity Registry component with the parent staging record for the parent entity Application
This example illustrates the fields and controls on the Example of Entity Registry component with the parent staging record for the parent entity Application. You can find definitions for the fields and controls later on this page.
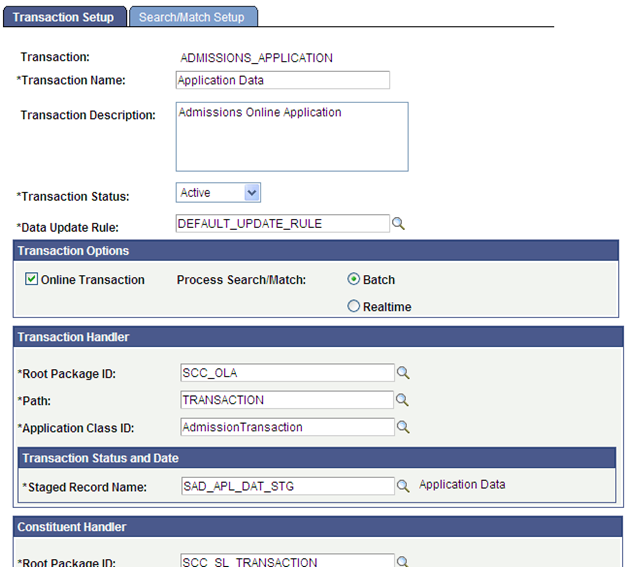
The following is an example of how the SAD_APL_DAT_STG parent staging record (delivered with the AAWS admission transaction) is defined in the Transaction Setup component for the transaction code ADMISSIONS_APPLICATION:
Image: Example of Transaction Setup component with the SAD_APL_DAT_STG parent staging record for AAWS transaction
This example illustrates the fields and controls on the Example of Transaction Setup component with the SAD_APL_DAT_STG parent staging record for AAWS transaction. You can find definitions for the fields and controls later on this page.
Along with the staging records you created for your CTM transaction (whether they are constituent staging records or transaction-specific staging records), you can create a supporting application class for each combination of staging and matching production records. Generally, this application class provides the properties, and adds any custom validation, pre-save, or setDefault logic. However, because it is an application class, anything can be overridden. To see all the methods refer to the Entity Registry section. The created application class needs to be entered in the Entity Registry component for the corresponding entity name.
Note: The application class can be created blank. Entity Registry can help generate the needed base code, which can then simply be copied and pasted into application designer.
The following is an example of the SCC_SL_TRANSACTION:INTFC application package that comprises the delivered application classes used by CTM:
Image: Example of application classes used by CTM
This example illustrates the fields and controls on the Example of application classes used by CTM. You can find definitions for the fields and controls later on this page.
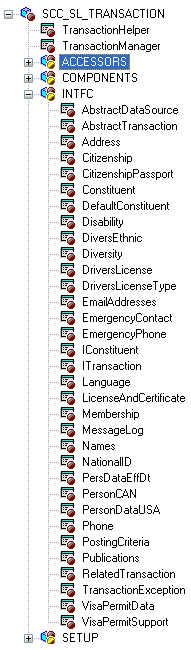
Note: If you created a new constituent entity, we recommend to not create the corresponding application class under the SCC_SL_TRANSACTION:INTFC application package. Instead, create a separate application package. The reason being that any modifications made to the delivered application package is considered a customization and might be overridden when a bundle is delivered.
Note that this step is only to create a shell application class. You create a name for it using Application Designer, but the PeopleCode logic is created through Entity Registry.
For information on creating application classes using the Entity Registry component, see Setting Up Entity Registry, “Creating a New Entity.”
As mentioned in the previous subsection, the CTM framework takes full advantage of the Entity Registry feature. Each combination of staging record and production record along with their application class need its own entity. The new entity can be a parent entity or a child of an existing parent. For instance, the Constituent and the Application entities, delivered with your system, are parent entities of many children.
Register a new entity in the Entity Registry page
When creating an entity that will be used as part of a CTM transaction, select an Entity Type that is defined to use both production and staging records. Two delivered Entity Types are set up that way:
Staged HR Entity (use it if the production record is owned by HR).
Staged Entity.
See Setting Up Entity Registry, “Configuring Entity Types, Setting Up Entity Types.”
CTM uses web services to move data to the production tables. If the CTM consumer you are creating involves transactions to be performed online, you can allow the self-service users to Save the transaction so that they can come back later to Submit when ready. If you choose to do so, you will need to create web services for the following actions:
One service for the Save action.
One service to retrieve a specific saved transaction.
One service to retrieve multiple saved transactions.
One service for the Submit action.
Use PeopleTools Integration Broker to create the web services.
Delivered with your system are the following AAWS web service operations constructed for the delivered CTM admission transaction. You can use them as samples to create your own web services.
|
Service |
Service Operation |
Operation Type |
Messages |
Action |
|---|---|---|---|---|
|
SAD_ADMISSIONS |
SAD_CREATEAPPL |
Synchronous |
SAD_CREATEAPPL_REQ SAD_CREATEAPPL_RESP SAD_FAULT_RESP |
Creates the application. |
|
SAD_ADMISSIONS |
SAD_GETAPPL |
Synchronous |
SAD_GETAPPL_REQ SAD_GETAPPL_RESP SAD_FAULT_RESP |
Retrieves one specific application. |
|
SAD_ADMISSIONS |
SAD_GETAPPLS |
Synchronous |
SAD_GETAPPLS_REQ SAD_GETAPPLS_RESP SAD_FAULT_RESP |
Retrieves all applications for a defined individual. |
|
SAD_ADMISSIONS |
SAD_GETATTACH |
Synchronous |
SAD_GETATTACH_REQ SAD_GETATTACH_RESP SAD_FAULT_RESP |
Retrieves attachments. |
|
SAD_ADMISSIONS |
SAD_SAVEAPPL |
Synchronous |
SAD_SAVEAPPL_REQ SAD_SAVEAPPL_RESP SAD_FAULT_RESP |
Saves an application. |
|
SAD_ADMISSIONS |
SAD_SUBMITAPPL |
Synchronous |
SAD_SUBMITAPPL_REQ SAD_SUBMITAPPL_RESP SAD_FAULT_RESP |
Submits an application. |
Creation or update considerations for CTM:
Service operations should be synchronous so request and response messages should be created.
The Entity Registry component provides a utility called Generate XSD that creates a schema that can be used to create web service messages (through Integration Broker). Use it to update or create the schema for either the delivered messages or the messages you create.
Delivered with CTM is the Constituent Staging component. The component enables an administrative user to review, update, and correct errors related to the staged constituent data entered for a CTM transaction. The component also enables the administrative user to process the transaction for which the constituent data was entered. But different consumers of CTM will probably also have transaction-specific data in addition to constituent data in a CTM transaction. In such a scenario, you can optionally create a component, similar to the Constituent Staging component, which an administrative user can use to review, update, and correct errors related to the staged transaction-specific data. The transaction staging component will complement the Constituent Staging component. Both must use the Temporary ID field (SCC_TEMP_ID) as high level key. The transaction staging component name you create and the menu navigation where you place it can be entered in the Transaction Setup component (in the Transaction Data Launch View group box). This will set a hyperlink on the Constituent Staging component allowing the user to easily navigate to the appropriate transaction staging component for the selected Temporary ID. To create your own transaction staging component and connect it with the delivered Constituent Staging component, we have delivered three subpages that can be inserted directly into the component you create in Application Designer.
Note: Each functionality that consumes CTM will probably require its own transaction staging component to display the transaction data specific to the functionality. Creation considerations:
At the top of the first page of your transaction staging component, add the following three delivered subpages:
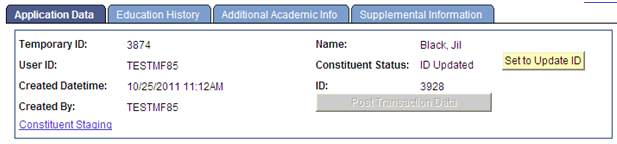
SCC_STG_HEADER_SBP: Used inside any transaction staging components (that is, this subpage can be used for all transactions). Contains all the generic fields pertinent to a CTM transaction, for instance, Temporary ID, User ID, Name, Constituent Status, and so on. The subpage also contains the fields for manually processing the transaction. For instance, the Run Search/Match/Post, Post Transaction Data, and Set to Update ID buttons. Finally, it contains the logic to assure proper component behavior based on the Constituent Status and the Transaction Status. The following is an example of the SCC_STG_HEADER_SBP subpage when used in a transaction staging component:
Image: Example of the SCC_STG_HEADER_SBP subpage
This example illustrates the fields and controls on the Example of the SCC_STG_HEADER_SBP subpage. You can find definitions for the fields and controls later on this page.
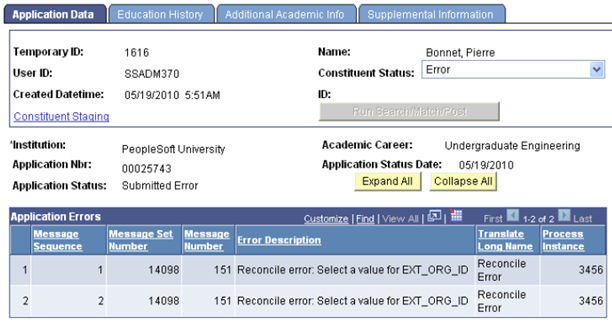
SCC_MESSAGELOG_SBP: Contains the grid for the errors that are found when CTM processes the transaction. The following is an example of the SCC_MESSAGELOG_SBP subpage when used in a transaction staging component:
Image: Example of the SCC_MESSAGELOG_SBP subpage
This example illustrates the fields and controls on the Example of the SCC_MESSAGELOG_SBP subpage. You can find definitions for the fields and controls later on this page.
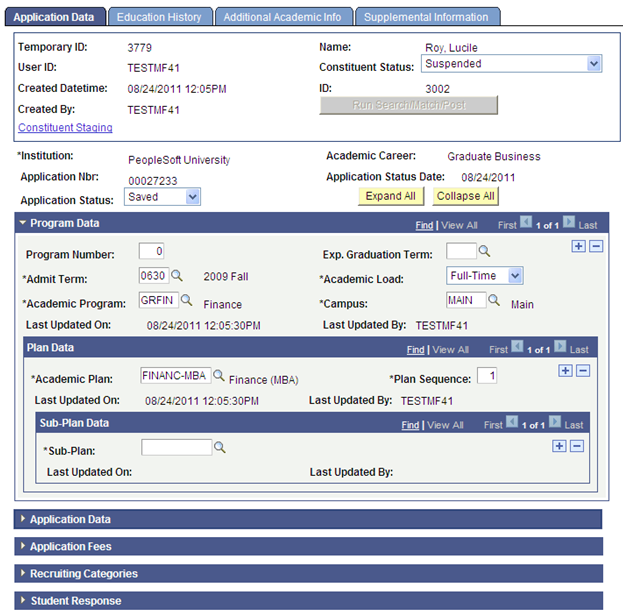
SCC_TRANSAC_SBP: Contains the transaction generic information and offers the possibility to unpost a posted transaction. The following is an example of the SCC_TRANSAC_SBP subpage when used in a transaction staging component:
Image: Example of the SCC_TRANSAC_SBP subpage
This example illustrates the fields and controls on the Example of the SCC_TRANSAC_SBP subpage . You can find definitions for the fields and controls later on this page.

Below the subpages, add the fields that you had included in the transaction staging records. Based on the quantity of data to display, use as many tabs as you need. Each tab should include the SCC_STG_HEADER_SBP subpage as header.
Create the component search record to include the desired access security. Consider using a view that will return the Temporary IDs of only the transactions for which the component is built. For instance, your institution might be using CTM for AAWS admissions transaction as well as for a new CTM consumer. Because these two CTM consumers use different transaction staging records, you will be using two different transaction staging components. The search record for your new transaction staging component could limit the Temporary IDs that have rows in one or more staging records (staging records that you created for your new CTM consumer). This way, your users will not see the Temporary IDs that performed the AAWS transactions. Also, consider securing the search record. For instance, the delivered search record to access the Constituent Staging component does not restrict the returned Temporary IDs. However, the delivered search record to access the Application Transactions staging component (SAD_APPL_STG) limits the returned Temporary IDs based on Application Center security tied to the User ID that accesses the staging component. The Application Transactions staging component is delivered with AAWS.
Once you create the component, component PeopleCode must be added to have the logic contained in the three subpages working properly. To do so, a generic application class (SCC_SL_TRANSACTION:UTIL:StageReviewBase) is delivered. It contains properties and methods that process data, change user interface details of fields residing in the three sub-pages. The application class must be extended and methods in it should be overridden according to functional requirement.
For example, to construct its transaction staging component (Application Transactions component), AAWS admission transaction uses the application class SAD_ADM_APPL:Components:SAD_APPL_STG. This application class extends the SCC_SL_TRANSACTION:UTIL:StageReviewBase application class. The StageReviewBase class contains Recruiting and Admissions specific logic.
Note: SCC_SL_TRANSACTION:UTIL:StageReviewBase contains a method called constituentStatusChangeEvent(). This method is invoked every time the SCC_STG_STATUS property is changed. This method is intended to be overridden by the subclass to add transaction specific logic.
Note: The SCC_SL_TRANSACTION:UTIL:StageReviewBase contains the SCC_RERUN_PUSH_BTN_FieldChange(); and SCC_CONST_STS_UPD_FieldChange(); methods. These two methods should be defined in the subclass and invoked from component record field PeopleCode events of the records fields <component>.SCC_SL_DERIVED.SCC_RERUN_PUSH_BTN.FieldChange and <component>.SCC_SL_DERIVED.SCC_CONST_STS_UPD.FieldChange. This is necessary to ensure that the push buttons on the header subpage works. Explanation to various other methods and properties of StageReviewBase class is given inside the application class itself. These methods/properties may or may not be overridden based on functional requirements.
Note: The SCC_SL_TRANSACTION:UTIL:StageReviewBase contains a method called method processtrandtls to populate the subpage SCC_TRANSAC_SBP. This method populates the fields of the subpage related to the transaction from the transaction staging record. This method should be called during the time of building transaction staging component and also every time the transaction staging record undergoes data changes during transaction processing.
Note: The SCC_SL_TRANSACTION:UTIL:StageReviewBase contains a method called SCC_TRANSTG_WRK_SCC_STS_UNPOST_Fieldchange. If you wish to provide the ability to unpost a transaction, extend this method in your Transaction App class with the required business logic/ business process to unpost a transaction. The delivered method SCC_TRANSTG_WRK_SCC_STS_UNPOST_Fieldchange would flip the transaction status field SCC_TRANS_STS of the staging record and set the value to "Submit". It would also appropriately change the values in UI as the status changes. To enable this, the method has to be invoked from the Fieldchange event of the SCC_STS_UNPOST field of your Transaction staging component PeopleCode.
Register the new component under the menu you choose and grant administrative users access to it.
Note: For an example of how this is done, use the Application Transactions staging component (Student Admissions, Application Transaction Mgmt, Application Transactions) delivered with AAWS and admission transactions functionality. This is the Application Transactions staging component:
Image: Example of a transaction staging component integrated with CTM
This example illustrates the fields and controls on the Example of a transaction staging component integrated with CTM. You can find definitions for the fields and controls later on this page.
Note: In the above example, AAWS Application Transactions component only uses the described first two subpages. It does not use SCC_TRANSAC_SBP. Instead the transaction uses its own logic.
See Reviewing and Editing Staged Admission Application Transactions.
See Setting Up CTM, “Defining Data Update Rules.”
See Setting Up CTM, “Setting Up a Transaction.”
Setup considerations:
The Transaction Handler application class handles the activities specific to the posting of the data for your new CTM transaction, for instance, data validation, posting, save, purge, to get related transactions and so on. The application class you specify here must extend the SCC_SL_TRANSACTION:INTFC:AbstractTransaction. Any method of this class can be overridden by the Transaction Handler class as per business requirements. The following is an example of a Transaction Handler application class code:
import SCC_SL_TRANSACTION:INTFC:AbstractTransaction;
class TransactionClass extends SCC_SL_TRANSACTION:INTFC:AbstractTransaction
	method TransactionClass ();

/* May override these methods as per business requirement */
	method validate(&p_tempConstituentID As number, &p_log As
SCC_SL_TRANSACTION:INTFC:MessageLog out) Returns boolean;
	method post(&p_tempConstituentID As number, &p_EMPLID As string);
	method save(&p_tempConstituentID As number, &p_EMPLID As string);
  	 method getRelatedTransactions(&p_tempID As number, &p_transacCode As string)
Returns array of SCC_SL_TRANSACTION:INTFC:RelatedTransaction;
	method purge(&p_arrTempConstituentID As array of number);

end-class;
method TransactionClass
	%Super = create SCC_SL_TRANSACTION:INTFC:AbstractTransaction();
end-method;
Note: For an example of a delivered Transaction Handler application class that extends the SCC_SL_TRANSACTION:INTFC:AbstractTransaction, look at the AAWS admission transaction delivered application class SCC_OLA.TRANSACTION.AdmissionTransaction.
The Staging Record Name is the staging record you created in Step 1: Creating or Extending Staging Tables. It is the parent staging record for your transaction.
While you can use different values, we recommend to set the Constituent Handler information as follows:
Root Package ID: SCC_SL_TRANSACTION
Path: INTFC
Application Class ID: DefaultConstituent
The Transaction Data Launch View should contain the location of where you applied the transaction staging component you created in step 5. Leave the values as blank if you decided not to provide a component to review the staged transaction-specific data.
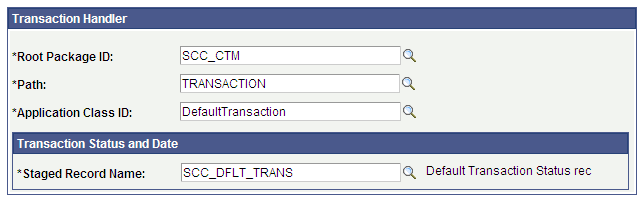
When creating a CTM transaction that only involves constituent data (no transaction-specific data), consider setting up your transaction with the following Transaction Handler information:
Image: Example of Transaction Handler section on Transaction Setup page
This example illustrates the fields and controls on the Example of Transaction Handler section on Transaction Setup page. You can find definitions for the fields and controls later on this page.
A delivered example of a CTM transaction that does not involve any transaction data is DELEGATED_ACCESS. This CTM transaction can be used to gather constituent information about the third party (the proxy) who has been delegated access to a student data. In this case the transaction will only process constituent data, leaving all the transaction-specific data logic unused.
Note: For examples on how the Transaction Setup component is configured for the delivered AAWS admission transaction, see Setting Up CTM.
The user interface for your CTM online transaction can be created using PeopleTools language, or others. While we recommend using Oracle Application Development Framework (Oracle ADF) to develop an online transaction user interface, you can use any technology or tool that complies with PeopleTools Integration Broker.
Creation considerations:
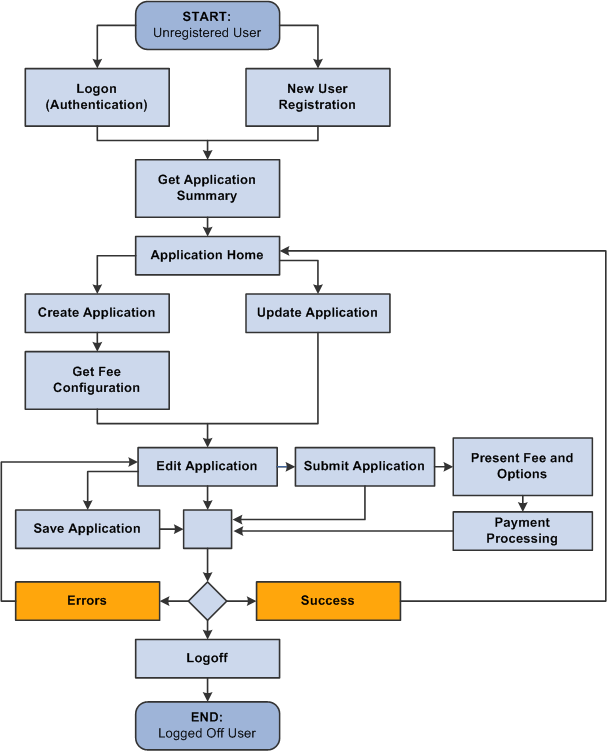
Start by defining the data collection flow for your online user interface. This exercise will help you identify where the web services you created in one of the previous subsections gets invoked. For example, an online application user interface, may have the following data collection flow:
Image: Example of a data collection flow for an Online Application
Example of a data collection flow for an Online Application
Because an online transaction requires authenticating the user, consider using the New User Registration framework to take advantage of all the Campus Solutions security objects delivered with the framework. Some self-service users may already have a username and a password to access your system (returning users) some don’t (guest users). The New User Registration framework allows both users to authenticate to your system and once successfully authenticated, be transferred to the online self-service page used by your CTM transaction.
Once the system has authenticated the user, it is also an appropriate time for the user interface to perform any initialization or setup to prepare the user for entry into the online transaction. Such setup may include requesting for a bulk list of values data that the user interface can subsequently display to the user. Performing this activity up front may result in a general performance improvement and improved user experience.
A typical self service online transaction user interface might perform the following actions:
To allow a new user to register and a returning user to login, see Setting Up CTM for New User Registration.
To initialize retrieval of list of values for specific fields:
After authenticating the user, optionally formulate a bulk List-Of-Values request message.
Submit the request message to the SCC_GET_LOV service operation.
Store the List-Of-Value results in a temporary storage area for use throughout the online transaction functioning.
Refer to the third step related to list of values discussed in the Creation considerations topic of this subsection.
To retrieve saved transactions:
If the online transaction allows the self-service user to save an incomplete transaction in order to come back later, create a page where you can display the incomplete transaction names so a user can select the proper transaction to complete. A get service will retrieve the saved data.
Self-service user interfaces constructed using tools external to your PeopleSoft Campus Solutions database may contain data fields that have predefined or prompt values used to control and streamline data entry for a user. If you want to display these values that are set up inside your PeopleSoft Campus Solutions database, whether it is for a prompt field or a field that contains translate values, you can take advantage of the List of Values web service to do so. This delivered web service recognizes and provides the values that are used to populate drop-down list boxes on a user interface and for validating selections.
In the Transaction Setup component you create a Transaction Code and associate the data update rule value and the Search/Match parameters you want to use when the transaction is performed. Now, for your CTM consumer, depending on the values entered by a self-service user while performing the transaction, you may want to use different data update rules and Search/Match settings. For instance, the AAWS Online Application may allow online users to apply to an institution PSUNV and to an academic career UGRD. Now a different online user may apply to institution ORACL and to an academic career GRAD. Because the different institutions or the different academic careers business processes may differ, you may need to use different data update rule codes or different Search/Match parameters to process these two transactions. This is achieved by setting two different transaction codes and using a setup component that will interpret, based on the data entered by the self-service user, which transaction code to use. Notice that this is possible because the same staging records, production records, application classes and user interface are used to perform the two transactions. Only the values entered vary.
Therefore, depending on the nature of the CTM consumer you are creating, you may, like for AAWS Online Application, need to create multiple transaction codes for the same transaction. You do so if you want to use a specific data update rule code or Search/Match parameters based on the values entered by the self-service user while performing the transaction. A setup component for the CTM consumer will therefore need to be created to identify what fields and values should define which Transaction Code to use. The transaction codes will use the same staging and production records, the same application classes, the same entities, and the same staging component. Only the data update rule or the Search/Match parameters (defined for the Transaction Code) could be different based on the data entered by the self-service user.
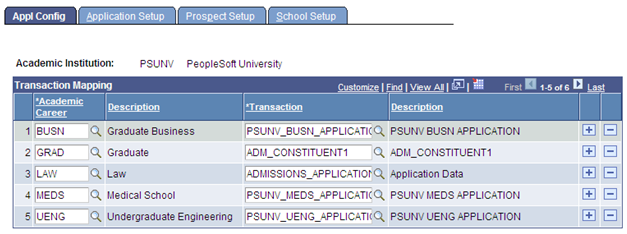
An example of a setup component for a CTM consumer is delivered with the AAWS admission transaction: Application Configuration component (SAD_ADM_APL_CONFIG). Typical to admissions, their business processes function differently from one institution to another and from one academic career to another. While the staging and the production tables are the same, the behavior to update them and to process the transaction varies depending on the institution and the academic career values entered by the self-service user.
The following shows the extended transaction setup component delivered with the AAWS admissions online application transaction. To access this component, select
Image: Example of an extended transaction setup component – Application Configuration component
This example illustrates the fields and controls on the Example of an extended transaction setup component – Application Configuration component. You can find definitions for the fields and controls later on this page.
When a self-service user or an administrator uses the institution-created user interface to perform an online transaction, logic should be in place inside the user interface to interrogate the extended transaction setup component to determine which Transaction Code to use based on the values entered by the user.
For example, a transaction code PSUNV_UGRD_EXAMPLE is created with a data update rule value DO_NOT_UPDATE_RULE and a second transaction code ORACL_GRAD_EXAMPLE with a different data update rule value DEFAULT_UPDATE_RULE. The extended transaction setup component should specify that for institution PSUNV and academic career UGRD, the transaction code to use is PSUNV_UGRD_EXAMPLE. And for institution ORACL and academic career GRAD to use transaction code ORACL_GRAD_EXAMPLE.
Note: The Application Configuration component supports only AAWS.
When you use an entity profile, CTM will identify the entity profile ID and prepare a response message based on the profile setting. Using an entity profile improves web service performance because you can set the payload size of the response message. Currently, only service requests whose response message contains the Constituent entity can take advantage of CTM entity profiling.
To set up an entity profile for an online transaction:
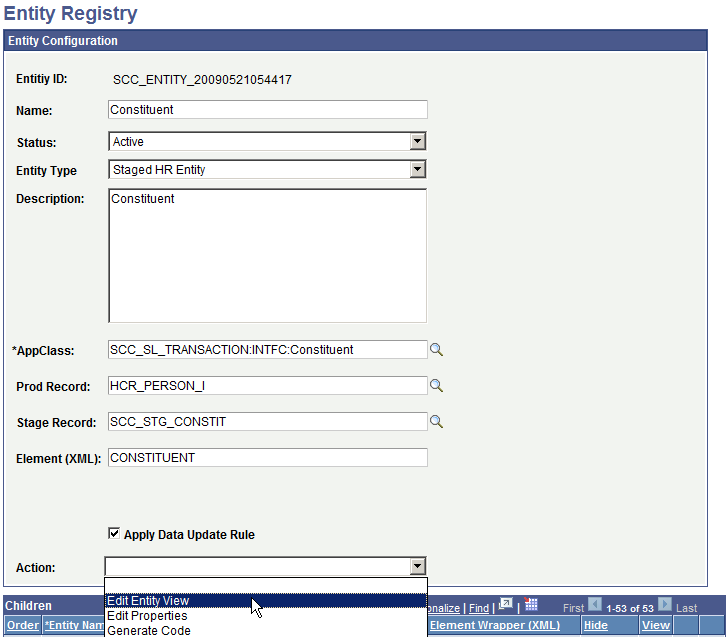
Go to
Search for Constituent. The Entity Configuration page appears.
From the Action drop-down field, select Edit Entity View.
Image: Edit Constituent Entity View (example)
This example illustrates the fields and controls on the Edit Constituent Entity View (example).
To add an entity view, click the + button to add a row.
In Entity View Name, enter a name for the view. For example, PROFILE_TESTER.
Scroll down to the Entity Children region, then select the entities you do not want to appear in the response message. For example, if you select all entities in the list and leave the child entity ‘Name’ deselected, only Name will appear in the response message.
Save your changes.
Associate the entity view you created to an entity profile:
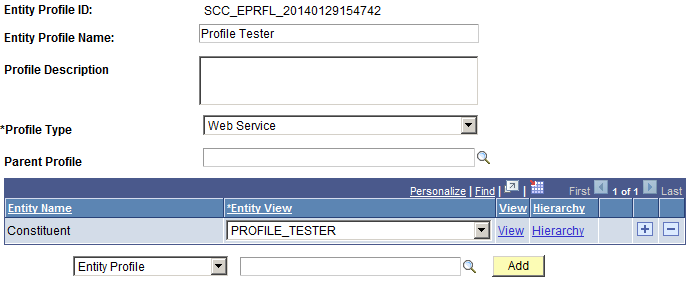
Go to Set Up SACR, System Administration, Entity, Entity Profile.
Click Add a New Value to set up an entity profile.
In Entity Profile Name, provide a name for the profile.
In Profile Type, select Web Service.
Click Save and an Entity Profile ID is generated.
Image: CTM — Entity Profile Example page
This example illustrates the fields and controls on the CTM — Entity Profile Example page.
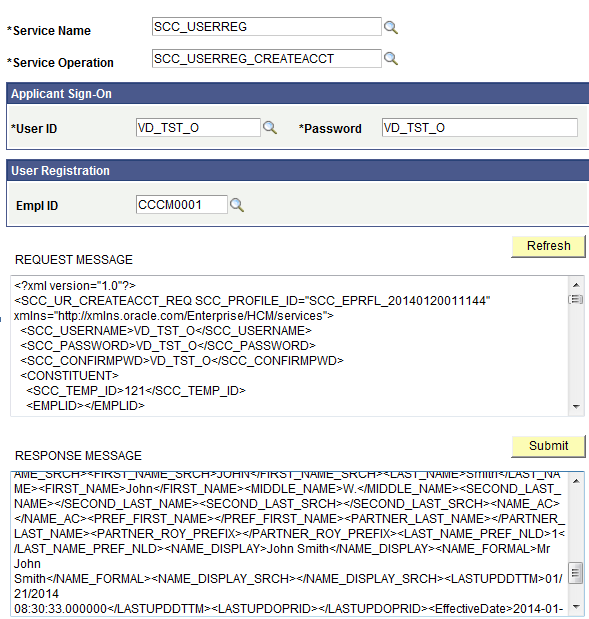
To test the entity profile, submit a service request for SCC_USERREG using any service tester. In the request message, make sure you include the attribute SCC_PROFILE_ID, and use the value that was generated for Entity Profile ID.
The response message should return only the entity or entities you selected when you created the entity view.
Image: Service Request for SCC_USERREG - Response Message example
This example illustrates the fields and controls on the Service Request for SCC_USERREG - Response Message example.