Setting Up List of Values
This section discusses how to set up list of values.
|
Page Name |
Definition Name |
Navigation |
Usage |
|---|---|---|---|
|
List of Values Setup |
SCC_SL_LOV |
|
Define how the Get LOV service operation should return the list of values for a field. The system uses this setup when the external user interface calls the Get List of Values service operation. |
Access the List of Values Setup page ().
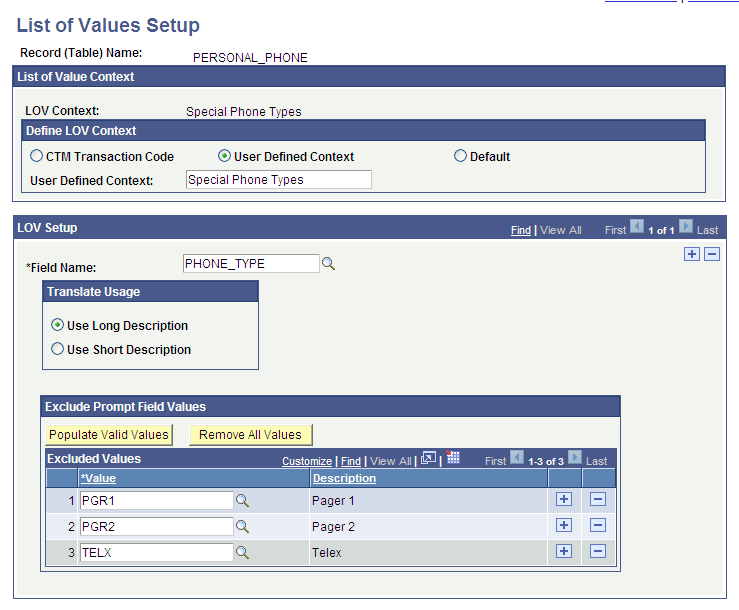
Image: List of Values Setup page (1 of 2)
This example illustrates the fields and controls on the List of Values Setup page (1 of 2). You can find definitions for the fields and controls later on this page.
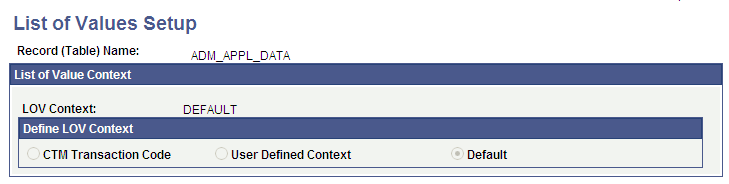
Image: List of Values Setup page (2 of 2)
This example illustrates the fields and controls on the List of Values Setup page (2 of 2). You can find definitions for the fields and controls later on this page.
You configure list of values for a specific record name and field name. Because multiple external UIs can use the same record-field name combination and a single UI can use the same record-field name combination differently, you need to identify in which context the setup should be used. You do that by defining a LOV Context. Here is an example of when you will use two different contexts for a record-field name combination. Suppose you want to create an external UI that prospect students will use to review information about the academic programs your institution offers. The Academic Program list or prompt field in the UI should display the list of programs offered for all academic careers. On the other hand, you want to create another external UI that allows an applicant to apply to a specific program for a specific career. In such a case, you want the Academic Program list or prompt field to display the list of programs for which you are ready to accept online applications for a particular career, such as undergraduate. In both UIs, you want to use the Academic Program field (that is, record name ADM_APPL_DATA and field name ACAD_PROG), but the UIs should display different list of values. To support this functionality, you may have two contexts for ADM_APPL_DATA record name and ACAD_PROG field name with different settings to exclude some values. The combination of LOV Context, record name and field name determines which setup to use, to return to the users the proper list of values for a Campus Solutions translate field or a prompt field.
You can also configure, using the same LOV Context, record name, and field name combination, different list of values settings depending on whether the external user interface is used by a self-service user (Self-Service Mode) or an administrative user (Administrator Mode). This is dictated by the external UI logic and the information is passed inside the LOV service operation (SCC_ADMIN_MODE element is included inside the LOV request message). Whether or not the external UI passes SCC_ADMIN_MODE parameter determines which LOV mode settings are used by the service. Setting the list of values differently for self-service users and administrators can be useful, for example, if you want to restrict the number of values returned to the self-service users or to show them the long descriptions. For your administrative users, it may be more appropriate to show them the short descriptions to enable them to select from a larger list of values.
See Using Self-Service and Administrator Modes for Online CTM Transactions.
|
Field or Control |
Definition |
|---|---|
| Record (Table) Name |
Indicates the record reference that you want to configure to determine how the list of values should be returned. You specify the record name when you access the List of Values Setup page in Add mode. |
List of Value Context
You define a list of values set up for a combination of a record name and a field name.
Multiple external UIs can use the combination and you can have multiple lists of values setup records for a single record-field combination based on the UI logic. Due to this reason you can define in what context the list of values settings are applicable for the record-field combination.
Use the List of Value Context group box to define a context.
|
Field or Control |
Definition |
|---|---|
| LOV Context |
Required. Define the context in which the list of values settings for the record-field name combination will be used. This field is display-only and you can populate a value in this field only by selecting one of the options in the Define LOV Context group box. You define a LOV Context when you create a list of values setup record on the List of Values Setup page. When you save the record, the LOV Context field becomes uneditable. Note: While the LOV Context is required inside the List of Values Setup component, it is optional inside the LOV request message. When the request message does not contain a LOV Context, the LOV response message returns the list of values for the DEFAULT LOV Context setup, for the record-field combination. If DEFAULT is not set up for the record-field combination, the service returns the list of values based on the prompt table or the field properties (in the case of a translate field) defined for the record and field in the Application Designer. |
Define LOV Context
Select an option to indicate which LOV Context the list of values service should use:
|
Field or Control |
Definition |
|---|---|
| CTM Transaction Code |
Select if this list of values setup is specific to a single Constituent Transaction Management (CTM) transaction. By selecting this option, you name the LOV context the same as the transaction code. When you select this option, the Transactions Code field becomes available. Note: This option is editable only when you create a new list of values setup. |
| Transactions Code |
Enter a transaction code that the system should name as the LOV context. Note that the lookup for this field displays only the Active Transaction Code values (SCC_TRNSAC_DTLS.SCC_TRANSAC_CD). |
| User Defined Context |
Select if this list of values setup is specific to a user-defined context. For instance, suppose multiple CTM Transaction Codes use the same UI. In such a case, the UI should select a single LOV context that applies to the multiple transaction codes. In addition, you can select this option when the UI is used outside of CTM. When you select this option, the User Defined Context text box field becomes available. Note: This option is editable only when you create a new list of values setup. |
| User Defined Context (text box field) |
Enter a name for the LOV Context. |
| Default |
Select to set this list of values setup as the default. Select this option when the list of values setup for the selected record name and field name is applicable to all of your external UIs in all circumstances. A default LOV Context is also useful when no LOV Context is included inside the LOV request message (only a record-field combination is included). In such a case, the response message, if it exists, will return the list of values for the Default LOV Context, for the record-field combination. Note: This option is editable only when you create a new list of values setup. |
LOV Setup
Use this scroll area to define the list of value settings for a specific field (Field Name) in the record (Record (Table) Name). You can define list of values settings for multiple fields in a record.
|
Field or Control |
Definition |
|---|---|
| Field Name |
Enter the field whose list of values you want to modify. A record may have multiple fields and therefore multiple rows may exist on the LOV Setup scroll area because:
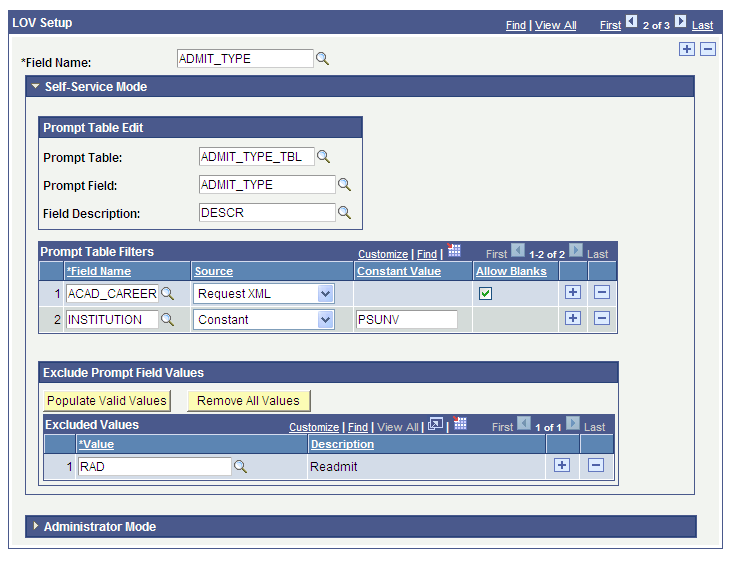
If you enter a field name that has a user-defined list of values (that is, a prompt field), the system displays the Self-Service Mode and Administrator Mode collapsible sections. Examples of fields that have user-defined list of values include ACAD_CAREER and ADMIT_TYPE for the ADM_APPL_DATA record. If you enter a field name that is set up with translate values in its properties, the system hides the Self-Service Mode and Administrator Mode collapsible sections and displays the Translate Usage group box. Example of a field that has translate values is HOUSING_INTEREST for the ADM_APPL_DATA record. |
Self-Service Mode and Administrator Mode
These two collapsible sections appear only for a field name that has a user-defined list of values.
Use the Self-Service Mode collapsible section to control the list of values returned to the external UI accessed by self-service users.
Use the Administrator Mode collapsible section if you want to configure the list of returned values differently when an administrator uses the same record name and field name in the same context. Using the self-service or the administrator mode is dictated by the SCC_ADMIN_MODE logic you put in the external UI. If the external UI includes SCC_ADMIN_MODE in the request message, the service determines that it has to use the Administrator mode. Conversely, if the external UI does not include SCC_ADMIN_MODE in the request message, the service determines that it has to use the Self-Service mode.
In the collapsible sections, you can identify the criteria that the service should use to return the list of values. To define the criteria, you can:
Use the Prompt Table Edit group box to select the table (or the view) you want to prompt to retrieve the list of values.
By default, the system populates the Prompt Table and the Prompt Field fields with the prompt table information defined in Application Designer for the record and the field name you selected. Using a view here can be useful if you want to add logic to restrict the list of values based on criteria of your choice.
Use the Prompt Table Filters grid to filter the values in the selected prompt table.
To filter, you can set up a constant or force the values to come from the xml request. In the latter case, the value needs to come from the external UI (whether it is entered by a user or programmatically forced by the UI logic), For example, in the previous List of Values Setup page graphic example, the setup is asking the external UI to specify an academic career (ACAD_CAREER) to filter the admit types to return (ADMIT_TYPE field). The academic career value is either entered by the external UI user or programmatically defined by the UI logic.
Use the Exclude Prompt Field Values group box to indicate the values you want to exclude from the list of values returned to the self-service users or administrative users.
Note: When you use Administrator Mode, the academic structure security settings restrict the list of values that the service returns. Examples of academic structure security settings include: institution, career, program, and plan security. Therefore, in such cases, administrators can view only those values for which they are authorized to access, as defined in the List of Values Setup component and the academic structure security settings.
Prompt Table Edit
|
Field or Control |
Definition |
|---|---|
| Prompt Table |
Select the table from which you want the Get List of Values service operation to retrieve the values. The system populates the Prompt Table field, by default, with the prompt table defined in Application Designer for the record name and field name. You can change this value to select a different prompt table to display the proper values. For example, you could create a view that uses an SQL to further restrict the values to return to the external UI. Note: If selected prompt table is a secured table, the external UI users will need to have the proper security to access certain values. In Campus Solutions, granting security access to secured tables is often controlled by User ID under While administrators should always have a User ID, self-service users may not have a User ID. Because self-service users may not have a User ID, on the Self-Service Mode collapsible section, you may need to select a prompt table for which the system does not apply User ID security. Warning! You cannot use a dynamic view or a derived record as a prompt table because they are not a reliable list of values source for the service operation. |
| Prompt Field |
Select the column from which you want the service operation to retrieve the values. The system populates this field, by default, with the field name defined in Application Designer for the record and field name. You can change this value to select a different field name to display the desired values. |
| Field Description |
Indicate which description field you want the service to use to return the list of values. The choices are the fields contained inside the Prompt Table record you selected. If you know that the external UI users are familiar with seeing the values' short description you could indicate to display the short descriptions, if it is present inside the prompt table. Displaying a list of short descriptions could be appropriate for administrators. But if you want the external UI to display the full descriptions for the values, you may want to indicate to display the long descriptions if it is present inside the prompt table. For example, administrators may be familiar with seeing the short descriptions for the Academic Career values, but a self-service user might find it more useful to see the long descriptions. In such a case, you would set up the value descriptions so that the administrator would see the short description, UGRD and the self service user would see the long description, Undergraduate. Depending on the description field that you select, the LOV response message will return the list of values with the desired descriptions. Warning! If you do not enter a description field, the Get LOV response message will return codes without descriptions. Warning! While the Field Description prompt shows all the fields contained inside the selected prompt table, make sure you select a field that really stores a description. For instance the long description field is often called DESCR and the short description DESCRSHORT. Selecting a field not related to description will result in wrong behavior. |
Prompt Table Filters
Use this grid to filter the list of values, based on data populated for certain fields.
On this grid, list the fields that the system will use to filter the list of values. The filtering will be performed based on how these fields are populated. The filtering data can be populated by the UI (when Request XML is selected) or by setting a constant (when Constant is selected). This is useful especially when key fields need to be populated prior to retrieving the list of values. To do so, you select the key fields that are contained inside the selected prompt table. The service will then need values for these key fields to return the appropriate list of values for the selected prompt field. For instance, if you set up list of values for the ADM_APPL_PROG record name and the ADMIT_TERM field name, the prompt table, by default, to return the ADMIT_TERM values is TERM_TBL. In Campus Solutions, you link defined terms to every academic career at an academic institution (Set Up SACR, Foundation Tables, Term Setup, Term/Session Table, Term Table). Therefore, if you enter in the Prompt Table Filters grid, the key field names - ACAD_CAREER and INSTITUTION - which are part of TERM_TBL, you will ensure that the service returns the proper admit term values in accordance to the user selections.
Additionally, use the Prompt Table Filters grid to list any non-key fields that can help filter even more the list of valid values returned to the users.
The grid functions like the conditions you would have in an SQL query. For instance, return values where ACAD_CAREER = <value from the UI> AND INSTITUTION = 'PSUNV' (a constant).
There are two ways to select a source for the key field name value:
Select XML Request if you want the external UI user to populate the field name.
Continuing with the previous example, you can select XML Request for ACAD_CAREER to make the external UI specify an academic career value when it requests for a list of admits term values. The Get List of Values service operation will use the field names marked with XML Request as input parameters.
Specify a Constant if you want to force the UI to use a fixed value.
Continuing with the previous example, you can specify a constant PSUNV for INSTITUTION in the Prompt Table Filters grid. This will ensure that the service knows that it has to return a list of admit term values for PSUNV. By forcing a constant value, you do not need to include the field inside the external UI (that is, the user does not need to see a field which is set up with a constant value).
|
Field or Control |
Definition |
|---|---|
| Field Name |
Enter the key and non-key fields to filter the list of valid values to return to the external UI. The system prompts you from the fields in the prompt table that you selected on the Prompt Table Edit group box. |
| Source |
Define the source from where the value for the field name should come. Valid choices are:
|
| Constant Value |
Enter the constant value that the system should populate for the field name. The system will use the constant value to filter the list of valid values to return. As an example, in the previous List of Values Setup page screen shot above, the setup indicates that the Get List of Values service operation should return a list of admit type values valid for the institution PSUNV. This field appears when you select Constant in the Source field. |
| Allow Blanks |
Select to indicate that the field value can be blank. As an example, in the previous List of Values Setup page screen shot, the ADMIT_TYPE field name depends on the ACAD_CAREER key field name for its list of values and the Allow Blank check box has been selected for ACAD_CAREER. This is because the ADMIT_TYPE_TBL prompt table can not only store admit types for a specific career, but it can also store admit types for all careers. Therefore, the external UI may choose not to send an ACAD_CAREER value while requesting for admit types. This check box appears when you select XML Request in the Source field. |
Exclude Prompt Field Values
Use this group box to exclude all or some of the values returned by the Prompt Table you selected and by the Prompt Table Filter if you had set up field names with a constant value. For example, in the previous List of Values Setup page screen shot, the setup indicates that the INSTITUTION field name is marked with a constant value PSUNV. Using the Exclude Prompt Field Values grid, you can exclude any ADMIT_TYPE values from the prompt table selected (ADMIT_TYPE_TBL record) where INSTITUTION = 'PSUNV'.
This group box is available for both types of fields: field names that have user-defined lists of values (prompt fields) and field names that have translate list of values.
Note: Limitation: The exclusions cannot be conditional. The service excludes the values that you select here regardless of the data that the external UI passes for the Prompt Table Filters fields. For instance, suppose you selected Prompt Table = 'ADM_APPL_DATA', Prompt Field = 'ACAD_CAREER', in the Prompt Table Filters grid you added field name INSTITUTION with Request XML and you excluded the value 'UGRD' (Undergraduate). Now Undergraduate may be a valid academic career for several of your institutions. In such a case, the UGRD value will be excluded regardless of the institution the users may select.
|
Field or Control |
Definition |
|---|---|
| Populate Valid Values |
Click to populate the Excluded Values grid with the field's values. You can use this button as a utility to preview the values that the service will return to the users and then decide which values, if any, you want to specifically exclude. Note: The Populate Valid Values button queries the prompt table that you selected and includes, as criteria, the constant values you may have entered inside the Prompt Table Filters grid. For instance, if you had entered in the Prompt Table Filters grid, the key field name INSTITUTION with a constant value of PSUNV, the button will query the prompt table where INSTITUTION = PSUNV. The result that the Excluded Values grid displays is a distinct list of the valid values for the selected field name. The Excluded Values grid also considers Effective Date and Effective Status when it displays the list of values. Warning! Depending on the number of values to return, the processing time when you click the button can vary. |
| Remove All Values |
Click to remove all the values from the Excluded Values grid. |
| Value |
Specify the values that you want to exclude from the external UI users. The system prompts you the values from the prompt field that you selected on the Prompt Table Edit group box. The prompt performs the same query as previously described for the Populate Valid Values button. |
| Description |
Displays the value descriptions in accordance with the Field Description value you selected in the Prompt Table Edit group box. If you have left the Field Description blank, the system does not populate this field. |
Setting up list of values for translate list of values
When you set up list of values for a field name that contains translate values, the system hides the Self-Service Mode and the Administrator Mode sections and displays the Translate Usage group box.
Use the Translate Usage group box to indicate whether you want the service to return either the long descriptions or the short descriptions as the list of values.
The Self-Service Mode and the Administrator Mode sections are not applicable for field names that have translate values.
The system also displays the Exclude Prompt Field Values grid, when you select a translate field name. The Exclude Prompt Field Values grid is described in the previous topic.
Image: Example of a field with translate list of values
This example illustrates the fields and controls on the Example of a field with translate list of values. You can find definitions for the fields and controls later on this page.