Developer Reference to Deploy New User Registration
To create user accounts, New User Registration requires two pre-defined user profiles set with the following user IDs: SCC_GUEST and SCC_SS_TEMPLATE.
Once created, those user profiles can be used as templates to grant your guests basic security access to your PeopleSoft system.
To be provisioned with application level security and transfer to a specific target page, the newly created user ID will need to be provisioned with a security role granting access to the Gatekeeper.
Creating a Role
You must create a role that contains security access to the security objects that is needed to use New User Registration (e.g. Gatekeeper and Forgot Password/Forgot User ID utilities). To create the role, use the Roles component (), then enter the following information:
|
Field |
Value |
|---|---|
|
Role Name |
<name of your choice. E.g.’CS - NUR GateKeeper’> |
|
Description |
<description of your choice> |
|
Permission Lists |
HCCPCSSA1200 - CS NUR GateKeeper. This permission list is delivered with your system. It grants security access to generic NUR objects:
HCCPCSSA1210 - CS NUR Utilities. This permission list is delivered with your system. It grants security access to optional NUR utilities such as Forgot Password and Forgot User ID:
|
Creating SCC_GUEST user ID
In PeopleTools 8.5+, any anonymous inbound request originates from the ANONYMOUS node. For example, when a guest (unknown person) requests for a user ID, the user registration service operation associates the request with the ANONYMOUS node.
To enable anonymous access to Campus Solutions web services in a secure fashion, the PeopleSoft system, by default, associates all anonymous requests with a default account: SCC_GUEST. Therefore, to use New User Registration, you need to set up a default user profile that has minimal system access. This default user profile should be set with the User ID SCC_GUEST.
To create the SCC_GUEST account, use the User Profiles component () and enter the following information:
|
Field or Control |
Definition |
|---|---|
| User ID |
SCC_GUEST |
| Symbolic ID |
<As defined for your institution> |
| Password |
<password of your choice> |
| Confirm Password |
<password of your choice> |
| Language Code |
<Language of your choice> |
| ID Type |
None |
| Role Name |
PeopleTools and Standard Non-Page Permissions and either CS – NUR GateKeeper or the role name you created above to grant access to the New User Registration Gatekeeper. Note: The anonymous user needs access to a role that contains the permission list HCCPCSSA1210 – CS NUR Utilities. In this way, the anonymous user can use the Forgot User ID and Forgot Password utilities. |
Perform the following steps to update the ANONYMOUS Integration Broker node:
Access the Node Definitions page (), and select Node Name ANONYMOUS.
In the Node Definitions tab, ensure that Node Type is set to External, the Default User ID is set to SCC_GUEST, and the Active Node and Segment Aware options are selected.
In the WS Security tab, enable WS-Security for this node by selecting an authentication token type (for instance Username Token).
Note: It is assumed that you have performed and validated all the basic Integration Broker setups prior to setting up the node. See PeopleTools: Integration Broker for information on Integration Broker gateway setup and service configuration.
Creating SCC_SS_TEMPLATE User ID
After successfully processing the user registration request, the user registration service operation creates a new account for the user. In other words, the service operation creates a PeopleTools user profile for the guest. The service operation uses the template account SCC_SS_TEMPLATE to clone its security setup and create a new account for the guest.
Create the SCC_SS_TEMPLATE account and assign any common default values that your institution wants new users to automatically receive when registering. To be authenticated to your system through New User Registration, the new user needs to have access to the Gatekeeper. Add to this user ID template the role you created above to grant access to the Gatekeeper.
To create the SCC_SS_TEMPLATE account, use the User Profiles component () and enter the following information:
|
Field or Control |
Definition |
|---|---|
| User ID |
Enter SCC_SS_TEMPLATE. |
| Symbolic ID |
<As defined for your institution> |
| Password |
<password of your choice> |
| Confirm Password |
<password of your choice> |
| Language Code |
<Language of your choice> |
| Navigator Homepage |
Enter HCSPNAVHP. |
| Process Profile |
Enter HCSPPRFL. |
| Primary |
Enter HCPPALL. Identifying a Primary Permission List is needed for personal data information getting its security information from there. For example, Citizenship, Visa Permit, Demographic Data Access (DDA), and so on. |
| Row Security |
Enter HCDPALL. |
| ID Type |
None |
| Role Name |
Examples: PeopleSoft User, Standard Non-Page Permissions and either CS – NUR GateKeeper or the role name you created above to grant access to the New User Registration Gatekeeper. Also, add any other roles you want to grant access your guests at the moment of registering. Make sure the role names you include in this generic user ID template only grant access to basic components and security objects to access your PeopleSoft Campus Solutions system. The role names provided here are only examples. |
Warning! The information given in the grid above related to SCC_SS_TEMPLATE role assignment and configuration are for use only in a testing or demo environment. Before migrating your transaction setup and the web services to a production environment, it is recommended that you complete a thorough analysis of your institution's security requirements.
It is also recommended that you allocate the SCC_SS_TEMPLATE user ID only a minimal amount of system access that is required to execute the needed web services for your self-service transactions. You define Web Services access under . For instance, any roles that you assign to the SCC_SS_TEMPLATE should contain at least a Permission List that has access to the following web services:
|
Web Services |
Service Operations |
Access |
Definition |
|---|---|---|---|
|
<custom services> |
<custom service operations> |
Full Access |
Web services you created to perform your self-service transactions. For example, to perform the AAWS online application transactions, select Service SAD_ADMISSIONS and select Full Access to each of the service operations. If you setup a transaction for Delegated Access, select Service SCC_DA and select Full Access to each of the service operations. |
|
SCC_USERREG |
SCC_USERREG_AUTHENTICATE SCC_USERREG_CREATEACCT |
Full Access |
Web services to use New User Registration and User Authentication. |
|
SCC_LOV |
SCC_GET_LOV |
Full Access |
Optional. Web service to use List of Values. |
|
SCC_SM_SERVICE |
SCC_SM_SERVICE_SYNC |
Full Access |
Optional. Grant access only if you use External Search/Match. |
|
SCC_SM_FETCH |
SCC_SM_FETCH_SYNC |
Full Access |
Optional. Grant access only if you use External Search/Match. |
Similarly, any roles that you assign to the SCC_SS_TEMPLATE user ID template should contain at least a Permission List that has access to the following HCM component interfaces that are required to operate these services (which are used by CTM to access the HCM Person data):
HCR_EMPLOYEE_CHECKLIST_SRV
HCR_IDENTIFICATN_DATA_SRV
HCR_JOB_DATA_POI_SRV
HCR_MIL_EE_TRK_SRV
HCR_NAMES_OTHER_SRV
HCR_PERSONAL_DATA_SRV
Assigning Specific Security Roles to a User
Because different online transactions integrated with New User Registration can have their own security needs, each online transaction can define these roles in the New User Registration Context page.
See Step 3: Defining New User Registration Contexts.
See Setting Up CTM for New User Registration.
For each of the online transactions you want to integrate with New User Registration, create a New User Registration Context ID or create a New User Registration Context ID that will serve as default.
Set up the following on the database of the Kiosk:
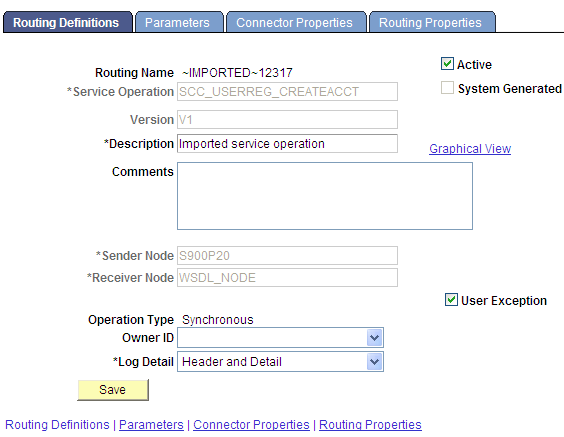
The User Exception check box needs to set on the Routing Definition page of the Kiosk. When the check box is selected, in case an error is encountered during processing it allows the system to capture the SOAP fault and display it. Else, when the check box is not selected the system responds with a HTTP 500 error. To access the Routing Definition page, select
Image: Routing Definitions page
This example illustrates the fields and controls on the Routing Definitions page. You can find definitions for the fields and controls later on this page.
Verify that the gateway is active. To access the Gateways page, select .
Image: Gateways page
This example illustrates the fields and controls on the Gateways page. You can find definitions for the fields and controls later on this page.
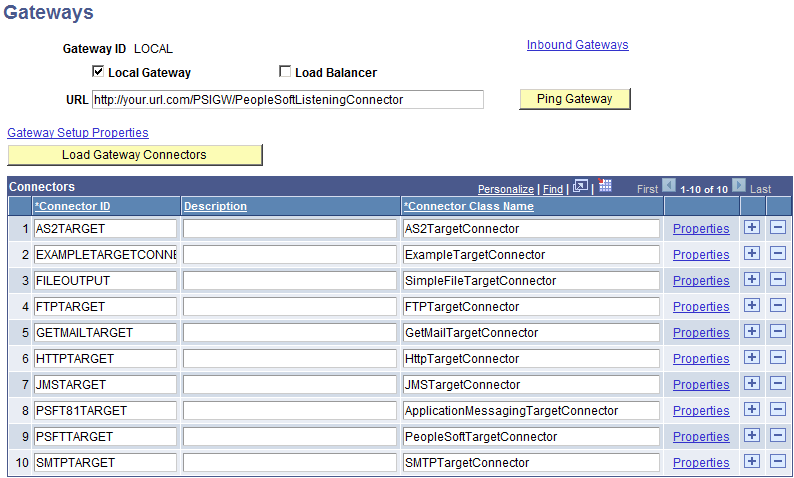
Press the Ping Gateway button to make sure the gateway is active. The Status displays ACTIVE.
Note: The gateway needs to be active on both the Kiosk as well as the production environments.
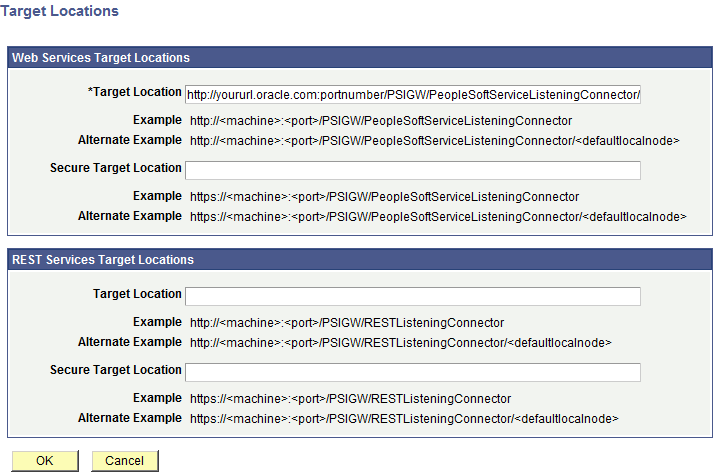
Verify that the setup target location is configured. To access the Target Locations page, select . In the Service Configuration tab, click the Setup Target Locations link.
Image: Target Locations page
This example illustrates the fields and controls on the Target Locations page. You can find definitions for the fields and controls later on this page.
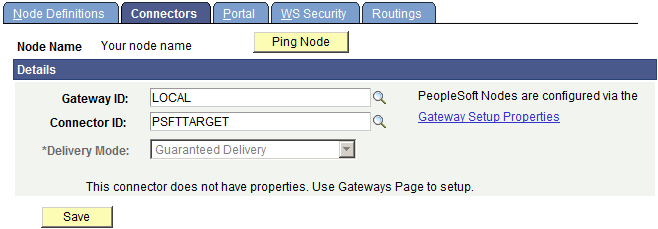
Verify that you can ping the node. To access the Connectors page, select . From the Connectors page, press the Ping Node button.
Click the Ping Node button to verify the results. Make sure Message Text shows Success.
Image: Connectors page
This example illustrates the fields and controls on the Connectors page. You can find definitions for the fields and controls later on this page.
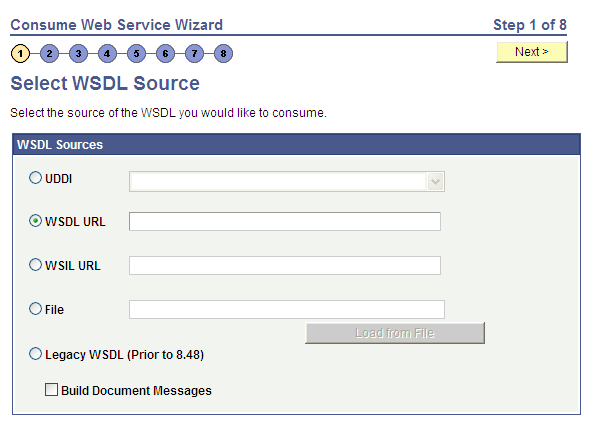
During the consume web services step ensure that the Build Documents Message check box is cleared. To access the Consume Web Services wizard, select .
Image: Consume Web Service Wizard page
This example illustrates the fields and controls on the Consume Web Service Wizard page. You can find definitions for the fields and controls later on this page.
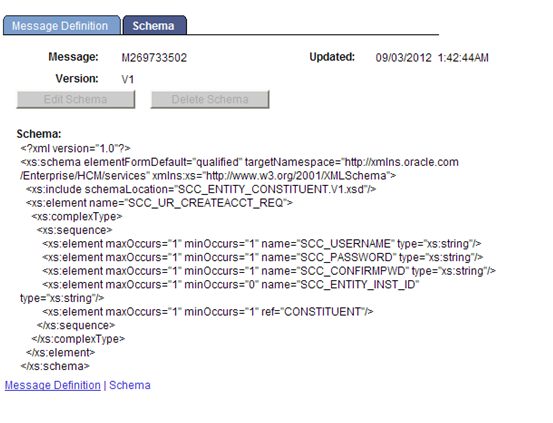
Verify that schema exists for the imported message. To access this schema, first navigate to the General page of the service operation(), then click the View Message link for the message, and finally click the Schema tab.
Image: Schema page
This example illustrates the fields and controls on the Schema page. You can find definitions for the fields and controls later on this page.
Use the Provide Web Service page to publish the SCC_USERREG web service ().
New User Registration includes the SCC_USERREG web service with the following service operations:
SCC_USERREG_AUTHENTICATE
SCC_USERREG_CREATEACCT
SCC_USERREG_GET_PASSWORD
SCC_USERREG_GET_PSWD_HINT
SCC_USERREG_GET_USERID
SCC_CHECK_AUTH
Note: Activate this only if you use Simplified Campus Experience
See the product documentation for PeopleSoft Integration Broker.
The URL triggers the NUR framework. It transfers your anonymous users to your New User Registration login page. To facilitate the consumption of the NUR framework, you can use the New User Registration Installation page to automatically generate the URL. The URL is embedded with the environment information you specify as well as the logic that the NUR framework provides. For example, the autologger and gatekeeper information. You use the New User Registration Installation page, and, optionally, the New User Registration Context page to configure the NUR constants, and activate the Production or Tester URL. Use the Production URL if you are ready to deploy your online transactions, and the Tester URL to test your online transactions.
You can hardcode the URL in your applications, although it is recommended to use logic to dynamically refer to the URL. As part of the NUR framework, the application class SCC_IDENTITY_MGR.UTIL.NURConstants contains the logic to use the URL that you specify as Active in the New User Registration Context page. To see an example of how the application class is extended, see the Delegated Access application class SCC_DA.NOTIFICATION.NOTIFY.OnExecute. In this application class, the NUR context ID for Delegated Access is hardcoded: SCC_NURCTXT_20120918102441. The method ActiveAutoGenURL is implemented to retrieve the proper URL that you would include in an email message. For Delegated Access, an email message is sent to the proxies to inform them how to access the school system. It includes the URL (a hyperlink) that is also dynamically retrieved.
When you dynamically refer to the URL, it ensures that if there are any changes to the New User Registration constants, the current URL will always be retrieved. It also allows you to easily switch between your Tester URL and Production URL.
See product documentation for PeopleTools: Portal Technology, Configuring the Portal Environment, Understanding Web Profiles.
The permission list HCCPCSSA1200 - CS NUR GateKeeper is used to access the Gatekeeper. Add this permission list to a role that you want to assign to all of your users that could potentially register with your system through a New User Registration login page. For example, students, alumni, applicants, and so on.
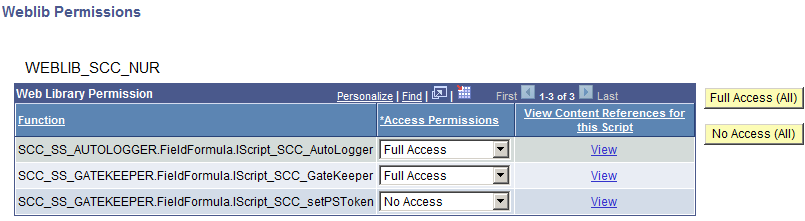
The HCCPCSSA1200 permission list grants access to the web library WEBLIB_SCC_NUR.
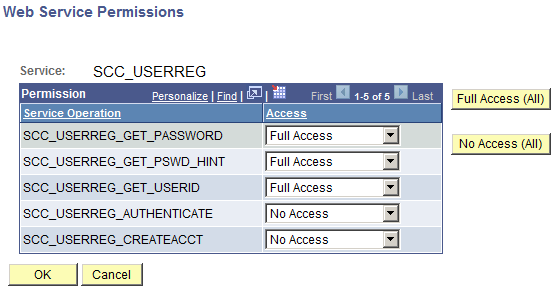
Image: HCCPCSSA1200 Web Service Permissions Page
This example illustrates the fields and controls on the HCCPCSSA1200 Web Service Permissions Page.
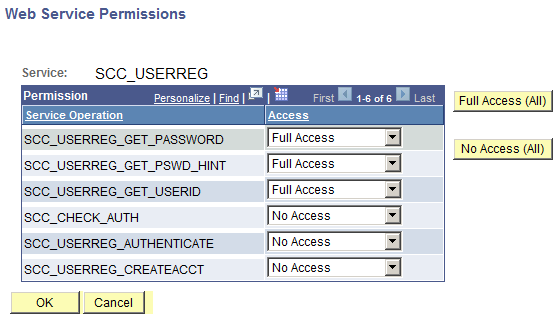
The web library grants access to the following permissions:
Image: WEBLIB_SCC_NUR Weblib Permissions Page
This example illustrates the fields and controls on the WEBLIB_SCC_NUR Weblib Permissions Page.
Having security access to the Gatekeeper will allow your existing users to sign in through New User Registration login page with an existing user ID and password, and take advantage of the Gatekeeper functions. For example, automatic application level provisioning and page transfer after successfully signing into your system. If users do not have access to the Gatekeeper, they see the following error after they are authenticated: Not Authorized.
If you implement the New User Registration Forgot Password and Forgot User ID utilities, your existing users will also need to have access to the HCCPCSSA1210 permission list. This permission list grants access to the web services that are needed for the Forgot Password and Forgot User ID utilities.
Image: HCCPCSSA1210 Web Service Permissions Page
This example illustrates the fields and controls on the HCCPCSSA1210 Web Service Permissions Page.
For guest users, create a new role that exclusively contains the HCCPCSSA1200 permission list. Also, when you implement the New User Registration Forgot Password and Forgot User ID utilities, include the HCCPCSSA1210 permission list. Add this role to the SCC_SS_TEMPLATE user ID. By default, the guest will be provisioned with all the security setup inside that user ID.
To configure the Forgot User ID Utility:
Store email addresses in the PSOPRDEFN.EMAILID and PSUSEREMAIL.EMAILID records where PRIMARY_EMAIL = ‘Y’.
To take advantage of the Forgot User ID utility, all users must have an email address stored in their user profile. When users forget their user ID, they are asked to enter their email address. The email address is matched to the one stored in your system. This email address must match only one user profile stored in your system.
You can require users that are created through the SCC_USERREG_CREATEACCT service operation to enter an email address. For example, guests who create their own account using the New User Registration login page. To require users to enter an email address, select this option in the New User Registration Installation page. The email address users enter at account creation time is automatically stored in the newly created user profile. The email address is used to populate the records PSOPRDEFN.EMAILID and PSUSEREMAIL.EMAILID with an email type (EMAILTYPE field), and the PRIMARY_EMAIL field must be selected.
See:
PeopleTools: Security Administration, “Setting General User Profile Attributes”
Set up the Notifications Framework.
If necessary, set up the generic template NUR_EMAIL_OPRID. The generic template NUR_EMAIL_OPRID is configured for the Forgot User ID email message. You can modify the text of this template. To set up the template, go to
See Understanding New User Registration, Notifications Framework and New User Registration.
Verify the notification setup and the email recipients for the generic template. This setup is delivered with your system as sample data (Notification Template ID SCC_NTF_TMP_20130213051038 – NUR_EMAIL_OPRID). To view the setup, go to
Verify the setup for the notification consumer for New User Registration. This is delivered with your system as sample data (Notification Consumer ID SCC_NTF_CON_20121212000832 – New User Registration). To view the setup, go to
Grant all users access to a permission list that is set up to grant access to the Forgot My User ID page.
To configure the Forgot Password Utility:
Store email addresses in the PSOPRDEFN.EMAILID and PSUSEREMAIL.EMAILID records where PRIMARY_EMAIL = ‘Y’.
The New User Registration Forgot Password utility leverages the PeopleTools security function for forgotten passwords. This function uses the PeopleTools Workflow and requires users to have an email address stored in their user profile (General tab, Edit Email Address link).
To take advantage of the Forgot Password utility, you can require users that are created through the SCC_USERREG_CREATEACCT service operation to enter an email address. For example, guests who create their own account using the New User Registration login page. To require users to enter an email address, select this option in the New User Registration Installation page. The email address users enter at account creation time is automatically stored in the newly created user profile. The email address is used to populate the records PSOPRDEFN.EMAILID and PSUSEREMAIL.EMAILID with an email type (EMAILTYPE field), and the PRIMARY_EMAIL field must be selected.
See:
PeopleTools: Security Administration, “Setting General User Profile Attributes”
Create the URL you include in the forgotten password email text.
When you use the Forgot Password utility, the user receives an email message that contains the newly generated password. In the email message, it is recommended that you include a URL to access the New User Registration login page. Use the URL to force users to reset the temporary password they received. After users log in with their temporary password, they should be automatically redirected to the Change Password page. The URL you use must be embedded with the New User Registration context ID that grants the newly authenticated user the security to access and immediate transfer to the Change Password page. Your system includes a New User Registration Context ID sample: SCC_NURCTXT_20130211110717 - NUR_CHANGE_PASSWORD. Make sure the generic URL you use has been configured using the New User Registration Installation page.
See:
Create password hint questions.
To use the Forgot Password utility, users need to answer a security question or password hint question. To create password hint questions, go to
See PeopleTools: Security Administration, “Creating Hints for Forgot Passwords.”
Set up the Forgot Password email text.
When the user initiates the Forgot Password utility and successfully answers the security question, an email message is sent to the email address that is stored in the user's profile. It includes a newly generated password. You can configure the email message text by going to
The email text must include the <<%PASSWORD>> tag. PeopleTools replaces the tag with the newly generated password. To facilitate user experience, it is recommended that you also include a URL that transfers the user automatically to the New User Registration sample login page (or your own version of this page). This is the URL you create in step 2. This forces the user to immediately change the newly received password. The PeopleTools email text editor allows you to easily paste a URL. You can use the URL you marked as Active in the New User Registration context ID in your system (SCC_NURCTXT_20130211110717 - NUR_CHANGE_PASSWORD).
This is an example of an email text:
You are receiving this auto-generated email message because you requested your Campus Solutions password to be reset. Use the following temporary password: <<%PASSWORD>>. Click this link or copy the below URL to access the system with your newly generated password. You will be requested to change the temporary password immediately.” https://yourKioskServer.yourKioskDomain.com/psc/ps/EMPLOYEE/HRMS/c/SCC_NUR.SCC_NUR_REG.GBL=start?CAMPUS_URL=https%3a%2f%2fyourCSServer.yourCSDomain.com%2fpsc%2fps%2fEMPLOYEE%2fHRMS%2fs%2fWEBLIB_SCC_NUR.SCC_SS_GATEKEEPER.FieldFormula.IScript_SCC_GateKeeper%3fSCC_APPL_CONTXT_ID%3dSCC_NURCTXT_20130211110717
See PeopleTools: Security Administration, “Working with Passwords.”
Grant all your users access to a self-service page where they can respond to a security question.
Delivered with your system with the generic PeopleTools security a self-service user can answer is a security question under Home page, My System Profile. In the General Profile Information page (USER_SELF_SERVICE), by clicking the link Change or set up forgotten password help, the user can select a question and enter a response. This page is delivered with your system and security needs to be granted to all of your users. Alternatively, a simpler self-service version of this page could be created.
Configure the Forget My Password page.
This is a delivered custom version of the Tools page EMAIL_PSWD as public.
See PeopleTools: Security Administration, “Working with User Profiles Across Multiple PeopleSoft Databases, Implementing Default User Profile Synchronization.”
Make sure you grant all your users access to a permission list set up with Allow Password to be Emailed and Forgot My Password.
Set up the New User Registration context ID for the Change My Password page, or use the SCC_NURCTXT_20130211110717 - NUR_CHANGE_PASSWORD context ID.
Set the PeopleTools Workflow to activate email.
The New User Registration Forgot Password utility leverages the PeopleTools send password functionality. Because this functionality uses the PeopleTools Workflow, the following setup is required:
Go to
In the make sure the Worklists Active and the Email Active checkboxes are selected.
Reboot the application server for the changes to take effect.