Understanding New User Registration
New User Registration is a framework that enables a user to sign in to the Campus Solutions system in order to complete a specific online self-service transaction. For example, on your institution’s portal you could indicate the steps a future applicant should perform in order to apply online. In this case the specific online self-service transaction is the online application. You can provide a link to transfer the user to your Campus Solutions database where the future applicant first needs to sign in. Going through New User Registration, the user can either create a user ID and password, or use an existing user ID to sign in to your system. New User Registration assigns the newly created user profile with generic security roles that are required to access your system. When the user profile is created or when the user uses an existing user ID, New User Registration assigns security roles to the user profile that are specific to the online transaction to which the New User Registration framework is integrated. Once the user is authenticated, New User Registration immediately redirects the user to a predefined target page that is related to that specific online transaction.
In a nutshell, New User Registration offers user validation, user registration, system authentication, generic and specific (just-in-time) security provisioning, and easy navigation access by transferring the newly authenticated user to a predefined target page specific to the online self-service transaction the user elected to perform.
Consider this example. If you use Admission Applications Web Services (AAWS) and deployed an online application self-service component, an online applicant will first use New User Registration to register for a user ID (or first get authenticated if the applicant already has a user ID) and then perform the online application transaction, such as submitting an application. In this case, after being successfully authenticated to your system, the system provisions the applicant’s user profile with the role security specific to access your online application page and then immediately redirects the applicant to this online application page. Another example is, if you are using the Delegated Access feature, a person who received delegated access (a proxy) could first use New User Registration to access your system by either creating a user ID or reusing an existing user ID. Once successfully authenticated through New User Registration, the system could provision the proxy’s user profile with a security role needed to access the Delegated Access initial page (the Proxy Terms and Conditions page).
New User Registration provides web service operations that you can use on your user interface to:
Create a user account (user ID) (SCC_USERREG_CREATEACCT)
Authenticate a user (SCC_USERREG_AUTHENTICATE)
Retrieve a user ID (SCC_USERREG_GET_USERID)
Reset a password (SCC_USERREG_GET_PASSWORD and SCC_USERREG_GET_PSWD_HINT)
Check if authenticated users have the proper security role (authorization) (SCC_CHECK_AUTH)
Also, New User Registration is a consumer of the Constituent Transaction Management (CTM) framework (delivered CTM transaction code is NEW_USER_REGISTRATION). This allows staging of any constituent information that is entered at the time of registering a new user ID. For example, when creating a user ID you may want to ask users to enter their name, email address, and so on. If the online transaction integrated with New User Registration is defined as a CTM transaction, it can reuse or display the constituent data that was entered at registration time in the self-service transaction pages (that is, if the CTM transaction is partitioned by constituent).
Your system is provided with two sample login pages: New User Registration login sample page and New User Registration Tester page. Both are visually similar and allow a user to create a user ID or use an existing user ID to access your system. The New User Registration login sample page is fully integrated with all the New User Registration framework security objects. It is an example of how your own custom login page can be integrated and deployed with New User Registration. For example, it can reside outside of your firewall and be set as a Kiosk. The New User Registration Tester page can be used by your developers to test and evaluate the New User Registration framework objects. The Tester page contains the same functionality included in the New User Registration login sample page, but is meant to be used inside the same database. This page should be used only for testing purposes and should not be deployed in a production environment.
The following diagram shows the workflow for a new user and a returning user when New User Registration framework is deployed:
Image: New User Registration User Flows
New User Registration User Flows
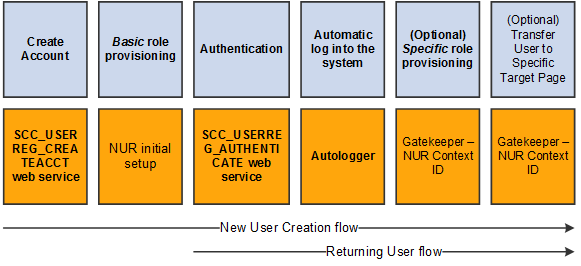
The first row of boxes indicates the steps in the workflow for a new or returning user. The second row indicates what needs to be set up so that the user can perform the step.
The following terms are important to the understanding of New User Registration framework and are used throughout the documentation.
|
Term |
Description |
|---|---|
|
Guest |
New user. A person who is unknown to the Campus Solutions system and who wants to perform an online transaction. A guest needs to register for a user ID to access the system. |
|
Returning User |
A person known to the Campus Solutions system and who wants to perform an online transaction. This person will use his or her existing user ID and password to access the system. |
|
CTM |
Constituent Transaction Management. This is a framework that allows a user to perform an online transaction without having an EMPLID known. CTM stores the constituent and the transaction-specific data in staging records. The system assigns an EMPLID only after the user saves or submits the online transaction. Using CTM allows no interruption for a user to complete an online transaction because the process that the system uses to assign an EMPLID is completely transparent to the online user. |
|
Online transaction or online self-service transaction |
This refers to the transaction that consumes the New User Registration framework. |
|
Login page |
The page used to access the Campus Solutions system. The login page is integrated with the New User Registration framework security objects. Institutions customize the sample login page or use their own page to comply with their security management requirements. |
|
Target page |
The page to which the guest or the returning user is redirected after being authenticated through the New User Registration framework. The target page is defined in the New User Registration Context setup component. |
|
Landing page |
The page to which the guest or user is redirected before registration and authentication by the system. |
|
Autologger |
An object that the New User Registration framework delivers. This object allows signing in the guest or the returning user directly into your system after being successfully authenticated. |
|
Gatekeeper |
A utility that the New User Registration framework delivers. This utility acts as a router for all requests from external clients wishing to access Campus Solutions self-service pages. An external client is a user interface that is built by an institution and that lie outside the PeopleSoft system. The Gatekeeper uses the New User Registration Context ID to provision application-specific security role and transfer the user to a specific target page after authentication. |
|
SwitchUser |
A PeopleTools function used by the New User Registration Tester sample page to autolog the guest’s or the returning user’s entered user ID. The function switches a signed in user to another one. |
|
Anonymous user |
When the guest elects to create a new user ID, he or she is first considered an anonymous user by the system. |
|
Provisioning |
New User Registration provisions security roles at two levels: Basic provisioning: When a guest creates a new user ID though New User Registration, basic roles are provisioned to the newly created user profile. Basic roles grant access to generic information that all users are required to have to access and navigate in your system. This provisioning is required. Specific provisioning: When a New User Registration Context is used, the guest or the returning user is provisioned just-in-time after being authenticated with application level security. The security provisioning done here is specific to the application integrated with New User Registration. This provisioning is optional. |
You can configure your login page to request additional personal information such as first name, last name, email address and so on when a user creates a new user ID. To store this information in the production tables, an EMPLID is required. If the user does not have an EMPLID at the time of registration, New User Registration uses the Constituent Transaction Management (CTM) framework to store the personal information in the CTM constituent staging tables. During this process, the system enters the information using a temporary ID (SCC_TEMP_ID), and uses the CTM transaction code NEW_USER_REGISTRATION that is delivered with your system. If New User Registration is followed by a subsequent CTM online transaction (and that CTM transaction is set up to be partitioned by constituent), the system can gather additional personal information, create or assign an EMPLID, then promote the staged constituent data to the respective production tables.
The following diagrams show where CTM takes place as part of the New User Registration flow:
Image: Create Account Page for New Users
This example illustrates the fields and controls on the Create Account Page for New Users. You can find definitions for the fields and controls later on this page.
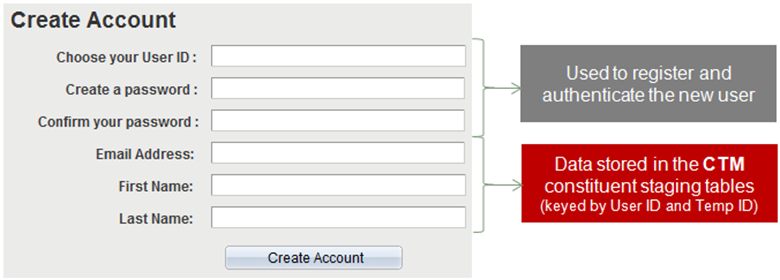
Image: Login Page for Existing Users
This example illustrates the fields and controls on the Login Page for Existing Users. You can find definitions for the fields and controls later on this page.

When New User Registration consumes CTM, the system does not trigger the process to create EMPLIDs. This prevents non-serious individuals from creating user records for themselves in your system and populating your database with dummy names or with users that will never pursue any other actions with your institution. To prevent this, CTM triggers Search/Match only when the guest performs a subsequent transaction such as an online application. Only then is the constituent data considered valid.
Note: CTM is not involved when an existing user signs into your system through New User Registration. This is because at the time of authentication the returning user is typically only asked to enter a user ID and a password.
The self-service online transaction that you integrate with New User Registration does not need to be a CTM transaction. A self-service online transaction is usually configured for CTM when the data provided by the self-service user needs to be staged before it is moved to the production tables, or when an EMPLID needs to be associated with the self-service user. Using CTM allows for no user interruption to assign an EMPLID. If the integrated self-service online transaction does not require an EMPLID to be assigned or no data to be staged, it can still be integrated with New User Registration.
The New User Registration framework uses the Notifications framework as part of the Forgot User ID utility. New User Registration triggers the Notifications framework from the New User Registration sample login page or New User Registration Tester page. When users click the Forgot your User ID link and enters their address, the system validates the email address and the user ID is retrieved. The Notifications framework sends an email to the user that contains the user’s ID.
An email template for sending an email message that contains the user’s ID is delivered with your system. It uses a custom logic to retrieve the user’s email address. This logic is delivered with your system and it matches the email address in the user’s profile with the email address users provide when they use the Forgot User ID utility. The custom logic is contained in the application class SCC_IDENTITY_MGR:NOTIFICATION:NURCustomLogicprovider.
Notification Templates for New User Registration
Email templates are delivered with your system. These generic templates establish a common format for notifications.
|
Template Name |
Description |
Trigger |
Recipient |
|---|---|---|---|
|
NUR_EMAIL_OPRID |
A basic email that includes the user ID of the requestor. Example: Email Subject: Your User ID to access the Campus Solutions system. Email Message: You are receiving this email message because you had forgotten your User ID to access the Campus Solutions system.Your User ID is TEST100 This is an auto generated email; please do not respond to this message. |
When a user clicks the Forgot your User ID link on the New User Registration sample login or Tester page. The user provides an email address, which the system validates. When the email address is valid, the user ID is retrieved and is sent through an email message. |
Users who have forgotten their user IDs. |
To modify the template, go to .
Currently, only the following variables are defined and delivered with the Forgot User ID utility. Adding more variables requires substantial programming effort.
%1 => OPRID
%2 => URL Link (not used in the delivered template)
Warning! Notifications are intended to be short and simple messages with the purpose of informing about a specific subject. The list of variables contained in each message is delivered with your system and require extensive coding effort to be modified.
Note: As part of New User Registration framework, only the Forgot User ID utility consumes the Notifications framework. The Forgot Password utility uses the PeopleTools Send Password Email utility.
A New User Registration context is optionally used when the New User Registration framework is consumed by a specific self-service online transaction. A New User Registration context is defined through a New User Registration context ID. The context ID is an optional element. You embed the context ID in a URL that is used to transfer a user to the New User Registration login page. You need a New User Registration context ID if you want to seamlessly assign application-specific security roles to the newly authenticated user, and then transfer the user to the target page for the self-service online transaction that the user wants to access. The Gatekeeper uses the Context ID that you include in the URL to grant the user the required security roles, and to access the target page.
The New User Registration Context ID is read by the Gatekeeper immediately after a user is successfully authenticated into your system. The New User Registration Context ID defines the security roles that the system should assign to the user. This ensures that the user has the required security roles to be automatically transferred to the target page for that specific self-service transaction and perform the online transaction. Both security provisioning and page transfer occur after a guest or returning user is successfully authenticated by New User Registration into your system. You can define a New User Registration Context for each online self-service transaction that you integrate with New User Registration. Each transaction will have its own security provisioned and target page information.
To define a New User Registration Context, use the New User Registration Context page (SCC_APPL_CONTEXT). The security provisioning is defined by roles and the target page can either be a PeopleSoft Internet Architecture (PIA) page defined in your PeopleSoft system or a URL to an external site. Provisioning security or transferring to a target page is optional. Create a New User Registration Context for your integrated self-service transaction only if you want to provision specific security for the transaction or to transfer the user directly to a target page related to the self-service transaction.
You can create a default New User Registration Context ID. If there is no New User Registration Context ID in the URL when a user accesses the New User Registration login page, the default context ID is used to provision security or transfer the user to a target page. In this case, you should set up your default context ID to contain generic information such as your institution’s home page, which is then used as the target page.
See: