Setting Up New User Registration Context
Access the New User Registration Context page ().
Image: New User Registration Context page
This example illustrates the fields and controls on the New User Registration Context page. You can find definitions for the fields and controls later on this page.
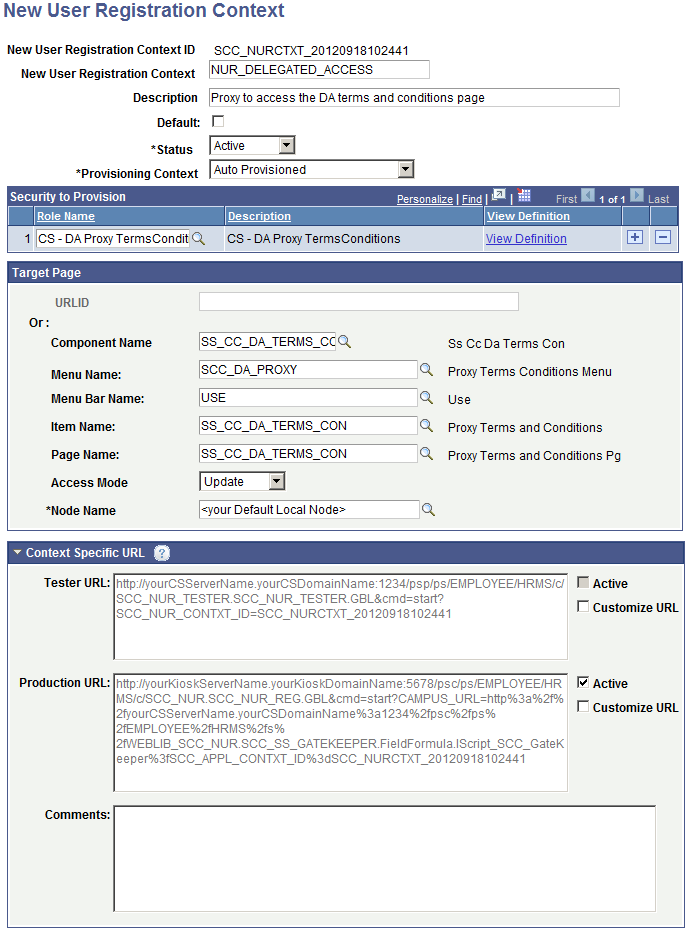
Create a NUR context ID only if the online self-service transaction requires the user to be either provisioned with application-specific security roles or needs to be transferred to a specific target page. The NUR context ID is used by the NUR framework only when it is embedded in the URL you provide to your users to access your login page.
By default, once the New User Registration Installation page is populated the URL is automatically created for you. While you can directly provide the URL to your users, we recommend to programmatically retrieving the URL by evaluating which one is marked as Active.
|
Field or Control |
Definition |
|---|---|
| New User Registration Context ID |
Displays the unique ID that the system assigns when you add a NUR context. When you add a context, this field displays the value NOID until you save the record. When you save the new context, the field displays the ID that the system assigned to the context. By default, the context ID is automatically appended to the generic URLs you auto-generated in the NUR Installation page. The resulting URLs are then specific to the online self-service transaction. The NUR framework uses this value, which is embedded in the URL used to log in to your system, to assign the security roles and/or transfer the user to the target page accordingly. |
| New User Registration Context |
Enter the name of the context for the NUR context ID. For example, if you create a NUR context ID so users can access your Admissions online application page, you could enter Online Application. |
| Description |
Enter a longer description for the New User Registration context (50 characters). |
| Default |
Select to mark the NUR context as default. Only one NUR context can be marked as default. The system uses the default NUR context when a NUR context is not passed in the URL that the user clicks to access the login page. When the NUR context is not passed, the system looks for the default NUR context ID. If the system does not find the default context ID or the default context ID is inactive, then the user is transferred to the home page and application-specific security roles are not provisioned. Note: It is optional to pass the NUR context in the URL. |
| Status |
Select to set status. Default is Active. If the URL provided to your users to access your system refers to an inactive NUR context, then the URL is embedded with “No URL defined.” Your users will not be able to access your login page. |
| Provisioning Context |
Select Auto Provisioned if context should be Public. When Auto Provisioned is selected, the guest or the returning user is provisioned with application role level security dynamically just-in-time by the Gatekeeper. The Gatekeeper gets these roles from the list of roles you select in the Security to Provision grid. After real-time provisioning, the user is redirected to the specified target page, if one is provided. |
(Optional) Security to Provision
Use this grid to define a list of security roles that are specific to the consuming self-service transaction (such as AAWS Online Application or Delegated Access) for which the New User Registration context is created. The roles that you enter in this grid are assigned only to the users who are successfully authenticated by the NUR framework for a specific consuming self-service transaction. These roles are assigned by the Gatekeeper to the user profile of the newly created user or the returning user after the user is successfully authenticated by your system.
|
Field or Control |
Definition |
|---|---|
| Role Name |
Select the application-level security role names that you want to provision the user’s profile going through the NUR framework with this NUR context. The prompt returns the roles set up in the PeopleTools Roles component (). If you specify a target page, make sure you enter a role name that grants access to the specified target page. Otherwise, the user will not be transferred to the target page due to lack of security. |
(Optional) Target Page
Depending on the online self-service transaction that consumes NUR, it may make sense to transfer the user directly to a target page instead of making the user manually navigate to the desired page after successful authentication into the system. For instance, if you have deployed an online application self-service transaction, the system can direct the user to your Online Application homepage. In Delegated Access, the system should direct the proxy directly to the very first page that the proxy should access to take advantage of the delegated accesses (the Proxy Terms and Conditions page). The target page can also be an external URL.
If you do not identify the target page in this group box, the user is redirected to the application home page.
|
Field or Control |
Definition |
|---|---|
| URL |
If the target page lies outside the PeopleSoft system, provide the URL to access the page. After successful authentication, the user is immediately transferred to the URL address. |
| Component Name, Menu Name, Bar Name, Item Name, Page Name |
If the target page is built within the PeopleSoft system, list the menu objects to retrieve the proper page. If you are using an external UI that lies outside the PeopleSoft system (a URL ID), these fields are disabled. |
| Access Mode |
Select the mode in which the target page, built within the PeopleSoft system, should open when the user is transferred to the target page. Applicable values are: Add, Correction, Update and Update All. See Access Mode field. |
| Node Name |
This is a required field regardless of whether the target page is a URL or a PeopleSoft component name. Select the name of the local node defined for the database where the target page is located (for a typical installation, select your default local node). The default local node is defined in the Integration Broker Nodes component (). The Gatekeeper uses this node to transfer the user to the specified target page. Your system includes the following NUR context IDs:
If you intend to use these contexts, you must update the Node Name from the default value ‘LOCAL’ to your local node name. |
Access Mode field
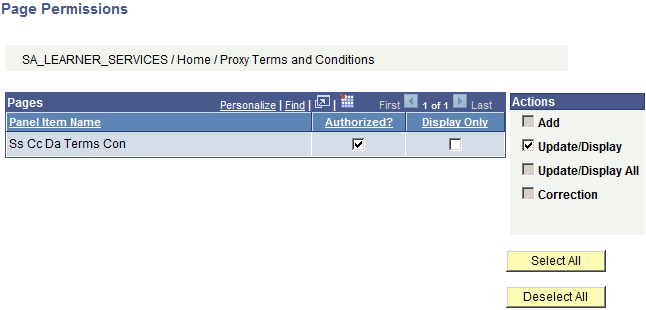
If one of the roles you list in the Security to Provision grid includes a permission list that grants access to the component and menu names that are listed in the Target Page group box, make sure you select the action mode used in the permission list for the page name you select. For example, the image that illustrates the NUR Context page shows the role ‘CS - DA Proxy TermsConditions’. This role contains a permission list that grants access to the SCC_DA_PROXY menu and the SS_CC_DA_TERMS_CON component, which contains the page SS_CC_DA_TERMS_CON. When you open the page permission, the Actions selected is Update/Display. You should select Update.
Image: Page Permissions page
This example illustrates the fields and controls on the Page Permissions page..
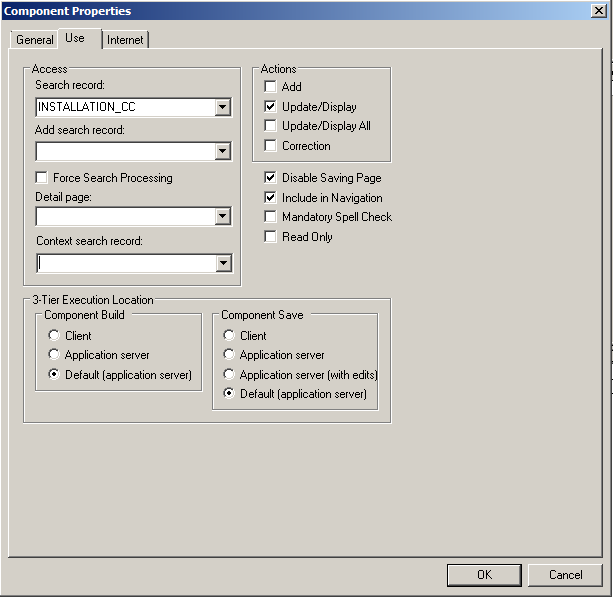
If you did not list any roles, make sure you select an Action Mode for which the component was created. For example, the preceding graphic shows the component name SS_CC_DA_TERMS_CON. If you open this component using Application Designer, the Component Properties show that the possible Actions selected is Update/Display. In this case, you select Update.
Image: Component Properties window
This example illustrates the fields and controls on the Component Properties window.
Context Specific URL
By default, the URLs that appear in this group box are the respective auto-generated URLs from the New User Registration Installation page appended with the NUR context ID that is specific to the NUR consumer. The Tester URL transfers the proxy to the NUR Tester login page and the Production URL transfers the user to the NUR sample login page or your own custom version of the page.
If you did not auto-generate the generic URL for any one of these fields, then these fields do not display any value.
If you select the corresponding Customize URL for any one of these fields, the field becomes editable and you can specify your own URL. For example, in the Production URL field you can specify the URL to your custom login page. You can specify your own URL even if you do not use the NUR framework.
The Active checkbox allows you to test the deployment of your online self-service transaction by selecting the Tester URL. When your self-service transaction is ready, make sure you set the Production URL to Active. The Active checkbox allows you to test a new online self-service transaction while others may be in production.
The specific Production and Tester URL can be directly provided to your users to access (or test) your login page and do the proper authentication. However, it is recommended to programmatically retrieve the URL that is marked as Active. This way you will always be certain the URL is updated with the latest installation information. For example, if your Campus Solutions domain port number is modified in the New User Registration Installation page, the new port number will be automatically reflected in the specific URL.
By default, the Active and Customize URL check boxes for the Production and Tester URLs are deselected.
Only one URL can be active at any one time. Use the Tester URL only for testing the deployment of your online self-service transaction. When your self-service transaction is ready, make sure you come back to the NUR context ID settings to set the Production URL to Active.
|
Field or Control |
Definition |
|---|---|
| Production URL |
Displays the URL that is used to access the NUR sample login page or your custom version of the page. The production URL is used when you set up a kiosk for the production environment. If you select the:
|
| Tester URL |
Displays the URL that is used to access the NUR Tester page. The tester URL is used when you do not set up a kiosk, but want to test the URL with the NUR Tester page before you switch to production. If you select the:
|