Using Admin Notifications
While the self-service Notifications pages are intended for a user to check and interact with his or her own notifications, the Admin Notifications pages are intended for users such as a research supervisor or administrative manager who are responsible for notifications sent to particular users.
Because the Admin Notification pages can display notifications for multiple users, a search page is provided so that someone such as an administrator can either:
Search for specific notification recipients using search criteria in the conventional manner or
Show all notifications that they are permitted to view by selecting the Show All Notifications check box.
If no notifications are found, or the user lacks the requisite permissions, the Notifications Administration Overview page shows a message No Notification items found for selected criteria. Otherwise the user can view the notifications that appear in an almost identical manner to those shown for the self-service Notifications Center, with following exceptions if the administrator’s access mode is set to Read/Update:
In the Worklist Details page, the Worklist item can be marked as completed.
On the Announcements tab, the trash can (deletion) icon and the Create Announcement button become available.
|
Page Name |
Definition Name |
Navigation |
Usage |
|---|---|---|---|
|
Notifications Administration Overview |
SCC_NTF_ADMN_MAIN |
|
Review and manage notifications. |
Image: Notifications Administration Overview Page
This example illustrates the fields and controls of the Notifications Administration Overview page.
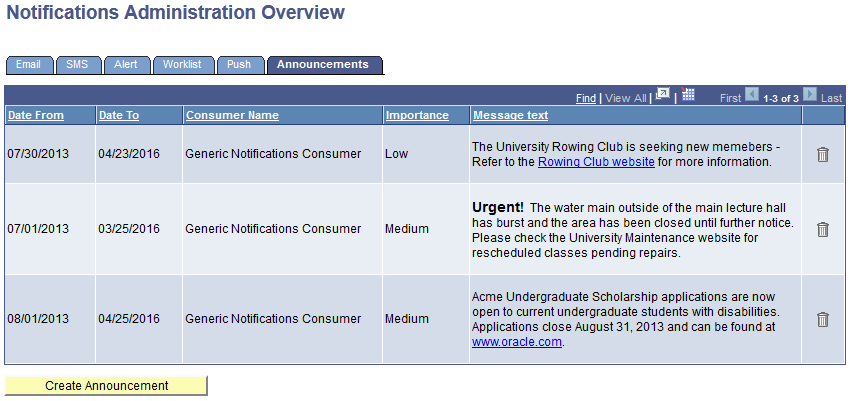
Features of the Notifications Administration Overview page include:
Each notification type has its own tab where notifications of that type are shown.
The notifications are shown in descending date and time order, so that the newest one is at the top, unless the user resorts the list by another column heading.
For Email, the Subject of the email and Sender information is shown. The emails listed here are those that were sent with this particular ID as the ‘To’ recipient. The emails that were sent with this ID as ‘Cc’ or ‘Bcc’ recipient are not shown.
The Period default value is 7 days.
All details shown on the Email tab are shown on the SMS and Alerts tabs, except Sender information. Because SMS does not have a Subject, the message text is displayed instead.
The Worklist tab has an extra field Life Left Days that shows how many days remain until the deadline for the worklist item is reached. Similar to SMS and Alerts, the Worklist tab does not include a Sender column.
The Worklist tab also has a Status field with the values Unactioned and Actioned. If permitted, the user can change the status of the worklist item by selecting the Details link for Worklists and selecting the Read/Actioned check box. The worklist item will then be listed in the Actioned list.
The Announcements tab also includes extra features for the creation and removal of announcements, subject to security, which is discussed in the next section.
Announcements
An administrator can use the Announcements feature to announce information to ALL students, without being restricted to specific EmplDs. The Notifications alert channel was enhanced to provide this functionality. Announcements are essentially alert-type notifications. However, unlike alerts, there is no recipient EMPLID for announcements; instead an audience indicator (SCC_NTF_AUDCE) is populated, indicating the particular alert is an Announcement.
The SCC_NTF_AUDCE field is found in the Notification Detail record (SCC_NTFREQ_DTL) with possible values of NA and ST. This field, which was introduced in Bundle 31 (October 2013), defaults to NA; therefore, pre-bundle 31 adopters who have not specified audiences can effectively ignore this field and should not be impacted. The ST value indicates that this Alert type notification is actually an Announcement applicable for all students.
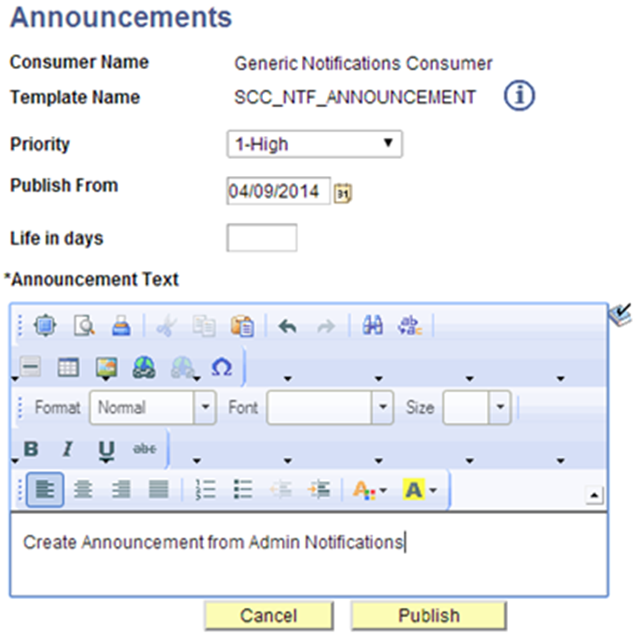
To create an announcement, the user clicks the Create Announcement button on the Announcement tab, which opens an Announcements window (shown below). The user then enters data in the required fields. Details of the template can be viewed by clicking on the information icon next to the template name. After the required details are populated, the user clicks the Publish button to send the Announcement to all students.
Image: Announcements Page
This example illustrates the fields and controls of the Announcements page.
Announcements sent from this page can also be viewed in the self-service Notifications Center.
See Using the Self-Service Notifications Center.
The recent announcements also appear on the SCE springboard page.
Refer to the Simplified Campus Experience documentation on My Oracle Support (Doc ID 1600569.1).
Features of the Announcments tab include:
Administrators who have read/update access to Generic Notifications Consumer can create announcements using the Create Announcement button.
All announcements including the timed-out announcements are listed on the Announcements tab.
Depending on the access level setup for logged-in user for that consumer, the Delete icon is visible on the Announcements tab. If a user has read-only access for a consumer, the Delete icon is not visible for that particular row. When an admin user has read/update access the Delete icon is available.
When creating announcements:
A user can set the priority of the announcement as High, Medium and Low.
The date entered in the Publish From field is displayed as the Date From field in the Announcement tab. If Publish From is greater than current date, the announcement appears in the grid from that date.
The value entered in the Life in days field is added to the date entered in the Publish From field and it becomes the Date To value on the Announcement tab.
Announcement Text is a mandatory field. If it is blank, a warning message is displayed.
If a user clicks the Publish button, the announcement appears in the Announcements grid.