Using the Letter Generation Process
This section provides overviews of the Letter Generation (Letter Gen) process and the sample templates, lists prerequisites, and discusses how to:
Specify general parameters.
Specify date/merger parameters.
Specify checklist parameters.
Run the letter generation data extract process.
Important! Mass Change is a deprecated product. Support will be maintained for this product, but no new development will be produced for Mass Change. It is strongly recommended that you use Application Engine instead. For more information on PeopleSoft Application Engine, see PeopleTools: Application Engine.
You can extract data from your PeopleSoft Campus Solutions system and use it to generate letters, labels, lists, envelopes, and so on. You can extract data from one individual ID, all individual IDs, or all organization IDs in your database. You specify the type of data to extract and then run the extract process. The system places the extracted data into a comma delimited (.csv) file, which is a standard format readable by most word processing programs. Then, using your institution's word processing software, you can merge the data into any of the templates that you have for the letter codes defined on the Standard Letters page, including the sample Microsoft Word templates delivered with the system, and print the outcome.
For information about using your institution's word processing software to merge data and print letters, consult the manufacturer's documentation.
Before you can extract letter data, a communication record for the desired letter must be assigned to the intended recipients. For joint communications, you should assign the communication to only one of the individuals. If you assign it to both, the letter generation process extracts the data for both IDs and will print two joint communications for the same two people. The record must include the appropriate administrative function, communication category, and communication context, and specify a method of Letter and the direction of Outgoing. You can assign communications to individuals or organizations manually or using the 3C engine or mass change functionality.
When the communication records exist, follow this procedure to use the Letter Generation process to extract data and generate a letter:
To generate a letter:
Specify the data to extract for the letter, including the ID, address usage, address name, salutation, and letter code.
Specify the date to print on the letter, the date to use as the letter completed date, and the communication date selection range.
Specify any checklist items to include in the letter.
Run the Letters Data Extract process to extract the specified data.
Use your word processing program to merge the extracted data into the letter template.
Save the softcopy template with merged data or use it to print the letter.
Specifying the parameters for extracting data for the letter includes selecting the letter to use, identifying the individuals or organizations whose data you want to extract, and specifying the types of data to extract. Use the run control pages, described in the following sections, to specify extract data parameters.
After defining all of the parameters for extracting data, run the data extract process. Unless you specify a different file path, the process places the data files in the temporary directory for the server. You can specify a shared folder on your local machine or on any valid network drive path.
When the process finishes, files with the appropriate file names are placed at the specified extract file path destination. If you select the .csv output, three files are created at the destination:
CCLTR<LETTERCODE>.CSV for letters.
CCLBL<LETTERCODE>.CSV for labels.
CCLTRGEN.DAT file, which is coded to work with the Microsoft Word templates delivered with the system.
For example, if you use the TRN letter code and you select the .csv output, the file for letters at the destination is CCLTRTRN.CSV.
Note: If you use a letter code for which you specified a unique SQC, you must place the SQC in the same directory as the CCLTRGEN.sqr and the CCLTRUNQ.sqc. You must also modify CCLTRNAM.SQC to look for the specific SQC.
You can review extracted data online for individuals and organizations on the Communication Letter Data pages.
When you run the letter generation data extract process, the data specified under Letter Printed Data for that letter code on the Standard Letter Table page is listed on the Communication Letter Data page for individuals or on the Organization Communication Letter Data page for organizations. You can use these pages to review and confirm the data extracted for an individual or organization. For example, using the Communication Letter Data page, you can confirm the address to which the letter for a specific individual was addressed.
The letter generation data extract process automatically formats extracted addresses to meet U.S. postal regulations for domestic and international mail. The format is reflected in the address listed on the appropriate Letter Data page.
If you set a relationship to generate a copy of communications for a separate recipient on the Communication Recipient page in the Relationships component, you can view the data extracted for that separate recipient on the Communication Recipient Data page described in this section.
The letter generation data extract process creates a .dat file for merging data from your system into Microsoft Word templates. The PeopleSoft Campus Solutions system delivers sample Microsoft Word templates. You can use the sample templates as delivered, modify them (unless otherwise indicated in the warning below), or create your own Microsoft Word templates.
This table lists the CS letter codes with corresponding delivered sample templates.
|
Letter Code |
Description |
Microsoft Word Template Name |
|---|---|---|
|
APP |
Appointment Mailer |
CCLTRAPP.DOC |
|
AV1 |
Gift Acknowledgement |
CCLTRAV1.DOC |
|
AV2 |
Gift Receipt |
CCLTRAV2.DOC |
|
CST* |
Inquiry Acknowledge – Viewbook |
CCLTRCST.DOC |
|
F02 |
Frosh Missing Requirements |
CCLTRF02.DOC |
|
F03 |
Frosh Admit Regular |
CCLTRF03.DOC |
|
FAN* |
Financial Aid Notification |
FANLTR.DOC |
|
IHC |
International Health Coverage |
CCLTRIHC.DOC |
|
IN1 |
Initiative Appeal |
CCLTRIN1.DOC |
|
JNT |
Summer party - Joint Invitation |
CCLTRJNT.DOC |
|
MAD |
Mid-Term Academic Deficiency |
CCLTRMAD.DOC |
|
MB1 |
Membership Card |
CCLTRMB1.DOC |
|
OFR |
Early Offer Letter |
CCLTROFR.DOC |
|
OPR |
Web Operator Notification |
CCLTROPR.DOC |
|
P01 |
Inquiry Acknowledgment |
CCLTRP01.DOC |
|
REC |
Admit Recipient Letter |
CCLTRREC.DOC |
Warning! Do not modify the PeopleSoft Financial Aid FAN letter code or template. Modifications to this value could cause processes that depend on it to fail, requiring substantial reprogramming effort.
For sample templates delivered for PeopleSoft HRMS, refer to the PeopleSoft HRMS 9.0 Application Fundamentals, "Setting Up and Generating Form Letters."
Before identifying data to extract and merge into letters or other communications output, design your Campus Community structure, including names and address usages. Before specifying checklist items data to extract, set up checklists and tracking groups.
|
Page Name |
Definition Name |
Navigation |
Usage |
|---|---|---|---|
|
General Parameters |
RUNCTL_LTRGEN1 |
|
Specify general parameters for extracting letter data, including the IDs for which data is to be extracted, the letter code into which the data should be merged, the name and address usages to use, and the joint salutation (if appropriate). |
|
Date/Merge Parameters |
RUNCTL_LTRGEN2 |
|
Specify the necessary file locations, dates, and sort option for extracting data. |
|
Checklist Parameters |
RUNCTL_LTRGEN3 |
|
Specify any checklist items to extract and use in a letter. |
Access the General Parameters page ().
Image: General Parameters page
This example illustrates the fields and controls on the General Parameters page. You can find definitions for the fields and controls later on this page.
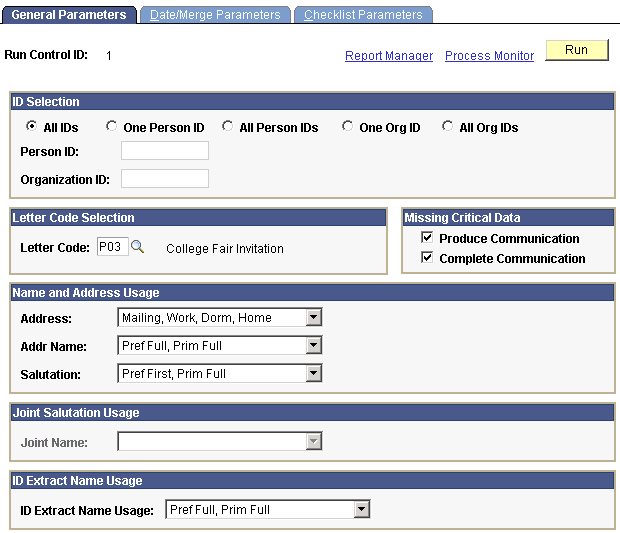
ID Selection
|
Field or Control |
Definition |
|---|---|
| All IDs |
Select to extract the data from all IDs (person IDs and organization IDs) that are assigned a communication with the letter code indicated and that are not marked complete. |
| One ID |
Select to extract the data from the one individual ID indicated. The communication with the indicated letter code must be assigned to this individual. If you select the One ID option, specify the individual's ID in the Person ID field. |
| All Person IDs |
Select to extract the data from all the individuals' IDs that are assigned a communication with the letter code indicated. |
| One Org ID (one organization ID) |
Select to extract the data from the one organization ID indicated. The communication with the indicated letter code must be assigned to this organization. If you select the One Org ID option, specify the organization's ID in the Organization ID field. |
| All Org IDs (all organization IDs) |
Select to extract the data from all the organization IDs that are assigned a communication with the letter code indicated and that are not marked complete. |
Letter Code Selection
|
Field or Control |
Definition |
|---|---|
| Letter Code |
Enter the letter code that identifies the template into which to merge the extracted data. Only those letter codes to which you have 3C group security access are available from the list. |
Missing Critical Data
|
Field or Control |
Definition |
|---|---|
| Produce Communication |
Select this check box for the process to produce the extract file even if critical data is missing (for example, address information or name of the recipient). |
| Complete Communication |
Select this check box for the process to set the status to Complete even if critical data is missing. |
Name and Address Usage
Name and address usages apply to letters addressed to individuals. They do not apply to letters for organizations.
|
Field or Control |
Definition |
|---|---|
| Address |
Enter the type of address, from the Address Usage page, to extract for this letter. You can list address types in a preferred search-and-use order. For example, if you list an address usage that containsMailing, Billing, and Home the system searches for the mailing address first; if none exists, then the billing address; if none exists, the home address last. |
| Addr Name (address name) |
Enter the type of name, from the Name Usage page, to extract for the address section of this letter. As with addresses, you can list address name types in a preferred search-and-use order. |
| Salutation |
Enter the type of name, from the Name Usage Table page, that the system should extract for use in the opening or salutation of this letter. For example, you might want to use the individual's primary full name in the address section of the letter, but use his preferred first name in the salutation (Dear Dave). As with addresses, you can list salutation name types in a preferred search-and-use order. |
Joint Salutation Usage
|
Field or Control |
Definition |
|---|---|
| Joint Name |
The Joint Name field is available when the selected letter code is set on the Standard Letters page to allow joint communications. The joint names available in the list are those with the Joint Usage check box selected on the Name Usage page. The process extracts this salutation name usage for IDs set up for joint communications. |
ID Extract Name Usage
|
Field or Control |
Definition |
|---|---|
| ID Extract Name Usage |
Enter the ID name usage to use. The ID Extract Name Usage is an additional way to extract name data using the name usage. For example, you might want to use the individual's primary full name in the address section of the letter (Mr. Juan M. Dominguez), his preferred first name in the salutation (Dear Juan), and his last name in the text to say We are sure the Dominguez family will enjoy participating in this event. As with addresses, you can list ID name types in a preferred search-and-use order. |
Access the Date/Merge Parameters page ().
Image: Date/Merge Parameters page
This example illustrates the fields and controls on the Date/Merge Parameters page. You can find definitions for the fields and controls later on this page.

Extract File Path/Options
The server temporary directory is the default location for the .cvs and .dat extract files. If you want the system to place the files elsewhere, specify the correct path here.
The path must be a valid network path, containing the path delimiter (forward slash or back slash), and be in the appropriate letter case (upper or lower) for your platform. For example, on Windows NT where the target machine is Machine01 and the target folder is LtrData, the valid path is \\Machine01\temp\LtrData\.
|
Field or Control |
Definition |
|---|---|
| File Type |
Select the file type (CSV or Other) to create an extract file compatible with your word processing program. Comma delimited (.csv) files are compatible with most word processing programs. The process also creates a .dat file specifically for Microsoft Word and the Word templates delivered with the system. |
Update Communication Letter Printed Date With
Select the date to appear on the letter.
|
Field or Control |
Definition |
|---|---|
| Communication Date |
Select to use the communication assignment date from the Person Communication page for individuals or the Organization Communication page for organizations as the date on the letter. |
| System Date |
Select to extract the current system date for the date of the letter. |
| User Supplied Date |
Select to use the specified date as the date of the letter. You must supply the desired date. |
Update Communication Completed Date With
Select the date for the system to use as the communication completed date on the communication record.
|
Field or Control |
Definition |
|---|---|
| Communication Date |
Select to use the date when the communication was assigned as the communication completed date. |
| System Date |
Select to use the current system date as the communication completed date. |
| User Supplied Date |
Select to use the specified date as the communication completed date. You must supply the desired date. |
Communication Date Range Selection
Enter the date range of the communication records from which to extract data. For example, you might want to extract data only from those IDs to which you assigned a specific letter code and set the communication date between January 1 and March 1 of the current year.
Use the date range to schedule and manage letter communications. For example, you might schedule daily or weekly runs of the letter generation data extract process for prospect inquiry letters, or missing information letters for applicants.
The from and to date range is inclusive of the dates that you enter.
Word Merge Parameters
If you are using the sample Word templates delivered with the system or if you are using other templates created in Microsoft Word, specify parameters here. A macro (CCLTRGEN.DOT) built into the delivered Word template process uses these parameters when performing a letter merge.
If you are not using Microsoft Word, you can skip these fields.
Note: Setting these parameters on the Letter Generation run control page affects the data included in the CCLTRGEN.DAT file, but does not invoke the Word merge process. To perform a letter merge, you must launch Word and perform the merge process.
|
Field or Control |
Definition |
|---|---|
| Template Path |
Enter the file path to the template into which the process should merge the data. |
| Sort Option |
Enter the order in which the process should sort the merged letters. Values for this field are delivered with the system as translate values. Do not modify these values in any way. Any modifications to these values could require substantial programming effort. |
| Send to Printer |
Select for the Word letter merge process to automatically send the letter with merged data to the printer. |
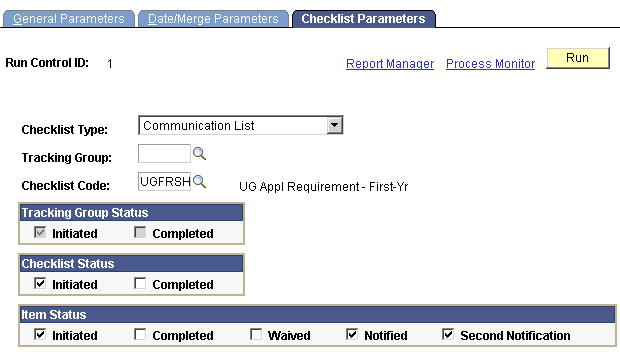
Access the Checklist Parameters page ().
Image: Checklist Parameters page
This example illustrates the fields and controls on the Checklist Parameters page. You can find definitions for the fields and controls later on this page.
|
Field or Control |
Definition |
|---|---|
| Checklist Type |
Enter the type of checklist from which the process should extract data for this letter. |
| Tracking Group |
Enter the tracking group whose checklist data the process should extract for this letter. |
| Checklist Code |
Enter the specific checklist code whose checklist item data the process should extract for this letter. |
Tracking Group Status
If you specified a tracking group, you must also select a tracking group status. You can select more than one status option.
|
Field or Control |
Definition |
|---|---|
| Initiated |
Select to extract tracking group data with the status of Initiated for this letter. |
| Completed |
Select to extract tracking group data with the status of Completed for this letter. |
Checklist Status
|
Field or Control |
Definition |
|---|---|
| Initiated |
Select to extract data from checklists with the status of Initiated for this letter. |
| Completed |
Select to extract data from checklists with the status of Completed for this letter. |
Item Status
If you specified a checklist code, you must select a checklist item status. You can select more than one status option.
|
Field or Control |
Definition |
|---|---|
| Initiated |
Select to extract data from checklist items with the status of Initiated for this letter. |
| Completed |
Select to extract data from checklist items with the status of Completed for this letter. |
| Waived |
Select to extract data from checklist items with the status of Waived for this letter. |
| Notified |
Select to extract data from checklist items with the status of Notified for this letter. |
| Second Notification |
Select to extract data from checklist items with the status of Second Notification for this letter. |
After you specify the extract parameters, you can run the CCLTRGEN data extract process by clicking the Run button from the General Parameters page, the Date/Merge Parameters page, or the Checklist Parameters page.
Note: Setting parameters on these run control pages affects the data included in the CCLTRGEN.DAT file; however, it does not invoke the merge process. To perform a merge, you must launch the merge process provided from within your institution's word processing software. If you want to merge the extract data into any of the sample templates (or other Word templates), you must launch Word and perform Word's Mail Merge process.
Note: The default output for CCLTRGEN is .csv. This setting is defined within the CCLTRGEN program. Selecting Type and Format field values on the Process Scheduler Request page does not change this output.