Setting Up and Managing Bank Accounts
For better SEPA compliance and IBAN handling, it is recommended that you use any one of the following components to set up and manage bank accounts:
For student bank accounts:
Student Financials, Banking, Bank Accounts - Student
Student Financials, Student Financials NLD, NLD Student Accounts
For corporate bank accounts:
Student Financials, Banking, Bank Accounts - Corporate
Student Financials, Student Financials NLD, NLD Corporate Accounts
Note: The Convert Banking Records (SSF_BANK_CNV) process copies student and external organization bank account details from the Netherlands banking tables (PS_SSF_BANKACC_NLD and PS_SSF_COR_BANKACC) to the core Student Financials bank table (PS_SSF_BANK_ACCT). For business unit bank accounts, you manually add the account details to the core Student Financials bank table. This process migrates only active student and corporation bank accounts. Savings and checking accounts will be migrated as is, while other account types will be converted to Checking accounts and their corresponding Nickname fields will be populated with the current account type and description from the Netherlands bank record. If you select IBAN Required in the Set up HRMS, IBAN Country Setup component for the Netherlands, only records that contain an IBAN will be converted.
It is also recommended that you use the Convert Banking Records (SSF_BANK_CNV) process only once.
This section discusses:
|
Page Name |
Definition Name |
Navigation |
Usage |
|---|---|---|---|
|
Business Unit Bank Accounts |
SSF_ACCOUNT_BU_NLD |
|
Establish bank account information for businesses. |
|
Student Bank Accounts |
SSF_STDNT_BNK_NLD |
|
Establish bank account information for students. |
|
Corporate Bank Accounts |
SSF_CORP_BNK_NLD |
|
Establish bank account information for external organizations. |
|
Set Up default Values VERWINFO/Clieop03 |
SSF_BNK_LAY_NLD |
|
Set up default values for VERWINFO or Clieop03. |
|
NLD Bank Accounts WorkCenter |
SSF_BANKACC_WC_NLD |
|
Provides a one-stop access point from which institutions in the Netherlands manage banking information for students, external organizations, and business units, as well as access SEPA mandate contracts. |
|
NLD Student Accounts |
SSF_STUD_ACCT_NLD |
|
Administer student accounts. This page accommodates all necessary administrative fields. |
|
NLD Corporate Accounts |
SSF_CORP_ACCT_NLD |
|
Administer corporate accounts, including corporate accounts associated with a business unit. This page accommodates all necessary administrative fields. |
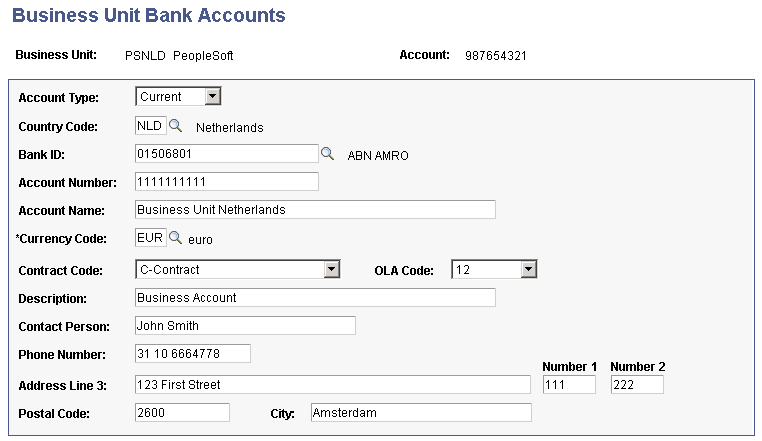
Access the Business Unit Bank Accounts page ().
Image: Business Unit Bank Accounts page
This example illustrates the fields and controls on the Business Unit Bank Accounts page. You can find definitions for the fields and controls later on this page.
|
Field or Control |
Definition |
|---|---|
| Account Type |
Select one of these options to specify the type of bank account: Current Giro Note: If the Account Type is Giro, then the Bank ID is always Postbank. If the Account Type is Current, then the Bank ID can be any bank that you have set up. You can set banks up in Set Up HRMS, Common Definitions, Banking, Banks. |
| Country Code |
Select the appropriate country code. |
| Bank ID |
Select the appropriate bank ID. |
| Account Number |
Enter the account number. |
| Account Name |
Enter the account name. |
| Currency Code |
Select the currency code. |
| Contract Code |
Select one of these options: A-Contract: The collector is not permitted to add or cause to be added (OCR-B font) data to the reader strip of the submittal section of the accept giro. B-Contract: The collector is not permitted to add the form code and the collector's account number to the reader strip, or to add the name, address, place of residence, or business and account number to the body. C-Contract: The collector is permitted to add the form code and the collector's account number to the reader strip, or to add the name, address, place of residence, or business and account number to the body. |
| OLA Code |
Select one of these options: 12: Deposit fees for payer with annotations. 13: Deposit fees for payer without annotations. 14: Deposit fees for collector with annotations. 15: Deposit fees for collector without annotations. |
| Description |
The name of the business unit account, if one is available. |
| Contact Person, Phone Number, Address Line 3, Number 1, Number 2, Postal Code, and City |
Enter the appropriate information about the contact person. |
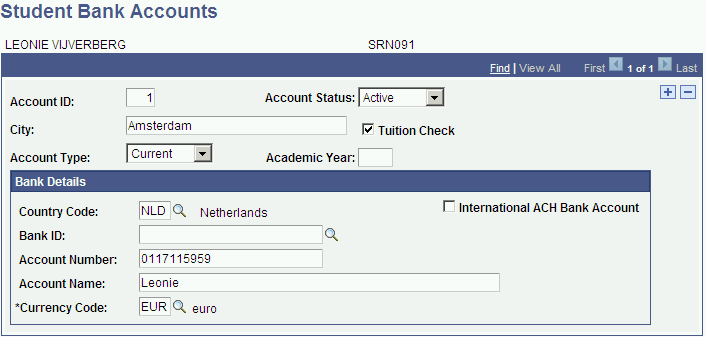
Access the Student Bank Accounts page ().
For better SEPA compliance and IBAN handling, you can also use the Bank Accounts - Student page in the Student Financials, Banking component to set up student bank accounts. If you use this component, the information is saved in the Student Financials core bank table (SSF_BANK_ACCT).
Image: Student Bank Accounts page
This example illustrates the fields and controls on the Student Bank Accounts page. You can find definitions for the fields and controls later on this page.
|
Field or Control |
Definition |
|---|---|
| Account ID and Account Status |
Enter a unique ID for the bank account, and enter the status of the account. You can link more than one account to a student, so you must uniquely identify each account and its status. |
| Tuition Check |
Select to specify this account to be used for the payment of tuition fees. This setting tells the system which account it should use for automatic debit or for the creation of giro slips. When you link bank accounts to a student, you must select this check box for one of the accounts. |
| Account Type |
Select one of these options to specify the type of bank account: Current Giro Note: If the Account Type is Giro, then the Bank ID is always Postbank. If the Account Type is Current, then the Bank ID can be any bank that you have set up. You can set banks up in Set Up HRMS, Common Definitions, Banking, Banks. |
| Country Code |
Select the appropriate country code from the list. |
| International ACH Bank Account |
Select to indicate that the bank account is an international bank account. |
| Bank ID |
Select the appropriate bank ID. |
| Bank Branch ID |
Select the appropriate bank branch. |
| Account Number |
Enter the account number. The system validates the account number using Elfproef, the Dutch check for valid bank account numbers. Current bank account numbers must be less than seven digits long. Giro account numbers are not checked. |
| Account Name |
Enter the account name. |
| Currency Code |
Select the currency code. |
Access the Corporate Bank Accounts page ().
For better SEPA compliance and IBAN handling, you can also use the Bank Accounts - Corporate page in the Student Financials, Banking component to set up corporate bank accounts, including corporate accounts associated with a business unit. If you use this component, the information is saved in the Student Financials core bank table (SSF_BANK_ACCT).
Image: Corporate Bank Accounts page
This example illustrates the fields and controls on the Corporate Bank Accounts page. You can find definitions for the fields and controls later on this page.
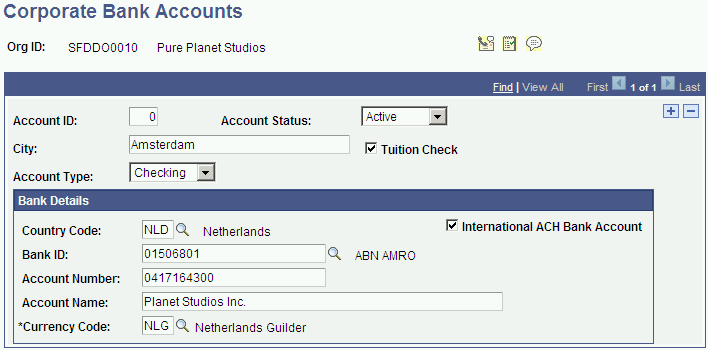
Use the Corporate Bank Accounts page to set up bank accounts for external organizations.
Access the Set Up default Values VERWINFO/Clieop03 page ().
Image: Set Up default Values VERWINFO/Clieop03 page (1 of 2)
This example illustrates the fields and controls on the Set Up default Values VERWINFO/Clieop03 page (1 of 2). You can find definitions for the fields and controls later on this page.
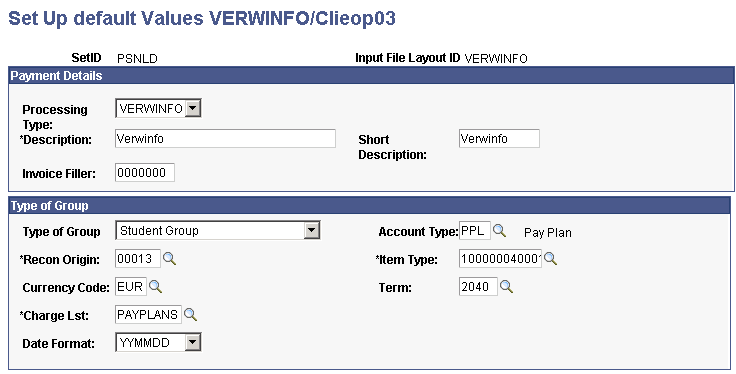
Image: Set Up default Values VERWINFO/Clieop03 page (2 of 2)
This example illustrates the fields and controls on the Set Up default Values VERWINFO/Clieop03 page (2 of 2). You can find definitions for the fields and controls later on this page.
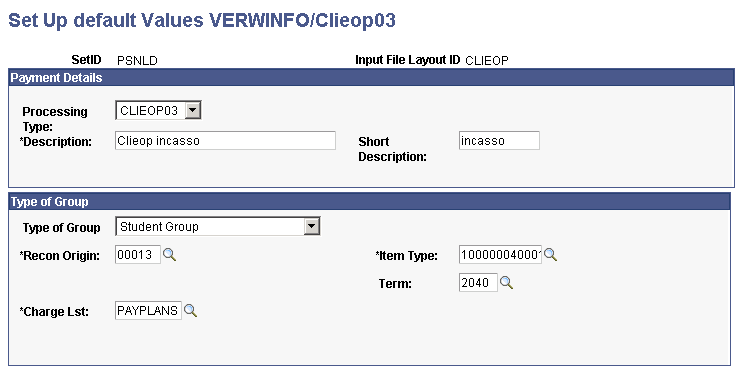
Payment Details
|
Field or Control |
Definition |
|---|---|
| Processing Type |
Select one of these options: CLIEOP03 VERWINFO |
| Description and Short Description |
Enter a long and a short description. |
| Invoice Filler |
Enter seven numeric characters. |
Type of Group
Depending on the processing type, some or all of the following fields will appear.
|
Field or Control |
Definition |
|---|---|
| Type of Group |
Select one of these options: Student Group External Org Group |
| Account Type |
Select the account type. |
| Recon Origin (reconciliation origin) |
Select the reconciliation origin. |
| Item Type |
Select the item type. |
| Currency Code |
Select the currency code. |
| Term |
Select the term. |
| Charge Lst (charge list) |
Select the charge priority list. |
| Date Format |
Select a date format. |
Access the Bank Accounts Work Center page ().
Image: Bank Accounts Work Center (sample) page
This example illustrates the fields and controls on the Bank Accounts Work Center (sample) page. You can find definitions for the fields and controls later on this page.
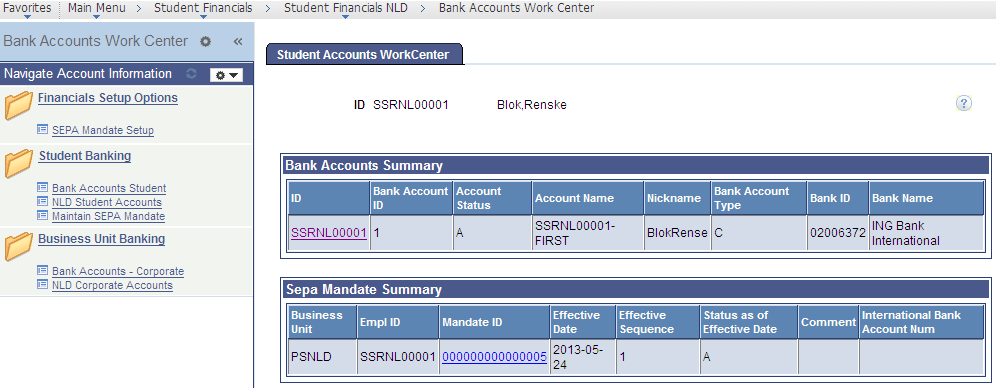
The Bank Accounts Work Center provides a singular access point from which you can set up and manage bank accounts for students and organizations in the Netherlands. From here, you can also access SEPA mandate contracts. To access the Bank Accounts Work Center, you need PeopleTools 8.51 or later. If you are using an earlier version of PeopleTools, you can still access the components in the Bank Accounts Work Center using the portal navigation.
The sample page shows a summary of all existing bank accounts of a student and the SEPA mandate contracts. If you click the Student ID, you can access the Bank Accounts - Student page, while the Mandate ID lets you access the Direct Debit Mandate for Students page. The Navigate Account Information pane on the left provides access to the components that let you set up or manage bank-related information.
|
Field or Control |
Definition |
|---|---|
| SEPA Mandate Setup |
Click to open the Mandate Setup page in the Work Center. For versions earlier than PeopleTools 8.51, go to |
| Bank Accounts Student |
Click to open the Bank Accounts - Student page in the Work Center. For versions earlier than PeopleTools 8.51, go to |
| NLD Student Accounts |
Click to open the NLD Student Accounts page in the Work Center. For versions earlier than PeopleTools 8.51, go to |
| Maintain SEPA Mandate |
Click to open the Mandate Contracts page in the Work Center. For versions earlier than PeopleTools 8.51, go to |
| Bank Accounts - Corporate |
Click to open the Bank Accounts - Corporate page in the Work Center. For versions earlier than PeopleTools 8.51, go to |
| NLD Corporate Accounts |
Click to open the NLD Corporate Accounts page in the Work Center. For versions earlier than PeopleTools 8.51, go to |
See:
Access the NLD Student Accounts page ().
Image: NLD Student Accounts page
This example illustrates the fields and controls on the NLD Student Accounts page. You can find definitions for the fields and controls later on this page.
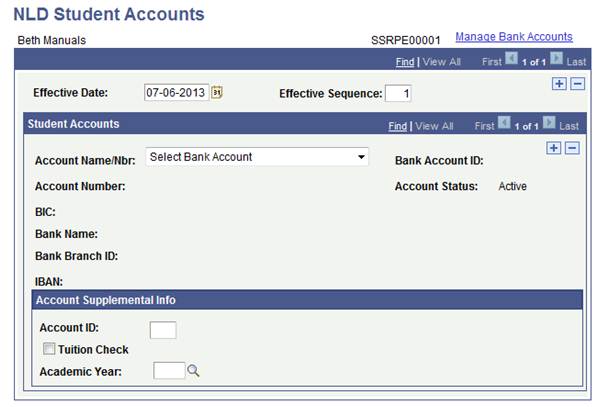
Use the NLD Student Accounts page to provide additional administrative information for student accounts in the Netherlands.
|
Field or Control |
Definition |
|---|---|
| Account Name/Nbr |
Select an active student account to administer. If an account is already administered, this field appears as view-only. |
| Effective Date and Effective Sequence |
Multiple accounts can be current on the same effective date and effective sequence. When you use a new effective date (or effective sequence within an effective date), all existing accounts are copied from the previous effective-dated row. You must make sure you administer all relevant accounts on the current row. |
Student Accounts
This group box displays the account number, BIC code, bank name, bank branch ID, bank account ID, account status, and IBAN. These fields appear as view-only. The account number and IBAN are unencrypted.
Account Supplemental Info
You can administer supplemental account information for only for active accounts. For converted NLD accounts, the account ID is displayed. You can enable Tuition Check for only one active account at any given time.
Access the NLD Corporate Accounts page (.)
Image: NLD Corporate Accounts page
This example illustrates the fields and controls on the NLD Corporate Accounts page. You can find definitions for the fields and controls later on this page.
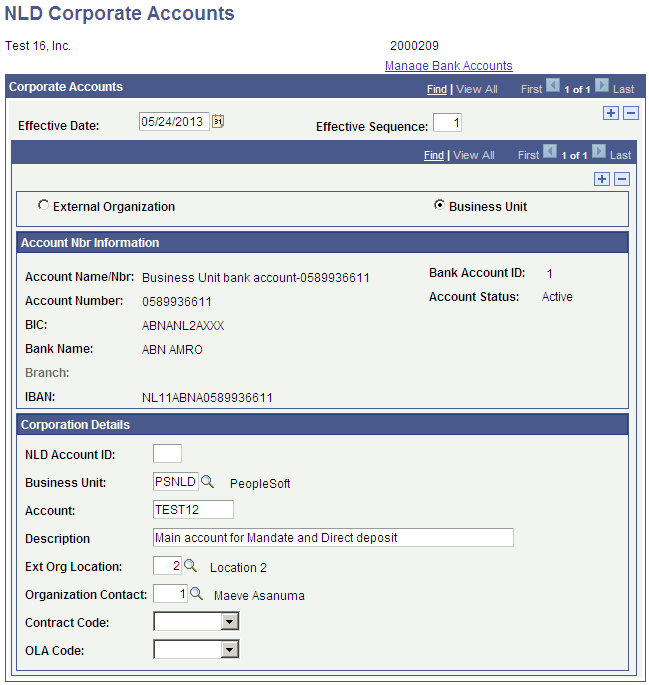
Use the NLD Corporate Accounts page to provide additional administrative information for corporate accounts in the Netherlands. From this page, you can also retrieve and view bank account details.
To use the NLD Corporate Accounts page, the corporation must have an existing active bank account. Information about existing corporate bank accounts that are inactive can only be viewed.
|
Field or Control |
Definition |
|---|---|
| External Organization or Business Unit |
If you select Business Unit, you can set the business unit as a creditor in SEPA mandate contracts. External organizations cannot be set as a SEPA creditor. |
Account Nbr Information
This group box shows unencrypted bank account information as defined in the Corporate Accounts page.
|
Field or Control |
Definition |
|---|---|
| Account Name/Nbr |
Select to administer an active corporate account. If an account is already administered, this field appears as view-only. |
Corporation Details
|
Field or Control |
Definition |
|---|---|
| NLD Account ID |
Enter the Netherlands account ID reference, or use a reference from a converted corporate account in the Netherlands. |
| Business Unit |
Select a business unit for the account. |
| Account |
Enter an account ID. |
| External Org Location |
Select a location. This location can be used to select a corporate account address in the Direct Debit Mandate for Students page. |
| Organization Contact |
Select a contact person for the account. |
| Contract Code |
This code is used only for Accept Giro processing. |
| OLA Code |
Select a relevant OLA code. This is used only for Accept Giro processing. |