Automating Graduation Processing and Reporting
The Graduation Processing and Reporting feature, which is run through the Graduation Reporting component, facilitates the degree checkout process. The feature works as a part of core functionality, and it works as an integrated complement to the PeopleSoft Campus Self Service application (through which students can use self-service pages to apply for graduation).
Using the Graduation Processing and Reporting feature, you can dynamically define a student population, and for this population you can:
Update degree checkout status values (from a valid status that you specify to another status that you specify).
Create requests for transcripts, degree audits, and special advisement reports.
Generate a graduation report.
This section provides an overview of the graduation reporting process, lists prerequisites, and discusses how to:
Enter graduation report parameters.
Retrieve the student population.
To run the graduation reporting process:
Select the Student Population check box, and enter your student population selection criteria on the Graduation Reporting page.
Click the Run button to run the Graduation Reporting process.
Click the Fetch button on the Selection Results page in order to populate the page with your resultant student population.
Delete rows to remove students that you do not want to process.
Insert rows to add students that did not match your parameters, but whom you want to process.
Navigate to the Graduation Reporting page and clear the Student Population check box.
Select the run option check boxes and their respective data.
For example, select the Update Program and Degrees check box, and provide the information required in the Program/Degree Update Options group box, including the new degree checkout status, completion term, and program effective date.
Click the Run button and run the Graduation Reporting process.
If you run a report, you should use a type of Web and a format of PDF.
After the process finishes, you can do the following:
Navigate to the Transcript Generation page to generate transcripts (use the transcript request number on the Graduation Reporting page).
Navigate to the Student Degrees page or the Degrees page to view updated degree checkout status values.
Review the Graduation report.
If you plan to create transcript requests, you must first define transcript types in the Transcript Type component.
|
Page Name |
Definition Name |
Navigation |
Usage |
|---|---|---|---|
|
Graduation Report |
RUNCTL_GRAD_RPT |
|
Enter graduation report parameters: define a population of students for which you can update degree checkout status values, create transcript requests, and generate graduation reports. For example, when a student applies for graduation through the self-service Apply for Graduation feature, the system sets that student's degree checkout status to Applied. You can use the Graduation Reporting component to set all students with a status of Applied to In Review. |
|
Selection Results |
RUNCTL_GRAD_RPT2 |
|
Retrieve the results of your population query, add or delete students, and edit the degree GPA and degree honors for each student. |
Access the Graduation Report page ().
Image: Graduation Report page
This example illustrates the fields and controls on the Graduation Report page. You can find definitions for the fields and controls later on this page.
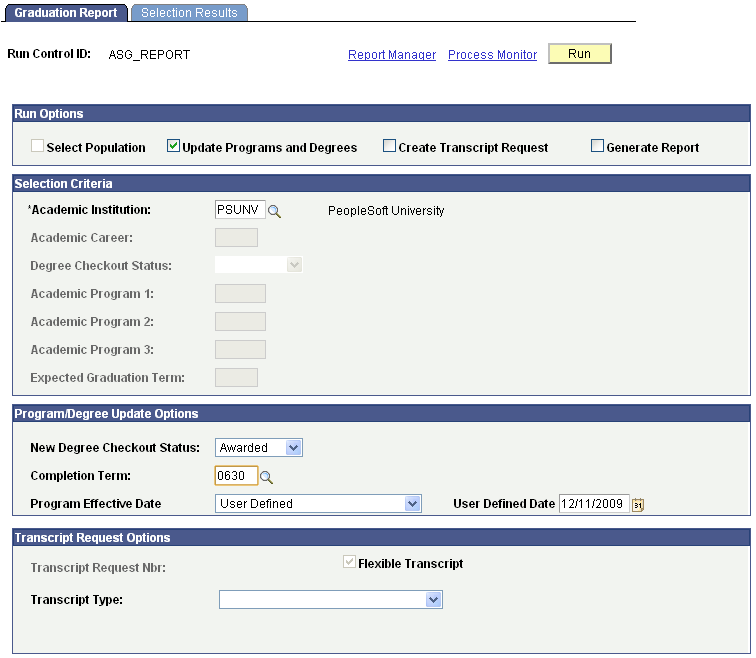
Run Options
|
Field or Control |
Definition |
|---|---|
| Select Population |
The first step to using the Graduation Reporting component is entering selection criteria and fetching a student population. Select this check box to enable the fields that define your student population in the Selection Criteria group box. After you enter all of your parameters, click the Run button to run the Graduation Reporting process. View your student population on the Selection Results page, where you can add or delete students. Note: The process does not select students with a current program action of Admission Revocation, Defer Enrollment, Discontinuation, Suspension, or Administrative Withdrawal. |
| Update Programs and Degrees |
After you enter your selection criteria and fetch your population, select this check box to enable the fields in the Program/Degrees Update Options group box and enter your update data. After you specify your update data, click the Run button to run the Graduation Reporting process to update program and degree information for the students in your population. Specifically, this process updates for all students in your population the student career term records with the values from:
|
| Create Transcript Request |
After you enter your selection criteria and fetch your population, select this check box to enable the fields in the Transcript Request Options group box and to enter your transcript type data. After you specify your data, run the Graduation Reporting process to create a batch transcript request for the students in your population. Next, generate the transcripts on the Transcript Generation page. |
| Generate Report |
After you enter your selection criteria and fetch your population, select this check box and run the process to create a report that highlights all of the graduation data for the students in your population. |
Selection Criteria
|
Field or Control |
Definition |
|---|---|
| Academic Institution |
The academic institution of the students you want to fetch. |
| Academic Career |
The academic career of the students you want to fetch. |
| Degree Checkout Status |
The current degree checkout status of the students to fetch: Applied, Approved, Denied, In Review, Pending, or Withdrawn. |
| Academic Program 1, Academic Program 2, and Academic Program 3 |
You can enter up to three academic programs within the career you specify to identify the students you want to fetch. If any fields are left blank, the system fetches all students in the career you specify. |
| Expected Graduation Term |
The expected graduation term of the students to fetch. The system verifies this value against the value in the Expected Grad Term (expected graduation term) field on the Student Program page. This field is optional. |
Program/Degree Update Options
|
Field or Control |
Definition |
|---|---|
| New Degree Checkout Status |
When you select the Update Programs and Degrees check box, the New Degree Checkout Status field becomes available. Specify the degree checkout status that you want to assign to all students in your population: Approved, Awarded, Denied, In review, Pending, or Withdrawn. For a new checkout status of Awarded, the system inserts a new effective-dated row on the Student Program page with a program action of Completion of Program. For all other checkout status values, the system inserts a new effective-dated row on the Student Program page with a program action of Data Change. The system does not specify a program action reason. |
| Completion Term |
When you select a New Degree Checkout Status field value of Awarded, you must specify the completion term that you want the system to assign to students in your population. |
| Program Effective Date |
The field becomes available when you select the New Degree Checkout Status field value of Awarded. Select the value that you want assigned as the effective date for the student's academic program upon awarding the student's degree (that is, upon setting the program action to Completed and the Degree Checkout Status to Awarded.) Values are: Confer Date: Select to use the confer date (defined on the academic calendar) as the student's program completion effective date. If, however, the confer date is prior to the current program effective date, the process will assign today's date as the program effective date, not the confer date. For example, the student applied for graduation on September 1, 2009 and you are trying to confer the degree for a prior term (such as Spring 2009); the process will assign today's date (the system date) as the student's academic program effective date. Today's Date: This is the default value whereby the process assigns today's date (the system date) as the program effective date. If the current program effective date is also today's date, then the process will assign a new effective sequence number with today's date. For example, if the student applies for graduation today, and you run the process to award the degree with today's date, the program effective date will remain today's date and the process will insert an incremental effective sequence with the number of "2." User Defined: Select this value if you want to define the date that should be used as the program effective date. Then select a date in the User Defined Date field. |
| User Defined Date |
If you select the Program Effective Date field value of User Defined, select a date. Note: If the user-defined date is prior to the current program effective date, the process will assign today's date as the program effective date, not the user-defined date. |
Transcript Request Options
Elements in this group box are available when you select the Create Transcript Request check box.
|
Field or Control |
Definition |
|---|---|
| Transcript Request Nbr (transcript request number) |
The system generates and displays the number of your transcript request after you specify your transcript options and run the Graduation Reporting process. Use this number to generate transcripts on the Transcript Generation page. |
| Transcript Type |
Specify the type of transcript to create for all students in your population. |
| Transcript default as of date |
When you select a transcript type that is also an advising report (special or standard), this field becomes available. A value appears by default from the Transcript Default Date field on the Installation Student Administration page. You can override it. |
| Database Report |
When you select a transcript type that is also an advising report (special or standard), this check box becomes available. Select this check box to create a transcript request where the results of the advising report populate the analysis database tables. |
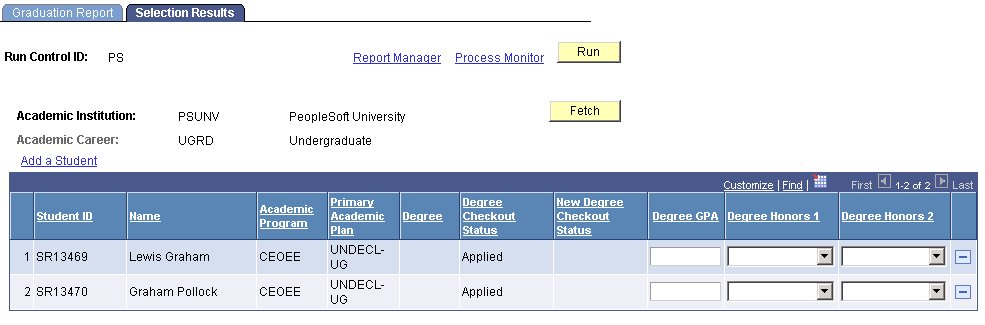
Access the Selection Results page ().
Image: Selection Results page
This example illustrates the fields and controls on the Selection Results page. You can find definitions for the fields and controls later on this page.
|
Field or Control |
Definition |
|---|---|
| Fetch |
Click to populate the page with your student population. If no students appear, either no students match your selection criteria, or you did not run the Graduation Reporting process. |
| Add a Student |
Click to access the Add Student page where you can search for other student IDs within the career that you have specified. Only students that are active in their program are available. |
| Student ID |
The ID of the student in the population. |
| Name |
The name of the student in the population. |
| Academic Program |
The academic program of the student in the population. If a student is active in more than one program in the career you specify, the selection returns all instances. You can delete program instances as necessary. |
| Primary Academic Plan |
The primary academic plan of the student. |
| Degree |
The degree that is associated with the program and primary plan of the student. |
| Degree Checkout Status |
The student's degree checkout status prior to the update degree checkout status process. The system reads this value from the Student Degrees page. |
| New Degree Checkout Status |
The student's degree checkout status of the student after the update degree checkout status process. The system reads this value from the Student Degrees page. |
| Degree GPA (degree grade point average) |
Enter a degree GPA on one of three pages: the Selection Results page (prior to program completion/degree checkout status of Awarded), the Student Degrees page (prior to program completion or degree checkout status of Awarded), or the Degrees page (after program completion). |
| Degree Honors 1 and Degree Honors 2 |
The student's degree honors for this degree. The values appears from the Student Degrees page. Enter degree honors on one of three pages: the Selection Results page (prior to program completion/degree checkout status of Awarded), the Student Degrees page (prior to program completion/degree checkout status of Awarded), or the Degrees page (after program completion). |