Building Programs by Format
This section provides an overview of building programs by format and discusses how to:
Use the Build Program by Format component in Add mode.
Use the Build Program by Format component in Update/Display mode.
The Academic Item Registry component allows you to create program elements and to establish links between those elements. However, because no intrinsic program hierarchy is built into the structure, you cannot use the component to build a program in ‘top-down’ fashion. That is, the program and its parts cannot be built and assembled in a single task flow. The Build Program by Format component provides this single task flow user experience by using the Program Format structure to establish a framework—and therefore a program hierarchy—upon which you can assemble a program of study. This single task flow streamlines the program building process, allowing you to chart your progress towards completion. When data entry is complete you can easily access a complete view of the program.
See Setting Up Program Formats
Note: Build Program by Format always obeys the Program format. Therefore, a user cannot insert an unauthorized tree node (even if the user is an AIR administrator).
See Setting Up AIR Administrator Security
The task is accomplished in three steps:
You provide a Program Format ID.
The component renders the Program Format Tree structure.
You follow the tree guideline to build the elements of the program by adding new academic items or using previously built academic items.
All program items are audited against their program format definition when the program academic item is retrieved in the Build Program by Format or Program Template components.
Note: The Build Program by Format component restricts the type of items that can be assigned within a program tree:
When you assign an item to a tree node, you must create or use an academic item of the same type that was used in the program format definition.
Child Items: Only items with an item type that is not defined as a Program format tree node can be assigned as a child to an item that you create or update in this component.
|
Page Name |
Definition Name |
Navigation |
Usage |
|---|---|---|---|
|
Build Program by Format |
SSR_PROG_BUILDER |
|
Build programs by format. |
|
Build Program by Format (select mode) |
SSR_PRG_BLDR_SEL |
Click the link for any item type in the tree other than PRG. |
Specify how you want to assign the item for the node. |
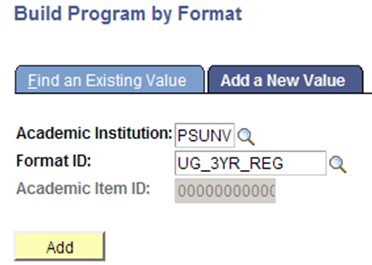
To build a program by format in Add mode:
Add the program by selecting an Institution and Program Format.
Image: Build Program by Format step 1 example page
This example illustrates step 1 in the Build Program by Format (Add mode) process.
The Program Format appears in a Tree view when the component opens:
Image: Build Program by Format step 2 example page
This example illustrates step 2 in the Build Program by Format (Add mode) process.
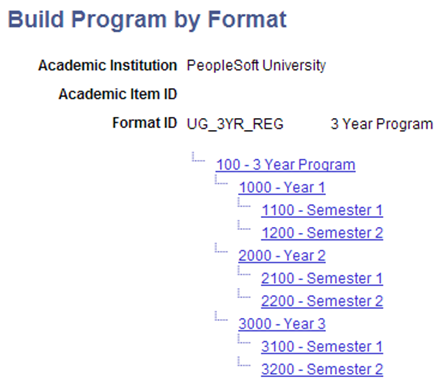
Each node of the tree is a link/prompt for you to:
Build a new academic item for the node or
Associate an existing item with the node or
Clone an existing item to create a new item for the node.
You must assemble the program in accordance with the tree structure. Begin at the root (program) node. If you click any other link you receive a message instructing you to assign the item for the Parent node. The message returns the node ID that should be used (in this example it would be 100). This same message is returned if you skip a level in the tree. In this example if you assign the item for node 100, but then click the link for 1100, the error message instructs you to first assign the item for the parent (1000).
Program (Node Academic Item Type = PRG):
Click the link for the root node that represents the Program of Study: you are transferred to the AIR component where you create a new academic item for the Program node.
Image: Academic Item Registry Program Node example page
This example illustrates step 3 in the Build Program by Format (Add mode) process.
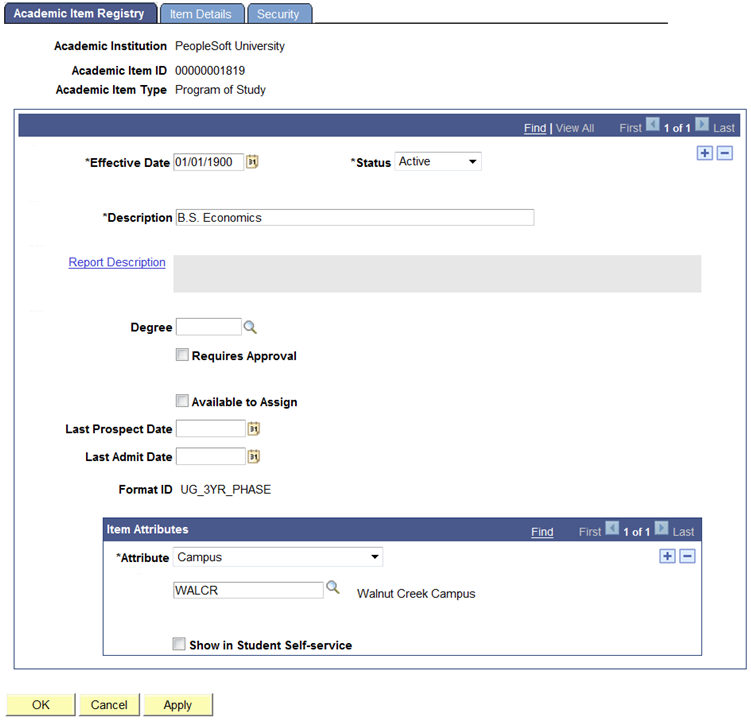
The Institution and Academic Item Type (Program of Study) appear by default and cannot be changed. All of the features of the AIR component are available. You can:
Save and return to the Build Program by Format page by clicking OK.
Discard any changes and return by clicking Cancel.
Save any changes and remain on the AIR component by clicking Apply.
When you click OK, the item is saved, an academic item ID is assigned, and you are returned to the Build Program by Format main page:
Image: Build Program by Format (Add Mode) After AIR Save
This example illustrates the Build Program by Format main page after you save the AIR component.

The tree node where the item was assigned is highlighted and inactivated. The Program Structure tab opens and the academic item (and any child items) that was assigned to the node is listed.
If updates are required, use the Item ID link to access the item.
Any Other Item Type (other than PRG) in the Tree
When you click the link for any other item type in the tree, you are transferred to the Build Program by Format - Select Mode (SSR_PRG_BLDR_SEL) page where you specify how you want to assign the item for this node. By default, the Item Type value is the item type of the node and cannot be changed.
Image: Build Program by Format (select mode) page
This example illustrates the fields and controls on the Build Program by Format (select mode) page. You can find definitions for the fields and controls later on this page.

|
Field or Control |
Definition |
|---|---|
| Create New Item |
When you select this option, you are transferred to the AIR component. Institution and Academic Item Type values appear by default and cannot be changed. After you create the item in AIR and click OK, you are returned to the Build Program by Format main page and the node is inserted in the program structure. |
| Use Existing Item |
When you select this option, the Academic Item ID field becomes available (the Item Type value is the item type of the node and cannot be changed). The academic items that are available match the Institution, Item Type, and Effective Date of the Program Node. If you select an existing item, you are returned to the Build Program by Format main page and the node is inserted in the program structure. |
| Clone Existing Item |
If you select this option, the academic items that are available match the Institution, Item Type, and Effective Date of the Program Node. If you select an existing item, you are transferred to the AIR component. The Effective Date is, by default, the Effective Date of the Program Node and cannot be changed. After you clone the item, you are returned to the Program by Format main page and the node is inserted in the program structure. Note that when you copy an item that has child items, the cloned item and the original item share the same child items. |
Using the Program Structure Tab
When academic items are assigned to the tree nodes, the program structure is tracked in the Program Structure tab on the Build Program by Format page. The display is updated as academic items are created/assigned to tree nodes. Rows are inserted for each assigned item as well as any child items entered for the item (or child items that were attached to an existing item).
Image: Build Program by Format page (Program Structure tab)
This example illustrates the fields and controls on the Build Program by Format page (Program Structure tab). You can find definitions for the fields and controls later on this page.
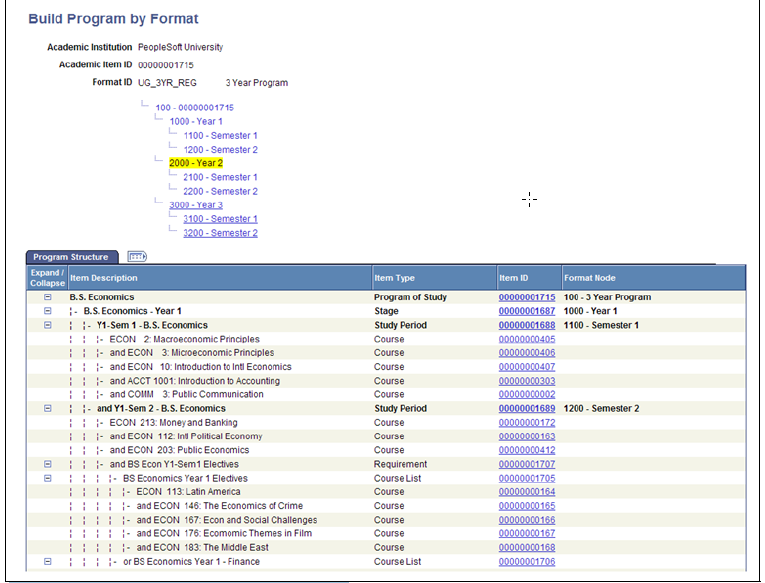
|
Field or Control |
Definition |
|---|---|
| Expand/Collapse |
You can expand or collapse any related child data. |
| Item ID |
Click this link to transfer to the AIR component. |
| Format Node |
The value that appears here is based on the setup on the Program Format (SSR_PROG_FORMAT) page. |
You can use the Build Program by Format component to retrieve and update an existing program. Items can be assigned to tree nodes and existing items can be maintained. The search record is restricted to academic items with an academic item type of PRG.
Viewing Program Format Audit Messages
Image: Build Program by Format page (Audit Messages)
When you retrieve a program, the Program Format audit is run and missing tree nodes (and missing child nodes) are identified and listed on the page in the Program Format Audit Messages grid:
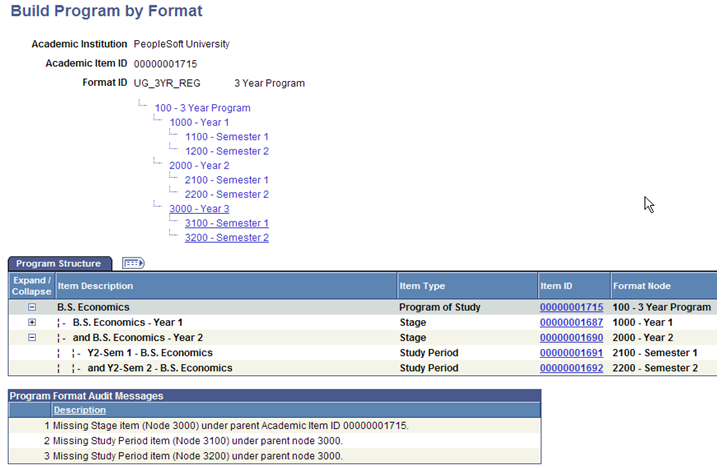
The audit occurs each time that you retrieve a program using the Build Program by Format component—if a program is left unfinished, the audit messages appear the next time that a program is retrieved.
When an item has not been assigned to a node in a particular branch of a tree, a message is returned in the following format: Missing <Item Type Description> item (Node <Tree node ID of child>) under parent Academic Item ID <Academic Item ID assigned to the PRG node>.
In the example above an academic item has not been assigned for the tree node 3000 – Year 3:
Error message sequence 1 identifies the item type and the ID for the missing node, with a reference to the item ID of the parent program node.
Error messages 2 and 3 (for the missing study periods) refer to the parent only by the node ID, because an academic item has not been assigned.
Using the Messages Tab
Select the Build Program by Format page, Messages tab.
Image: Build Program by Format page (Messages tab)
This example illustrates the fields and controls on the Build Program by Format page (Messages tab).
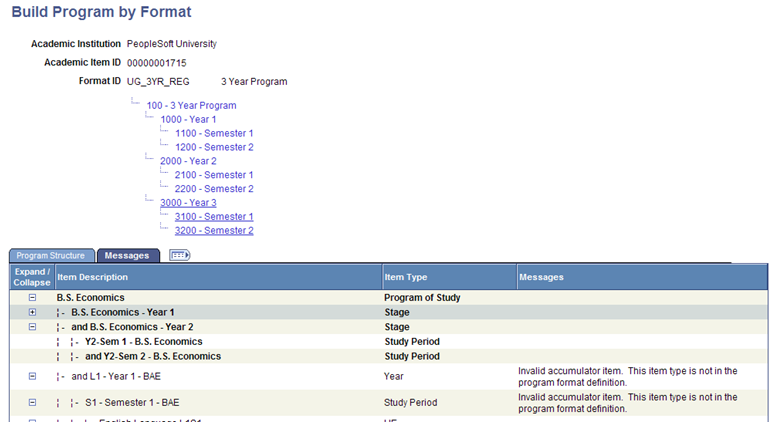
In addition to the program format audit messages, the Build Program by Format component also displays messages when an invalid Program Format Tree Node item has been inserted in a program tree. This could occur if you retrieved an item associated with a tree node in the Academic Item Registry component, because this action is prevented on the Build Program by Format component. The error is detected by the audit process and an error message is displayed on the Errors tab on the Build Program by Format page. When messages are present, the Errors tab appears as the Messages tab.
|
Field or Control |
Definition |
|---|---|
| Messages |
The message identifies the invalid node. This item type is not attached to a node in the tree branch. |