Setting Up Program Formats
This section provides an overview of program formats and discusses how to define program formats.
Program Format determines the structure of a Program of Study. In AIR, program format applies specifically to an academic item that has a type of Program of Study (PRG).
The inherent flexibility of the AIR structure means that different institutions will define their program hierarchies in different ways. You must therefore define frameworks to assign to the programs for your particular institution. The system then uses that framework to impose a template on a PRG academic item.
The Program Format:
Identifies those levels (or nodes) of a program that equate to a year of program (or level, stage).
Identifies the levels that equate to term (STRM) value for enrollment purposes.
Provides the basis for a template for building a program of study.
|
Page Name |
Definition Name |
Navigation |
Usage |
|---|---|---|---|
|
Program Format |
SSR_PROG_FORMAT |
|
Define program formats. |
Program Format definitions are created by Institution, with a user defined Format ID. The program format is created by assigning a tree node ID to the academic items that are used to build a program of study. Because this format represents the structure or framework of a program of study, it uses only those academic items that have been identified as Program Format Tree Nodes.
Note: If you built out Program Formats in your environment before Bundle 24/Additional Features January 2012, you must adjust your Program Format definitions after you apply Bundle 24/Additional Features January 2012. In order to use the APT Activation process, you must enter a Planning Node Item Type value here on the Program Format page. (See the description of the Planning Node Item Type field for further information.)
If you built out Program Formats in your environment before Bundle 27/Additional Features October 2012 using the add session level property, you must adjust your Program Format definitions after you apply Bundle 27/Additional Features October 2012.
Access the Program Format page ().
Image: Program Format page
This example illustrates the fields and controls on the Program Format page. You can find definitions for the fields and controls later on this page.
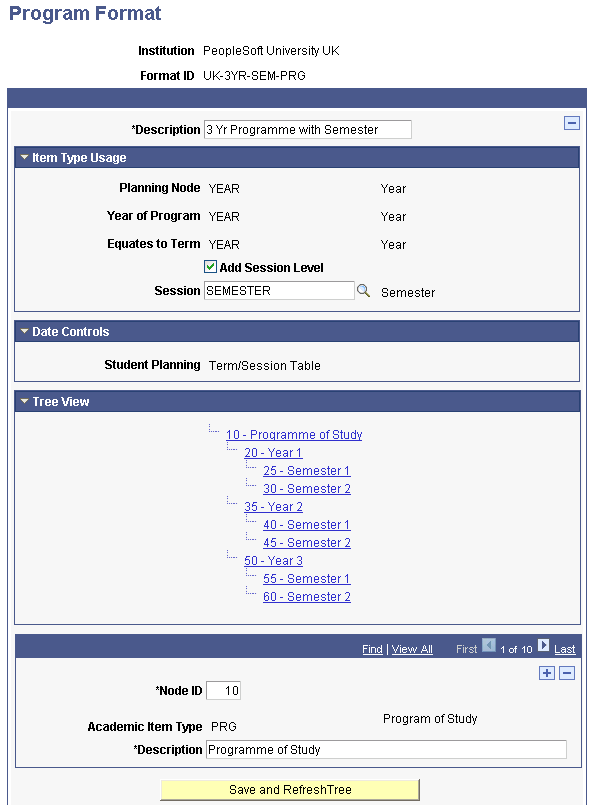
The Planning Node Item Type, Year of Program Item Type, and Equates to Term Item Type fields all prompt against the Item Type Matrix (SSR_ITEM_CHILD) table for item types for which the Program Format Tree Node check box is selected in the Academic Item setup component.
See Identifying Child Item Types and Syncing Entities
See Setting Up Academic Item Types
Item Type Usage
|
Field or Control |
Definition |
|---|---|
| Planning Node |
Enter a value to indicate which node of the Program Format definition should be used for APT Activation purposes. If, for example, the Planning Node Item Type is Phase, this indicates that a student is allowed to plan and enroll by Phase—the Activate icon is available at the Phase level in APT as the student progresses through a program. If a Planning Node Item Type is not entered, the entire program is available for planning and enrollment. |
| Year of Program |
Enter a value to identify this item type as the one that will be used to map to Year Of Program in the Program Format tree, where the program is constructed of a number of units which are completed in a number of years. You cannot select PRG item type for this field. |
| Equates to Term |
Enter a value to indicate that the node will be used to map to a Campus Solutions Term (STRM) value for enrollment purposes. This flag is used for Enrollment Cohort purposes. You cannot select PRG item type for this field. |
| Add Session Level |
If you select this check box, you are prompted to enter a session academic item. Enrollment cohorts attached to this program format can be mapped to term and session combinations, using the Session field on the Program Enrollment Cohort page. Note: If you use session level, the Equates to Term Item Type must be mapped to a term and session combination. |
| Session |
Enter a value for an academic item type that represents a Campus Solutions Session in your program format. This might be used if you have configured your Campus Solutions Term values to represent an academic year within which Campus Solutions Sessions represent your actual terms, semesters or some other component of an academic year. |
Date Controls
The Date Controls setup is used in student self service.
|
Field or Control |
Definition |
|---|---|
| Student Planning |
When you add a new program format definition, you must specify whether Student Planning is controlled by the Academic Period Table or the Term/Session Table. Note: When the item type values in the Planning Node and Equates to Term fields are the same, the system sets the Student Planning period value to Term/Session Table and grays the field. When these values are not the same, users can select Academic Period Table or Term/Session Table, but this value cannot be changed after the component is saved.
|
Tree View
The tree view provides a tree representation of the node structure that you enter at the Node ID scroll level—see the example page above. Each node in the tree links to the node definition that it represents.
|
Field or Control |
Definition |
|---|---|
| Node ID |
Enter a node ID. The lowest Node ID value must have an Academic Item Type value of PRG. Node IDs for successive (child) nodes must increment. For example, a Program Format with three nodes, such as Program, Stage and Study Period could use 10 for Program, and then numbers starting at 1000 for the Stage nodes - for example 1000, 2000 and 3000. The child Study Period nodes could then number within each range (for example 1100, 1200 for Study Periods within the first stage). |
| Parent Node ID |
Enter a parent node ID. The value that you enter here must already exist as a node ID. For example, if you previously added a Node ID of 100 for Academic Item Type PRG, then if you enter a Node ID of 200 for Academic Item Type STAGE, you can assign it a Parent Node ID of 100 to indicate that 200 (STAGE) is a child node of 100 (PRG). |
| Academic Item Type |
Select an academic item type. This field prompts against a view of the Item Type Matrix table (SSR_ITEM_CHILD) for items that are defined as Program Format Tree Nodes. See Identifying Child Item Types and Syncing Entities See Setting Up Academic Item Types Node IDs that have the same parent node ID must share the same academic item type: the value appears by default in the field and is not available for edit when this is true. For example, if you add Node ID 200 for Academic Item Type STAGE with a Parent Node ID 100 (PRG), then, when you add Node ID 300 with a Parent Node ID of 100, the Academic Item Type of STAGE is automatically assigned to Node ID 300. |